Using Templates from D365 CE in D365 App For Outlook

Using D365 App For Outlook’s Template feature, you can simply pull a template from Dynamics 365 CE and use it to send emails from Outlook itself. Here’s a typical example in this post below –

In case you are also looking to get started with D365 App For Outlook, you can refer the post here – Summarizing D365 App For Outlook Setup in 3 steps with Exchange Online mailbox

or

Check how you can add your entities to D365 For Outlook here – Enable entities for Dynamics 365 App For Outlook

Email Template in D365

Let’s say I’ve this template prepared for myself in D365 which I want to use in order to quickly reply to my queries asked.

To keep things simple for example, I’m only using the attribute First Name of the Contact in my sample template.

templateIn365

Add a Template in Outlook

Now, let’s say I got this email from Priyesh asking for a quick discussion.
incomingEmail

Now, instead of thinking and replying, let me just use one of my standard templates to respond. Here’s how I do it –


  1. In this case, I’ve opened a new Email to respond (selected Reply/Reply All) and opened D365 App For Outlook besides.
    dropDownMenu
  2. Then, select Add Template option
    addTemplate
  3. Remember, you’ll need to have the record tracked before you could select a Template
    trackMissing
    (In this case, I tracked the record against the Contact record itself)
  4. And then try selecting Add Template again. Next, you’ll be asked to select the Template Entity based on the fields in the Email. In this case, it identified that Priyesh Wagh was a Contact from D365
    selectEntity.png
  5. Based on #4 above, it identified that Contact entity is in context and accordingly, it’ll show me Templates for Contact entity.
    quickReponseTemplateInOutlook
  6. Once I select this, I will be asked for confirmation to insert into Email.
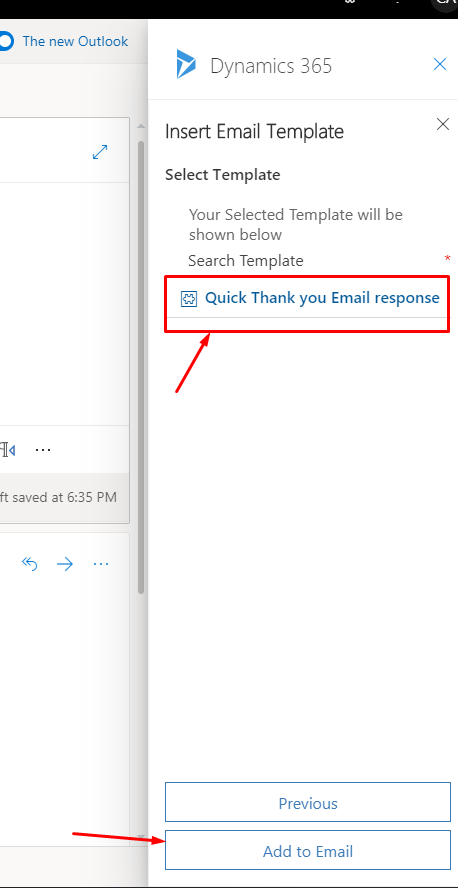
    confirmSelection
  7. And there we go! Email is ready to be sent in the next moment. Note that Priyesh in the Email body got populated from the Template’s First Name attribute.
    emailInserted


Hope this helps!!

Select which Appointments should be synced to Outlook from D365 CE

Perhaps you want to select what all Appointments should be synced to Outlook and not all from Dynamics 365. You can simply have a custom filter control this behavior for yourself and choose which all Appointments should go over.

Customization

Add a new Two Option field in your Dynamics 365 Appointment entity which will specify if the Appointment should be sent to Outlook or not.
isSyncedField


Personal Settings

Now, you’ll need to add this field to the My Appointments view for yourself. You can do so by going into your Personal Settings from the Gear Icon on top-right corner
Options

Then, go to Synchronization and select filters as shown below
selectFilters

viewSelector

You can modify the My Appointment view in your custom filters as follows

modifiedFilter.png
Choosing which Appointments to Sync

Now Appointment 1 and Appointment 3 are marked as Is Syned? == Yes. So only those will appear in the Outlook and the rest will stay in D365 itself.

Scenario

In my Dynamics, I created 3 Appointments – Appointment 1, Appointment 2 & Appointment 3.

Of which, Appointment 1 and Appointment 3 are marked to be synced and Appointment 2 is marked to not Sync. See below –

table

So, only Appointment 1 and Appointment 3 will be synced and not Appointment 2

synedOnlySelected

Hope this helps!

D365 For Outlook 2016: There is a Problem communication with the Microsoft Dynamics CRM server for D365 v9

One of the recent and most frequent issues faced while upgrade is that of the existing Dynamics 365 For Outlook 2016 setup which doesn’t connect to D365 v9.

Right after the environment upgrades to v9, D365 For Outlook’s older version doesn’t connect.

But that’s not the end of the story, obviously, there’s is an upgrade. So let’s see how to go about this process and why this happens.

Error

When you’re trying to re-enter credentials or connect to D365 v9 from the existing D365 For Outlook version, you see this error
error

Reason

The reason is that D365 version 9 required TLS 1.2. Detailed explanation of which you can find here – https://support.microsoft.com/en-in/help/4054414/dynamics-365-for-outlook-update-for-version-9-0?LCID=1033

Version Upgrade

You can either choose to upgrade to D365 For Outlook v8.2.2.137 which you can download from here – https://www.microsoft.com/en-us/download/confirmation.aspx?id=56327

Or, if you don’t have any pre-installed version, you can also directly setup D365 For Outlook – https://www.microsoft.com/en-us/download/details.aspx?id=56972

Make sure you have upgraded your D365 to v9 first. I’ve posted a related blog regarding this in the past and you can refer it here – https://d365demystified.com/2018/11/13/d365-quick-tip-higher-version-of-d365-for-outlook-wont-work-older-d365-online/


Hope this helps! 🙂

Enable entities for Dynamics 365 App For Outlook

So, you’re all set to use D365 App For Outlook from your OWA (Outlook Web App) or even from your Desktop client. Let’s look into enabling any given entity (predefined or custom) to show up while searching in the D365 App For Outlook

Let’s say, you have these entities already enabled when you recently setup the App
noEntityDisplayed

And you don’t have your custom entity, say, Customer Subscriptions enabled yet. So let’s set that up.
actualEntity

Pre-Requisites

  1. Make sure the users’ mailbox is synced using Server Side Sync and they have been enabled to use D365 App For Outlook.
    addToApp
    You can see the above settings from Settings > Dynamics 365 App For Outlook as shown below –
    D365AppOnSiteMap
  2. Make sure the Entity is already enabled for Activities so that it can be used to track records against.
    enableActivities
    Note: I also read on other blogs stating that the entity should also be present in the Categorized Search under Settings > Administration > System Settings – General Tab. But this worked for me without it.

Enable entity for D365 App For Outlook

Now, let’s enable Customer Subscriptions to be available in the D365 App For Outlook

  1. We will need to add it in the D365 App For Outlook itself. Navigate to Settings > My Apps as shown below
    myAppsIf My Apps is missing from your SiteMap, you can refer to my blog for using the shortcut link to access it – ‘My Apps’ missing from D365 SiteMap
  2. In My Apps, find Dynamics 365 App For Outlook app and open it in the App Designer as shown
    openInAppDesigner
  3. Once you open it, on the right hand side, expand Entities
    artifactEntities
  4. Find that Customer Subscriptions (or your entity which you wish to enable) is not enabled yet.
    entityInAppFound
  5. Enable it by clicking the checkbox. It will now appear in blue and selected
    entityInAppEnabled
  6. It will also appear on the left hand side now
    entityInLeftSide
  7. Simply Save and Publish the changes.
    publishChanges

Entity is Enabled

In your Outlook (OWA of Outlook client app), when you restart or re-open open the app, you’ll see that the entity is enabled as below and you can use it to search and track records against.
entityIsEnabled

And we are done. 🙂

D365 PSA Quick Tip: Sync Resource Bookings with Outlook

You as a resource in an Organization are booked on projects. But are also needed to be in some meetings. But what if, someone who wants to invite you to a meeting needs to know if you’re booked on a Project/Task in D365?

In that case, Syncing your Bookings to Outlook Calendar comes handy.

Let’s say, most commonly in a Technical Services Industry where users are supposed to work on projects and they should appear as booked so that others don’t drag them to other meetings. 😊

Remember, Server Side Synchronization should be turned on for the user on their mailbox to be able to use this feature.


Enable Sync Resource with Outlook Feature

  1. In System Settings, navigate to Synchronization tab and enable Synchronize resource bookings with Outlook as shown below.
    enableSystemSettingLevel
  2. Personal Settings – The same needs to be done for an individual user on their Personal Settings in D365.
    personalSettingEnable

Bookings in PSA now appear in Outlook

Now, example, Priyesh is booked on Home Link Piping project on Monday, 3rd December and this is how the schedule board looks like this
scheduleBoard

As the sync happens, the Bookings will now show up in the user’s Outlook Calendar.
syncedToCalendar

Please note that Server Side Sync can take up to 15 mins to sync through as per the minimum sync cycle duration.

Hope this helps!