Duration field in Dynamics 365 converts Hours value to Days in Dynamics 365 | [Flow Workaround to convert in Hours and Mins]

This must be one of the most common scenarios Dynamics 365 Users must’ve come across. The Whole Number’s Duration field shows Duration in Days once it crosses 24 hours, it shows the Duration in Days. Like below –

And once you leave the control, it’ll be converted to it’s equivalent Days conversion

But if you click on it, you can in fact see the Hours

However, It’s not ideal to click on the field and check the Hours on the form. Also, this doesn’t work in case the field is seem from a View on the entity. Unfortunately, we can’t change this behavior. So, to have a workaround, I created a new field to store the translated value.

Hope this implementation is useful to you. In case of any better ideas, kindly suggest in the comments and I’ll be happy to update this post in order to serve full purpose. 😊
To understand the core conversion using long division, refer this post – https://www.calculatorsoup.com/calculators/conversions/minutes-to-hours.php

New Single Line of Text Field and a Flow

Let’s look at how the implementation is –

We’ll need to also review the following Logic Apps’ Math Functions to understand how to apply them – https://docs.microsoft.com/en-us/azure/logic-apps/workflow-definition-language-functions-reference#math-functions?WT.mc_id=DX-MVP-5003911

Also, to understand how to read data from triggerOutputs(), check this post – Using triggerBody() / triggerOutput() to read CDS trigger metadata attributes in a Flow | Power Automate

  1. I’ve created a new Single Line of Text field called as Time In Hours (cf_timeinhours) which will hold the translated Hours & Minutes. Making the field as Read-Only is recommended so that no one changes it on the form post update.


  2. Now, here’s a Flow (You can configure it either on demand for existing records of on Create/Update of the Duration field which itself to calculate once the value is changed field). Just for example’s sake, my field is on Contact and hence, I’m triggering the Flow on Update of the contact on the change of the Avg Turnaround Time (Whole Number of format Duration) field.


    See, that the Body of the step will have the Avg Turnaround Time field storing the duration in minutes.


  3. First actions is to use Divide to get the Hours. I’m creating a variable called as Divide To Get Hours of type Float.


    Here’s how the div function included above looks like –


    Formula is: div(triggerOutputs()?['body/cf_avgturnaroundtime'],60)
    Explanation: Duration field in Dynamics 365 stores Minutes. First, we divide these minutes by 60 to get the Hours value.
    If you divide 3375/60, you get 56.25. But the Div will give you the Integer value. (The right way to divide to get exact float is to also store the 60 in a variable and then work with variables. See this post https://powerusers.microsoft.com/t5/General-Power-Automate/How-to-receive-decimal-number-result-after-dividing/td-p/195399) However, in this case, we anyway need to 56 part, so this is fine for now.

  4. Next, we’ll multiply the result of the Hours we got from the step above i.e. Divide to Get Hours.


    Here’s how the Mul function looks –


    Formula is: mul(60,int(variables('Divide to Get Hours')))
    Explanation: Now, we multiple the result of the Divide to Get Hours. This will be used to subtract from the actual value of Avg Turnaround Time field.
    Here, we multiple 60 x 56 = 3360 and get 3360

  5. Finally, to get Minutes, we use the third variable that uses a Sub function


    The Sub function looks like below –
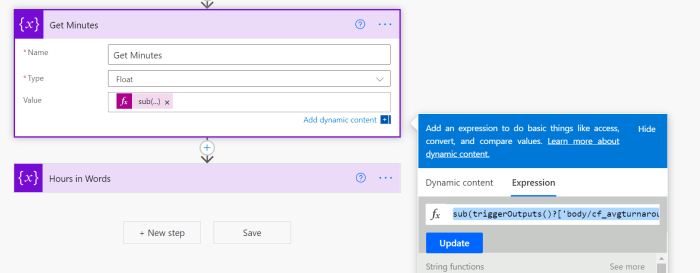

    Formula is: sub(triggerOutputs()?['body/cf_avgturnaroundtime'], variables('Number to Subtract From'))
    Explanation: Now, we subtract the result of the Number To Subtract step from the value of the Duration field i.e. Avg Turnaround Time field itself. These will be the minutes.
    Now, to get the minutes we subtract the result of the Number to Subtract from the actual minutes value of the duration field i.e. 3375 – 3360 = 15. These are your minutes!


  6. Final step is to simply arrange it in a String (you can also form the string elsewhere directly and skip the below)

  7. And to make sense of this conversion, I’ll update the field on the record to show what the converted Hours and Minutes is.

  8. Here’s the final result once the Flow runs successfully.

Hope this helps! You might always want to check more Power Automate / Dynamics 365 posts –

  1. Office 365 Outlook connector in Cloud Flows showing Invalid Connection error | Power Automate
  2. FormatDateTime function in a Flow | Power Automate
  3. Formatting Approvals’ Details in Cloud Flows | Power Automate
  4. Trigger Conditions not working in a Cloud Flow? Here’s Why | Power Automate Quick Tip
  5. Read OptionSet Labels from CDS/Dataverse Triggers or Action Steps in a Flow | Power Automate
  6. InvalidWorkflowTriggerName or InvalidWorkflowRunActionName error in saving Cloud Flows | Power Automate Quick Tip
  7. Store ‘Today’s Date’ in a field to use in workflow conditions in D365 CE
  8. Create a Team, add Members in Microsoft Teams upon Project and Team Members creation in PSA / Project Operations | Power Automate
  9. Setting Lookup in a Flow CDS Connector: Classic vs. Current Environment connector | Power Automate Quick Tip
  10. Using outputs() function and JSON Parse to read data from missing dynamic value in a Flow | Power Automate
  11. Run As context in CDS (Current Environment) Flow Trigger | Power Automate
  12. Adaptive Cards for Teams to collect data from users using Power Automate | SharePoint Lists

Thank you!

Office 365 Outlook connector in Cloud Flows showing Invalid Connection error | Power Automate

Office 365 Outlook connector is one of the most required connectors for Cloud Flows since it involves Exchange Online / Outlook services.

At times, all the Connection References work fine elsewhere but in causes issues with Office 365 Outlook and shows error which says ‘Connection not found. Please create a new connection and change your application to use the new connection‘ even when you were able to authentication successfully with/without MFA being enabled.

What could be wrong? See below.

Error for Office 365 Outlook

In Power Automate / Cloud Flow, if you may face this error especially in the Office 365 Outlook connector and using Actions for the same.

  1. For example, I want to use Send Email (V2) Action from the Office 365 Outlook connector, but I see the below error.

  2. If you check for the Connection Reference it is using, even though the credentials are correct and you’ve correctly re-authenticated it several times, it shows as an Invalid Connection

Resolution

Here’s why this issue occurred –

  1. Go to the User who you are using as a Connection Reference in your Cloud Flow. Look if a Mailbox exists for the user.


  2. Now, assign the User a license which will create a Mailbox / re-assign a license which has Mailbox/Exchange Online service present in it.


    Here’s Microsoft Documentation on which all licenses provide Exchange Online which must be assigned to a User: https://docs.microsoft.com/en-us/office365/servicedescriptions/exchange-online-service-description/exchange-online-service-description?WT.mc_id=DX-MVP-5003911
    In my example: I use E3, so I’ll assign the same. Depending on your scenario, you must assign a license which has Exchange Online plan on it


  3. Check for Exchange Online service and it should be enabled/selected.

  4. Once a license is assigned, it takes a few minutes for provisioning to complete.

  5. Now, if you try to correct the Invalid connection, it will be accepted and you’ll see this

Hope this helps!

Here are some more Power Automate / Cloud Flows posts you might want to check –

  1. Formatting Approvals’ Details in Cloud Flows | Power Automate
  2. Visualize Adaptive Card for Teams user action within a Cloud Flow | Experimental Feature
  3. FormatDateTime function in a Flow | Power Automate
  4. Send a Power App Push Notification using Flow to open a record in Canvas App | Power Automate
  5. Trigger Conditions not working in a Cloud Flow? Here’s Why | Power Automate Quick Tip
  6. InvalidWorkflowTriggerName or InvalidWorkflowRunActionName error in saving Cloud Flows | Power Automate Quick Tip
  7. Parallel Branching in Cloud Flows – Isolate Response dependent Step Actions in parallel branches | Quick Tip
  8. Read OptionSet Labels from CDS/Dataverse Triggers or Action Steps in a Flow | Power Automate
  9. Setting Lookup in a Flow CDS Connector: Classic vs. Current Environment connector | Power Automate Quick Tip
  10. Make On-Demand Flow to show up in Dynamics 365 | Power Automate

Thank you!!

Show custom ribbon button based on Security Role of the logged in User in Dynamics 365 | Ribbon Workbench in XrmToolbox

In ribbon button customization, it is a common scenario to show the button only to a certain set of users who have a certain security role.

Security Role Scenario

  1. Let’s assume Subscription Manager is a security role in your Dynamics 365.

  2. And the Ribbon button will only be visible to the Users who have been assigned this Security Role.

  3. If they have this Role, they’ll be able to see the button as below

  4. And, if the Role is not assigned, the logged In user won’t be able to see the Button.

  5. See below that in this case, the button will not show up.


JavaScript Code to check assigned Security Roles to the logged in User

  1. Since we are going to use a CustomRule further in the Ribbon Workbench to pick a true or false value based on whether the logged in user has a Security Role or not, let’s write a quick JavaScript function to provision the same.

Tip: Make sure you now pass the PrimaryControl (context) to any JS functions and avoid using Xrm.Page since the same has been deprecated.

// JavaScript source code
contactFormCustomization = {
    checkSubscriptionAccess: function (context) {
        "use strict";
        debugger;
        var currentUserRoles = context._globalContext._userSettings.securityRoles;
        var roleId = "BA69EA1F-A76E-EB11-A812-000D3A1948AB"; // Subscription Manager role
        roleId = roleId.toLowerCase();
        // Get all the roles of the Logged in User.
        
        for (var i = 0; i < currentUserRoles.length; i++) {
            var userRoleId = currentUserRoles[i];
            if (userRoleId == roleId) {
                // Return true if the Role matches
                return true;
            }
        }
        return false;
    }
    
};

Refer this post which discusses a simple JavaScript function to use in order to check if the logged in User has a certain security role or not – https://medium.com/capgemini-microsoft-team/dynamics-365-v9-verify-logged-in-user-security-role-using-typescript-2de52f2ef04e

Explanation

  1. Hard-code the GUID of the Security Role which you are looking to check.
  2. Then read all the Security Roles assigned to the user.
  3. Once the Security Roles are found in the logged in User’s Security Role, return true. Else, return false.

Ribbon Button – Enable Rule

Let’s see how the button customization will look like in XrmToolBox’s Ribbon Customization –

  1. In Ribbon Workbench, you need to add a CustomRule under Enable Rules for the Ribbon button.

  2. Then, it asks for the JavaScript function (mention the function which returns a simple true or false based on above steps). and then mention the library –
    Also, pass the context PrimaryControl and using the same, pick the Security Roles of the logged in user as mentioned in the JS code explanation above.
    I’m naming my Enable Rule as SecurityRoleCheck.

    Now, the CustomRule I’ve applied will call the JS function and is expected to receive either a true or a false based on the code. If false – the button will not be enabled, if true – the button will be enabled.


  3. Now, make sure you add this Enable Rule to the Command (which is in-turn attached to the Ribbon Button itself)

Hope this was helpful. Here are some more XrmTool / Ribbon Button customization related posts you might find helpful –

  1. Ribbon button visibility based on a field value in Dynamics 365 | Ribbon Workbench
  2. Get GUID of the current View in Dynamics 365 CRM JS from ribbon button | Ribbon Workbench
  3. Pass Execution Context to JS Script function as a parameter from a Ribbon button in Dynamics 365 | Ribbon Workbench
  4. Pass selected rows’ GUIDs to ribbon button in D365 | Ribbon Workbench
  5. Debug Ribbon button customization using Command Checker in Dynamics 365 CE Unified Interface
  6. Show Ribbon button only on record selection in Dynamics CRM
  7. Hide Custom Ribbon Button [Easy Way] – Ribbon Workbench
  8. Enable Flow button on D365 Ribbon
  9. [SOLVED] Navigating URL from Ribbon’s custom button in Dynamics for Phones app
  10. Fix Ribbon icons on the Unified Interface in D365 CE
  11. Connecting XrmToolBox to an MFA enabled Dynamics 365 environment | Azure AD
  12. Find deprecated JS code used in your Dynamics 365 environment | Dynamics 365 v9 JS Validator tool | XrmToolBox

Thank you!!

Connecting XrmToolBox to an MFA enabled Dynamics 365 environment | Azure AD

It has always been recommended to enable MFA on environments we work on. For developers, it is especially critical that MFA is enabled that developers are also someone who need to connect the https://www.xrmtoolbox.com/ more than ever!

Here’s one of the common challenges in being able to connect to an MFA enabled Dynamics 365 instance using XrmToolBox.

Register the Dynamics 365 environment as an App in Azure

Microsoft has provided a recommended way to register an App with Azure Active Directory and also the same has been mentioned in the XrmToolBox Connection utility. Below is a summary from the original Microsoft Documentation on the same – https://docs.microsoft.com/en-US/powerapps/developer/data-platform/walkthrough-register-app-azure-active-directory?WT.mc_id=DX-MVP-5003911

  1. Go to https://portal.azure.com/ and look for Azure Active Directory.


  2. Once you save it, you’ll get the Application (client) ID which which will be needed by the XrmToolBox while connecting.

  3. Go to the Manifest file and make “allowPublicClient” to true and Save it.

  4. Now, navigate to API Permissions from the left side menu.

  5. Now, search for the permission “Common Data Service” under the tab APIs for my organization uses.

  6. Make sure Delegated Permissions are selected and tick mark user_impersonation and click on Add permissions.


  7. Select the same and your permissions should look like below. Once this is the state, you are done on Azure side.


    Now, let’s connect XrmToolBox to the Dynamics 365 environment.

Connecting to Dynamics 365 using the XrmToolBox

Let’s see what steps you need to follow in order to connect to the Dynamics 365 instance

  1. Open XrmToolBox and create a New Connection.

  2. Now, since you are aware that the environment is MFA enabled, select MFA/OAuth method.


  3. Enter the URL of the Organization and click Next as shown below.


  4. Now, enter the Application ID which you can copy from the registered App in Azure.

  5. If you click on the “Use development Azure AD App”, the Reply Url will be populated automatically. Before that, you’ll see the message notifying which scenarios this is suitable.

  6. Read below. At this point, I haven’t tried the other method and stuck to the below since I connect XrmToolBox to the Dynamics 365 environment for development purpose.


  7. Once you click OK on the above, the Reply Url will be auto-populated and you can proceed further.

  8. Now, enter the username which you want to connect with. Supposedly, this is the one on which MFA is enabled.

  9. Upon clicking Next, you will be asked the Password of the credentials you are using.

  10. Once you’ve entered the same, it will send a request to your Authenticator on the registered device.


  11. One the device, assuming you have the Authenticator App installed already, you can Approve the same to let the Authentication go through.

  12. Upon Approval, the XrmToolBox will be authenticated and it will be connected to the Dynamics 365 environment. As usual, you can then give it a name and click Finish to save it on your XrmToolBox.


Hope this was helpful!!

Here are some more Azure / Dynamics 365 / XrmToolBox related posts you might want to check out –

  1. Find deprecated JS code used in your Dynamics 365 environment | Dynamics 365 v9 JS Validator tool | XrmToolBox
  2. Set Lookups in Xrm.WebApi D365 v9 correctly. Solving ‘Undeclared Property’ error
  3. Understanding Xrm.Page Object ModelForm Access Checker in new Power Apps Form Designer | Model-Driven Apps in Dynamics 365
  4. Use Rich-Text Control for Multiple Lines of Text in Dynamics 365 CE | Quick Tip
  5. Ribbon button visibility based on a field value in Dynamics 365 | Ribbon Workbench
  6. Pass Execution Context to JS Script function as a parameter from a Ribbon button in Dynamics 365 | Ribbon Workbench
  7. Log Canvas Power App telemetry data in Azure Application Insights | Power Apps
  8. Call Azure Function from Dynamics 365 CRM using Webhooks
  9. Use Azure App Passwords for MFA enabled D365 authentication from Console App
  10. Find Created On date of solution components in Solution Layers | Dynamics 365 [Quick Tip]

Thank you!!

Form Access Checker in new Power Apps Form Designer | Model-Driven Apps in Dynamics 365

Most of us have been used to using the classic form designer as of now. And the Power Apps UI which is in https://make.powerapps.com/ has some important new features.

We create forms and we then have to explicitly make sure we have assigned them correct Security Roles and added them to the Apps correctly.

So the new Power Apps Form Designer has a very useful feature called as Form Access Checker. Let’s look at it

A Form & An App

  1. Let’s say we have a custom/Unmanaged Form called as ‘Management Form’.

  2. And an App called as ‘Management App’.

  3. And it has Contact entity with 2 Forms added.

  4. And here are the 2 forms – Contact (OOB) and Management Form (Custom)

Form Access Checker

The Form Access Checker answers 2 questions at once – Let’s look at this feature

  1. Open the form and go to Form Settings.


  2. In the Form Properties, look for Form access checker.


  3. Now, select the Security Role you want to check for and then the App you want to check. The Form Checker will show the Forms which satisfy either and both the criteria.


    Now with only Salesperson role, below are the forms which are applicable. Note that the App is not yet selected.

  4. Now, if you choose the App – the Form that matches both these will be selected.

  5. And it’ll show only the Forms which are applicable to both criteria. (Notice that the form we added in the Management App didn’t show up)

  6. Now, let’s give the Management Form we added Salesperson Security Role and see it satisfy the above criteria. You can now assign Roles to a Form within the Form designer itself.

  7. And if you check again, you’ll be able to conclude that the App we are looking for has both these forms for the Security Role you want to check


Hope this helps. Here are some more Dynamics 365 related posts you might want to check out –

  1. Use Rich-Text Control for Multiple Lines of Text in Dynamics 365 CE | Quick Tip
  2. Ribbon button visibility based on a field value in Dynamics 365 | Ribbon Workbench
  3. Find deprecated JS code used in your Dynamics 365 environment | Dynamics 365 v9 JS Validator tool | XrmToolBox
  4. Make On-Demand Flow to show up in Dynamics 365 | Power Automate
  5. Track and Set Regarding are disabled for Appointments in Dynamics 365 App For Outlook message | Demystified
  6. Get GUID of the current View in Dynamics 365 CRM JS from ribbon button | Ribbon Workbench
  7. Remove ‘This Email has been blocked due to potentially harmful content.’ message in Dynamics 365 Emails | OrgDbSettings utility
  8. Find Created On date of solution components in Solution Layers | Dynamics 365 [Quick Tip]
  9. Pass Execution Context to JS Script function as a parameter from a Ribbon button in Dynamics 365 | Ribbon Workbench
  10. Dynamics 365 App For Outlook missing on SiteMap in CRM? Use shortcut link [Quick Tip]

Thank you!!

Wave 1 2021 Early Access is now available | Opt-in

As per MS Docs Key Dates i.e. Feb 1st for 2021 Wave 1 Early Access – https://docs.microsoft.com/en-us/dynamics365-release-plan/2021wave1/#key-dates-for-the-2021-release-wave-1?WT.mc_id=DX-MVP-5003911

Note: Since these are Early Access Features, not all features would necessarily make it to the final Wave 1 2021 release. Kindly try these features in a Sandbox environment only and test the same.

Microsoft Docs for details on Opt-in Features

Dynamics 365 Release Plan 2021 Wave 1 Early Accesshttps://docs.microsoft.com/en-us/dynamics365-release-plan/2021wave1/features-ready-early-access?WT.mc_id=DX-MVP-5003911

Power Platform Release Plan 2021 Wave 1 Early Accesshttps://docs.microsoft.com/en-us/power-platform-release-plan/2021wave1/features-ready-early-access?WT.mc_id=DX-MVP-5003911

Here’s how you can Opt-in

  1. Navigate to https://admin.powerplatform.microsoft.com in your tenant and go in one of the Sandbox environments you want to enable the Wave 1 2021 Features on.


  2. Click Update now as seen below


    Then click Confirm


  3. Now, Updates will start applying based on what D365 Apps you have installed.


Check Updates

Once completed, you’ll see that the status is now On for Wave 1 2021 Updates Early Access


Navigate to About in your App Selection Screen –


And you’ll see that the Updates have been applied

Here are some more Dynamics 365 Power Platform / Administrator related posts you might want to check out-

  1. Recover deleted D365 PowerApp environment using PowerShell
  2. Enable/Disable the need to Approve Email for Mailboxes in Dynamics 365 CRM CE
  3. Create a support Queue in Dynamics 365 CRM
  4. Create new Sandbox and copy Production over to it in PowerPlatform Admin Center
  5. Office 365 Admin: Quickly Enable Multi-factor authentication for users
  6. Turn Teams On / Off at Org Level, provisioning users | M365 Admin Center Tip
  7. Convert environments between Production and Sandbox | Power Platform Admin Center [Quick Tip]
  8. Make On-Demand Flow to show up in Dynamics 365 | Power Automate

Thank you!!