Install On-Premise Gateway from Power Automate or Power Apps | Power Platform

Here’s your summary to understand what are On-Prem Gateways in Power Automate and how you can set them up.
The same can be done from Power Apps as well (https://make.powerapps.com/)


So let’s see how you can set it up and get started. This post is for beginners who are looking to install an on-premise gateway. So this should be fairly simple process! 😊

Create an On-Prem Gateway in Power Automate

Here’s how you can create an On-Prem Gateway in Power Automate

  1. Expand the Data section and look for Gateways. Then, when you go in Gateways, you will see + New gateway button.


  2. Then, you’ll be taken to a new webpage (https://powerapps.microsoft.com/en-gb/downloads/). Here’s you’ll be able to Download an on-prem Gateway

  3. Once you click on Download, it’ll start downloading the Installer on your machine.


    It’ll complete, then you can simply open it to start installing.

  4. Once you begin the installation, choose where the Gateway folder path should be.
    Then, click Install.


    And it’ll install and will take a few moments.
  5. Once completed, it’ll ask for the email address (or rather username needed to install the Gateway)


  6. Further, authentication will take place as below (in case you have MFA enabled, that will be occur too)


  7. And, it’ll Sign you in.

  8. Once in, it’ll ask if this is a migration or the first time setup.
    Since I’m installing it for the first time, I’ll choose the first option as this is a fresh install.

  9. Upon clicking Next, I’ll be asked to set Properties for the gateway.
    So, to identify the machine, I’ll select a name with which I can identify and then enter a Recovery Key which I will store safely with me.
    Then, click Configure.


  10. It’ll take a few moments to configure.


  11. And now, you’re done in a few moments. Finally, the Gateway is now installed.


Configuration & Info

Given that your Gateway is now installed, you can always go in the File Explorer where you set it up and open the below app

If you wish to check the configurations in detail, you’ll need to Sign In again

And in Power Automate, you’ll see the Gateway is listed.


And if you open it up, you’ll see the high-level details and status of it.

Here are some Power Automate posts you want to check out –

  1. Co-presence in Power Automate | Multiple users working on a Flow
  2. Search Rows (preview) Action in Dataverse connector in a Flow | Power Automate
  3. Suppress Workflow Header Information while sending back HTTP Response in a Flow | Power Automate
  4. Call a Flow from Canvas Power App and get back response | Power Platform\
  5. FetchXML Aggregation in a Flow using CDS (Current Environment) connector | Power Automate
  6. Parsing Outputs of a List Rows action using Parse JSON in a Flow | Common Data Service (CE) connector
  7. Asynchronous HTTP Response from a Flow | Power Automate
  8. Validate JSON Schema for HTTP Request trigger in a Flow and send Response | Power Automate
  9. Converting JSON to XML and XML to JSON in a Flow | Power Automate
  10. Duration field in Dynamics 365 converts Hours value to Days in Dynamics 365 | [Flow Workaround to convert in Hours and Mins]

Thank you!

Column dependency for Event Handlers for Model-Driven Apps – Modern vs Classic form designer | Power Apps Tip

You must be already familiar with Locking fields on the form in Dynamics 356 CRM so that they are not removed from the form unless you remove the Lock.

Also, it’s a “best practice” to add Dependencies explicitly to your events so that if multiple customers are working on the same form, no one should delete a field which is required by Events added to fields/forms.

In the modern form designer, it looks like below


And when you try to remove the field from the form, you’ll see this error.

Now, there’s also another way you can lock this field and not remove it explicitly due to a dependency – Let’s see what we have in the modern app designer!!

Events dependency in modern app designer

Let’s say you are using the modern app designer to work on your forms, here’s what you notice

  1. For example, you are using the modern App Designer and you are working on Website field on the Account entity.
    Let’s add an Event Handler for the Website field in the modern designer.

  2. Once you added an event, you’ll see a Column Dependency field which can choose to select fields. (Denoted by arrow in below screenshot)

  3. Here, I’ll select the Website field from the dropdown so that the Lock is established on the field.

  4. So now, when I look at the field Properties, the Lock will be disabled and I can’t choose to remove it explicitly from the Properties itself.


In Classic Form Editor

Here’s where you can add dependencies to Event Handlers in the Classic Form Editors (I’ll be honest, this usually goes unnoticed and I never cared to add dependency)

  1. Wherever you add Events on the field/form, look for the Dependencies tab on the window where you add the JS function.


  2. And you’ll see the fields which are selected for Dependencies so that they are not accidentally removed.

Here are some more Power Apps related posts you might want to check out –

  1. HTML Text control in Canvas Power Apps | Power Platform
  2. Configure Dataverse Search in Power Platform Admin Center | Dynamics 365
  3. Form Access Checker in new Power Apps Form Designer | Model-Driven Apps in Dynamics 365
  4. Log Canvas Power App telemetry data in Azure Application Insights | Power Apps
  5. Variables in Canvas Power Apps | Global and Context
  6. Dynamics 365 Solutions’ New Experience in Power Apps, Solution Checker and more
  7. Navigate Screen automatically based on Timer in Canvas Power App | Power Platform
  8. Advanced Lookup in Model-Driven Apps | Power Platform
  9. New App Designer for Model-Driven Apps | Power Platform
  10. Primary Key of Activity type entity in a Dataverse connector in Power Automate | Quick Tip

Thank you!

Create a Power Apps Per User Plan Trial | Dataverse environment

Here’s how you can create a Power Apps trial under the Per App Plan which is of $20!
Link: https://powerapps.microsoft.com/en-us/pricing/

Under Per App Pricing, look for Try New button where you can start the trial setup process.

Setting up a new tenant

Once you use the above link to, you’ll be taken to the Setup page like any other Dynamics trials you must’ve signed-up for –

  1. Fill in an email on which you would want to receive subscription communication email.
    Then, click Next.
  2. In the next step, if the email address doesn’t exist ()-

  3. Next, under Tell us about yourself section, enter the basic details.

  4. Once you fill in these details, click Next. You’ll be asked to enter phone on which you’ll receive the OTP to authenticate

  5. Enter code and proceed.
    In case you want to change the domain, you can do so before finalizing. Else, you can directly click on Next.


    And once this is finalized, you can click on Save and it’ll be locked.
    So in case you changed, then click on Next post that.

  6. In the final step, you’ll see the below. Once the info is correct, click on Get Started and you’ll be taken to M365 Admin Portal.

License

If you check the license which is assigned in this, you’ll see the –

Creating a Dataverse Environment

Now, you can create a Power Apps Dataverse environment –

  1. Go to https://admin.powerplatform.microsoft.com/ and you can click on New.

  2. Now, you can set the name of the environment.
    Note that the default type is set to Sandbox [I’ll tell you why this will cause an issue]


  3. In case you proceed to create a Sandbox type


  4. You’ll end up having this error which needs at least 1GB space.

  5. That’s why you can go back and change the Type to Trial (Subscription-based).
    Also, notice that the Database will be created.

  6. Then, you can proceed. Also, notice that I’m also deploying sample data. Hence, Power Apps based Apps will be setup with demo data and not the Dynamics 365 Apps.

  7. Then, provisioning will start.

  8. In a few moments, the environment will be created and you can navigate to it.

  9. Select the environment and click on Open Environment.

  10. And the environment with sample apps and data will open up!

Here are some more Power Apps related posts you might want to check out –

  1. HTML Text control in Canvas Power Apps | Power Platform
  2. Configure Dataverse Search in Power Platform Admin Center | Dynamics 365
  3. Form Access Checker in new Power Apps Form Designer | Model-Driven Apps in Dynamics 365
  4. Log Canvas Power App telemetry data in Azure Application Insights | Power Apps
  5. Variables in Canvas Power Apps | Global and Context
  6. Dynamics 365 Solutions’ New Experience in Power Apps, Solution Checker and more
  7. Navigate Screen automatically based on Timer in Canvas Power App | Power Platform
  8. Advanced Lookup in Model-Driven Apps | Power Platform
  9. New App Designer for Model-Driven Apps | Power Platform
  10. Primary Key of Activity type entity in a Dataverse connector in Power Automate | Quick Tip

Thank you!

Configure Dataverse Search in Power Platform Admin Center | Dynamics 365

Relevance Search in Dynamics 365 CRM recently got renamed to “Dataverse Seach” as you might have seen some updates.

Here’s how to configure the Dataverse Seach in the new Solutions Explorer!

Scenario

Now, in case you search on the Global Search bar for a record and the table which it lies in doesn’t show up – In this case table I’m looking in is ‘Subscription’ – that means that this entity is not configured for Dataverse Search

Dataverse Search

Here are some points on the Dataverse Search –

  1. Dataverse search is enabled directly is you are opted in to 2021 Wave 2 Updates on your environment.
    Go to https://admin.powerplatform.microsoft.com/ and open the desired environment’s Features section from Settings.


    You’ll find that Dataverse Search is already ON.


  2. Now, navigate to https://make.powerapps.com/ to configure the Dataverse Search for a specific entity.
    Go to Solutions and look for the Solution which has your entity
    In this example, I’ll use the custom entity I’ve created called as ‘Subscription’

  3. In any solution which has this entity, I can click on Overview on the left.


    And then if you look at the right hand side – click on Manage Index


  4. It’ll show the entity which is not enabled for Search – But, notice that it is unchecked – means it is not enabled.


    Now, enable and save it


Check if Table is enabled for Dataverse Search

  1. Enable the Table for Search Results. Now, when you are in the Solution in the new Solution Explorer – Look for the Table. In my example, it is Subscription table.
    I’ll open the Settings of the Table.


  2. In the Settings of the Subscription table, you’ll need to expand the Advanced options.


  3. Now, scroll below and you’ll see the option for Appear in Search Results is enabled.


  4. And once this is enabled, the results will show up in Dynamics 365

Indexed Columns

Now, here’s how to understand the count of Indexed columns. Limit of 950 columns is imposed in a Dynamics 365 environment.
Refer Microsoft’s Official Post – https://docs.microsoft.com/en-us/power-platform/admin/configure-relevance-search-organization#select-tables-for-dataverse-search?WT.mc_id=DX-MVP-5003911

  1. Here’s a snippet from the above mentioned Microsoft Docs to show the count of Indexed Columns calculated towards a Dataverse Search

Hope this helped!

Here are some more Canvas Power Apps posts you might want to check –

  1. Transition effect on Gallery Items when hovered over in a Canvas Power App | [Quick Tip]
  2. Navigate Screen automatically based on Timer in Canvas Power App | Power Platform
  3. Search on multiple columns from a Dataverse table in a Canvas Power App Gallery control | Power Platform
  4. Call a Flow from Canvas Power App and get back response | Power Platform
  5. Enable Custom Code Components (PCF Controls) to be imported in a Canvas Power App | Quick Tip
  6. Retrieve Hashtags from Text in a Canvas Power App | Power Platform
  7. Rich Text Control for Canvas and Model-Driven App | Quick Tip
  8. Setting Correct Default Mode for Forms in a Canvas App | [Quick Tip]
  9. Rating Control to represent data from Dataverse in a Canvas Power App | Power Platform
  10. Clear a field value & Reset Form in a Canvas Power App [Quick Tip]
  11. Get Dynamics 365 field metadata in a Canvas App using DataSourceInfo function | Common Data Service
  12. Implement character length validation in a Canvas Power App | Power Platform

Thank you!

Delete App Passwords created by other users in Office 365 | Multi-factor authentication

Now, let’s say you have enabled your users to create their own App Passwords to use in non-browser applications. But, you want to clear the same for a particular user citing there are some security concerns and they needs to be cleared before you start fresh for that user.

Here’s how you can delete App Passwords created for a selected User. Example: Priyesh is a user who has created an App Password since MFA is enforced.

Office 365 Admin Center

In Office 365 Admin Center, go to Users

  1. Once you see all the Active Users, you can simply click on Multi-factor Authentication


  2. Now, you’ll be able to see all the users who use MFA and if they have been enforced and hence, must’ve created their App Passwords. (Only Enforced Users can create app passwords – Allow users to create App Passwords in Office 365 | Multi-factor Authentication)
    Now, let’s select Priyesh’s user settings by selecting the user and then going to Manage User Settings.


  3. In manage Settings for this user, you’ll see the option ‘Delete all existing app passwords generated by the selected user


    Select the same and then Save.

  4. Now, if Priyesh checked the App Passwords / Sign-In (https://mysignins.microsoft.com/security-info), the App Password would be gone!

Hope this was useful! Here are some more Azure / O365 posts you might want to check –

  1. Allow users to create App Passwords in Office 365 | Multi-factor Authentication
  2. Office 365 Outlook connector in Cloud Flows showing Invalid Connection error | Power Automate
  3. Import multiple Users in Office 365
  4. Office 365 Admin: Quickly Enable Multi-factor authentication for users
  5. Connecting XrmToolBox to an MFA enabled Dynamics 365 environment | Azure AD
  6. Log Canvas Power App telemetry data in Azure Application Insights | Power Apps
  7. Retrieve Metadata of Global OptionSets from Dynamics 365 in Power Automate | HTTP with Azure AD action
  8. Office 365 Admin: Quickly Enable Multi-factor authentication for users

Thank you!

Allow users to create App Passwords in Office 365 | Multi-factor Authentication

If you are an Admin User who wish to create App Passwords so that you can use them in your code/web applications so that you don’t have to store credentials in your application? Example: Azure Function you are developing shouldn’t store the password of the User.

At times, you must’ve noticed that why you can’t create App Passwords even when you are having MFA enabled for yourself!

Here’s why –

Scenario

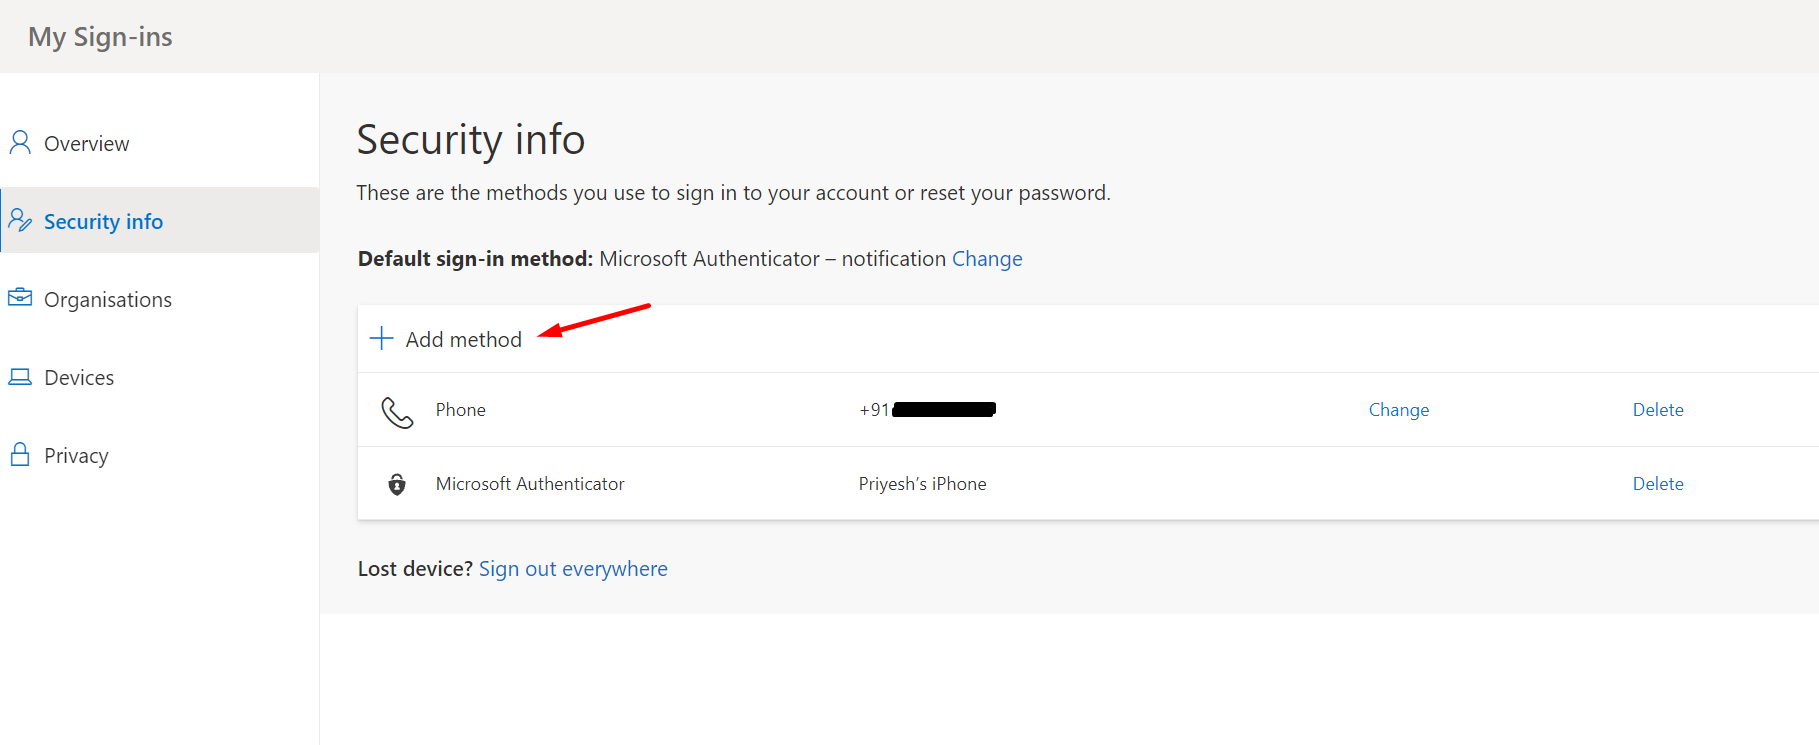
Let’s say the users are logged in and they go to their Office 365 Account where they can add multiple Authentication Methods. Shortcut for that is https://mysignins.microsoft.com/security-info

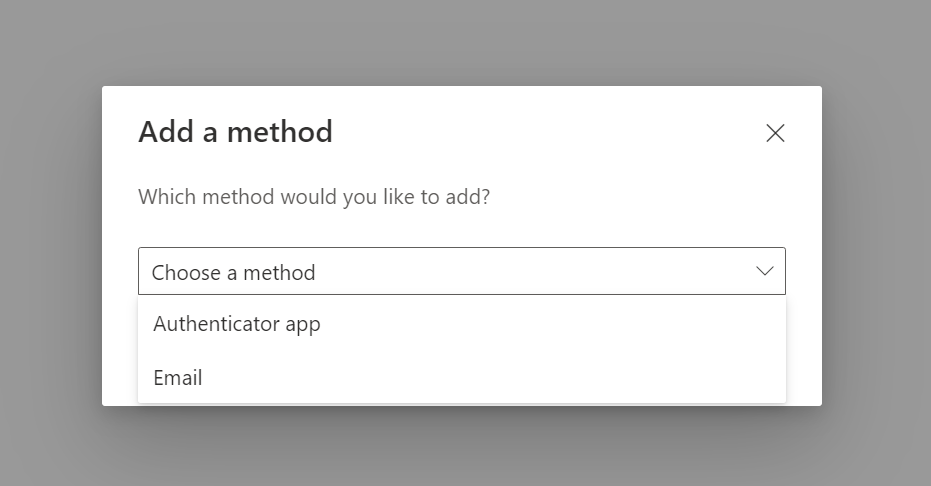
  1. Once they are in Security Info in order to add new method of Authentication as below

  2. And they don’t get to create an App Password by default.


    Let’s enable users to be able to create their own App Passwords from Azure Portal.

Enforce Users to use MFA

Let’s say the Conditional Access above is already set. Now, you need to enforce users to use MFA.

  1. In O365, go to the User in Active User whom you want to allow creation of Azure App Passwords.

    Select the user and click on Multi-factor Authentication.

  2. Now, in the multi-factor authentication page, you’ll see the users as whether they are using MFA or not.
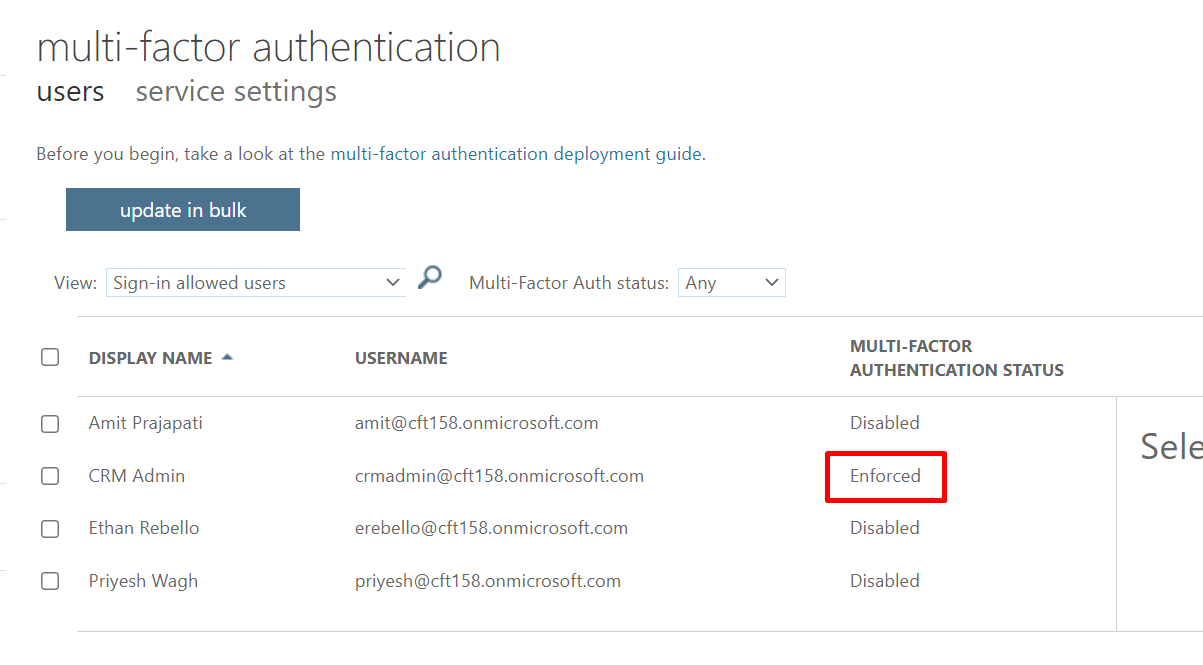
    As you see below, CRM Admin is Enabled for Multi-Factor Authentication, but not Enforced.

    So, you have to click on Enfore button to enforce the MFA.


  3. Now, when you click on Eforce, you’ll see the below message


  4. After enforcing, you’ll get a success message as below.


  5. Once enforced, you’ll see the below status is updated on whoever this is enforced on.


Create App Passwords from My Sign-ins page

Now that we have enforced the User to use MFA, here’s how you can create App Passwords

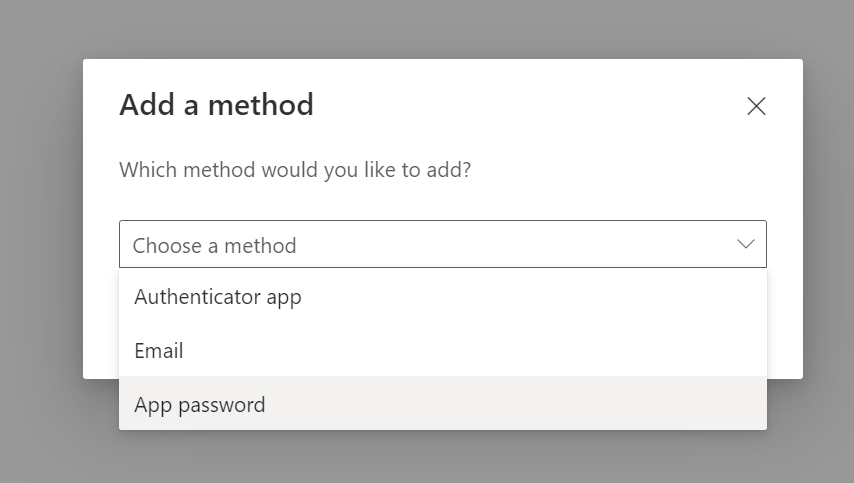
  1. As shown in the beginning, try to Add a new method


  2. This time, you’ll be able to see App Passwords as an option to select. Select it and click on Add


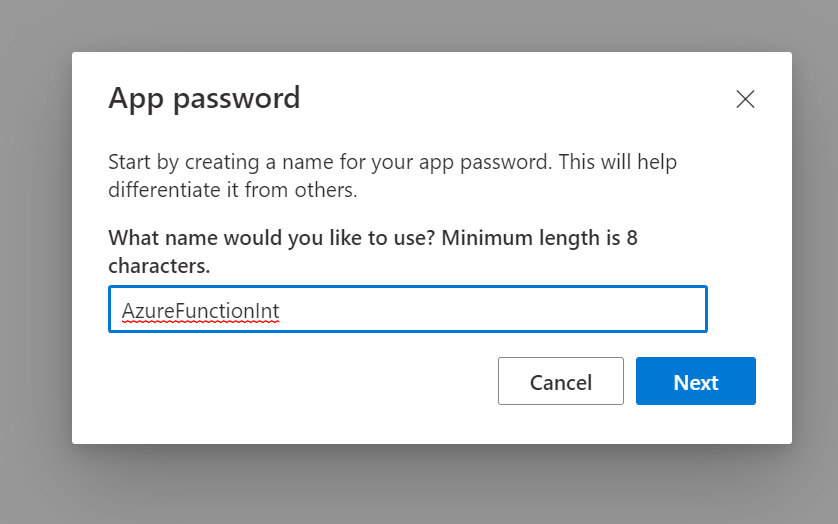
  3. Next, you can give a name to the App Password you are setting. You can give it a suitable name keeping in mind the purpose of the App Password you are creating.


    I’ll just give a sample name here since I want to use it in Azure Functions which I’m working on.


  4. And once it is created in a few moments, make sure you copy it before clicking on Done. Else, you can’t retrieve this later and it will be created without you noting it down.


  5. And it’ll be listed among other authentication methods

Additionally, it is recommended to also review setting up Conditional Access policies too while setting up Azure AD Multi-Factor Authentication – https://docs.microsoft.com/en-us/azure/active-directory/authentication/tutorial-enable-azure-mfa?WT.mc_id=DX-MVP-5003911

Hope this was helpful! Here are some more D365 posts which you might be interested in –

  1. Filter records in a View owned by a Team you are a member of | Dynamics 365 CRM
  2. Get GUID of the current View in Dynamics 365 CRM JS from ribbon button | Ribbon Workbench
  3. Dynamics 365 App For Outlook missing on SiteMap in CRM? Use shortcut link [Quick Tip]
  4. Import lookup referencing records together in Dynamics 365 CRM | [Linking related entity data during Excel Import]
  5. Mailbox Alerts Hide/Show behavior in Dynamics 365 CRM
  6. Excel Importing Notes (Annotation) entity in Dynamics 365 CRM
  7. Enable/Disable the need to Approve Email for Mailboxes in Dynamics 365 CRM CE
  8. Call Azure Function from Dynamics 365 CRM using Webhooks
  9. Show Ribbon button only on record selection in Dynamics CRM
  10. Accessing multiple occurrences of a field in Business Process Flow using JS in D365 CRM

Thank you!!

Use Hierarchy in Roll Up Fields in Dynamics 365 CRM

Here is the use of Use Hierarchy in Dynamics 365 CRM Roll-up Field’s Use Hierarchy option when defining the logic of the Roll-up fields.

Scenario

Let’s consider this out-of-the-box scenario where an Opportunity Rolls up Est. Revenue to the Account it is tagged to. Also, that Account also has another Account set in the Parent Account field.

So, the hierarchy here is Account (Parent Account) -> Account (child Account) -> Opportunity

Now, our demonstration of Use Hierarchy will show where does the Open Revenue (field on the Account) should Roll up from it’s own Account or from the Opportunity of the child Account’s Opportunity as well.
You’ll see a Hierarchy Icon to all records that participate –


And when you select either of them, you’ll be able to click on View Hierarchy button on the view’s Ribbon


This will show you how the Accounts are arranged in hierarchy


And here’s where you can access your Hierarchy Settings

Let’s see!

Use Hierarchy in Roll Up fields

Here’s how you would see the option to switch between Use Hierarchy in the Roll Up fields in Dynamics 365 –

Use Hierarchy: YES

Now, assuming this is set to Yes and it selects the OOB relationship that defined this hierarchy

  1. Consider the child Account “Alpine Contoso” (This is a child account of “Alpine Ski House Main“)


  2. And this Account Alpine Contoso has it’s own Opportunity worth of $25K


  3. Now, let’s look at the Alpine Ski House Main‘s Opportunity which is worth $30K

  4. Now, the Open Revenue for this child Account “Alpine Contoso” is $25

  5. However, since we are using Hierarchy as YES and selected the relationship between the self-lookup of Account itself, this value will also add up to the Open Revenue of the parent Account “Alpine Ski House Main” is $30K + $25K = $55K


    Here, we saw that the Open Revenue from the child Account too Rolled up to the Parent Account.

Use Hierarchy: NO

Assuming, the Roll-up field is now set to NO to Use Hierarchy, let’s see the difference on the Parent Account “Alpine Ski House Main” itself.

  1. If we look at the Alpine Ski House Main‘s Open Revenue value, it’ll only have $30K


  2. This $30K belongs to it’s own child Opportunity and not child Account i.e. Alpine Contoso‘s Opportunity.

Hope this was helpful! Here are some more D365 posts which you might be interested in –

  1. Filter records in a View owned by a Team you are a member of | Dynamics 365 CRM
  2. Get GUID of the current View in Dynamics 365 CRM JS from ribbon button | Ribbon Workbench
  3. Dynamics 365 App For Outlook missing on SiteMap in CRM? Use shortcut link [Quick Tip]
  4. Import lookup referencing records together in Dynamics 365 CRM | [Linking related entity data during Excel Import]
  5. Mailbox Alerts Hide/Show behavior in Dynamics 365 CRM
  6. Excel Importing Notes (Annotation) entity in Dynamics 365 CRM
  7. Enable/Disable the need to Approve Email for Mailboxes in Dynamics 365 CRM CE
  8. Call Azure Function from Dynamics 365 CRM using Webhooks
  9. Show Ribbon button only on record selection in Dynamics CRM
  10. Accessing multiple occurrences of a field in Business Process Flow using JS in D365 CRM

Thank you!!