“Enable Mobile Offline” for D365 for Phones app in D365 v9.x

Finally! After much await and as April 2019 kicks in, the Mobile Offline capability for D365 Apps is finally setting in. But remember, this is in preview as of April 2019 and is not recommended for Production use.

Here’s you can enable Mobile Offline for any Dynamics 365 App

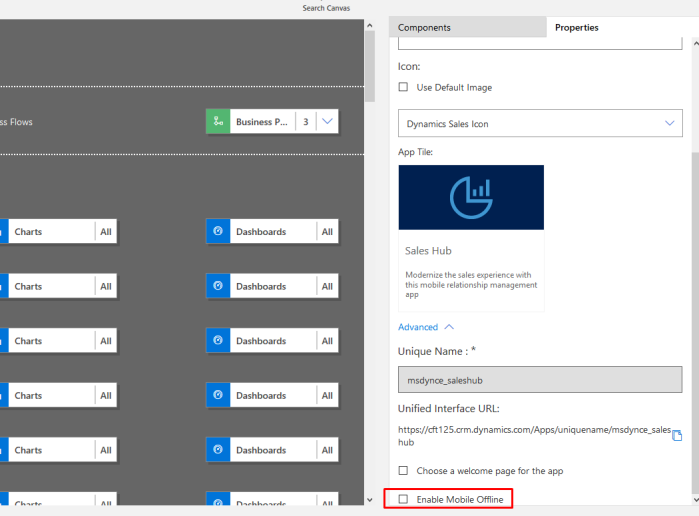
  1. You can see that you can now turn on Enable Mobile Offline for a certain app.
    beforeEnable
  2. Once you select it to tick, you’ll need to select a Mobile Offline Profile. Out-of-the-box, I have selected Sales Sample.
    selectedProfile
  3. These profiles are available for creation and edit in your Default Solution if you go and see
    profileInSolution
  4. And, they specify what properties should the offline mode have. Also, make sure the Users who should have this capability should be added to Users grid as shown below in the Offline Profiles.
    insideProfile
  5. Once done, save and Publish your Unified Interface app in the App Designer. Make sure the Profile is Published too!

Running Mobile Offline

When you open the Mobile App for that user, there’ll be a notification pop-up saying that changes on the org were made and you’ll need to update the same.

And when the update is complete, you’ll see the entities which are enabled for offline like the ones marked below (by a wifi signal icon)
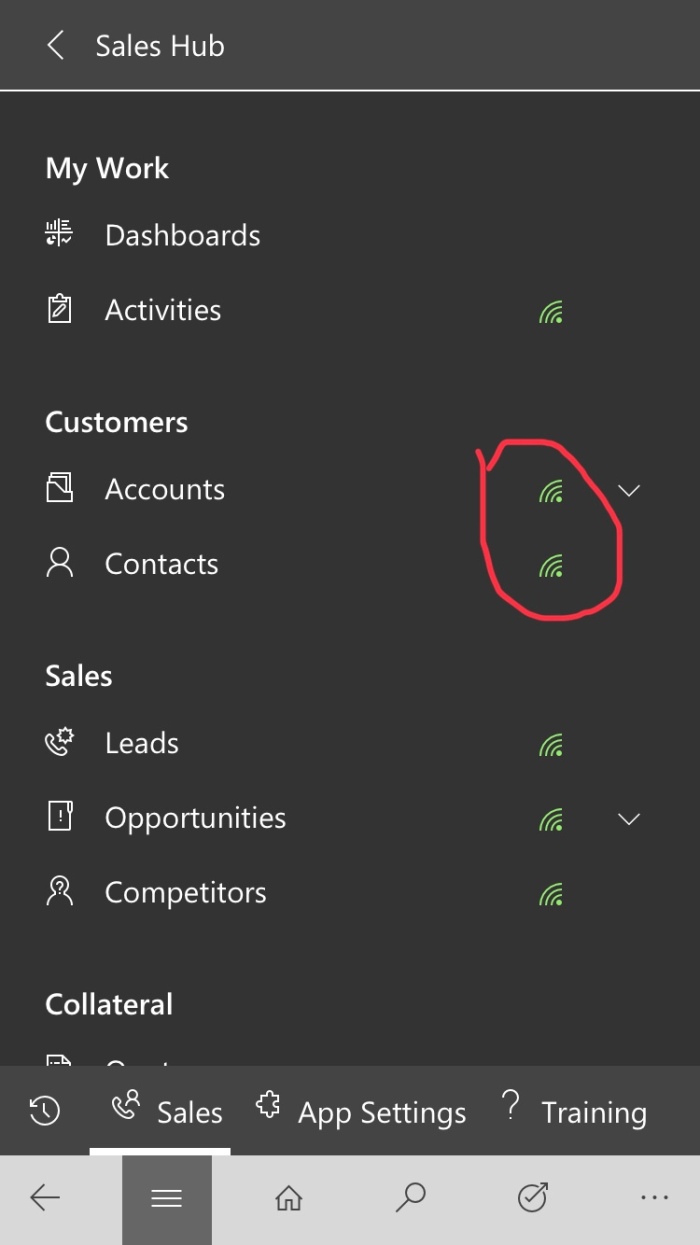
 

So, let’s assume you are offline, you won’t be able to view records that are not enabled for Offline and will see the below error instead.


And the entities like Accounts, which is enabled for Offline, you’ll see the record as below

To summarize, that was the Offline for Mobile which is in preview as of April 2019. Hope this helps!

Import Time Entries in PSA from your Bookings in D365 PSA v3

Often, one of the real-life scenarios is making time entries by either remembering what you did the whole week or looking at the Schedule Board and based on what you were booked, making each Time Entry in PSA manually.

Tiresome and inefficient, right? Not any more, a cool feature let’s you just create Time Entries in PSA v3 by a single click.

Now, let’s say your Bookings look like the below. I’m booked on 2 projects across the week.

scheduleBoard

And now let’s see how we import these.

Import Time Entries

  1. Let’s see you want to make time entries now based on you Bookings in D365. On the Time Entries scree, drop down to the arrow besides Import.
    dropDown
  2. Select Resource Bookings. (Obviously, like this method – you can import from Resource Assignments and Outlook Sync too! But we will keep that for some other day)
    importFromBookings
  3. Then, you can select what all Time Entries should actually make it to the records. So you can select the ones you need and leave the rest.
    summaryOfImport
  4. Once you click on Import, it’s done! Time Entries are created.
    imported

Works like a breeze!

My first ever #365Saturday session in Dubai | 13th Apr 2019

Evidently as people who know me in person could tell, I was thrilled to be a part of #365Saturday event in Dubai 2019.

First and foremost, thanks to Raz Dynamics for putting this forward on a massive scale. The most prominent vibe of the event was the enthusiasm guests and speakers had at the event.

It being my first ever #365Saturday event, I was presenting on Dynamics 365 Project Service Automation (PSA). I had a full audience having interesting questions on real business scenarios on PSA and how some customers have implemented the module.

My session covered aspects of PSA like the Sales Cycle (Opportunity -> Quote -> Order), Project Management, Resource Management, Time & Expense entires, Invoice and finally, Reporting.

A special experience of the event was that I got to meet brilliant minds in the industry such as Wael Hamze, Daniel Laskewitz, Andrew Welch, Hichem Chekebkeb & Narayan Solanki.

There’s always so much to learn and take back from these events and by meeting torchbearers of the Dynamics community.

Looking forward for more of it! 🙂

Geo Coding addresses in D365 v9.1 with Unified Interface

Very straight-forward and useful feature is Geo Coding addresses on Sales, PSA & Field Service entities. Like, on Account, Work Order etc. entity. Let’s take an example of Account in this article.

button

Enable Geo Coding

Geo Coding first, needs to be enabled in D365. If you try to access the Geo Coding feature, you’ll be treated with this error –

error

So, let’s do the following –

  1. Navigate to the Resource Scheduling app –
    resScheduling
  2. If you are in the Unified Interface, make sure you switch the Area to Settings and then select Administration
    settingsSwitch
  3. Then, Scheduling Parameters
    schedulingParameters
  4. In Resource Scheduling, flick the Connect To Maps to Yes, read the warning specified and confirm if you are ok
    connect.png
    warning
    That’s it.

Using Geo Code

  1. Once enabled, you can click on the Geo Code ribbon button on the Account record.
    button
  2. And, it will pick the address you entered and show the Latitude and Longitude for the same. You can simply click OK once the details look correct to you
    latLong
  3. The same will show on the fields on the Account entity
    actualFields

Hope this helps!