Accept HTTP Requests in a Flow and send Response back | Power Automate

Let’s say you want to create a consumable HTTP service, do some operation and send back Response. Here’s what you can do.

You can create an HTTP Request Trigger to receive the HTTP request, process the request and send back a Response.

Accept HTTP Request in Flow

Let’s create a listener first, so that we can get the URL to be used and ask users to submit on that URL.

  1. In your connectors, select the below connector ‘When an HTTP request is received


  2. This will let you accept HTTP requests of different methods. First, let’s just create the schema. Assuming you know what schema you are accepting, click on ‘Use sample payload to generate schema‘.
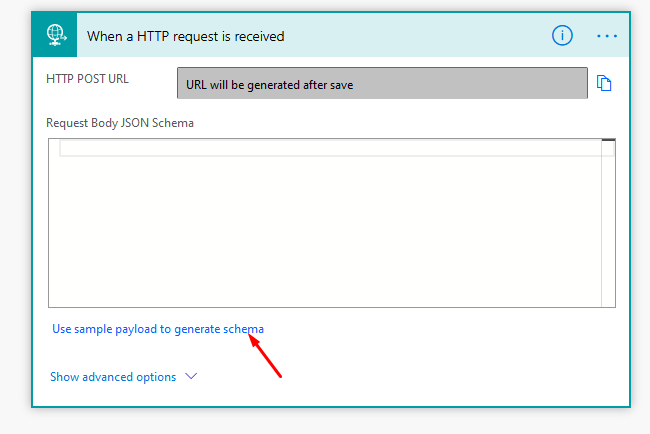

  3. Now, enter your sample data and click Done.


  4. Schema will be generated automatically.

  5. Now, save your Flow so that a URL could be generated.


  6. Also, remember to select what type of Request to accept. It’s under the Show advanced options

  7. Select what type of HTTP request this is. In this example, I’m accepting a POST request.

    relativePath is used when you want to access a specific resource in your HTTP request that is passed in the query string. None in my case, hence, not using it.
  8. Supported verbs in the HTTP Request trigger are GET, PUT, POST, PATCH, DELETE –

Process Info

This is subjective and is completely based on your use case, you can decide what you want to do with the data you receive. Could be anything!! I’ll simply highlight in short what I’m doing here.

I’m just accepting all “Requests” entity data and giving back a Reference ID to customer telling them that their request has been registered with us. Like a typical Ticketing system where you log a ticket and you get back a reference number.

In my example, I’m simply creating a CDS record in my D365 environment and I will return the Auto-generated field value to the Response so that it can be sent back to the caller.

In case you are also looking to create an Autonumber field for yourself in CDS, you can check this post – AutoNumber field in CDS | PowerApps

Send Back Response

Now, in the step above, I’ve created a CDS record in the system. It will also auto-generate a number for the record. I’ll use the same to pass it back as a response.

  1. Now, search for Response (or rather Request) in the Connectors list and you’ll be able to choose the Response action.


  2. In the same, you can then choose what Response code you want to return. This will differ based on where you use this. Example, if you use this Response Action in case of some error, you can return 500 or 404 if something was not found, depends.
    In this case, I’m returning 200 OK and the JSON of my message and sending back the Token (Auto-number field on Request entity record creation)

  3. Here, my Flow is complete.

Testing the Flow

Understand the building blocks of the Flow. Accept Request –> Process –> Response.

Now, the URL we get when we save the Flow is the one that goes to the developers/consumers.
It contain some tokens and header information.

See how I tested it using Postman.

  1. Once I copied it from the Flow and pasted in Postman, the Headers were populated automatically in Postman. (And then you can use this to build your code later on)


  2. Now, I am sending the data in the body in the following way

  3. Now, let’s say I submit the request using Postman.
    A record will be created in my D365 (Common Data Service)

  4. And the Token that the record generated will be returned as response back to Postman

    With the status of 200 OK

  5. And that’s how you can receive HTTP requests and send back responses using Flow in Power Automate.

Here are some more Power Automate / Flow posts you might want to look at

  1. Make HTTP request from Flow in Power Automate
  2. Setting Retry Policy for an HTTP request in a Flow | Power Automate
  3. Terminate a Flow with Failed/Cancelled status | Power Automate
  4. Adaptive Cards for Teams to collect data from users using Power Automate | SharePoint Lists
  5. BPF Flow Step as a Trigger in CDS (Current Environment) connector | Power Automate
  6. ChildFlowUnsupportedForInvokerConnections error while using Child Flows [SOLVED] | Power Automate
  7. Generate Dynamics 365 record link in a Flow using CDS connector | Power Automate
  8. Pause a Flow using Delay and Delay Until | Power Automate
  9. Get Count of records retrieved in CDS connector in a Flow | Power Automate
  10. Call a Dynamics 365 Action from Flow [Bound and Unbound Actions] | Power Automate
  11. Switch-Case in a Flow | Power Automate
  12. Using Parse JSON to read individual List Records in Flow|Power Automate

Hope this was useful! 🙂

Terminate a Flow with Failed/Cancelled status | Power Automate

Usually, things don’t fall into a certain condition and we tend to leave the Flow like that.

Use Terminate control in a Flow in Power Automate to correctly end a Flow Run by declaring that it wasn’t successful.

Scenario

At times, when we use Condition i.e. If True or False, we put everything in True and nothing in False, just keeping it blank.

And when the condition turns out that it doesn’t match the True part, it’ll go in False part and end the Flow. The status will still say Success because the Flow ran completely without any issues.

And when you try to search that Flow Run amongst all the results, you’re not quite sure because they show all Succeeded. This is where you can use Terminate Control to identify what didn’t go according to the condition so that you can identify that the Flow didn’t complete it’s intended purpose.

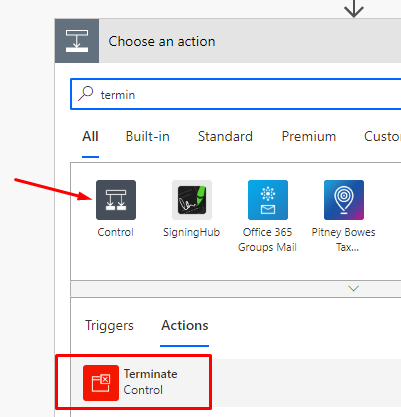
Terminate Control

You can use Terminate control to stop a Flow execution and result in a different message other than Success so that you ease the identification of which Flow Run went wrong just by looking at the Flow Runs results.

You can chose between Different types of termination Actions

You can choose between Failed or Cancelled.

Failed

If you selected Failed, you’ll be able to post a custom error code and a message

Cancelled
And when you select Cancelled, you don’t need to do much.

Working

So when the If condition is not True, if will go in False like shown below –

And if you open the same, it’ll show that it wasn’t successful.

If the Status was chosen as Cancelled, Cancelled will appear

And inside the Flow, it’ll appear like this

That way, you can pick the Failed Run and investigate the Flow based on the way you chose to terminate the Flow.

Here are some more Flow / Power Automate posts you might want to check out –

  1. ChildFlowUnsupportedForInvokerConnections error while using Child Flows [SOLVED] | Power Automate
  2. BPF Flow Step as a Trigger in CDS (Current Environment) connector | Power Automate
  3. Pause a Flow using Delay and Delay Until | Power Automate
  4. Generate Dynamics 365 record link in a Flow using CDS connector | Power Automate
  5. Text Functions in a Flow | Power Automate
  6. Get Count of records retrieved in CDS connector in a Flow | Power Automate
  7. Loop through array of objects in a Flow & Create records in CDS | Power Automate
  8. Make HTTP request from Flow in Power Automate
  9. Enable Flow button on D365 Ribbon
  10. Number Formatting in a Flow | Power Automate

Hope this helps!

Adaptive Cards for Teams to collect data from users using Power Automate | SharePoint Lists

Adaptive Cards is something so cool and works like magic!! I’m sure there are so many creative ways to use it.

Here’s an example – Use Adaptive Cards to gather data from Microsoft Teams Users and populate it automatically to SharePoint List.

Scenario

Let’s say, you have a set of data to collect from your employees – for instance, planning a trip (or any other event for that matter) where you have to take data from employees in order to better plan the logistics.

So, in my example, I want to plan an event for which I need to ask each employee their T-Shirt size, food preference and any allergies to be taken care of.

It’s better to let the users answer at their own accord. You simply need to create a SharePoint list and list out all the Employees whom the short questionnaire should be sent to.

Adaptive Cards (https://adaptivecards.io/)

As their website says, Adaptive Cards are platform-agnostic snippets of UI, authored in JSON, that apps and services and open exchange.

It’s a superb way to make these cards pop-up in Teams, Outlook, Bot Framework etc.

In this post, we’ll ask Microsoft Teams users to submit some info which will be automatically populated to the SharePoint List.

In https://adaptivecards.io/designer/, you can design your own Adaptive Card by looking at the samples already provided on the website.

SharePoint List

Let’s say, you’ve prepared a SharePoint List called ‘Employee Preferences‘ which looks like the below. And you need to get info from them on their Allergies, Food Preference and T-Shirt size in order to prepare for the event

Power Automate

Next step, is to create a Flow in PowerAutomate to send out these Adaptive Cards to the Teams member in their Chat so that they can send back their preferences which is automatically updated in the SharePoint List.
Let’s begin –
(Before we begin, it’s up to you to decide when should the Power Automate trigger, whether on create of Each Item, or all at once when the SP List is ready. I just chose the later. So, see what’s most suitable to you.)

  1. Let’s say my first step is to get all the items from the SharePoint List I created, called ‘Employee Preferences


    And then, set the below preferences –


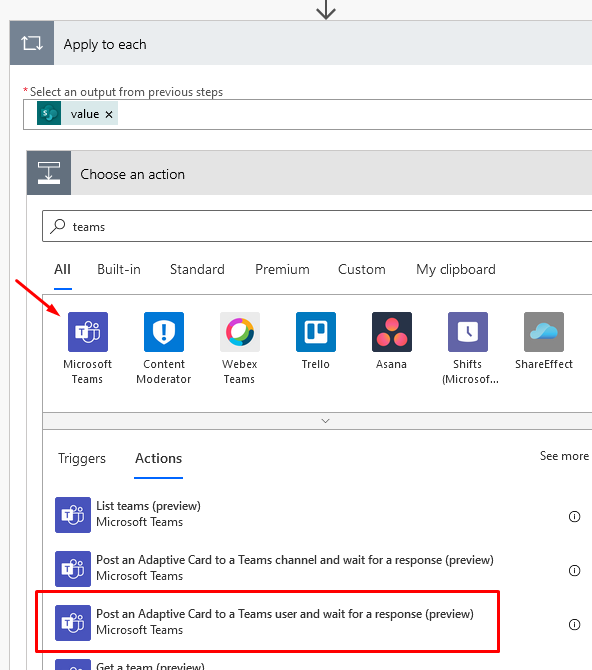
  2. Next, I’ll loop through each of the SP items and initiate an Teams action to send Adaptive Card and wait for the response.

  3. Now, in Adaptive Card you’ve selected for the user of the Team, I’ve used the Email field from the SP list so that I can use it in the recipient field to send the Adaptive Card to that Teams user.

    And paste the content from Adaptive Card editor in Message field.


  4. You can use dynamic data at the right places to populate you Adaptive Card wherever needed.


  5. Finally, you can have an Update message filled in. This is shown once the User Submits back the Adaptive Card with data.
    Should update card should be selected to Yes so that it doesn’t stay like that and the user knows that the response has been captured.


  6. Then, you need to update the captured response back to the SP List.


  7. At this point, your Adaptive Card is ready! Let’s test.

Adaptive Card in Microsoft Teams

Once this is run, the Teams user gets the below in the chat.

  1. User receives and Adaptive Card in their Teams Chat.

    Let’s zoom a little and see how it looks. Notice that we had populated the name dynamically in the Adaptive Card body.

  2. Now, click on Fill Out information and the card will expand to expose the form

  3. Now, I’ll fill the information as below and Submit the same

  4. Once I click Submit, I’ll see the below message. Remember, this populated from Update message field in the Adaptive card options.

  5. And when you check back the SharePoint List, the data has been updated in the same.

    And that’s it!!
    Hope this helped!

Here are some Power Automate / Flow posts you might want to look at –

  1. ChildFlowUnsupportedForInvokerConnections error while using Child Flows [SOLVED] | Power Automate
  2. BPF Flow Step as a Trigger in CDS (Current Environment) connector | Power Automate
  3. http://flowPause a Flow using Delay and Delay Until | Power Automate
  4. Generate Dynamics 365 record link in a Flow using CDS connector | Power Automate
  5. Text Functions in a Flow | Power Automate
  6. Loop through array of objects in a Flow & Create records in CDS | Power Automate
  7. Get Count of records retrieved in CDS connector in a Flow | Power Automate
  8. Number Formatting in a Flow | Power Automate
  9. Call a Dynamics 365 Action from Flow [Bound and Unbound Actions] | Power Automate
  10. Setting Retry Policy for an HTTP request in a Flow | Power Automate
  11. Switch-Case in a Flow | Power Automate
  12. Make HTTP request from Flow in Power Automate

Thank you for your time!

Aggregate functions in a Canvas Power App | Using on SharePoint Lists

Aggregate functions have one of the most common applications while building your Canvas Power App.

In this simple example, we’ll try to make common Aggregate Functions like Max, Min, Sum & Average work.

There are 2 more advanced Aggregate Functions, StdevP for Standard Deviation and VarP for Variance. (It might not make full sense in this post, but I added them anyway to see how we can apply for formula 😊 I’m sure your use-case will make more sense!)

SharePoint List

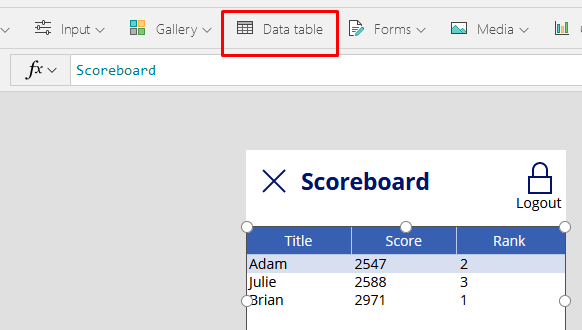
Let’s say, my SharePoint list looks like this. Scores of some people and their ranks

And I’m using Data Table to populate this into my Canvas Power App

Formulas

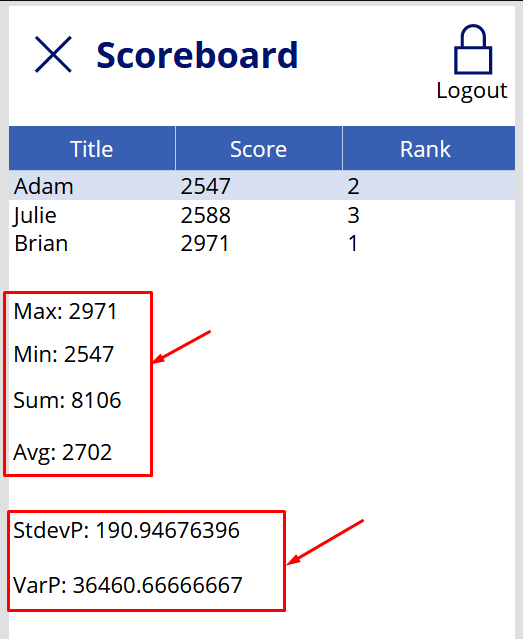
Here’s how I used for Formulas to use the Aggregate functions on the SharePoint list data I populated in my Canvas Power App

For all the Formulas above, I’ve written them inside a Concatenate function just so I could add some Text and then use the formulas. You may use differently.

In my case, the Formula goes like this –
Function(SharePointListName, ColumnName)

“Max” – Maximum Number in Score column of Scoreboard list


“Min” – Smallest Number in Score column of Scoreboard list

“Sum” = Total of all values in Score column of Scoreboard list

“Average” – Average of all values in Score column of Scoreboard list

“StdevP” – Standard Deviation arguments passed. Score column in this case

“VarP”-Variance of the arguments passed. Score column in this case

And that’s it! I tried to simply the explanation. However’s there much more to consider as well. Here’s the full documentation by Microsoft – https://docs.microsoft.com/en-us/powerapps/maker/canvas-apps/functions/function-aggregates

You might want to check some posts on Canvas Power Apps as well –

  1. Count of total CDS records returned in a Canvas Power App connection [Quick Tip]
  2. Dependent OptionSets in a Canvas Power App for 1:N related CDS entities | Power Platform
  3. Restore older version of a Canvas Power App | Power Platform
  4. Implement character length validation in a Canvas Power App | Power Platform
  5. Logged In User details in a Canvas Power App
  6. Implementing Exit app, Logout and Confirm Exit features in a Canvas Power App
  7. Variables in Canvas Power Apps | Global and Context
  8. Get N:N records in a Canvas Power App using Common Data Service connector | Power Platform
  9. Sending Image from Canvas PowerApps to SharePoint Document Library using Flows
  10. Correctly connect to an Excel file in a Canvas PowerApp

Hope this was helpful!

Import lookup referencing records together in Dynamics 365 CRM | [Linking related entity data during Excel Import]

This is one of the most common scenarios where you want to import an entity’s data in Dynamics 365 that has reference to some other entity. And the Lookup’s data is not yet created resulting in the Lookup reference missing. Just like below –

undefined

And resulting into the below –
undefined

And similarly while importing Contacts, the Account might not be already imported. And you get the error ‘The lookup reference could not be resolved

Most common scenario in Dynamics 365 implementations is importing Accounts and Contacts. The Primary Contact tried to lookup an already existing Contact and hence, fails.

Approach

Now, in order to handle such scenario, best and the most simple way is to import this together!

  1. Select both files and add them to a zip file –
    undefined
  2. Name it something appropriate
    undefined
  3. And import this in the Import Wizard in Dynamics 365 CRM.
    undefined
  4. You’ll see the files being included in the zip you selected.
    undefined
  5. After you review your mappings, you can confirm and Submit for Import.
    undefined
  6. There will be 2 jobs submitted and hence, 2 Imports will be created.
    undefined


Result

Now, if you check, both the Lookup references will be maintained.
Account will have the created Contact filled in Primary Contact and Contact record will have Account mapped in the Company Name field (or as per your mappings.)

undefined

In case you might want to look at some more Dynamics 365 CRM posts, you can check below –

  1. Mailbox Alerts Hide/Show behavior in Dynamics 365 CRM
  2. Dynamics 365 PSA v2 to v3 Upgrade failed? Here’s what to do.
  3. Refresh button missing on Roll-Up fields in D365 UCI? Quick Tip.
  4. Store ‘Today’s Date’ in a field to use in workflow conditions in D365 CE
  5. Excel Importing Notes (Annotation) entity in Dynamics 365 CRM
  6. Kanban view in Dynamics 365 Sales | 2020 Wave 1 Early Access Feature
  7. Time/Expense Entry Rejection comments in D365 PSA v3
  8. Custom View Filter JS code not working in Dynamics 365 CE. Why? [Quick Tip]
  9. Show Loading Screen in Dynamics 365 using Client API reference
  10. Accessing multiple occurrences of a field in Business Process Flow using JS in D365 CRM

Hope this helps!

Mailbox Alerts Hide/Show behavior in Dynamics 365 CRM

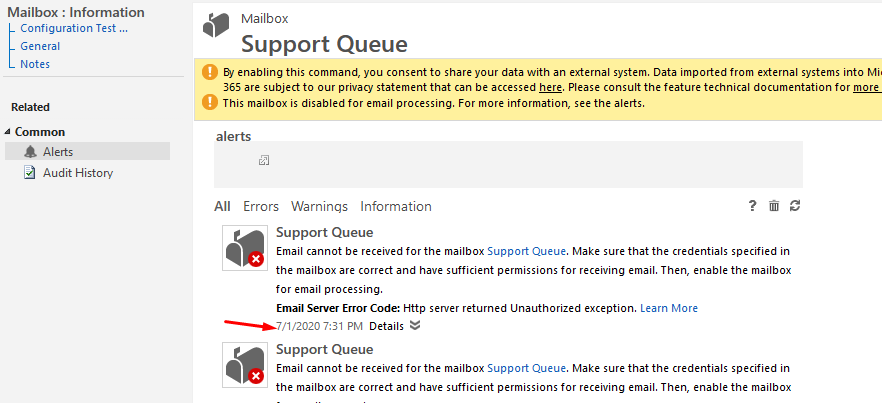
At times, ever wondered what happened to the Mailbox? You ran some tests, you also got results, but the Alerts section is empty or not generating Alerts.
undefined

Here’s what’s missing and how the behavior is –

Turn on Mailbox Alerts

In System Settings, you can turn on what type of Mailbox alerts should be shown.

Navigate to Email and scroll down. You can then choose what type of info should be generated in Alerts area in a Mailbox. Error, Warning or Information.
undefined

Behavior

Now, the behavior is a little confusing. Here’s what it is –

  1. Any previously generated errors will show if the setting was On initially and was later on turned off down the line.
    In my example, the last error was generated on 1st July 2020
    undefined
  2. Now, I turned the setting Off
    undefined

  3. And post that, if there are any new errors/messages, they won’t show up
    undefined
  4. But, after I turn the settings back on
    undefined
  5. New errors after that will start showing up again.
    undefined
  6. Meaning, the duration in which the Alerts are off, those will not be generated. And the duration in which the Alerts are On, they will keep populating the Alerts section.

Hope this was useful.

Here are some more Dynamics 365 CRM related posts you might want to look at –

  1. Viewing Emails as conversations on the Activity Timeline in D365 CE
  2. Create & Send PDFs from Word Templates for Quotes in D365 CE Wave 2 Updates
  3. Summarizing D365 App For Outlook Setup in 3 steps with Exchange Online mailbox
  4. Create a support Queue in Dynamics 365 CRM
  5. Quick Tip: Cleaning Queue Items
  6. Dynamics 365 Solutions’ New Experience in Power Apps, Solution Checker and more
  7. Easier template selection & Manage Activities with ease in Dynamics 365 | 2020 Wave 1 Feature
  8. Custom View Filter JS code not working in Dynamics 365 CE. Why? [Quick Tip]
  9. PSA v3 View Custom Controls used on Project form
  10. Modified By (Delegate) & Created By (Delegate) in D365

Thank you!!

Count of total CDS records returned in a Canvas Power App connection [Quick Tip]

Like in Dynamics 365, you see a total number of records under a view. And you want similar in a Canvas PowerApp too.
undefined

Here’s a simple tip to do so –

CountRows() method

It’s pretty simple. Using CountRows(source) method, you can get the count of records in the Source. In this case, it’s the CDS entity Accounts.
undefined

To flourish how I display the count, I use the Concatenate() method and then use CountRows() inside it first show the text and then the actual count.

Please note that this goes without filtering out any criteria and straight count of how many records the connection has. Your gallery could use more filtering to display lesser records if specified that way.

Handle Delegation

However, you need to handle a few things if you’re aware that your dataset is large.

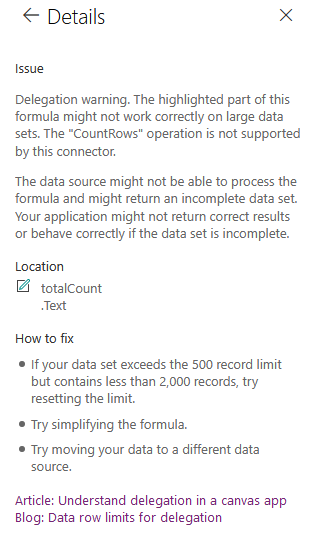
Using this formula will give a warning:
undefined

And the general help offered is this –
undefined

Refer this article to understand more: https://powerapps.microsoft.com/en-us/blog/powerapps-data-row-limit-for-non-delegable-queries/

Hope this quick tip helps!

Here are some more Canvas PowerApp / Power Automate posts you might want to look at –

  1. Dependent OptionSets in a Canvas Power App for 1:N related CDS entities | Power Platform
  2. Restore older version of a Canvas Power App | Power Platform
  3. Implement character length validation in a Canvas Power App | Power Platform
  4. Logged In User details in a Canvas Power App
  5. Implementing Exit app, Logout and Confirm Exit features in a Canvas Power App
  6. Variables in Canvas Power Apps | Global and Context
  7. Get N:N records in a Canvas Power App using Common Data Service connector | Power Platform
  8. Get Count of records retrieved in CDS connector in a Flow | Power Automate

Thank you!

Dependent OptionSets in a Canvas Power App for 1:N related CDS entities | Power Platform

Most useful scenarios is to create what we commonly call as “Dependent OptionSets” in Dynamics 365 context.

Scenario

Here, Country and State are 2 entities in CDS. Each Country has N states i.e. Country is a parent entity of State entity.
undefined

We’ll create 2 Drop-downs in a Canvas Power App i.e. 2 OptionSets namely Country and State that selection of Country will affect what should be populated in State entity. Simple!
undefined

Setting up your Drop-down controls

Let’s see how the drop-downs are set.

  1. Drop-down 1 is populated from Countries entity in CDS (Common Data Service)
    undefined

    undefined
  2. For State to be filtered based on the Country, we’ll use Filter() function to show records based on what Country is selected in Drop-down 1.
    For Items of the Dropdown2 control, we’ll write the below formula
    undefined
    undefined

    So, the Filter([EntityToPopulate], ‘[LookupFieldNameOfParent]’.[EntityOfParent]) = [DropdownControl].Selected.[GUIDFieldOfParentEntity])
    Sorry, it’s a little rough on the eyes!
  3. And it will give you the below. Select Country first
    undefined

    select your parent record
    undefined


    Then, the drop down will populate child records based on the Country. So the States will show up which have lookup to India as Country.
    undefined

And that was it!

Here are some more Canvas PowerApp posts you might want to look at –

  1. Restore older version of a Canvas Power App | Power Platform
  2. Implement character length validation in a Canvas Power App | Power Platform
  3. Logged In User details in a Canvas Power App
  4. Implementing Exit app, Logout and Confirm Exit features in a Canvas Power App
  5. Variables in Canvas Power Apps | Global and Context
  6. Get N:N records in a Canvas Power App using Common Data Service connector | Power Platform
  7. Adding a Canvas PowerApp to Teams
  8. Sending Image from Canvas PowerApps to SharePoint Document Library using Flows

Hope this helps!!