As part of various implementations, often you’ll need to ensure that the field validation is in place.
Note: Please note that this feature is still in Preview at the time of writing this post.
Enable Data Validation in Power Platform Admin Center
Here’s how you can enable Data Validation for Email fields in Power Platform Admin Center
- Once you have the correct rights in Power Platform Admin Center (https://admin.powerplatform.microsoft.com/environments), select the Environment you want to enable Data Validation for.

- Now, expand Product section and go to Features as show below

- When you scroll to the very bottom, you’ll find Data Validation option turned out by default.

- Turn it on and Save the Settings.

- Also, in the App Designer for Model Driven Apps, click on Settings on the Editor. Click on Settings in the Command bar and then go to Upcoming features in the Settings list.
You’ll find that the Enable Smart Email Address Validation Control feature is still set to No.
- Turn this feature on, Save the settings and Publish the App again before running it.

Validation in D365 Sales Example
Let’s look at the below example –
- When you have enabled the Email address validation, you can try to enter the below data which is invalid on purpose and see the result.
When you enter an address, it’s validating on the fly.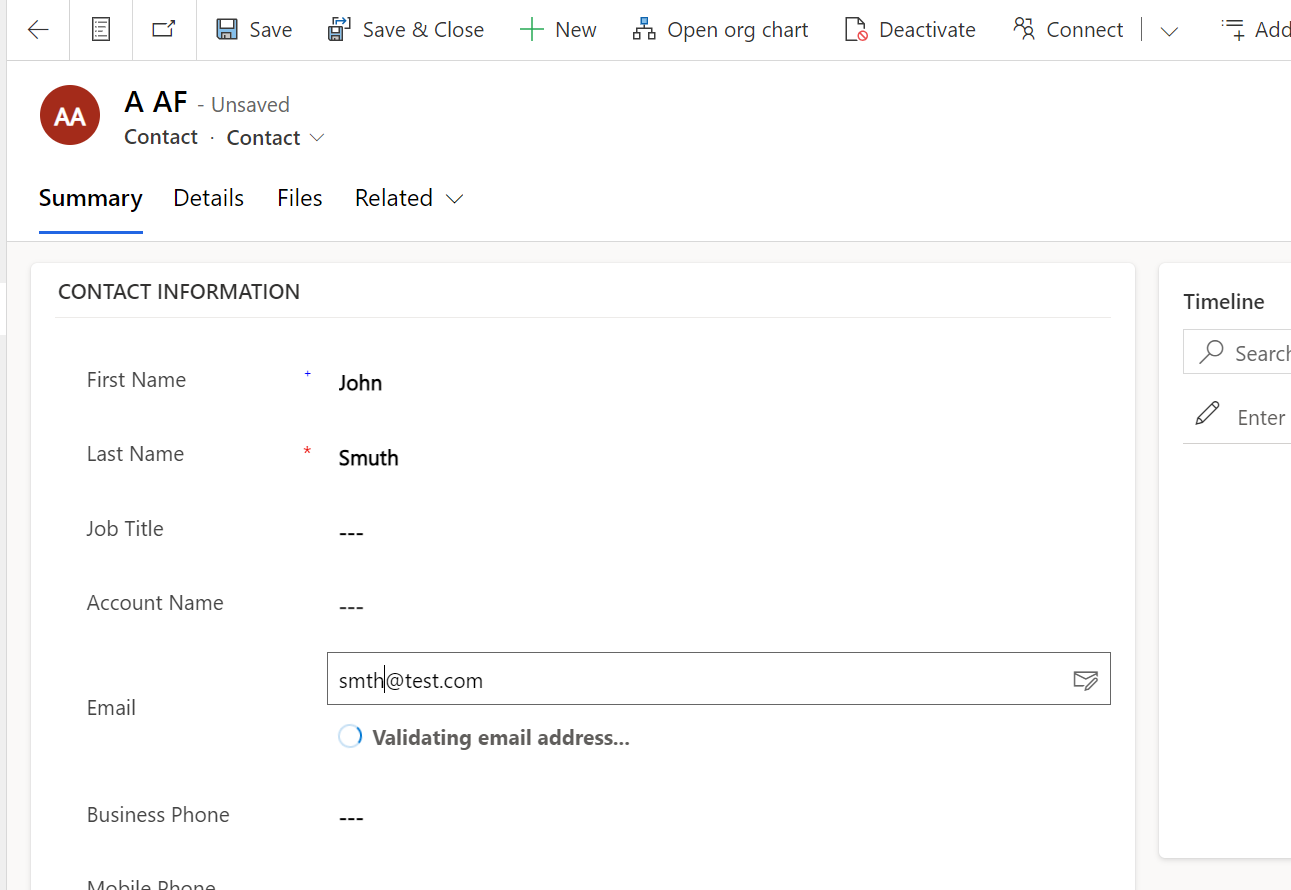
- It’ll show that the domain is known but disposable, for example.

What Validation is considered?
Below are the validations that are carried out –
- Incorrect Syntax – Like Email Domain and Username can’t exist together
- Disposable Domain – Temporary Email domains.
- Test or spam emails – You can turn this feature off is you are testing in Sandbox and enable for Production to prevent spam emails being entered.
- Expired Email Addresses – Disabled emails which can’t send or receive Emails.
- Emails that bounce back – Like disabled addresses which bounce back
Here’s Microsoft official documentation for this feature – https://learn.microsoft.com/en-us/power-apps/maker/data-platform/data-validation-email-column?WT.mc_id=DX-MVP-5003911
Hope this helps!
Here are some Power Automate posts you want to check out –
- Select the item based on a key value using Filter Array in Power Automate
- Select values from an array using Select action in a Power Automate Flow
- Blocking Attachment Extensions in Dynamics 365 CRM
- Upgrade Dataverse for Teams Environment to Dataverse Environment
- Showing Sandbox or Non Production Apps in Power App mobile app
- Create a Power Apps Per User Plan Trial | Dataverse environment
- Install On-Premise Gateway from Power Automate or Power Apps | Power Platform
- Co-presence in Power Automate | Multiple users working on a Flow
- Search Rows (preview) Action in Dataverse connector in a Flow | Power Automate
- Suppress Workflow Header Information while sending back HTTP Response in a Flow | Power Automate
- Call a Flow from Canvas Power App and get back response | Power Platform\
- FetchXML Aggregation in a Flow using CDS (Current Environment) connector | Power Automate
- Parsing Outputs of a List Rows action using Parse JSON in a Flow | Common Data Service (CE) connector
- Asynchronous HTTP Response from a Flow | Power Automate
- Validate JSON Schema for HTTP Request trigger in a Flow and send Response | Power Automate
- Converting JSON to XML and XML to JSON in a Flow | Power Automate
Thank you!

