Business Card Scan in D365 CE Wave 2 Updates

We are close to getting D365 Wave 2 Updates in Oct 2019 and with Early Opt-in to Wave 2 Updates, we are already able to access one of the most desired and requested features of this release – Business Card Scan!

If you are yet to enable Wave 2 Updates for your organization, follow me post on the same here – Early Opt-in for October 2019 Wave 2 Updates. Please do so only on your testing/sandbox environment and not on Production instance yet.

Note that this is only available in US and EU regions as of now and works only in the Unified Interface.

Phone App to scan business cards

Most obvious thing to do is to pull out a phone to scan a card.

  1. Open Dynamics 365 for phones app. And navigate to Quick Create Menu
    qcMenu.png
  2. Then, select Contact
    contactQC
  3. On the Quick Create of Contact form, you’ll see a Business Card control that opens the Camera
    businessCardButton
  4. It will open you Camera and you can simply take a picture of the business card itself like below
    picTaken
  5. It will upload and fill out all the captured information from the card to the Contact form.
    infoCaptured
  6. You can simply Save the record and you’re done. It will be uploaded to CRM.


Uploaded

And here it is, uploaded in CRM already.

enteredInCRM

And if you take a look at the record, the picture that was used is also stored in Dynamics
cardInfo

Custom Control Used

If you look at the form customization of the Contact’s Quick Create form, you can see what control was used. It’s AI Builder Business Card control
controlUsed

Hope this helps!

Set Work Hours Template to a Bookable Resource in D365 PSA v3

For all the newbies in D365 PSA, one of the most critical part of configuring PSA is setting up Bookable Resources with their respective Work Hours Template to define their Work Hours and Days they can be & should be booked.

By Default, if you create a Bookable Resource they have a 24-hour slot open to be booked.
Example, I created a new Resource Shailesh Wath. Specially, not the Timezone selected. This will define how the resource will appear on Schedule Board.
newResource.png

And if you open his Work Hours by clicking on Show Work Hours, you’ll see this (which isn’t defined).
calendarNotSet.png

And on the Schedule Board, Shailesh looks like this –

Available on All Days

allDays.png

And available on All Hours
allHours.png

Work Hours Template / Calendar Template

Simply put – Work Hours are defined Schedule based off a resource’s Work Hours that can be applied to other resources as well.
You can find the Work Hours under Settings > Calendar Templates
WHT.png

Firstly, any 1 users Work Hours need to be defined in order to be set as a Template to a Work Hours. In this case, the System User Priyesh Wagh‘s Work Hours will be applied to the India Work Hours in the Template created.
IndiaWHRecord.png

Assign Work Hours Template

Now, we are assigning Work Hours Template to Shailesh which have defined hours and defined days of the week.
So, under Bookable Resources, select the User and then click on Set calendar option.
setCalendar.png

In the window, I’ll select the Work Hours Template I wish to apply. India Work Hours in this case.
IndiaWH.png

And click Apply
clickApply.png

Work Hours Template will be applied with this message.
applied.png

Obviously, you can do this for multiple resources at one. 🙂

Applied Work Hours

Now, if you observe the Work Hours to the resource, you can see this (defined timings with holidays on weekends)
legitCalendar.png

And on the Schedule Board, you’ll see the Days are properly defined
holidays.png

And also the Hours (8am to 4pm work schedule)
definedHours.png

Hope this quick tip helps!
Booking Resources more than their capacity in D365 PSA v3

While booking resources, you often don’t pay attention to how much capacity the resource has.

Or rather, you are aware, but you want to book the resource anyway (only to change later on, which I don’t recommend.)

In that case, if you are trying to overbook a resource out of their capacity, you are treated with this message below –

errorMessage

Why this occurs?

This is because of the Work Hours defined for the Resource. Rather, what Work Hour Template is assigned to that resource. Now, let’s say, you are trying to book someone for 8 hours on top of their already booked 2 hours
overloading.png

If you switch to the Hours view, you’ll see the availability marked by white cells. Grey meaning, unavailable.
available

Remember, this is even said in the error message when you tried to click Book.
errorMessage

Alternative

Of course you can do this, but you should have a very strong reason to overbook resources. 🙂

Switch to Evenly Distribute Hours to allow the resource to be booked on top of the existing one.
evenlyDistribute.png

And this should be fine, but it will appear in red indicating that the resource is overbooked. Say, 10 hours (on top of already booked 2 hours) – exceeding the 9 hours total limit.
hardOver
redMarking

Suggested

You should rather Propose Book the resource, this way, the booking will exist and won’t bloat the schedule board. And then, you can decide later to do something with it.

Front Load – Proposed

Now with combination of Front-Load and Proposed, you should be able to Book for only the remaining capacity

frontLoadPropose.png
only7.png

Evenly Distributed – Proposed

With Evenly Distributed Proposed, you should be able to exceed the capacity and even Propose for the full time you want.
evenlyDisProposed.png
Full10Hours.png


Hope this quick tip helps! 🙂

Happy 365ing!


Time/Expense Entry Rejection comments in D365 PSA v3

Let’s say in your PSA implementation, you are the Project Approver and you often face the challenges to rejecting time entries so that the resources could just correct it and re-submit. (Or any reason, for that matter)

Do you manually go and tell them that they need to re-submit? Let’s make this easier. This post applied for both, Time and Expense entries in PSA v3.

Where are the Rejection comments stored?

As an Approver, you have Resources submitting their Time Entries and you see them under Time Entries For Approval view in Approvals entity, ready to be Accepted/Rejected
ApprovalWaiting.png


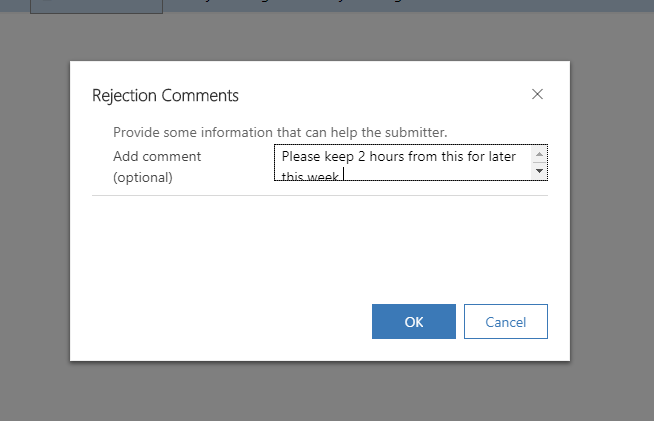
And optionally, you can enter comments specifying why you rejected the Time Entry.
rejectionComment.png

But where is this data stored?

It’s actually stored as a Note on the Time Entry record itself! Note that the Entry Status of the Time Entry now says ‘Returned
storedAsNotes.png

Let the Resource know

You could just create a workflow to send an email to (Even Microsoft Flow, if you are comfortable with it)
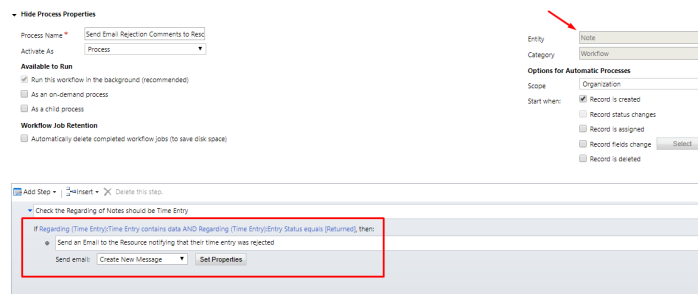
A simple workflow to send out a notification will be useful to let the Resource (Owner of the Time Entry) know that the Time Entry was rejected and they need to take action.
workflow
On create of Note, Check if the Regarding (Time Entry) contains data and the Entry Status == Returned

emailBody
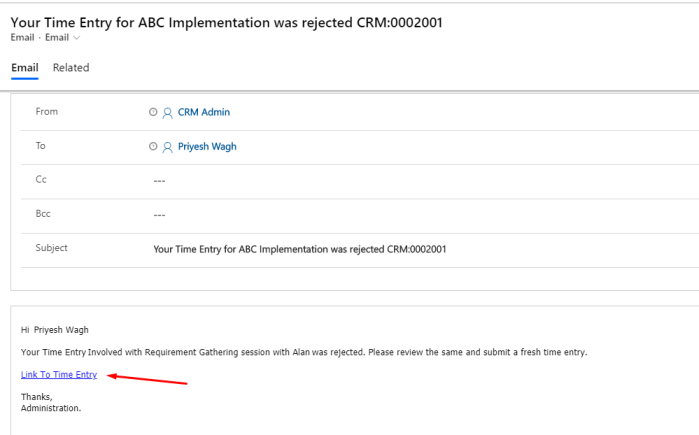
And send it to the Owner of the Time Entry specifying what details should go out. Add a link to the Time Entry record, maybe.

And they can click the link back to the Time Entry itself.
emailToResource

Hope this use-case proves useful in your implementation! 🙂

Happy 365ing!

Qualify Lead in D365 CE: Select which entity records should be created

Wave 2019 Updates brought some really sought-after features. Another one which I would like to bring up is the Lead Qualification experience.

I’ve written this post when I enabled the Early Opt-in of Wave 2 Oct 2019 Updates. To enable Early Opt-in, please refer this post – Early Opt-in for October 2019 Wave 2 Updates

This is set to release for the Oct 2019 Updates.

Default Behavior

So when you Qualify Lead by default – Account, Contact and Opportunity records are created.
fullQualifyLead

Notice that by default, the created Account and Contact are always auto-filled.
all3Records

Lead Qualify Experience in System Settings

By default, D365 will let you create all three – Account, Contact and Opportunity records when you Qualify a Lead.
originalSetting

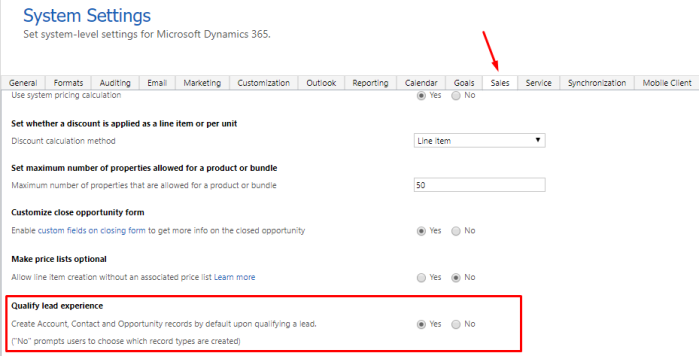
When you select No, you’ll be asked which all entities should be created when you Qualify a Lead.
selectNo


Lead Qualification for selected entities

No, when you click on Qualify button, you’ll be treated with this Dialog box where you can choose what records should be created.

I’ll select only Opportunity this time
selectWhichOnes


And only Opportunity will be created and notice that the Contact and Account are blank this time.
blankOpp

Hope this is useful!

Thanks.

Related Blog on one of Wave 2 2019 Update: Customize Opportunity Close dialog box in D365 CE v9 Unified Interface – Wave 2 update

I’m also listed on the Top 100 CRM Blogs and Websites on Feedspot. It has a curated list of awesome bloggers.

Customize Opportunity Close dialog box in D365 CE v9 Unified Interface – Wave 2 update

Oct 2019 Wave 2 update got one of the most asked feature. Being able to customize the Opportunity Close Dialog box.

Assuming, you have enabled 2019 October Wave 2 update enabled for your Organization or you’re reading this post Oct 2019 with Wave 2 Updates already applied to your organization.

For Early Access of Oct 2019 Wave 2 Updates, follow my post here – Early Opt-in for October 2019 Wave 2 Updates

Please note that this feature is still not generally available and is not recommended for Production use yet.

Non-Customizable Opportunity Close Dialog

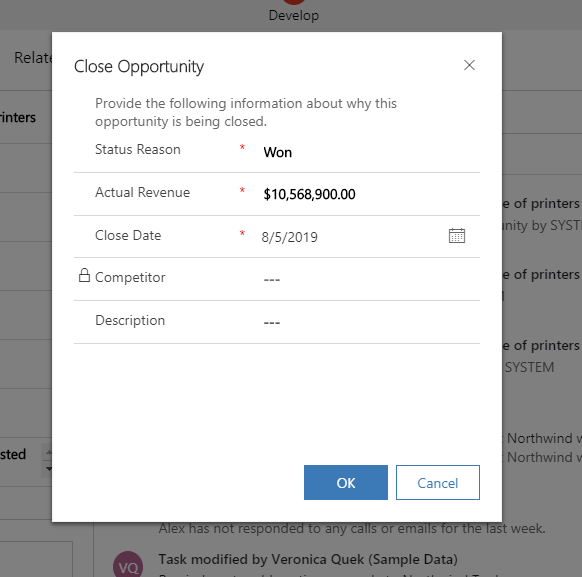
Up until now, you had this familiar Opportunity Close dialog where all you could do is just fill in the details and Close the Opportunity.

nonCustomizableCloseOpp

And you couldn’t add your own fields or modify it in anyway.

Please note that this feature is only available for the Unified Interface on Orgs enabled for 2019 Wave 2 Updates (Early opt-in or General availability)

Enable Customizable Opportunity Close Form

System Settings

Please note that this is a feature Admins will need to activate for the Organization and won’t be automatically updated once the Wave 2 updates are applied.

Under Sales tab in System Settings, enable Customize close opportunity form
turnOnSettings

Custom Fields

Example: Let’s say I have this field called as Internal Reason, I’ll add it on the Opportunity close entity (which users will use this on the Opportunity Close form when closing an Opportunity)
internalReasonField

And I’ll simply add it to the Opportunity Close Quick Create form
addToForm.png

Opportunity Close Quick Create Form

Once you do this, a Quick Create form you defined will open up instead of the traditional dialog box and you can include your custom fields on the same as well
customizableOppClose

Happy 365ing always! Hope this helps.

Early Opt-in for October 2019 Wave 2 Updates

August 2, 2019 was when the Wave 2 Updates were to be out. And here we are! By now, you should have gotten the option to update the wave 2 updates on your environment(s).

Let take a quick look at how you can enable this for your environment.

Here are the details Microsoft notes on the Early opt in to 2019 release wave 2

Enabling Wave 2 2019 Updates

Visit https://admin.powerplatform.microsoft.com/ (PowerPlatform Admin Center) and go to Environments.

Select the environment
selectEnv.png

Check that the updates are available for Activating. Initially the 2019 release wave 2 updates will appear Off. Click Manage.
Please note that you should try this on the Sandbox first before opting to apply on Production directly.
manageButton

Click on Update now

updateNow

Click Confirm.
confirm

And the Updating will start in a few moments.

Progress

You’ll see that the Apps are being updated as shown below for a few hours
updating

As and when each of the apps complete, it’ll show progress as below
partialComplete.png

Once complete, this will be the status
completeSetup.png

2019 Wave 2 Updates Applied

Once completed, you can log into Dynamics and check the About section to find out that the updates have been applied
completed

Here’s what everything’s included in the 2019 wave 2 updates: 2019 release wave 2 features available for early access

Happy 365ing! Hope this helps.