Create a Team, add Members in Microsoft Teams upon Project and Team Members creation in PSA / Project Operations | Power Automate

Let’s take a simple use case where you need to have a Microsoft Team created in Teams and have the Project Members added to the Microsoft Teams’ Project Team.

You can simply do this using 2 simple Flows in Power Automate

Scenario & Setup

If you are a PSA Customer, you would want to create a Team in Microsoft Teams based on what Project it is and then add Team Members of the Project as Team Members in the Microsoft Teams’ Team you created.
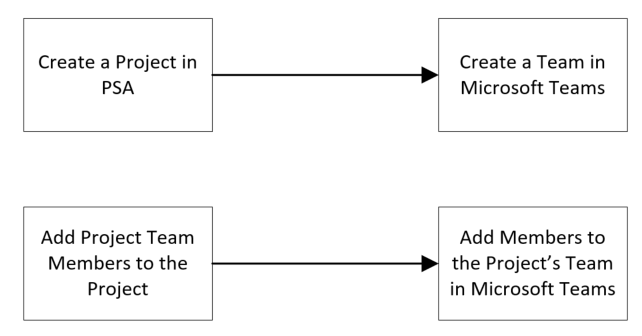
Let’s look at a Simple example of how you can do this. And further, you can enhance the implementation yourselves based on whether a Project becomes Inactive, or someone is to be removed from the Project Team.

I’ll be creating 2 Flows for this purpose –

  1. One that will create a Team in Microsoft Teams upon Project Creation and
  2. Other, will add Member to the Project’s MS Team upon addition of the Team Member in Project in PSA/Project Operations.

Create a Team for the Project

Let’s look at the first scenario where you can create a Team in Microsoft Teams once create a Project in PSA.

  1. Flow to trigger off of a creation of a Project.
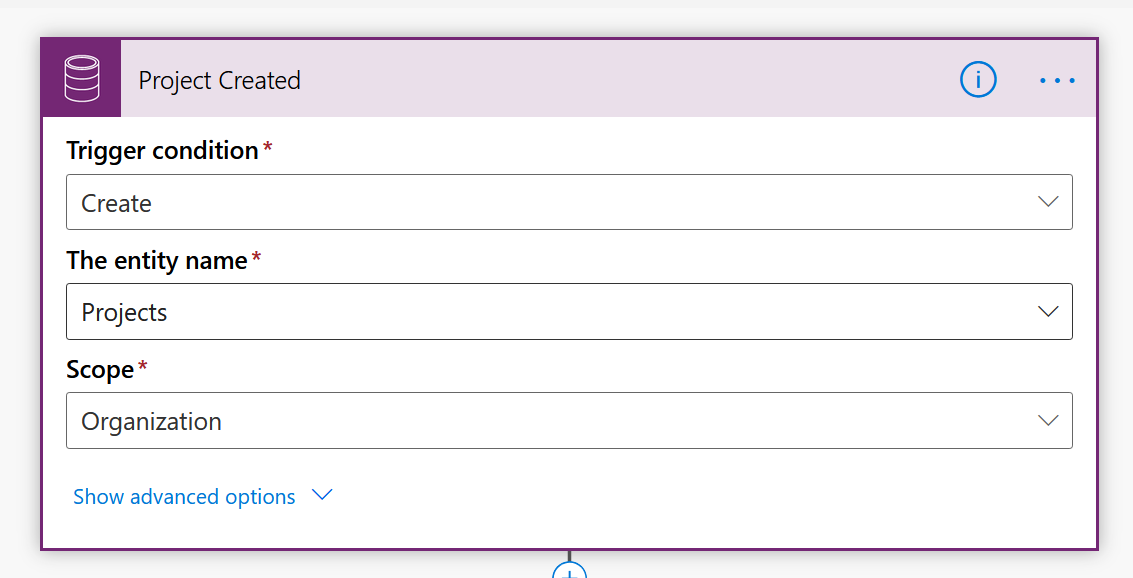
    |
  2. Now, search for create a team in the next step to find a Microsoft Teams connector’s Action to create a Team in Microsoft Teams.


  3. Assign the Name of the Project and Description of the Project for easy understanding. You can make the team Private which is ideal to keep users’ Teams cleaner and also keeps Project discussions isolated if that’s the need.
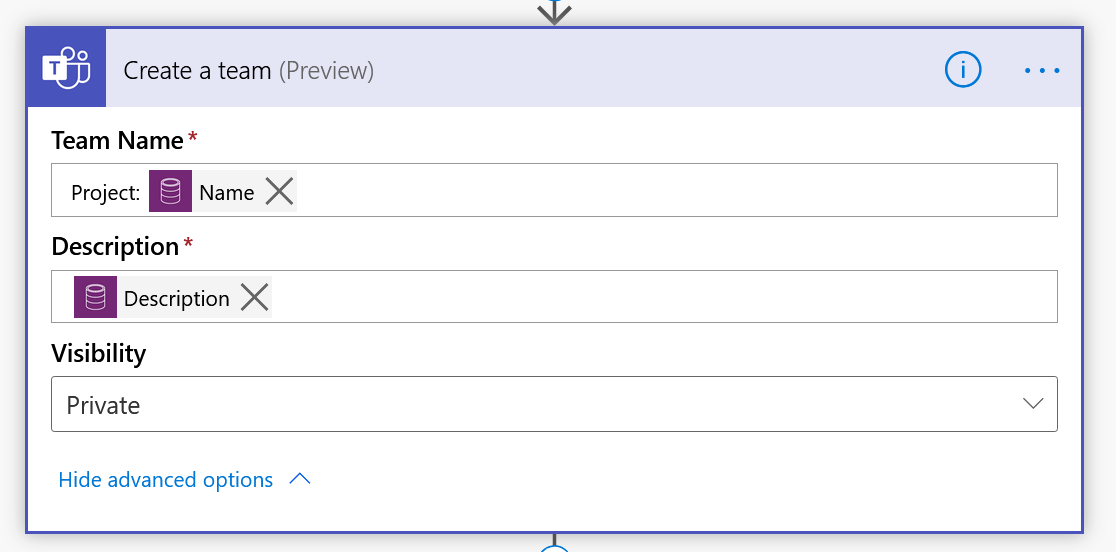

  4. Once a Team is created, I’ve created a field on Project record to hold the MS Teams’ ID for other references.
    Add a step to update the Project back with the created MS Teams’ ID like this

    And in that, I’ll update the Created Team’s ID

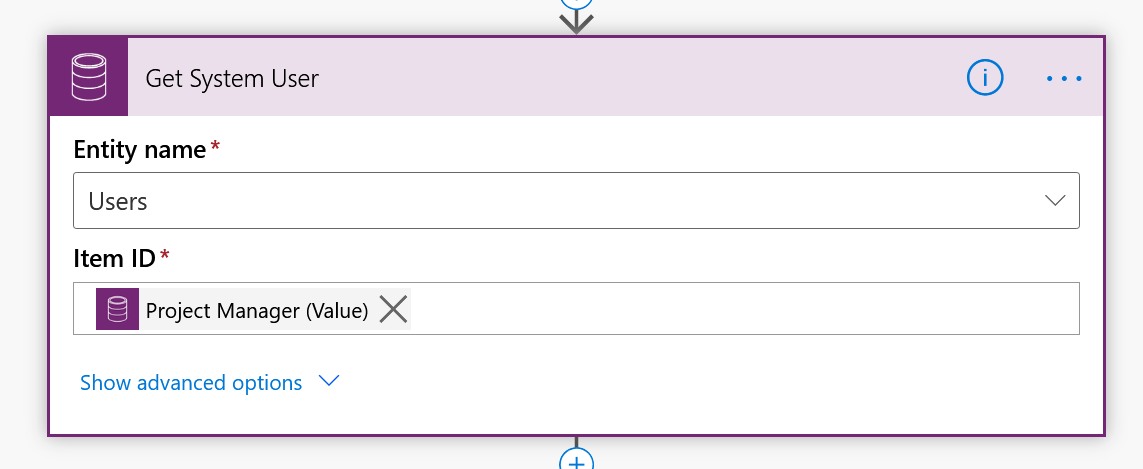
  5. Now, fetch the Project Manager’s User record in CDS (PSA, basically) so that the User’s ID can be used to make the Owner of the Team you are creating.
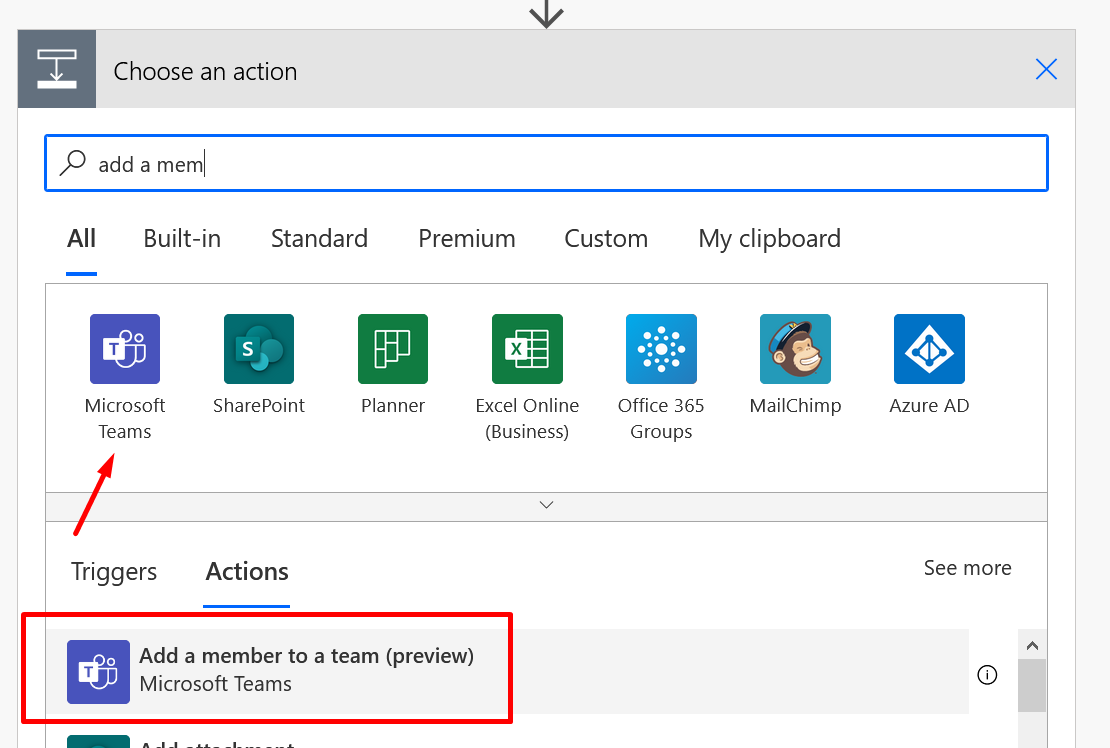
  6. Next, you need to add Members to the Team. Look for add a member to the team and you’ll find Microsoft Teams’ action which you can use.
  7. Here’s how the Add a team member looks like.

  8. Now, this is a little tricky. Since you don’t get the Dynamic Values right away in this Action, click on Add a custom item.

  9. In Add a custom item, you can add the Team ID of the MS Team you just created for the Project in step #3 above.
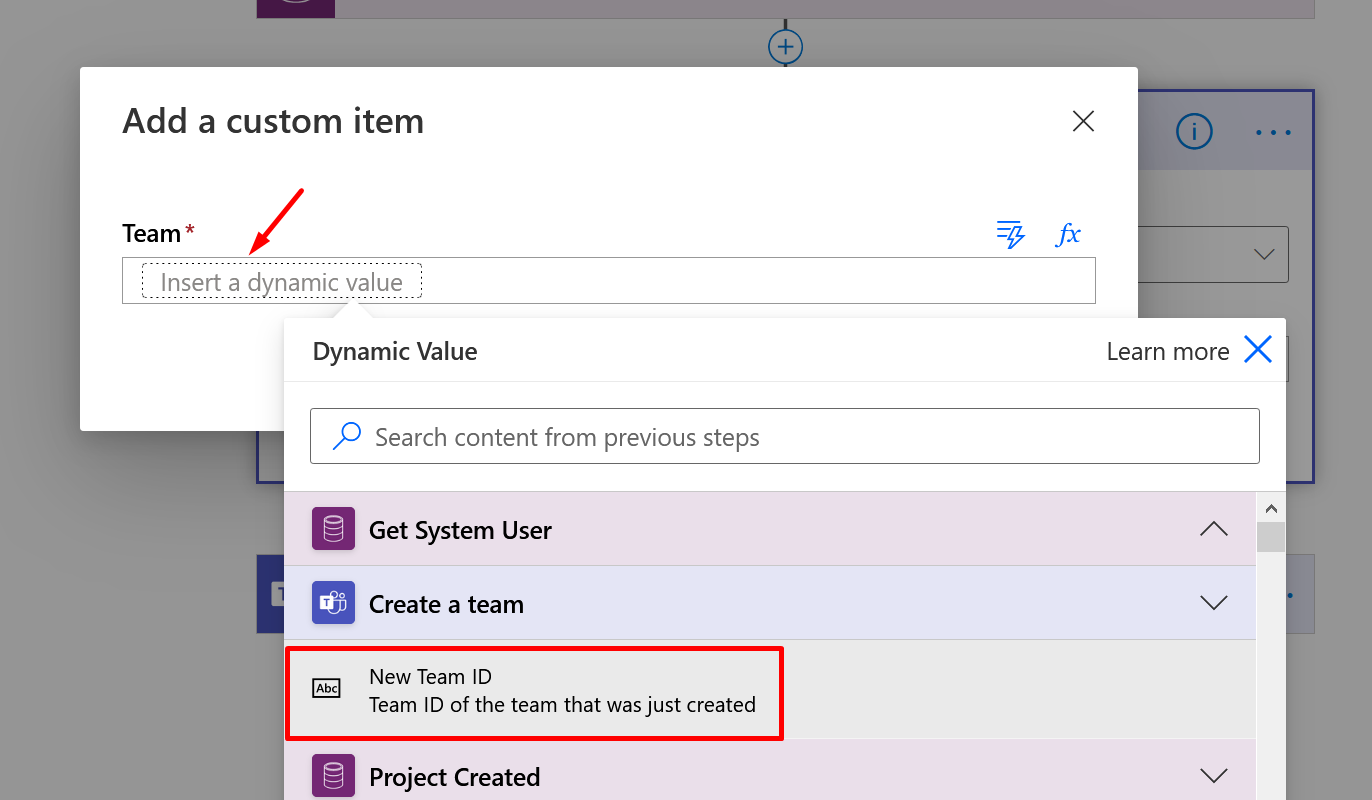
    Once you add it, it’ll look like below
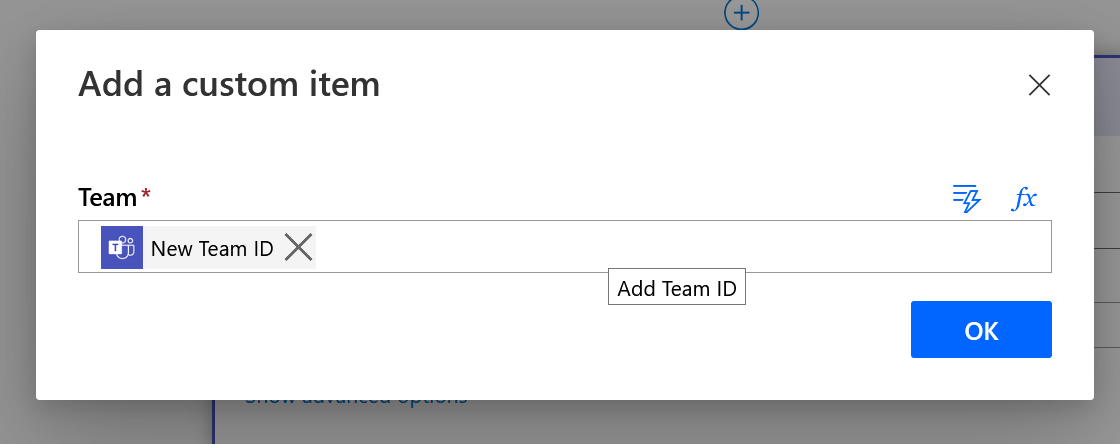
  10. And for the User’s AAD ID step, set the System User’s (fetched in #5)
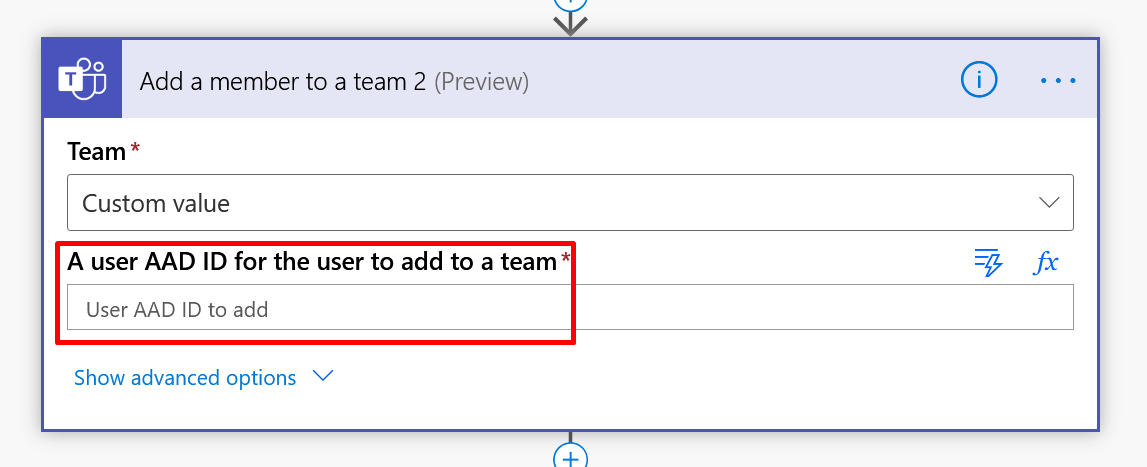
    Add Azure AD Object ID

  11. Now, the last step looks set.

Add Members to the Project Team

Let’s work on the other scenario with other Flow. This will be on trigger of a creation of a project Team Member.

  1. This second will fire off on creation of a Project Team Member. Hence, the trigger on Create of a Project Team Member.
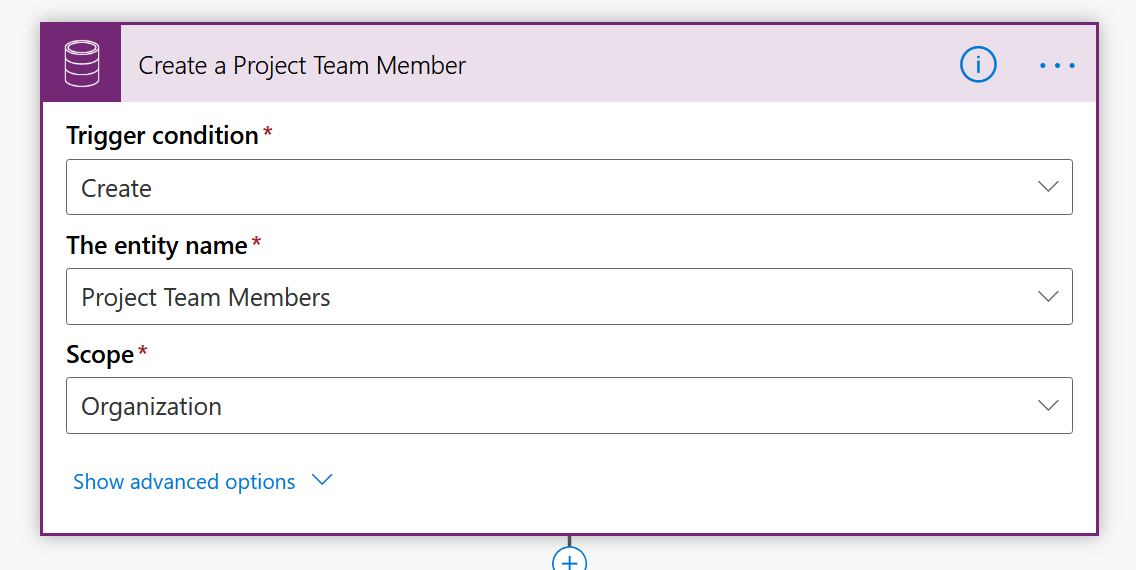
  2. I’ll get the Project record since I need the MS Teams ID which is a custom field we created to store the MS Team’s ID on the Project.

    Again, you can do this easily if you know how to get related records. I’ve done an extra step for simplicity.


  3. Now, the next step is to retrieve the Bookable Resource‘s Record. In turn, we’ll retrieve the System User record associated with the Bookable Resource record on the Project Team so that the System User’s ID can be used.
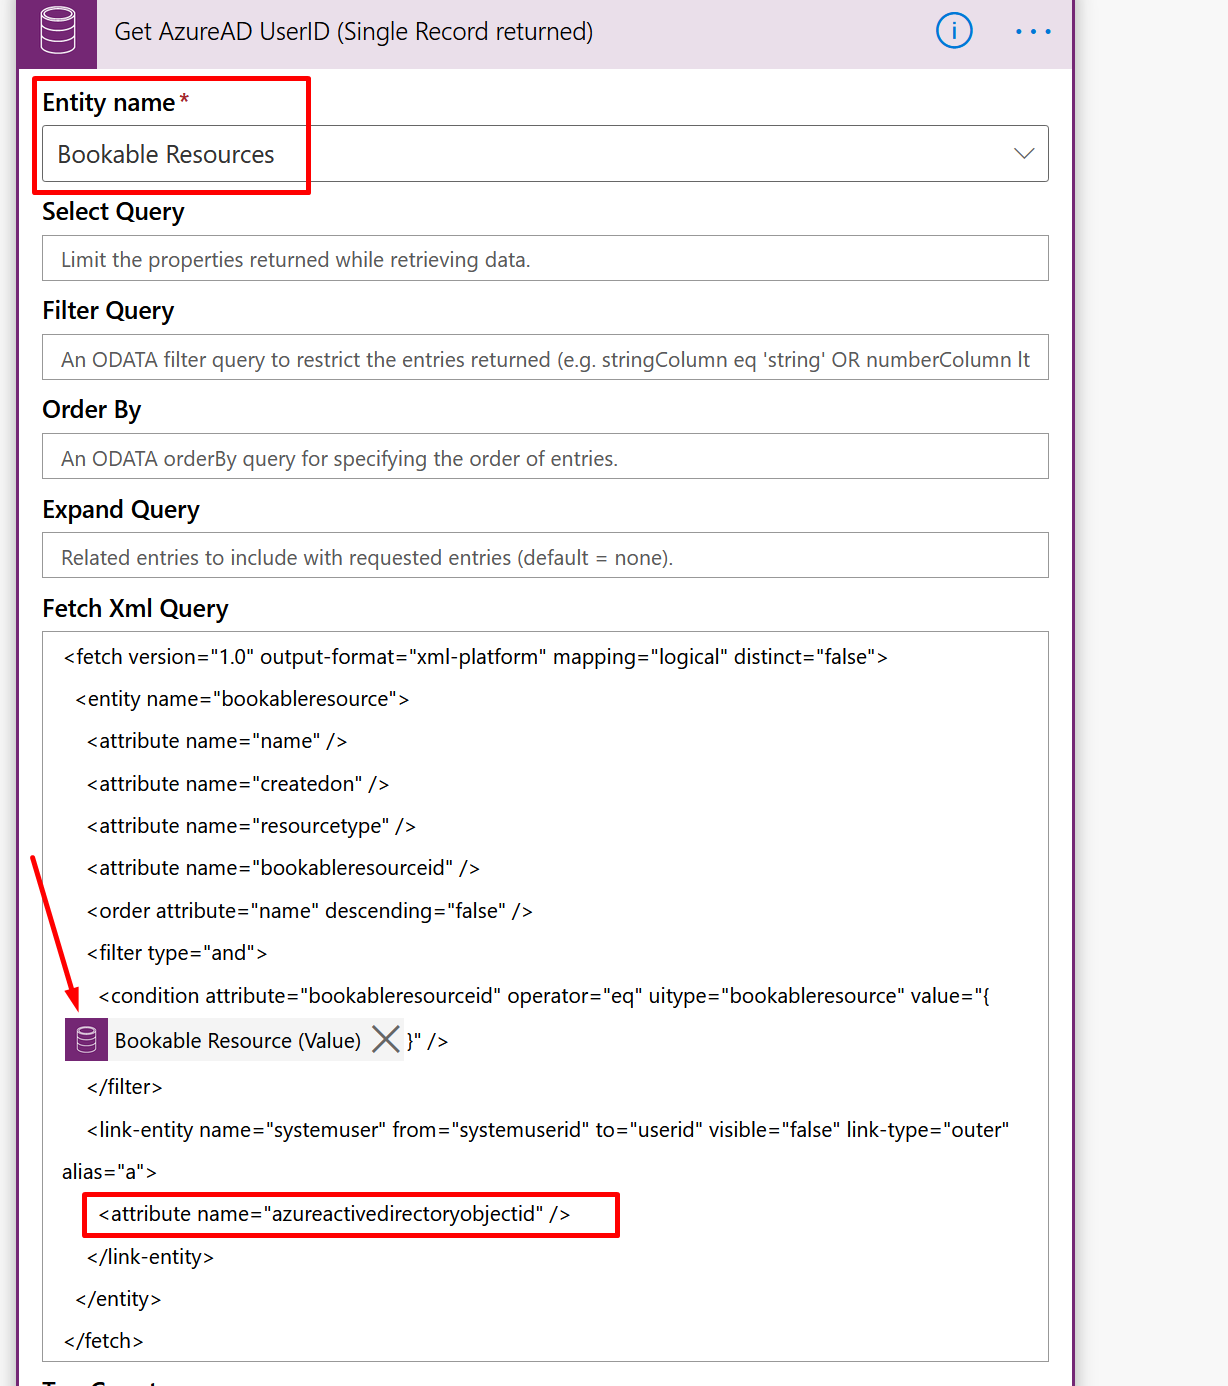
    Just because I need the Azure AD Object ID (User) entity, I’ve written a fetch XML on the Bookable Resource entity to go and get the User record’s Azure AD Object ID. I’ll need this to map it in the step where we’ll add the Member to the Project’s created Team.
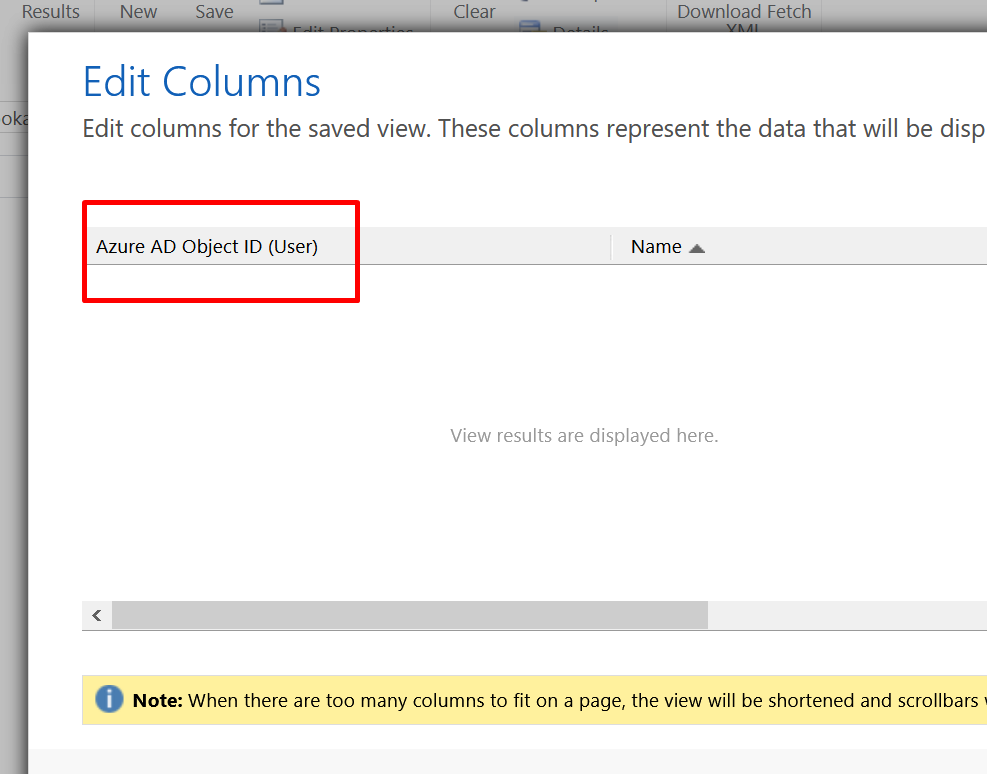

    My step to retrieve Bookable Resource + System User’s Azure AD ID looks as below. Make sure you select the Bookable Resource GUID reference from the trigger i.e. the Creation of the Project Team Member record to ensure we only get 1 record.
  4. Then, I’ll simply generate a Parsed JSON after the above Step so that I can get to select the required attribute to select in the Team’s Add a Team Member step (Because the related field is not available for Dynamic Values) (In case you know how to directly write using outputs() function, that should be good enough too!!)


  5. Now, add the Team Member to the Project’s Team in MS team. Again, as mentioned above in the previous Flow, use the Add a member to a team Action from Microsoft Teams connector to do so.
    Now, add the Team’s ID in the Team field.
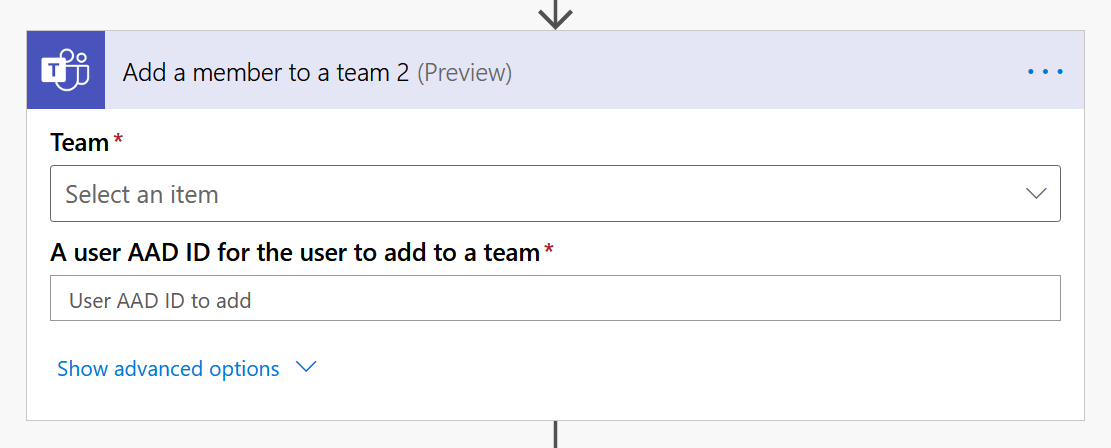
    On the Team field, you’ll need to Add a custom Value like we did in the previous Flow.


  6. And for the final step, in the User AAD ID for the user to add to a team step, you can pick the parsed Azure ID field from #4 above.
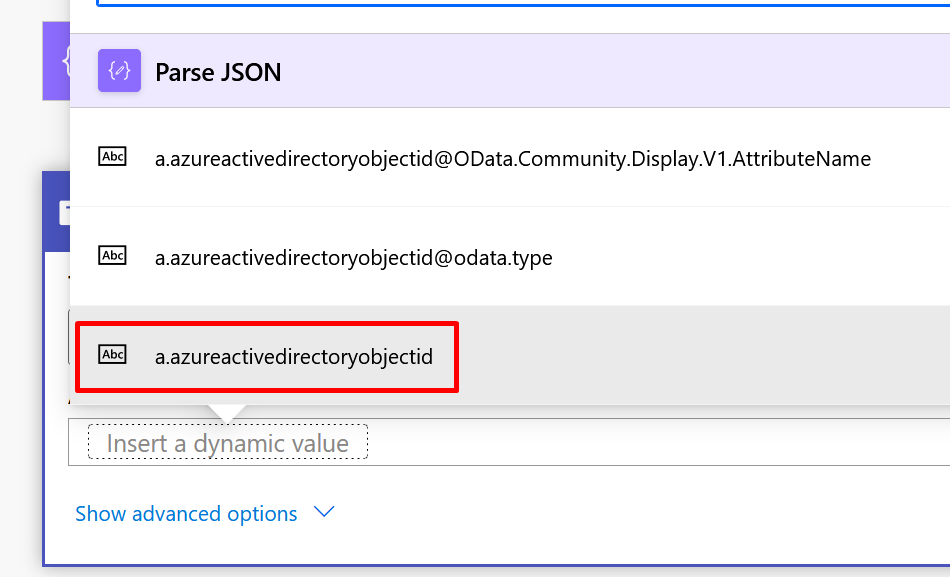
  7. As soon as you select from Parse, the Flow step will be converted to Apply to each. But that’s because we used List records which returns multiple values. Even though Apply to each is applied, this will logically run only once anyway!!
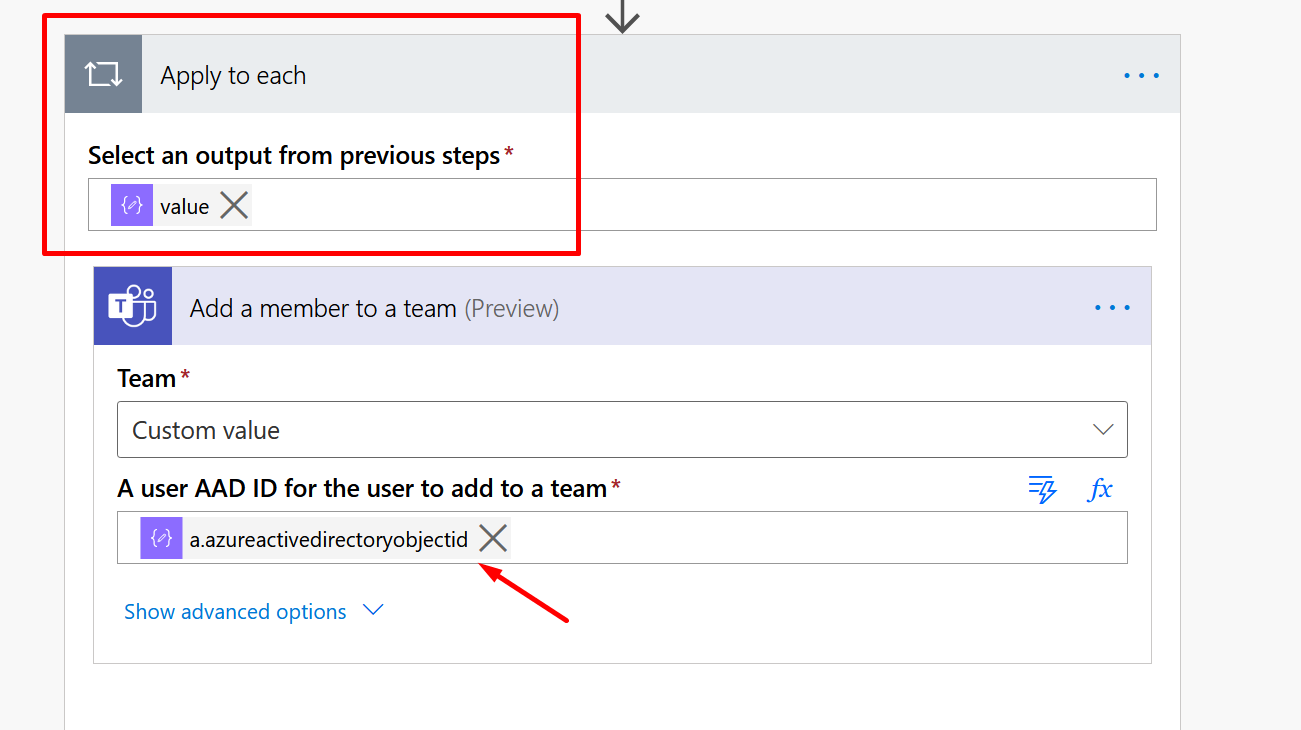
  8. Now in the user AAD

Working

Now’s let’s see all this in action.

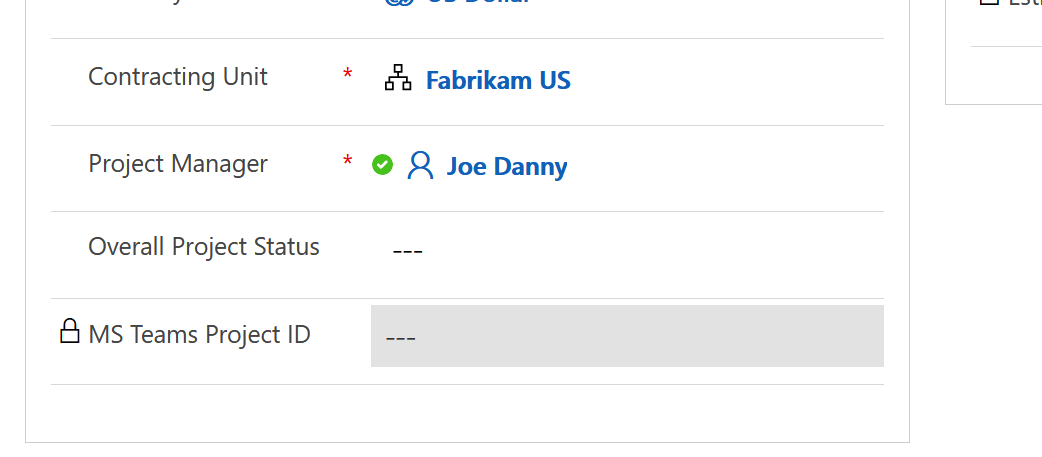
  1. Let’s create a Project in PSA. Notice I’ll enter the name and the Description since we are creating a Team in MS Teams and that’s what we are filling out. Notice that MS Teams Project ID is blank. Our Flow will populate that once a Team is created in Microsoft Teams.
    Notice that Joe Danny is the Project Manager on the Project, he will be the Owner of the Team we are creating in MS Teams as per our first Flow.


  2. A Team like this will be created in Microsoft Teams.

  3. Also, notice that in the Project in PSA, a MS Teams Project ID will be populated too.

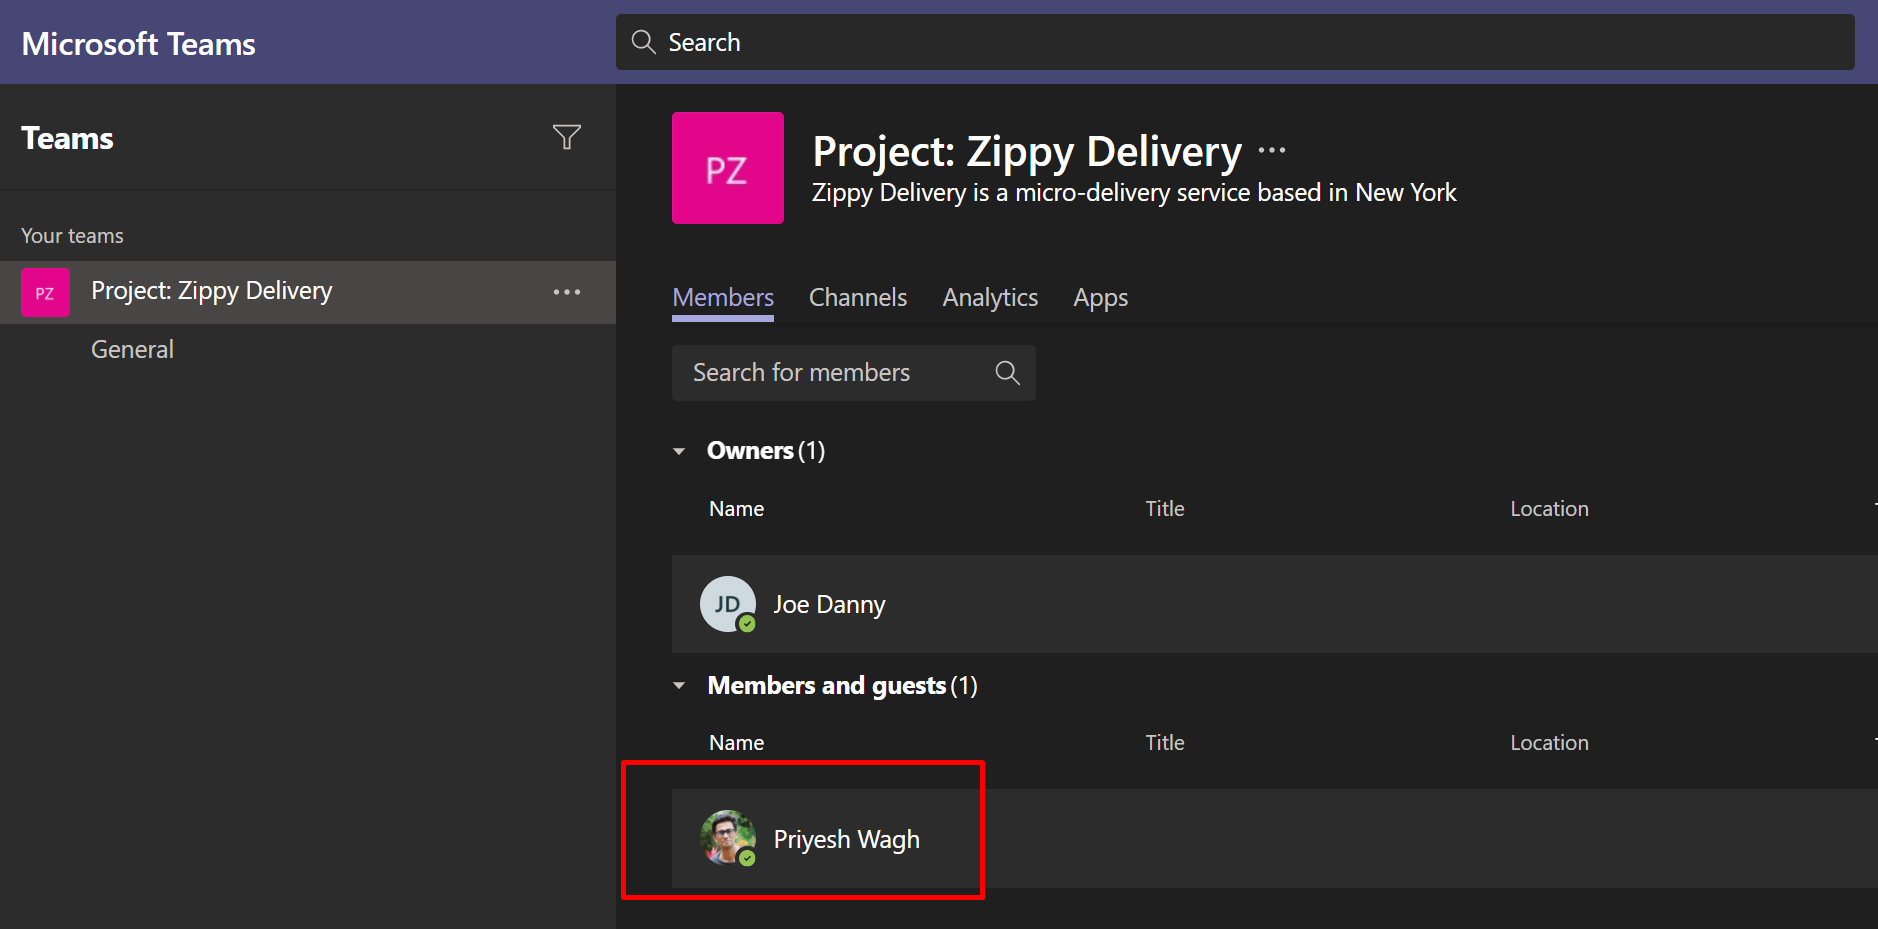
  4. Also, notice that Joe Danny is the Owner of the Team since Joe is the PM on the Project.

  5. Now, let’s add 1 more Team Members to the Project in PSA. Now, I’ve added a new Team Member Priyesh in the Project’s Team.
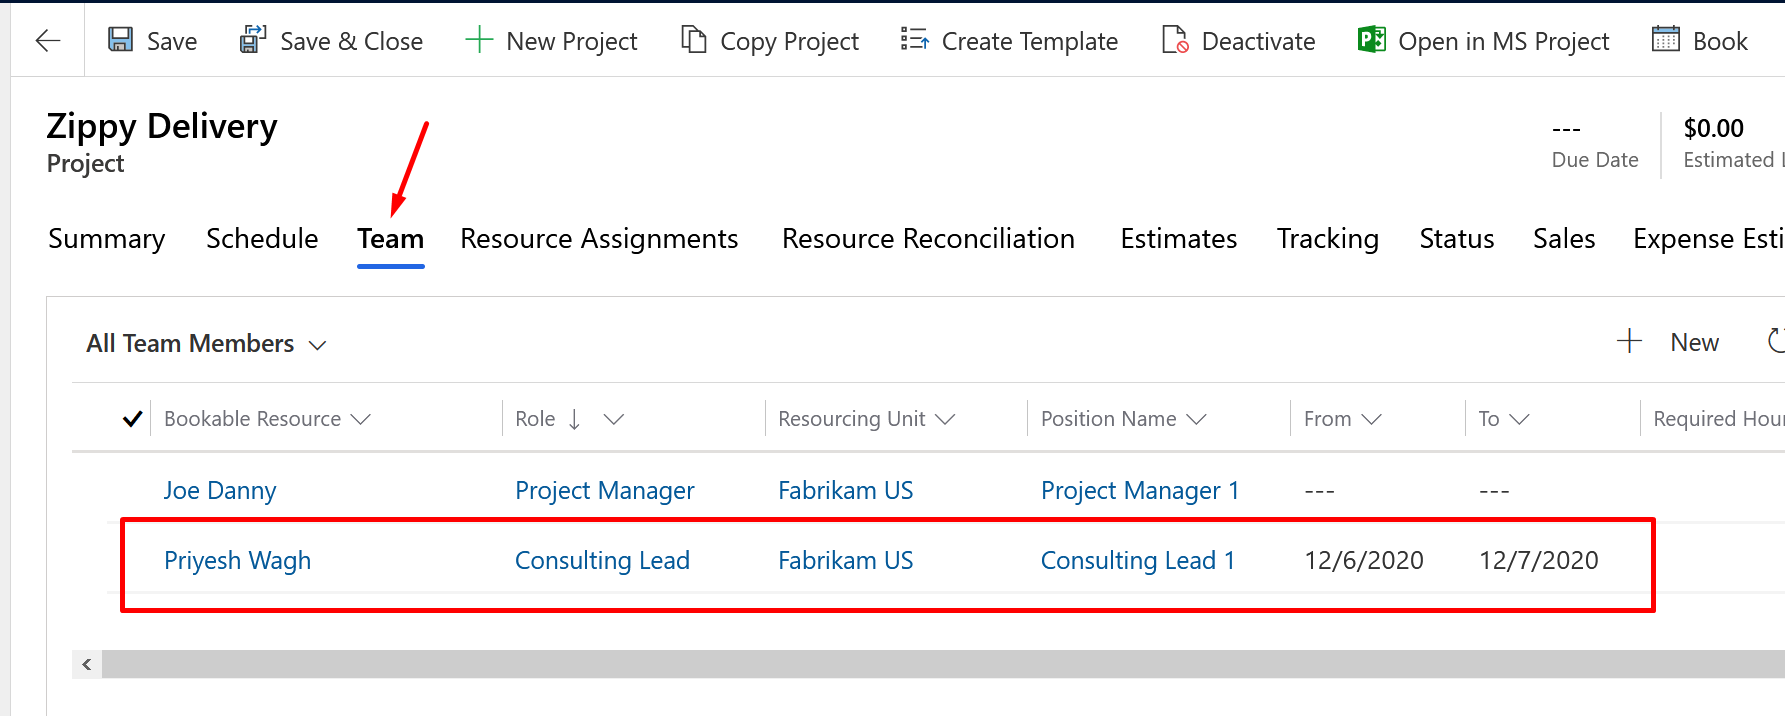

  6. That team member also get added as Members in Microsoft Teams in the Project’s Team. This is from out second Flow we created to add the Team Members to the created Teams for a PSA Project.

Here are some more enrichments you’ll need to do to handle some scenarios –

  1. Separately handle if a Project is Canceled/Deactivated for some reason.
  2. Remove Members from an MS Teams if they are removed from the Project.

Hope this was useful.

Here are some more posts about Project Service Automation (PSA) in Dynamics 365 / Microsoft Teams that might be helpful –

  1. Cancelled Bookings Imported in Time Entries in Dynamics 365 PSA issue | [Quick Tip]
  2. Task Completion reminder using Flow Bot in Microsoft Teams | Power Automate
  3. Change Booking Status colors on Schedule Board for Field Service/PSA [Quick Tip]
  4. Additional columns in PSA v3 Schedule view
  5. Check Managed Solution failures in Solution History in Dynamics 365 CRM
  6. Modify Project tab’s view in Schedule Board in PSA v3 | Quick Tip
  7. Update Price feature in D365 PSA v3
  8. A manager is required for non-project time entries, absence, and vacation error in D365 PSA v3
  9. Time/Expense Entry Rejection comments in D365 PSA v3
  10. PSA v3 View Custom Controls used on Project form

Thank you!!

Change Booking Status colors on Schedule Board for Field Service/PSA [Quick Tip]

Here’s a Quick Tip for everyone using Field Service and Project Service Automation. In case you are wondering how can you change the colors of the Booking Statuses on the Schedule Board for Field Service and PSA, here’s what you need to do.

Default Colors

This what your default Schedule Board looks like out-of-the-box.

Booking Statuses

Booking Status is an entity within which you can set this up.
You can navigate to Booking Statuses entity in your Field Service like below

There are these records you can modify. Also, for PSA, you have the same entity with different records for Booking Statuses
But, let’s look at Field Service’s example –

Now in each record, you can see in Common tab

And you can change by selecting this color picker control

And save the new selected color.

And let’s change for Completed as well, just another example – changed for Completed also to a greenish shade

Updated Colors

Now let’s look at the updated Schedule Board of how these colors look.

Hope this quick tip helps!

Here are some more PSA/Field Service posts you might want to look at –

  1. How to add Rating Values to Rating Models in D365 Field Service and PSA
  2. Why we see Cross Day in Work Hours on Bookable Resources/User?
  3. Modify Project tab’s view in Schedule Board in PSA v3 | Quick Tip
  4. Dynamics 365 PSA v2 to v3 Upgrade failed? Here’s what to do.
  5. Additional columns in PSA v3 Schedule view
  6. Update Price feature in D365 PSA v3
  7. A manager is required for non-project time entries, absence, and vacation error in D365 PSA v3
  8. Set Work Hours Template to a Bookable Resource in D365 PSA v3
  9. Booking Resources more than their capacity in D365 PSA v3
  10. PSA v3 View Custom Controls used on Project form

Thanks!

Dynamics 365 PSA v2 to v3 Upgrade failed? Here’s what to do.

This is a little tricky upgrade from PSA v2 to PSA v3. I’m sure by this time of the year, most of you must have upgraded and this post by me comes a little late than it should.

Here’s my experience and what help from Microsoft Support I needed to complete the Upgrade successfully.

So usually, this is what you expect when you initiate the upgrade process. You go to the Instance Picker from Dynamics 365 Admin Center.
upgradeButton

And you can see that you are on PSA v2.4.x version and the New version available is 3.10.x. When you kick off, it starts running
upgradeInProgress
But, it fails like this.
installFailed

Let’s take a stab at it!

I usually prefer to go with the old school classic Instance Picker, if you want to have a quick access to it, check this post – D365 Admin Center: Instance Picker Link

Solution Health Hub

Note: Please be aware that below mentioned steps that involve Project Service & Project Service Upgrade Rule Set can only be provisioned by Microsoft Support and we need to create a Support Request with Microsoft for them to provide this Rule Set. These comes in a Managed Solution Microsoft Support installs from their end into your environment.

  1. Assuming Microsoft Support has enabled this Rule Set for your organization, you can go to Solution Health Hub
    createNewAnalysisJob
  2. Then, select either Project Service or Project Service Upgrade
    ruleSet
  3. It will automatically run asynchronously as and when you create it. It should display results in a few moments.
    failedValidation
    In this case, my failures were that Resource Requirement records didn’t have Hours & Resources were not filled in. Some Project Tasks didn’t have Project attached to them which resulted in corrupted PSA data according to the Rule Set and hence, the upgrade fails.
  4. Now, in my case, I cleaned this data manually. Post that, I created another Analysis Job to ensure that there are no more failures.
    passedRuleSet
    Also, there’s another Rule that isn’t mentioned here but is a reason for failure. That is – Project Name (msdyn_Subject) should NOT be Blank. Use Advanced Find to find these records and correct manually.  Please ensure this manually as it won’t appear here. 
  5. Now, there’s a workflow called as Update User Work History. It should have shown 3.3 or higher in the version to select, unfortunately, this will come once the upgrade fails 1 time.
    oldWF
  6. Now, you are all set to kick off Upgrade Once again. It will fail due to the incorrect workflow mentioned above in #5.
    installFailed
  7. Now, you can go back and check that workflow, it should have the correct version appearing (due to the partial upgrade that happened in #6 above, which eventually failed)
    updateUserWorkHours
    Set this to 3.3 and Activate the workflow again.
  8. Now, trigger the Update to PSA v3 one more time. And this time it should go through correctly.
    installedPlease note, due to constant upgrades in the platform/PSA, there could still be some undetected issues which could result in failure. Hence, I tried to put what I experienced in general.

    Post this, also ensure that all SDK Message Process Steps and related Workflows related to PSA are enabled.

In case you are also looking to find out about dependencies about failed Solution Upgrades, you can check this post too – Check Managed Solution failures in Solution History in D365 CE

Hope this helps!

Update Price feature in D365 PSA v3

Typically, your costs for your clients go up by a certain percentage (%). It’s a standard practice to update the entire Price List consistently as and when there’s an increase.

This is a great feature to update the entire Price List by a defined % and then reflect this in the Estimates in your Project in PSA. Let’s take a look –

Scenario

Let’s say your original SalesPrice for a Developer role is $50
scenario1.png

And the same is reflected in the Estimates in a Project as well. Based on $50 for Developer i.e. resource Priyesh Wagh will spend 12 hours. So 12 * $50 for that week of 1st Dec is $600
originalSalesApplied.png


Updating Prices in Sales PriceList

Now, there’s an increase you want to apply. With just a simple change, you’ll be able to do so.

Assuming the PriceList in question here is SalesPriceListUS and you want to add a 10% increment to the same. Simply click on Update Prices button as shown below.
originalPrice.png
And specify the % of increment to be applied. Use Negative number to Decrease.
apply10
And there we go, a 10% to $50 is applied to all items as indicated.
scenario2

Update Price on Project’s Estimates

Similarly, to bring the change to the desired Project, look at the Estimates tab on the Project and click on Update Price button to effect the Prices on the table as well.
applyNew.png

And you’ll see the updated prices in Sales time-phase in the Project Estimates
updatedSalesApplied.png

Hope this helps!!

Set Work Hours Template to a Bookable Resource in D365 PSA v3

For all the newbies in D365 PSA, one of the most critical part of configuring PSA is setting up Bookable Resources with their respective Work Hours Template to define their Work Hours and Days they can be & should be booked.

By Default, if you create a Bookable Resource they have a 24-hour slot open to be booked.
Example, I created a new Resource Shailesh Wath. Specially, not the Timezone selected. This will define how the resource will appear on Schedule Board.
newResource.png

And if you open his Work Hours by clicking on Show Work Hours, you’ll see this (which isn’t defined).
calendarNotSet.png

And on the Schedule Board, Shailesh looks like this –

Available on All Days

allDays.png

And available on All Hours
allHours.png

Work Hours Template / Calendar Template

Simply put – Work Hours are defined Schedule based off a resource’s Work Hours that can be applied to other resources as well.
You can find the Work Hours under Settings > Calendar Templates
WHT.png

Firstly, any 1 users Work Hours need to be defined in order to be set as a Template to a Work Hours. In this case, the System User Priyesh Wagh‘s Work Hours will be applied to the India Work Hours in the Template created.
IndiaWHRecord.png

Assign Work Hours Template

Now, we are assigning Work Hours Template to Shailesh which have defined hours and defined days of the week.
So, under Bookable Resources, select the User and then click on Set calendar option.
setCalendar.png

In the window, I’ll select the Work Hours Template I wish to apply. India Work Hours in this case.
IndiaWH.png

And click Apply
clickApply.png

Work Hours Template will be applied with this message.
applied.png

Obviously, you can do this for multiple resources at one. 🙂

Applied Work Hours

Now, if you observe the Work Hours to the resource, you can see this (defined timings with holidays on weekends)
legitCalendar.png

And on the Schedule Board, you’ll see the Days are properly defined
holidays.png

And also the Hours (8am to 4pm work schedule)
definedHours.png

Hope this quick tip helps!

Import Time Entries in PSA from your Bookings in D365 PSA v3

Often, one of the real-life scenarios is making time entries by either remembering what you did the whole week or looking at the Schedule Board and based on what you were booked, making each Time Entry in PSA manually.

Tiresome and inefficient, right? Not any more, a cool feature let’s you just create Time Entries in PSA v3 by a single click.

Now, let’s say your Bookings look like the below. I’m booked on 2 projects across the week.

scheduleBoard

And now let’s see how we import these.

Import Time Entries

  1. Let’s see you want to make time entries now based on you Bookings in D365. On the Time Entries scree, drop down to the arrow besides Import.
    dropDown
  2. Select Resource Bookings. (Obviously, like this method – you can import from Resource Assignments and Outlook Sync too! But we will keep that for some other day)
    importFromBookings
  3. Then, you can select what all Time Entries should actually make it to the records. So you can select the ones you need and leave the rest.
    summaryOfImport
  4. Once you click on Import, it’s done! Time Entries are created.
    imported

Works like a breeze!

How to add Rating Values to Rating Models in D365 Field Service and PSA

Rating Models and Rating Values are attributed to Bookable Resources in Dynamics 365 PSA and Field Service. Out-of-the-box, there are 3 Rating Values – Familiar, Good & Proficient. But obviously, you want to customize to have your own.

This is a tricky change and this post will exactly describe before you end up doing something wrong.

If you think all you need to do is add a Rating Value to the Rating Model and save, it won’t work

addRating

Because when you do this, the Value field is locked and you can’t enter anything and just saving the record with the name of the Rating Value will result in the error as shown below

errorWhenDirect

Update Max Rating on Rating Model

So, the right way to do it is to update the Max Rating Value on the Rating Model record.

updateMaxRating

As soon as I save the record, see the an additional Rating Value appears. And in fact, these are the new records that were created when you updated the Max Rating Value and not that the old ones were renamed to ‘Enter rating label here…’

newLabelsToEnter

Note: You can simply enter the record and update all the Ratings inside to the corresponding values.

What happens to existing Ratings used for Resources?

They are all there but have been deactivated, if you query all the Rating Values as is, you’ll see the ones created due to the change we did above and the ones that already existed were suffixed with “[Inactive]” label. See below –

newlyCreated

Well, since these are all the new records created, the old ones are ‘Deactivated‘. What remains with the existing Bookable Resource Characteristics records are the Inactive ones.

inactiveAssigned

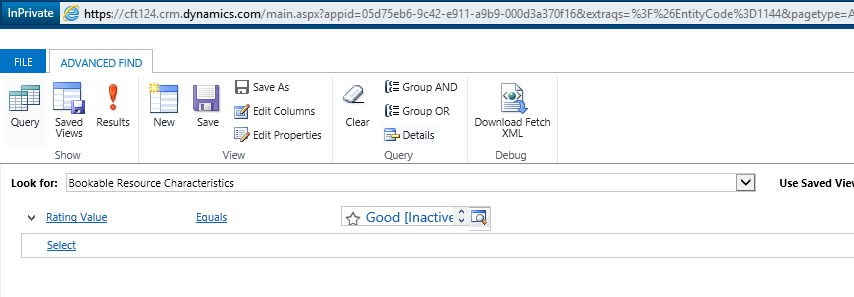
To update these, you can do a simple Advanced Find by querying one of the inactive Rating Values and updating them using Bulk Edit to set the new one.

  1. Query the inactive ones
    queryInactive
  2. And simply Bulk Edit to update the Inactive ones
    bulkEditInactive

By the way, if you want to Bulk Clear and start fresh, you can check my blog on Bulk Clearing fields using Advanced Find here – D365 Quick Tip: Bulk Clear field values

Hope this helps you!


D365 PSA: Restrict Project access only to their Project Managers

Out-of-the-box PSA’s Project Manager security role provides complete access to even other Project Managers. But then, what if you want to bring down the access of the Project Managers to their own Projects only?

Remember, access in D365 PSA is provided for Owner (ownerid) field and not Project Manager (msdyn_projectmanager) field.

PSARoleRestrict

Scenario

Now, I don’t want a Project Manager to have access to others Projects and looks like this can’t be controlled from the Security Level perspective, given the Project Manager is a separate field than Owner of the Project.

So, I’ll limit the access to only the User level (the one who created the record would have the access, obviously)

PSARoleRestrict2

But this remove the access from even the Project Managers since they don’t own the Projects. To overcome this, I’ve written a simple plugin to provide access to the Project Manager whenever they are updated by Sharing and giving PMs the access.

For this, I’ve written a plugin code that will grant all permissions to the Project Manager of that Project and I would like to share this with you all to consume it.

GitHub Project

Here’s the GitHub repository I’ve created which has the plugin code and the Unmanaged Solution that contains only the plugin assembly and the registered step –

Link: D365PSA-PMAccessRights

gitProj

The D365 Unmanaged Solution resides here –

unmanagedSoln

This will work in the following scenarios –

  1. When a Project Manager is changed from Person A to Person B, the access rights of Person A will be removed and granted to Person B.
  2. You can even create a trigger field and use an on-demand workflow to set the trigger. This trigger should be included in the filtering attributes of the plugin step to update the existing records.

This will provide access to the Project Manager of the Project automatically apart from the Owner so that they see/access only Projects that concern them
accessGiven

Make sure no other security role is overriding your restricted access.

Hope this helps! 🙂

D365 PSA Quick Tip: Sync Resource Bookings with Outlook

You as a resource in an Organization are booked on projects. But are also needed to be in some meetings. But what if, someone who wants to invite you to a meeting needs to know if you’re booked on a Project/Task in D365?

In that case, Syncing your Bookings to Outlook Calendar comes handy.

Let’s say, most commonly in a Technical Services Industry where users are supposed to work on projects and they should appear as booked so that others don’t drag them to other meetings. 😊

Remember, Server Side Synchronization should be turned on for the user on their mailbox to be able to use this feature.


Enable Sync Resource with Outlook Feature

  1. In System Settings, navigate to Synchronization tab and enable Synchronize resource bookings with Outlook as shown below.
    enableSystemSettingLevel
  2. Personal Settings – The same needs to be done for an individual user on their Personal Settings in D365.
    personalSettingEnable

Bookings in PSA now appear in Outlook

Now, example, Priyesh is booked on Home Link Piping project on Monday, 3rd December and this is how the schedule board looks like this
scheduleBoard

As the sync happens, the Bookings will now show up in the user’s Outlook Calendar.
syncedToCalendar

Please note that Server Side Sync can take up to 15 mins to sync through as per the minimum sync cycle duration.

Hope this helps!

D365 PSA: Delegated Resource gets error on making time entries for another Resource

Have you been added as a Delegate for a fellow colleague but not able to Read, Create or Submit Time Entries on their behalf?

Let’s see what you are missing.

Before that, if you want to learn about Delegations in D365 PSA, check this Delegating Time Entries in PSA

Scenario

William Contoso wants to make Veronica Quek as his Delegate and let her enter time on his behalf. So William created a Delegate record for Veronica.
delegateAdded

Error for the Delegate Resource

Now, Veronica is attempting to do time entries for William by going to Time Entry Calendar view and switching the user to William.

  1. And when Veronica wants to enter time as William, she’d switch to the User on the Time Entries Calendar View like this –
    switchUser
  2. But, see this error and she don’t know what the issue might be. Even though she’s the Delegate!
    error

Missing Security Role

Yes, this is the first thing you should check

  1. Veronica Quek is missing a Delegate Security Role in PSA to be able to make time entries on behalf of other users.
    Assign Delegate security role to the user to make them enter time on behalf of others.
    securityDelegate

Hoping this is quick fix for you. 🙂