Currency and Exchange Rate fields in a Dynamics 365 CRM entity | [Quick Tip]

Ever noticed why some entities have Currency (transactioncurrencyid) and Exchange Rate (exchangerate) fields and some don’t? Here’s why –

Default Scenario

Here’s what you see when you create a new custom entity –

  1. By default, if you notice – there are not Currency or Exchange Rate fields in this newly created custom entity.

When Currency and Exchange Rate fields are created?

So, here’s when the Currency and Exchange Rate fields are created –

  1. When you create your first Currency type of field in the entity as show below, the Exchange Rate (exchangerate) and Currency (transactioncurrencyid) fields are created in the entity –

  2. That’s why you see Currency and Exchange Rate fields in some entities and not in all.

Hope this quick tip helps you in some way!

Thank you!

Fiscal Year Settings in Dynamics 365 CRM

You or your customers might be in different geographies which need their Sales cycle to follow their respective Fiscal Year (or Financial Year).
Here’s how you setup Fiscal Year settings in your Dynamics 365 Sales CRM and how you can see data accordingly –

Fiscal Year Settings

Promoting use of Power Platform Admin Center, here’s how you can set your Fiscal Year settings from PPAC –

  1. Go to the Settings of the environment.

  2. In Settings, expand Business section and then select Calendar.

  3. It’ll open the Fiscal year settings in a new Tab.

  4. If you are still using the Classic UI in CRM, you need to go to the Business Management area in Settings from the navigation menu.

  5. And there, you’ll find the Fiscal Year Settings

  6. And it’ll open the same Fiscal Year settings dialog.

  7. Now, you can set a prior date to where a new Fiscal Year starts, in the below example, Indian Fiscal Year starts from 1st Apr, so – I’ve set this to 1st Apr 2022. And the Fiscal periods are Quarterly.

  8. Once you click OK, the Fiscal Year will be considered from 1st April. All he subsequent quarters and fiscal year end will be set which will help you see data accordingly.

Viewing Sales Data

Based on the Settings for Fiscal Year set above –

  1. Now, here are all the Won Opportunities.

  2. If you look at Won Opportunities and filter for a particular Fiscal Period (Quarter)
    You’ll see the below Opportunities closed in the current quarter.
    I’ll add a Filter here to show the current Fiscal Period.


    You’ll see data only for current Quarter –

  3. If you select, Fiscal Year (Fiscal Year starting from 1st Apr to 31st Mar), it’ll show the below data.


    And for this Fiscal Year, you’ll see Opportunities closed post 1st Apr 2022.

  4. Similarly, Last Fiscal Year will show data from prior to 1st Apr.


    It’ll show you the Opportunities closed prior to 1st Apr 2022.

  5. Additionally, you also have options to filter for last X Fiscal Period/Year

Hope this helps in setting correct Fiscal Year settings to see correct Sales data.

Hope this was useful!

Here are some Power Automate posts you want to check out –

  1. See Trigger Outputs using Edit Columns in Flow Runs | Power Automate [Quick Tip]
  2. Adding Image field on the form in Dynamics 365 CRM | Power Platform Modern Form Designer [Quick Tip]
  3. Blocking Attachment Extensions in Dynamics 365 CRM
  4. Upgrade Dataverse for Teams Environment to Dataverse Environment
  5. Showing Sandbox or Non Production Apps in Power App mobile app
  6. Create a Power Apps Per User Plan Trial | Dataverse environment
  7. Install On-Premise Gateway from Power Automate or Power Apps | Power Platform
  8. Co-presence in Power Automate | Multiple users working on a Flow
  9. Search Rows (preview) Action in Dataverse connector in a Flow | Power Automate
  10. Suppress Workflow Header Information while sending back HTTP Response in a Flow | Power Automate
  11. Call a Flow from Canvas Power App and get back response | Power Platform\
  12. FetchXML Aggregation in a Flow using CDS (Current Environment) connector | Power Automate
  13. Parsing Outputs of a List Rows action using Parse JSON in a Flow | Common Data Service (CE) connector
  14. Asynchronous HTTP Response from a Flow | Power Automate
  15. Validate JSON Schema for HTTP Request trigger in a Flow and send Response | Power Automate
  16. Converting JSON to XML and XML to JSON in a Flow | Power Automate

Thank you!

Adding custom fields to Opportunity Close form in Dynamics 365 CRM

Here’s how you can add your custom fields on the Opportunity Close form!!

It ends up being a Quick Create form instead of a modal dialog box. Let’s look at how we can enable this simple setting.

App Settings in Sales Hub

Here’s how you can enable having custom field on the Opportunity Closing form –

  1. Navigate to the SiteMap where you can change the area to App Settings.

  2. Then, navigate to Leads + Opportunity management and look for Opportunity Closing sub-menu. There’s you’ll find the option about Opportunity Closing.

  3. When this is turned OFF, you’ll see the usual Opportunity Closing form as below –


    And using the close buttons will show you the usual Opportunity Close form.

  4. You can turn this setting ON.

Adding Custom fields to Closing Opportunity form

Here’s how you can now add customer fields to the Opportunity Closing form once you’ve turned this setting ON in the App Settings area.

  1. You can look for the Opportunity Close Quick Create Form in the Customization.

  2. Then, navigate to the Opportunity Close Quick Create form.


  3. In the Opportunity Close form, you can then add your custom fields you might have created in the Fields of Opportunity Close entity.


    And when you Close the Opportunity, you’ll see a Quick Create form instead of the usual modal dialog box.

  4. So, you can just Save and Close like a usual record and the Opportunity itself will be closed.

Hope this was useful!

Here are some Power Automate posts you want to check out –

  1. Blocking Attachment Extensions in Dynamics 365 CRM
  2. Upgrade Dataverse for Teams Environment to Dataverse Environment
  3. Showing Sandbox or Non Production Apps in Power App mobile app
  4. Create a Power Apps Per User Plan Trial | Dataverse environment
  5. Install On-Premise Gateway from Power Automate or Power Apps | Power Platform
  6. Co-presence in Power Automate | Multiple users working on a Flow
  7. Search Rows (preview) Action in Dataverse connector in a Flow | Power Automate
  8. Suppress Workflow Header Information while sending back HTTP Response in a Flow | Power Automate
  9. Call a Flow from Canvas Power App and get back response | Power Platform\
  10. FetchXML Aggregation in a Flow using CDS (Current Environment) connector | Power Automate
  11. Parsing Outputs of a List Rows action using Parse JSON in a Flow | Common Data Service (CE) connector
  12. Asynchronous HTTP Response from a Flow | Power Automate
  13. Validate JSON Schema for HTTP Request trigger in a Flow and send Response | Power Automate
  14. Converting JSON to XML and XML to JSON in a Flow | Power Automate

Thank you!

Add Post Configuration and Post Rule Configuration entities in D365 Sales Hub Settings

In case the Post Configuration (msdyn_postconfig) and Post Rule Configuration (msdyn_postruleconfig) are missing in your Sales Hub SiteMap, here’s how you can add them somewhere in the Settings area in the SiteMap –

Like this, the Post entities don’t exist by default in the expected App Settings area and in fact are present in the default classic Settings are in Dynamics 365 CRM


Add Entities to the App

First, you’ll need to add the Entities to the Sales Hub app since they don’t appear by default –

  1. In editing Components in the App, search for the Post Configuration (msdyn_postconfig) and Post Rule Configuration (msdyn_postruleconfig)
    Tick them and then Save so that you can later add them to SiteMap.
    Add the Post Configuration (msdyn_postconfig) entity.


    And Post Rule Configuration (msdyn_postruleconfig)

  2. Once both of them have been checked, Save and then add them to the Settings area. Probably create a new Area and then add these 2 entities in them.

  3. Save and Publish the SiteMap changes too and refresh the Sales Hub App.

Hope this was useful!

Here are some Power Automate posts you want to check out –

  1. Blocking Attachment Extensions in Dynamics 365 CRM
  2. Upgrade Dataverse for Teams Environment to Dataverse Environment
  3. Showing Sandbox or Non Production Apps in Power App mobile app
  4. Create a Power Apps Per User Plan Trial | Dataverse environment
  5. Install On-Premise Gateway from Power Automate or Power Apps | Power Platform
  6. Co-presence in Power Automate | Multiple users working on a Flow
  7. Search Rows (preview) Action in Dataverse connector in a Flow | Power Automate
  8. Suppress Workflow Header Information while sending back HTTP Response in a Flow | Power Automate
  9. Call a Flow from Canvas Power App and get back response | Power Platform\
  10. FetchXML Aggregation in a Flow using CDS (Current Environment) connector | Power Automate
  11. Parsing Outputs of a List Rows action using Parse JSON in a Flow | Common Data Service (CE) connector
  12. Asynchronous HTTP Response from a Flow | Power Automate
  13. Validate JSON Schema for HTTP Request trigger in a Flow and send Response | Power Automate
  14. Converting JSON to XML and XML to JSON in a Flow | Power Automate

Thank you!

Edit Settings SiteMap in classic Dynamics 365 CRM UI | [Quick Tip]

Now that we are moving everything to the Unified Interface across all Apps in Dynamics 365 CRM, in case you still need to edit the old Settings area in your SiteMap in the Dynamics 365 CRM classic UI.

Here’s how to find the

Edit Old Settings SiteMap in class

Here’s how you edit the classic Settings area in your classic UI in Dynamics 365 CRM. It’s presumed you are a System Administrator / System Customizer –

  1. Create a blank Solution and save it.
    Then, click on Components on the left hand menu and then Add Existing as you used to previous do to add different components in the solution.
    Then, select SiteMap.

  2. Then, look for the SiteMap which doesn’t have any App Name written next to it.

  3. Now, you can see the Settings area which you can modify, Save and Publish your changes.

Hope this was useful!

Here are some Power Automate posts you want to check out –

  1. Blocking Attachment Extensions in Dynamics 365 CRM
  2. Upgrade Dataverse for Teams Environment to Dataverse Environment
  3. Showing Sandbox or Non Production Apps in Power App mobile app
  4. Create a Power Apps Per User Plan Trial | Dataverse environment
  5. Install On-Premise Gateway from Power Automate or Power Apps | Power Platform
  6. Co-presence in Power Automate | Multiple users working on a Flow
  7. Search Rows (preview) Action in Dataverse connector in a Flow | Power Automate
  8. Suppress Workflow Header Information while sending back HTTP Response in a Flow | Power Automate
  9. Call a Flow from Canvas Power App and get back response | Power Platform\
  10. FetchXML Aggregation in a Flow using CDS (Current Environment) connector | Power Automate
  11. Parsing Outputs of a List Rows action using Parse JSON in a Flow | Common Data Service (CE) connector
  12. Asynchronous HTTP Response from a Flow | Power Automate
  13. Validate JSON Schema for HTTP Request trigger in a Flow and send Response | Power Automate
  14. Converting JSON to XML and XML to JSON in a Flow | Power Automate

Thank you!

OAuth 2.0 URL for Dynamics 365

If you are new to using connecting to Dynamics 365 using OAuth 2.0, here’s an Auth URL you’ll need for your external applications / Postman testing of Web APIs in Dynamics 365 CRM.

URL for OAuth2.0 for Dynamics 365 CRM

The URL is: https://login.microsoftonline.com/common/oauth2/authorize?resource=[URL of the D365 Environment]

In the square brackets, you can put the URL of your Dynamics 365 CRM environment itself like shown below –

And then the URL should be: https://login.microsoftonline.com/common/oauth2/authorize?resource=https://cft158.crm.dynamics.com/

Hope this was helpful! Here are some more Dynamics 365 posts which you might be interested in –

  1. Dynamics 365 Storage Utilization | Dataverse Storage | Power Platform Admin Center
  2. Use Hierarchy in Roll Up Fields in Dynamics 365 CRM
  3. Filter records in a View owned by a Team you are a member of | Dynamics 365 CRM
  4. Get GUID of the current View in Dynamics 365 CRM JS from ribbon button | Ribbon Workbench
  5. Dynamics 365 App For Outlook missing on SiteMap in CRM? Use shortcut link [Quick Tip]
  6. Import lookup referencing records together in Dynamics 365 CRM | [Linking related entity data during Excel Import]
  7. Mailbox Alerts Hide/Show behavior in Dynamics 365 CRM
  8. Excel Importing Notes (Annotation) entity in Dynamics 365 CRM
  9. Enable/Disable the need to Approve Email for Mailboxes in Dynamics 365 CRM CE
  10. Call Azure Function from Dynamics 365 CRM using Webhooks
  11. Show Ribbon button only on record selection in Dynamics CRM
  12. Accessing multiple occurrences of a field in Business Process Flow using JS in D365 CRM

Thank you!!

Download Plugin Registration Tool for Dynamics 365 CRM using PowerShell

If you are new to plugin development, you must’ve learnt by now that you’ll need to download and install a Plugin Registration Tool in order to register your plugin with the Dynamics 365 environment you are working on.

In case you are on your own and someone hasn’t given you the zip file already, here’s how you can start from scratch. 😊

Download Plugin Registration Tool using PowerShell

Here’s how you start from the very beginning.

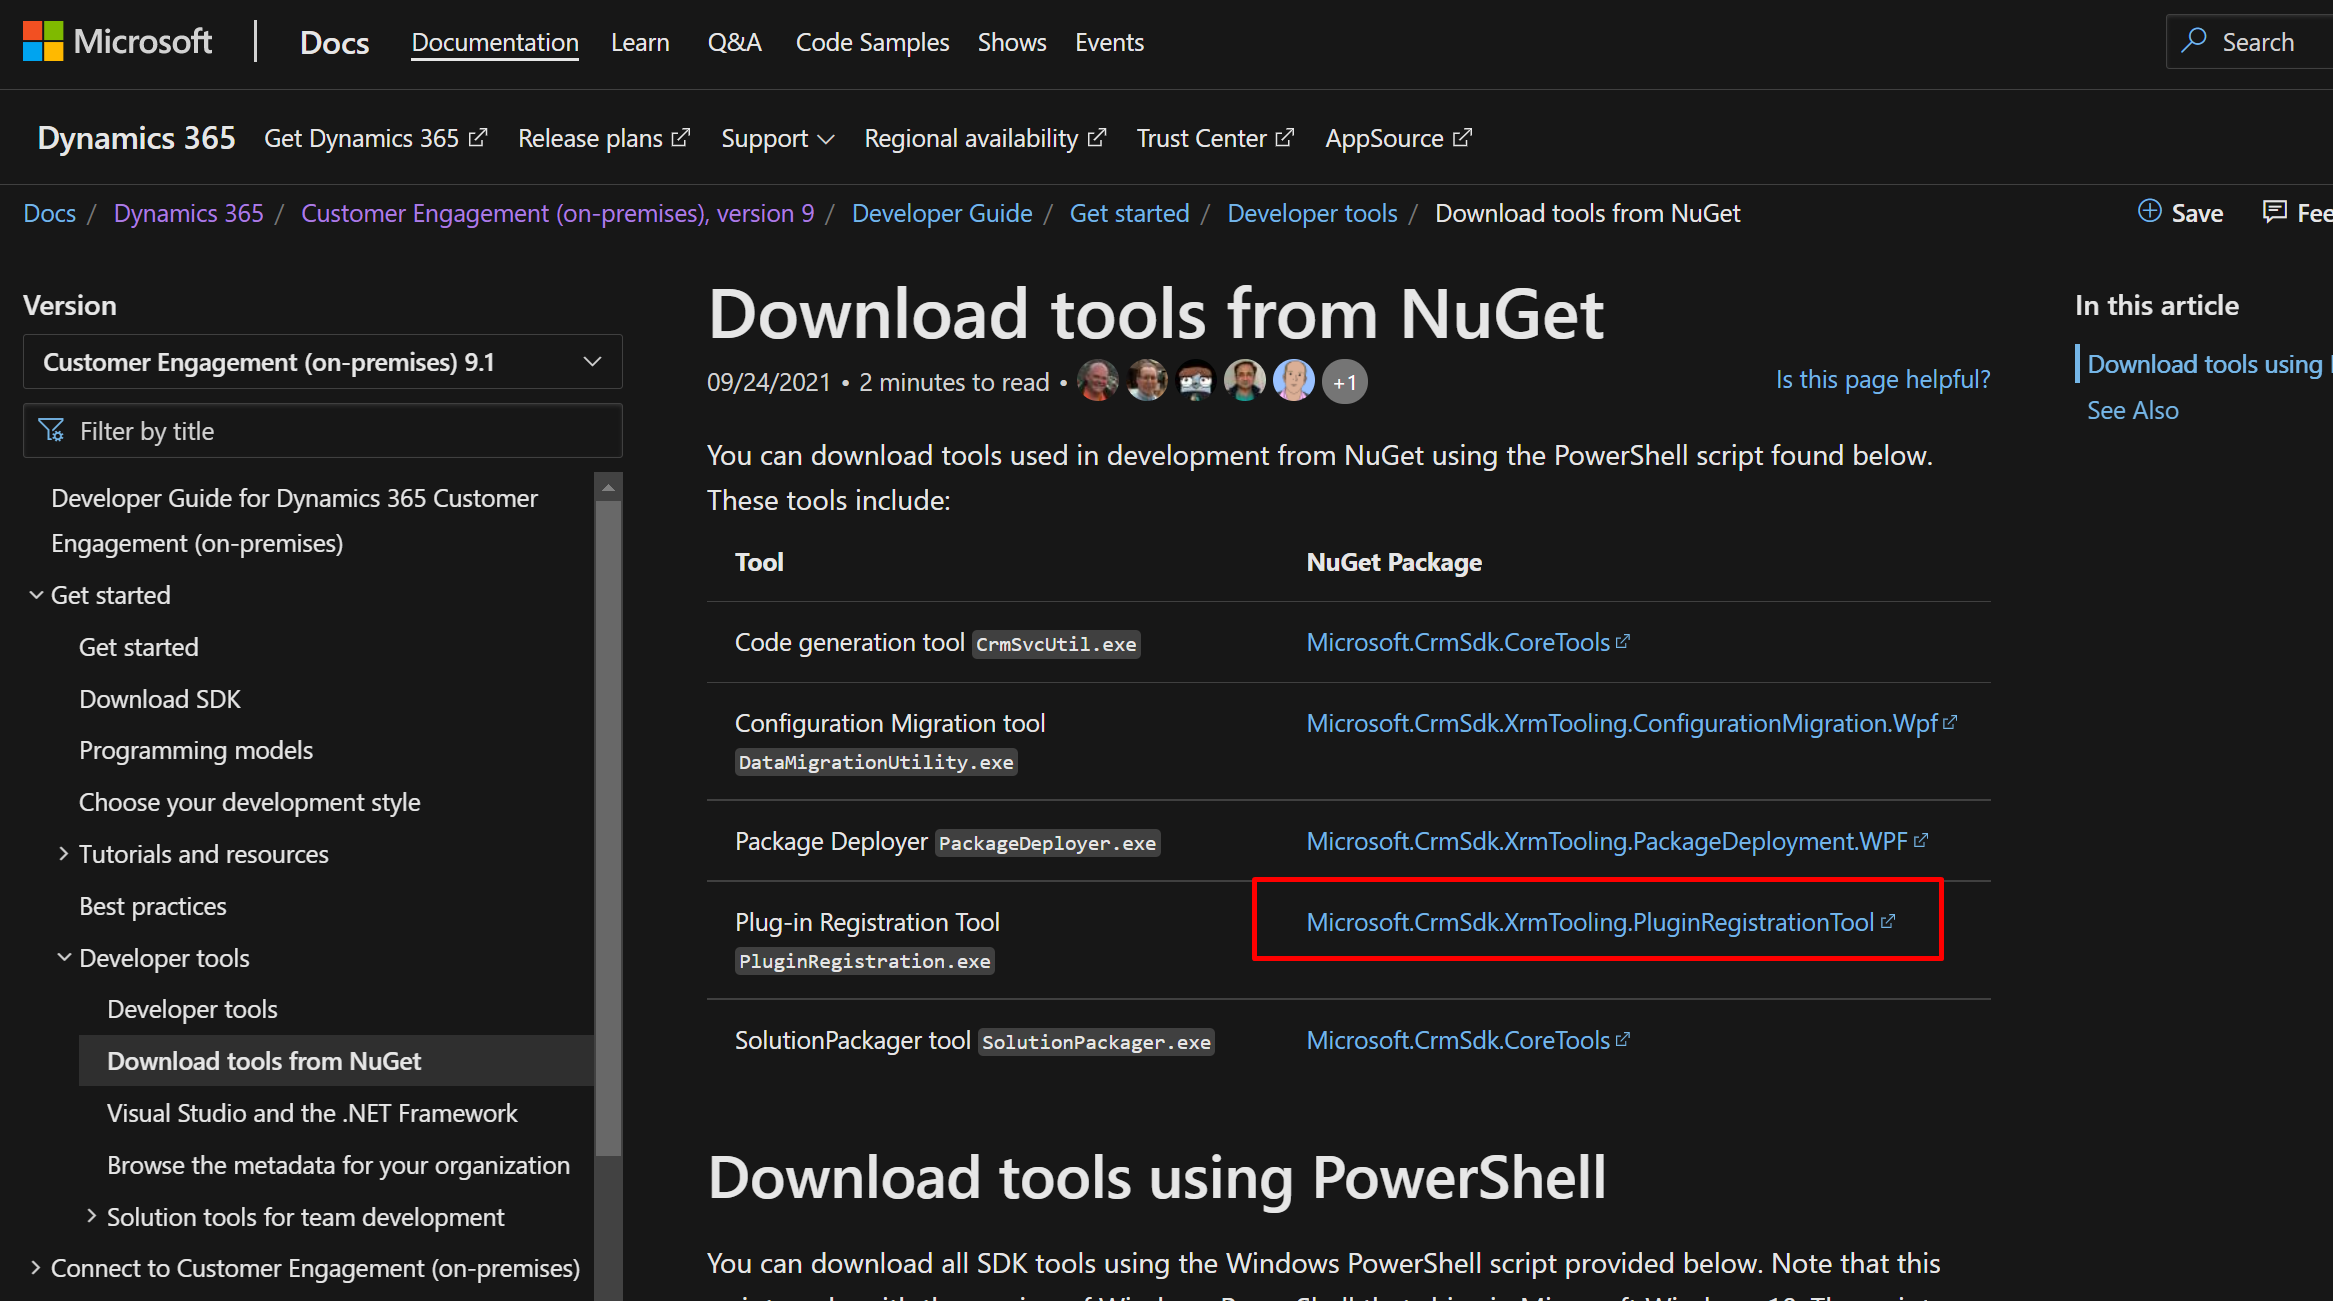
  1. If you do a quick Google Search, you might find someone must’ve already uploaded a Plugin Registration Tool somewhere, but in case you want to get it from Microsoft’s official website, here’s the link to Microsoft Docs – https://docs.microsoft.com/en-us/dynamics365/customerengagement/on-premises/developer/download-tools-nuget?view=op-9-1&viewFallbackFrom=op-9-1%3FWT.mc_id%3DDX-MVP-5003911
    Then, you can directly navigate to the Plugin Registration Tool segment by clicking on the highlighted link below


  2. In Plugin Registration Tool, you can simply click on the Download Package button


    This file Nuget file will be downloaded to your machine –

  3. Now, open PowerShell in Admin mode –

  4. Now, write the below code in PowerShell [Make sure you are pointing to the directory where you want to install the Nuget.exe]
    [Net.ServicePointManager]::SecurityProtocol = [Net.SecurityProtocolType]::Tls12 $sourceNugetExe = "https://dist.nuget.org/win-x86-commandline/latest/nuget.exe" $targetNugetExe = ".\nuget.exe" Remove-Item .\Tools -Force -Recurse -ErrorAction Ignore Invoke-WebRequest $sourceNugetExe -OutFile $targetNugetExe Set-Alias nuget $targetNugetExe -Scope Global -Verbose

    It’ll look like this when you type and press Enter, after a few moments when it’s completed downloading, you’ll be in the below state –

  5. Now, Microsoft Docs article above lists the PS Script to download all the Tools, but from that, if you want to only Download Plugin Registration Tool for now, that’s fine! You can just write the below PS Script and leave the rest –

    PS Script for Plugin Registration Tool only –
    ## ##Download Plugin Registration Tool ## ./nuget install Microsoft.CrmSdk.XrmTooling.PluginRegistrationTool -O .\Tools md .\Tools\PluginRegistration $prtFolder = Get-ChildItem ./Tools | Where-Object {$_.Name -match 'Microsoft.CrmSdk.XrmTooling.PluginRegistrationTool.'} move .\Tools\$prtFolder\tools\*.* .\Tools\PluginRegistration Remove-Item .\Tools\$prtFolder -Force -Recurse


    And when you press enter, it’ll setup the same and this will be your completed state –

  6. And you are done! Plugin Registration Tool has been downloaded
    And since we only Downloaded the Plugin Registration Tool and nothing else, only Plugin Registration Tool folder will be seen

  7. And here’s your Plugin Registration Tool


Hope this was helpful! Here are some more Dynamics 365 posts which you might be interested in –

  1. Dynamics 365 Storage Utilization | Dataverse Storage | Power Platform Admin Center
  2. Use Hierarchy in Roll Up Fields in Dynamics 365 CRM
  3. Filter records in a View owned by a Team you are a member of | Dynamics 365 CRM
  4. Get GUID of the current View in Dynamics 365 CRM JS from ribbon button | Ribbon Workbench
  5. Dynamics 365 App For Outlook missing on SiteMap in CRM? Use shortcut link [Quick Tip]
  6. Import lookup referencing records together in Dynamics 365 CRM | [Linking related entity data during Excel Import]
  7. Mailbox Alerts Hide/Show behavior in Dynamics 365 CRM
  8. Excel Importing Notes (Annotation) entity in Dynamics 365 CRM
  9. Enable/Disable the need to Approve Email for Mailboxes in Dynamics 365 CRM CE
  10. Call Azure Function from Dynamics 365 CRM using Webhooks
  11. Show Ribbon button only on record selection in Dynamics CRM
  12. Accessing multiple occurrences of a field in Business Process Flow using JS in D365 CRM

Thank you!!

Single record and multiple record auditing in Dynamics 365 to Audit record access | M365 Compliance

One of the most important asks for organizations who are sensitive about tracking their data is – Which records are accessed by the user?
There’s a powerful tool in Compliance Center i.e. Audit that can record this as to when a certain D365 record was accessed and all the details about the same.

What is recorded?

Single record – Only access to Dynamics 365 record opening will be audited/captured.

Multiple record – Access to Dynamics 365 record as well as other controls that were in context of the record like sub-grid controls, timeline controls etc. will be audited/captured.

Pre-requisites

  1. The User whose D365 Record Opening activities are to be logged must either have a O365 / M365 Enterprise E3 / E5 License assigned to them.

  2. The environment should be a Production one.


Turn on Recording of Audit (Dynamics 365 & M365 Compliance Center)

Now, to be able to record Auditing of User Record Access, you’ll need to make sure the Auditing is turned ON at these places –

  1. In Dynamics 365, make sure the Auditing is turned ON at the Global Level and that Audit Read Access is enabled too.


  2. Next, make sure the entity’s whose record access you want to capture should have their Auditing as well as Single and/or Multiple Record Access Auditing turned ON as well.


  3. Now, the M365 Admin Center (https://compliance.microsoft.com/) should also be enabled for recording the Audit of User access. This will start recording User and Admin Activity.


    It’ll ask for confirmation and then start updating. In my experience, this failed a few times and I wasn’t able to know for sure when it actually got enabled.


    Then, it takes a few moments


    In my case, this resulted in an error.
    Now, I’m not sure if I missed anything although I made sure everything was correct. And when I checked after some time, it was enabled even without me retrying it. But it could just be for me and might work correctly for you.


Recording of Auditing

Let’s test a scenario where a User is not an Admin User and they try to access the Account record on which we’ve enabled Single and Multiple User Access Auditing –

Please note that it takes about 3-4 hours to the log information to be available in (https://compliance.microsoft.com/homepage)

  1. Now, if you navigate to Audit and search.


  2. Make sure your criteria is as narrow as possibly by including only the user you really want to find if that’s the case
    In my scenario, I was logged in as Priyesh Wagh user and opened a record in CRM.

    So, just to look at what all was logged, my search criteria will look like this –
    I’ll make sure All Dynamics 365 Activities is selected if you want to look at everything which is D365 CRM related.


  3. Next, since I’m only looking for my own user who opened the CRM record, I’ll search and select the user in the below filter.
    Not to mention the time frame is also narrowed to get limited results. 😊


  4. Here, my results will show up.


    If I zoom on in, I’ll see the different types of logs that are filed in the Compliance Center – The retrieve Account is the actual record where all the other events are registered based on the different controls that were loaded when I opened the record itself.
    In my experiment, I opened the same record twice, so it recorded the Retrieve account twice along with other event logs.


  5. If I open the record, I’ll see this info about everything that was tracked along with the link to the record as well –

You can refer the full Microsoft Docs reference – https://docs.microsoft.com/en-us/power-platform/admin/enable-use-comprehensive-auditing?WT.mc_id=DX-MVP-5003911

Hope this summary was useful!

Here are some more Dynamics 365 Administrator related posts you might want to check –

  1. Enable Plug-in Profiler in Settings area in SiteMap in Dynamics 365 | [Quick Tip]
  2. Disable Recent Records from Dynamics 365 Lookup Control | Model-Driven Apps [Quick Tip]
  3. Language format for Whole Number field in Dynamics 365 CE
  4. Custom Help Pages and Guided Tasks for Unified Interface in Dynamics 365
  5. Make Managed fields Required in Dynamics 365 – Managed Properties Error [Workaround] | D365 CE Quick Tip
  6. Sign up for a Dynamics 365 Project Operations (Lite Deployment) environment and provision a new instance | Power Platform
  7. Show custom ribbon button based on Security Role of the logged in User in Dynamics 365 | Ribbon Workbench in XrmToolbox
  8. Filter records in a View owned by a Team you are a member of | Dynamics 365 CRM
  9. Duration field in Dynamics 365 converts Hours value to Days in Dynamics 365 | [Flow Workaround to convert in Hours and Mins]
  10. Form Access Checker in new Power Apps Form Designer | Model-Driven Apps in Dynamics 365

Thank you!

Enable Plug-in Profiler in Settings area in SiteMap in Dynamics 365 | [Quick Tip]

In case you are wondering why Plug-in Profiles under Extensions and Extensions itself don’t appear in your SiteMap because you want to debug from the Persist To Entity option?

But your Settings area still looks like this and don’t see Plugin-Profiles?

Install Plugin Profiler

You’ll need to install Plugin Profiler.

  1. Open Plugin Registration Tool and login to the environment.
    You should see an Install Profiler button. That’s the reason the Profile is not yet installed on the environment and it’s now showing in SiteMap.


  2. Now, when you click on Install Profiler, it’ll install the Profiler to the environment.


  3. Once this is installed, you’ll see it show in the SiteMap in Settings area.


  4. Also, if you notice the Solutions, a Managed Solution would also be installed which will SiteMap (it indicates the update that Plugin Profiles has been added to the SiteMap)


  5. Also, if you Uninstall the Plugin Profiler, the Managed Solution will be removed and also this will take Plug-in Profile off the SiteMap.
  6. Also, there’s another way to remove the Plugin Profiler – Workaround to get Plugin Profiler from the Unified Interface in D365 CE

Hope this was helpful!

Here are some more Dynamics 365 Admin related posts you might want to check –

  1. Disable Recent Records from Dynamics 365 Lookup Control | Model-Driven Apps [Quick Tip]
  2. Language format for Whole Number field in Dynamics 365 CE
  3. Custom Help Pages and Guided Tasks for Unified Interface in Dynamics 365
  4. Make Managed fields Required in Dynamics 365 – Managed Properties Error [Workaround] | D365 CE Quick Tip
  5. Sign up for a Dynamics 365 Project Operations (Lite Deployment) environment and provision a new instance | Power Platform
  6. Filter records in a View owned by a Team you are a member of | Dynamics 365 CRM
  7. Show custom ribbon button based on Security Role of the logged in User in Dynamics 365 | Ribbon Workbench in XrmToolbox
  8. Make On-Demand Flow to show up in Dynamics 365 | Power Automate

Thank you!

Advanced Lookup in Model-Driven Apps | Power Platform

Here’s a super useful feature now available in Dynamics 365 for Model-driven Apps called as Advanced Lookups.

Turn on Advanced Lookup from Behavior Settings

You’ll need to go to the Power Platform Admin Center (PPAC) –

  1. Navigate to Behavior

Using Advanced Lookups

Here’s how the experience will be for you while using Advanced Lookups

  1. Now, once this is enabled, in Dynamics 365 – for example – a Parent Account lookup on Account will work as below –


  2. And it will open this dialog where you’ll see a much wider view of the Advanced Lookup and help your find the record using navigation/filtering options


    Denoted by Red arrow, you can even switch between different available System Views for the selected Table (entity).
    Denoted by Green, you can either create a record on the fly or filter to show only records that you own.
  3. Once you select to switch a view, you’ll be able to select between different System Views.


  4. And once you select a record (Of course you can only select 1 record at a time) and click done, it’ll be done.


    And it’ll be added to the lookup field as follows.


  5. Also, only the views which you’ve selected in your Model-Driven App will appear and not all. For Example, in the Sales Professional App, I’ve selected only a handful of views and not all. So, only those will show up.


  6. Also, please make sure when you select Views and not all, please make sure you do select the Lookup View


  7. Else, if you don’t select this view, it’ll result in Runtime errors which I observed while trying to experiment on what views I can select. Hence, make sure that you select the Lookup Views along with other views which you require.

Here are Canvas Power Apps / Model-Driven Apps which you might like –

  1. New App Designer for Model-Driven Apps | Power Platform
  2. Rich Text Control for Canvas and Model-Driven App | Quick Tip
  3. Form Access Checker in new Power Apps Form Designer | Model-Driven Apps in Dynamics 365
  4. How to add Rating Values to Rating Models in D365 Field Service and PSA
  5. Language format for Whole Number field in Dynamics 365 CE
  6. Custom Help Pages and Guided Tasks for Unified Interface in Dynamics 365
  7. Filter records in a View owned by a Team you are a member of | Dynamics 365 CRM
  8. Show custom ribbon button based on Security Role of the logged in User in Dynamics 365 | Ribbon Workbench in XrmToolbox
  9. Duration field in Dynamics 365 converts Hours value to Days in Dynamics 365 | [Flow Workaround to convert in Hours and Mins]
  10. Find deprecated JS code used in your Dynamics 365 environment | Dynamics 365 v9 JS Validator tool | XrmToolBox

Thank you!