Fix Ribbon icons on the Unified Interface in D365 CE

So, since adoption of Unified Interface is growing, people are asking – “What happened to the Ribbon icons?”. Well, a simple answer to this is tweaking the implementation a little.

Typically, you have custom icons on your classic Web UI that look like this –
classicIcon

But the same looks like a puzzle piece in the Unified Interface –
puzzlePiece

So, here’s what you need to do. Icons on the Unified Interface take SVG format. You’ll need to take you existing PNG Web Resources


Creating SVG Icons

Like most online services or applications, you can easily convert images to SVG. In this example, I’m using this online tool – https://www.online-convert.com/

Or you can try this too which I found quite a few people recommended – https://www.syncfusion.com/downloads/metrostudio

For this example, I used https://convertio.co/png-svg/ And I got my converted SVG document downloaded.
Now, create a new Web Resource in SVG and Upload the same.
svgWebResource

Ribbon Workbench

Once your Web Resource for the SVG format is set, going back to your Ribbon Workbench customization work space, go to the Button where you wan to update the icon and select the SVG Web Resource under Modern Image as shown below

modernImage

Publish Changes and See

Once your customization are published, you can simply refresh and check that your image has been updated

converted
Note: An online converted might not give you an accurate image. However, it is best recommended to create SVGs on an app. I’ve heard recommendations about https://www.syncfusion.com/downloads/metrostudio

Hope this helps!

D365 Quick Tip: Getting layoutXml from DevTools

Most times when you want to use AddCustomView() method to a Dynamics 365 control, you need to pass layoutXml to the method that will show the view you define.
fromCOde

There’s an easier trick than writing this up.

Select your View

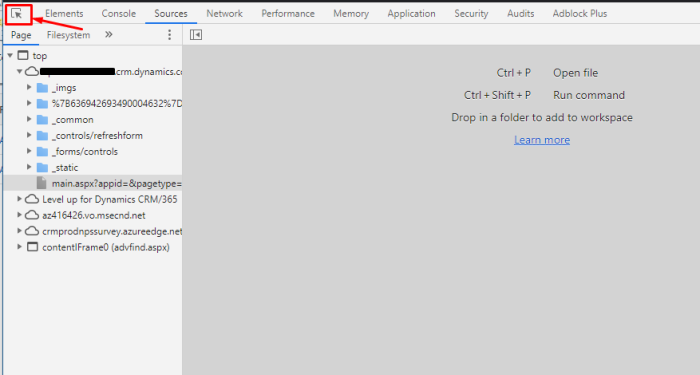
Assuming, you have an Advanced Find view open in the window which you want as a layoutXml of, on the same, press F12 to open Dev Tools. Select the selector.
selector

And on the Advanced Find window, select Body section
andSelectBody
Click on it, and the par will be selected in the Console of the Dev Tools.

Once this is available, search for layoutXml and cycle through the results to go to the last result.
selectFromConsole

select the “value” part. That is your layoutXml. Hope this helps.

Curious Case of the locked fields in D365 – Quote ID example

So, I struggled some time in trying to make something just work as it was supposed to work. And for no conscious reason, I was able to figure out why.

As to why my Quote wouldn’t save and auto generate the usual Quote ID? It kept asking me to enter it!

Problem

OOB, Quote ID is locked and is auto-generated when you save the record.
newForm

Instead, I got this
cantSave

And asks me to enter Quote in the field again.
enterQuote

Ideally, if you have a required field locked, you can save it and the form won’t force you.
fieldIsLocked

But, nothing would work.

After much hassle, I finally noticed the culprit lying in plain sight. Let’s look at why this was happening.

Culprit

This happened because the same field was on the Business Process Flow and was unlocked
quoteOnProcess

That was the issue. As a part of the requirement, I had put it there, but either didn’t lock it or shouldn’t be there.

I just removed it since it wasn’t a big deal and things were fine now.
savedQuote

Hope this helps you! 🙂

Create your first PowerApp! Connect to SharePoint Online List

PowerPlatform is the next big thing in

PowerApps comes with several Dynamics 365 licenses and make sure you have been assigned one as well as below –
license

Navigate to https://web.powerapps.com/ to go to the Admin Center and here you can simply start working on your first app.

In this scenario, I want to be able to read from my SharePoint Online list and make decisions based on what data is in the List
spList

Build your PowerApp from data

  1. Among the options to create your app from either Canvas or Model-driven, I’ll chose to build one based on data which is a Canvas type of application.
    startFromData
  2. Now, I’ll chose SharePoint’s Phone layout since I want to connect to my SharePoint Online site to be able to read from my lists
    selectSPApp
  3. Now, since I already have selected SharePoint connector, I’ll be creating a new connection on the next page.
    createSPConnection
    Since this example is for SharePoint Online, I’ll select Connect directly (cloud services).
  4. Now, since I already had accessed the SharePoint Site, it appears in my list. You can either connect to a new Site from + New Connection button on the left-hand side or enter a new SharePoint Site in the URL and click GO. Or even select a recently visited one like I did –
    selectSPSiteFromRecent
  5. Then, choose your list
    chooseList
  6. And it takes a few moments to build out your App. And when it’s ready to be worked on, here’s what you get.
    appIsReady

Understanding your App Designer space

Won’t be covering much details on what each tool does, but wanted to share how things are placed –

  1. On the left-hand side, the App pages/components are divided into three main sections. (Obviously, you are free to add and modify more screens as needed)
    defaultTreeView
  2. You can add several controls on these screens
    insertTab
  3. And these controls/components can be adjusted from the right-hand side pane as below
    customizeProperties
  4. That’s basically the most of the App basics you need to know at this point. I’ll post more posts on that later. 🙂

Publishing Your App & Share

Presuming that your app is now ready to go, her’s what you can do in order to publish

  1. Navigate to File, give a suitable Name to your App.
    appName
  2. Move over to Save and Save your App.
    saveApp
  3. Once Saved, Share the App.
    shareThisApp
  4. Once you click on Share, you can get to Add users who will have access to this App and you can chose their permission level.
    shareWithUser
    permissionSelection

Running your first PowerApp

Assuming you have installed PowerApps on your device and logged in with your credentials, you’ll see the App as below

And you can start working on your App already

Hope this was quick. And then there’s a tremendous lot to be done with PowerApps and leveraging the PowerPlatform!

Discount Settings for D365 Sales Line Items – Line Items or Per Unit?

For Line Item entities Opportunity Products, Quotes Products, Order Products or Invoice Products, you can chose what type of Discount you want to give out.

This is a simple Organization-wise setting  that you’ll need to set to define how Discount should be given on the Line Item level.

System Setting

Navigate to System Settings and under Sales tab, find this setting
lineItemSetting

You can chose either between Line Item or Per Unit.
options

Discount Behavior

Line Item

Now, when the Discount method is set to Line Item, the Discount value will be given to each of the Line Item regardless of the Quantity
lineItemCalculations

In the above example, the Discount $50 is applied to the entire Line Item entry of 2 quantities of the commodity of the price $1200 is

2 x 1200 = $2400 – $50 = $2350 ($50 Discount given to the Extended Amount)

Per Unit

And in case of Per Unit, the Discount amount of $50 is given to each Quantity in the Line Item
perUnitCalculation

In the above example, the $50 Discount is given to the quantity of commodity of worth $1200 each. i.e.

2 x $1150 ($50 Discount given to each Price Per Unit amount) = $2300

Hence, it vital what setting you want to use while giving Discount to Line Items in D365 Sales

Hope this helps! 🙂


Quickly get the right .NET Framework version to work with CoreAssemblies 9.0.2.x

Plugin development is a hassle if you don’t start of with getting the correct assemblies in place before you start writing your plugin code.

Best way is to get all of that from the NuGet Manager in VS. Preferably, we all pick the latest version from the NuGet Manager and pick Microsoft.CmSdk.CoreAssemblies. With 9.0.2.x version for v9 D365 environments, you might need to be careful with the .NET Framework version too. So, here’s a quick post about that.

Let’s say you pick Microsoft.CmSdk.CoreAssemblies

coreAssemblies

While installing, you get the below error
error

This is because your VS Project might not be on or might not have the correct .NET framework installed. If you go to Project properties, you can check that.

What version do you need?

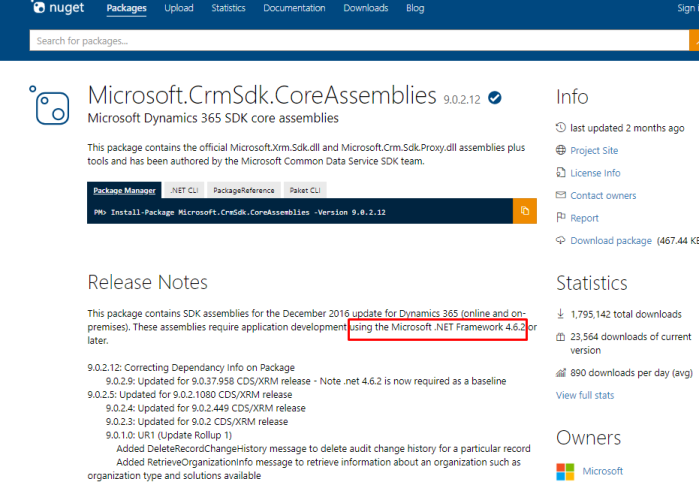
Nuget.org will tell you about the version of .NET Framework required for that assembly.
correctVersion

Getting .NET 4.6.2

You can download among the different versions of Developer Packs available across your VS versions from the link below –

Link: https://dotnet.microsoft.com/download/visual-studio-sdks?utm_source=getdotnetsdk&utm_medium=referral

Once you have the correct version, 4.6.2 in this case, you can simply select that Developer Pack and download.

Alternatively, you can also click on Install other frameworks… to get to the link (note that 4.6.2 is not yet installed for me)
installOtherFrameworks

Once you see the downloaded Setup in your browser as shown below, simply run it –
downloadedPack

It sets up like a typical Windows application. Once done, you can check your project properties and select the .NET Framework version you installed.
4.6.2NowInstalled

Re-install Assembly

And when you now try to re-install the assembly, it should be successful and you’ll get all the references you need in your plugin.
successfullyInstalled

Hope this will help! 🙂