Enable Copilot for Dynamics 365 Sales environment

Copilot for Dynamics 365 Sales is in Preview at the point of writing this post. Hence, I’ll start by showing how you can turn Copilot for Dynamics 365 Sales on for your environment.

It is recommended to do this in your Sandbox instances first.

Enable Copilot for Dynamics 365 Sales

Given that you have the correct licenses setup and you are a System Administrator, you can follow the below steps in order to enable Copilot for Dynamics 365 Sales –

  1. Make sure you are in the Sales Hub app.

  2. And then go to the App Settings

  3. Here, you’ll see the Copilot as an option on the Sitemap, select that.

  4. Note that all the Settings are turned off by default.
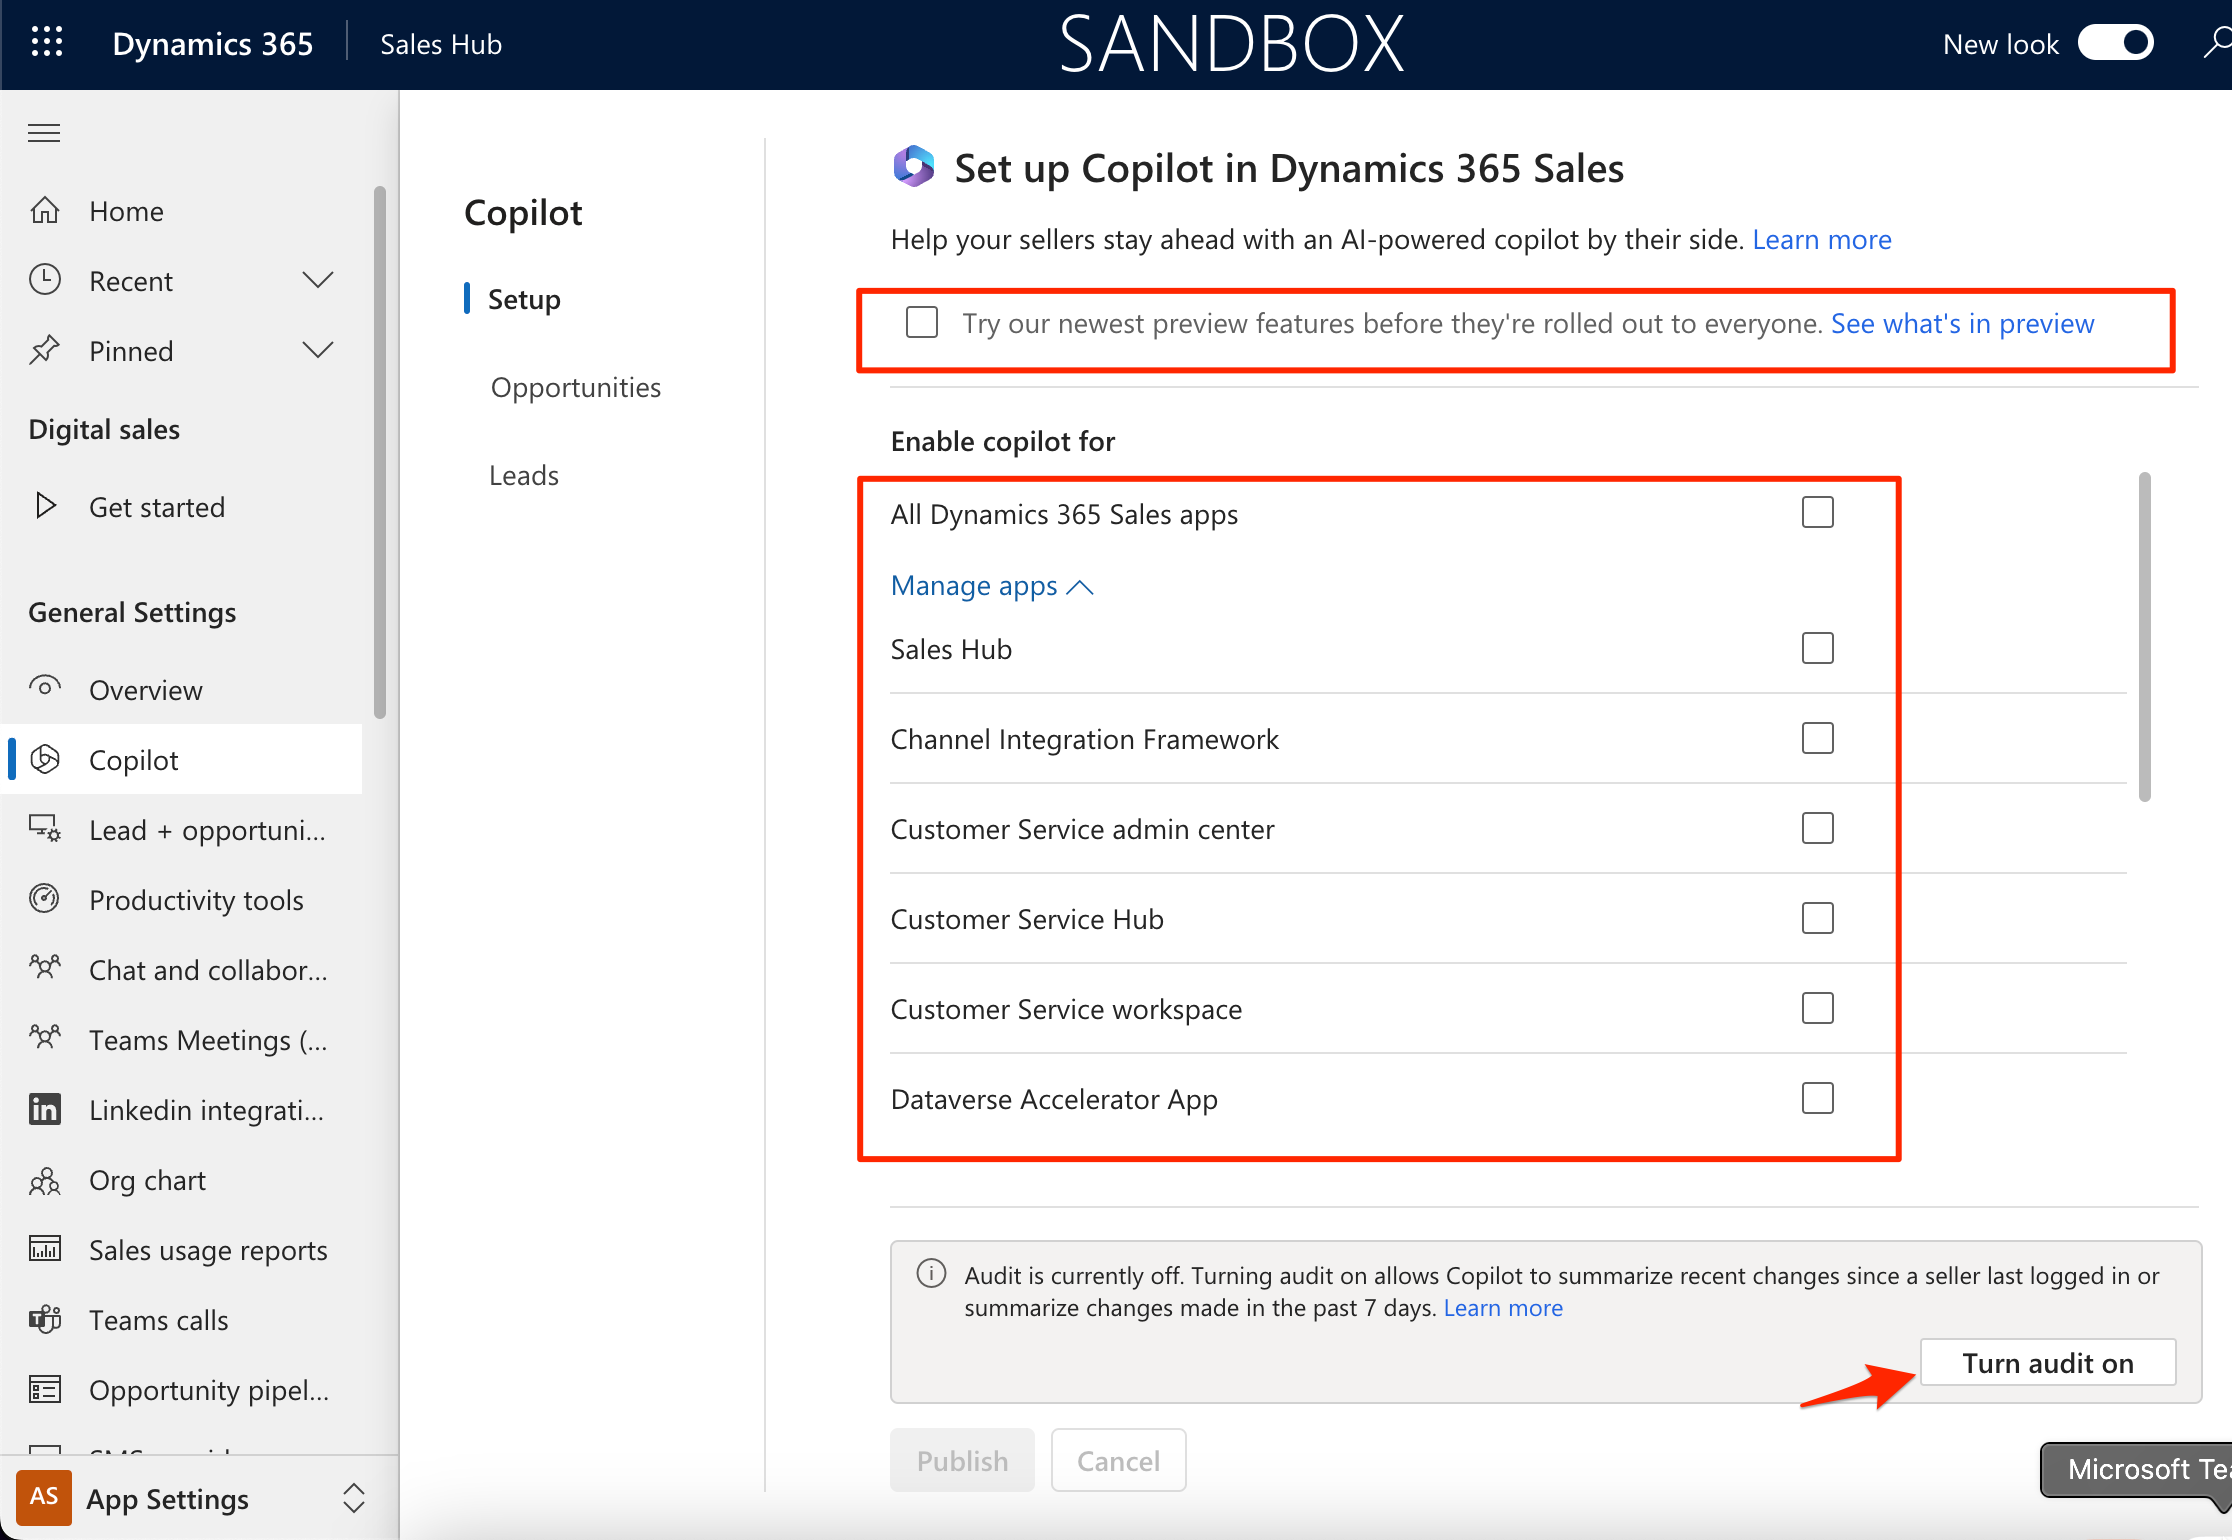
  5. First thing you can do is, turn Auditing On. It’ll take a while to Save the changes in the background.

  6. Then, you can turn on other features which are in Preview On and enable the Copilot App based on your Published apps in your environment.

  7. Here are the Preview features which are listed under the See what’s in preview link in the above screenshot – https://learn.microsoft.com/en-gb/dynamics365/sales/view-copy-email-summary
  8. Once the changes are saved, it’ll look like this in the Published state. the selections will remain the Publish button will be disabled.
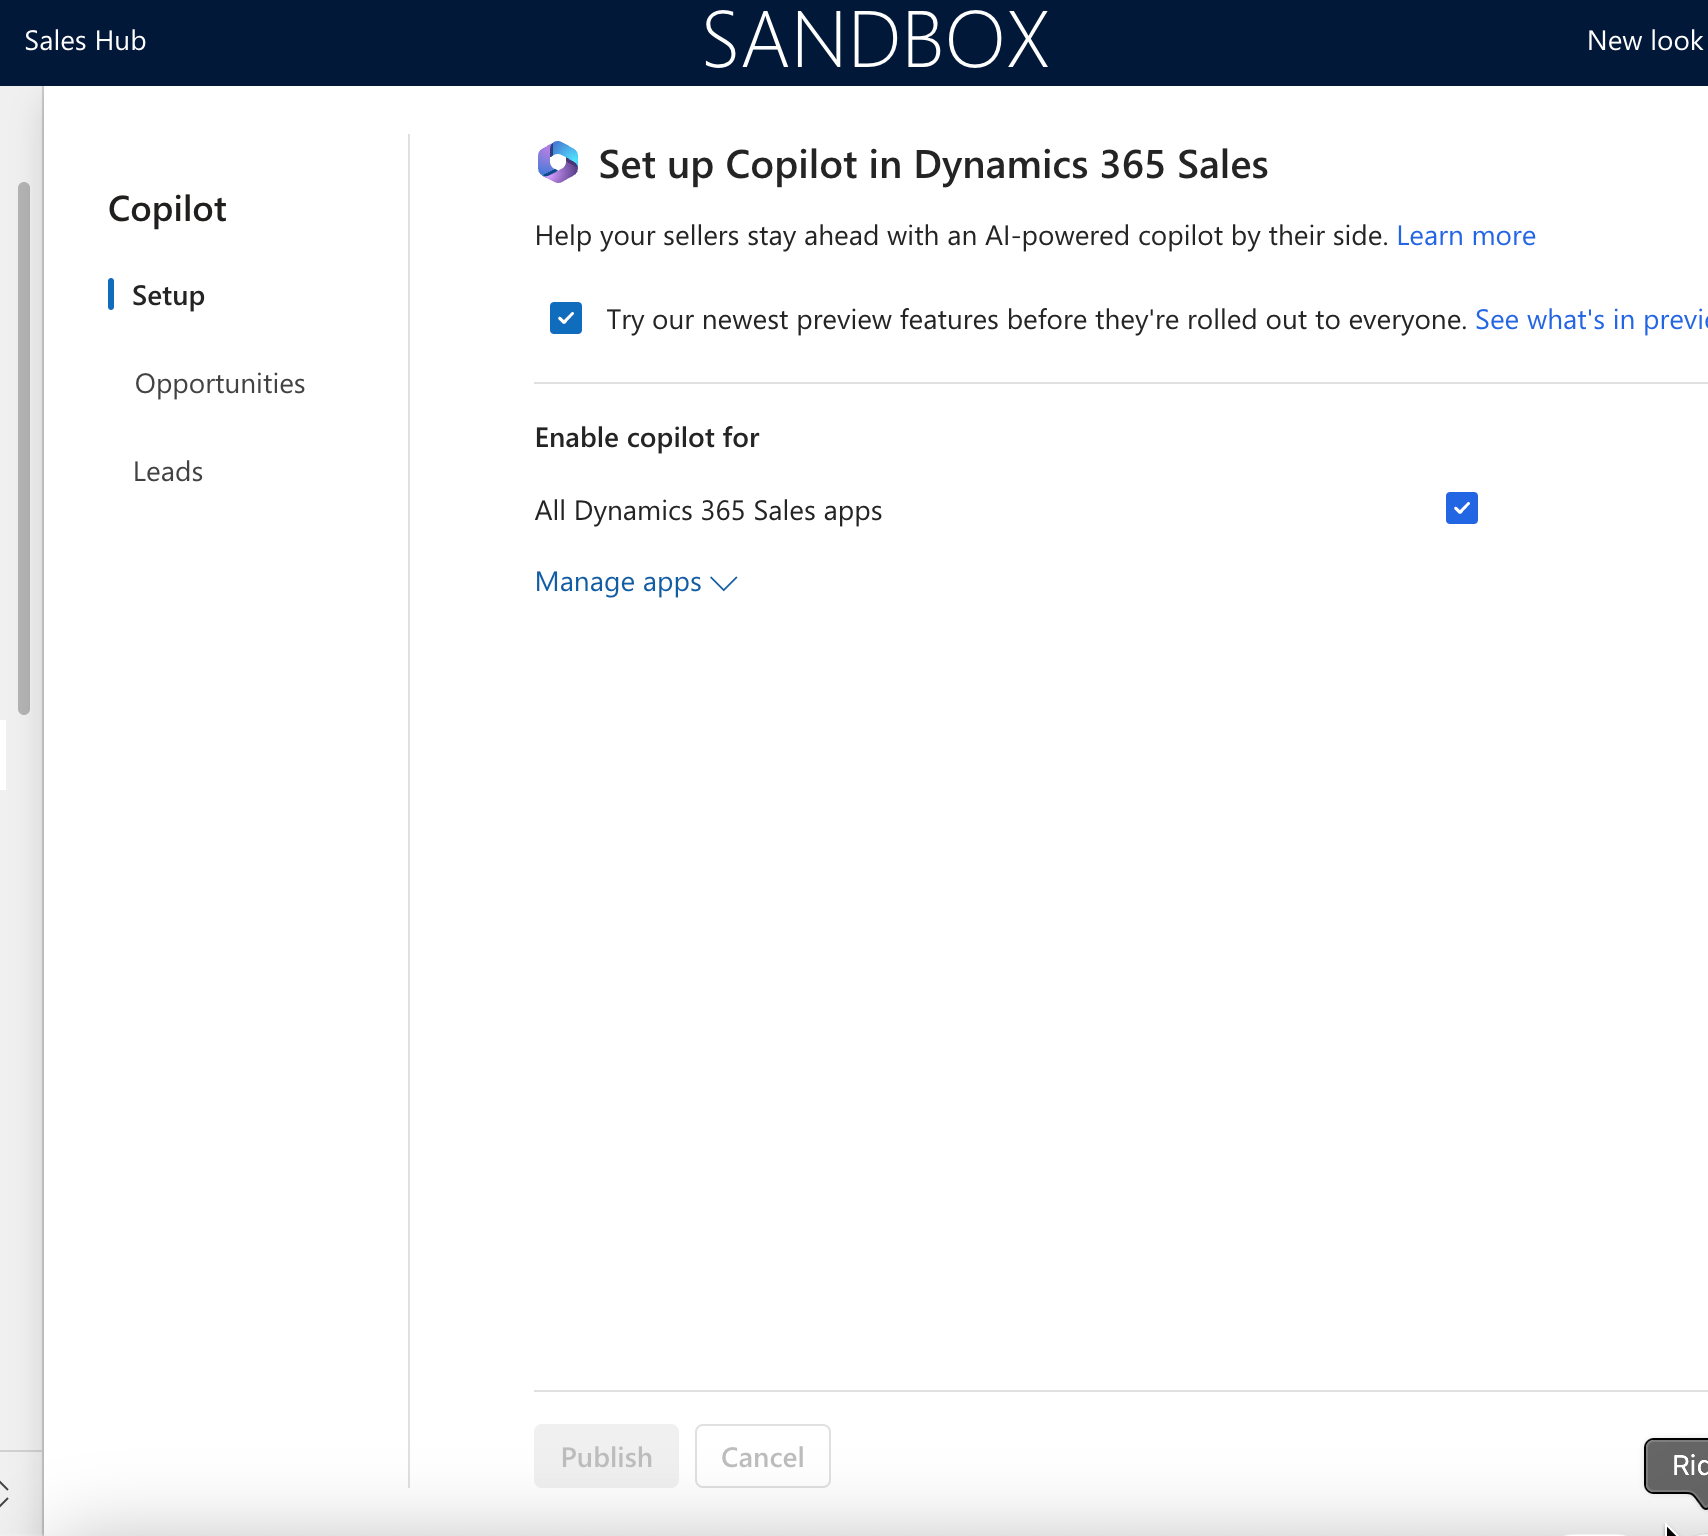
  9. At this stage, the Copilot has been enabled for the selected Apps in your environment.
    Now, you can move to other options like Opportunities and Leads tabs on the settings page.
    The Summary section in the entities will show which fields should be included in Summary information that Copilot will generate.
    The Recent Changes in the entities will show which fields should be included to keep track of the changes which happen on these fields.


At this point, you are all set in configuring Copilot in your Dynamics 365 Sales environment. Next, I’ll write about how we can use the features which we enabled in this post and I’ll share link of the upcoming post here.

Hope this helps!

Thank you!

Hierarchy Settings in Dynamics 365 CE | Power Platform Admin Center

You must have seen Security Roles, Field Level Security, Access Teams etc. as a way to access records in Dynamics 365 CE (or CRM). Here’s what Hierarchy Security is all about –

There are 2 types of Hierarchy Settings in Dynamics 365 CE and what they mean in a short explanation –

  1. Manager Hierarchy – Access control of records based on the Manager settings for a System User.
  2. Position Hierarchy – Access control of records based on the Position of the System Users based on how they are placed in the Organization.

Configure Hierarchy Settings in Power Platform Admin Center

Given that you have Dynamics 365 Admin privileges, you can configure the Hierarchy Settings as below –

  1. Go to the Environment’s Settings in Power Platform Admin Center

  2. Now, you can expand and click on Hierarchy Settings

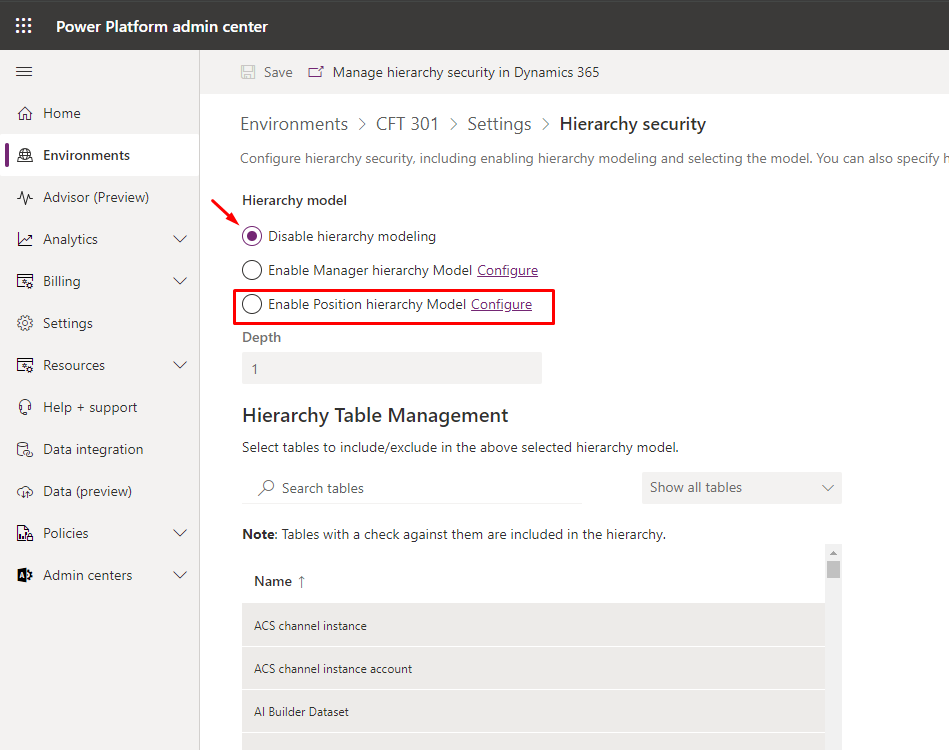
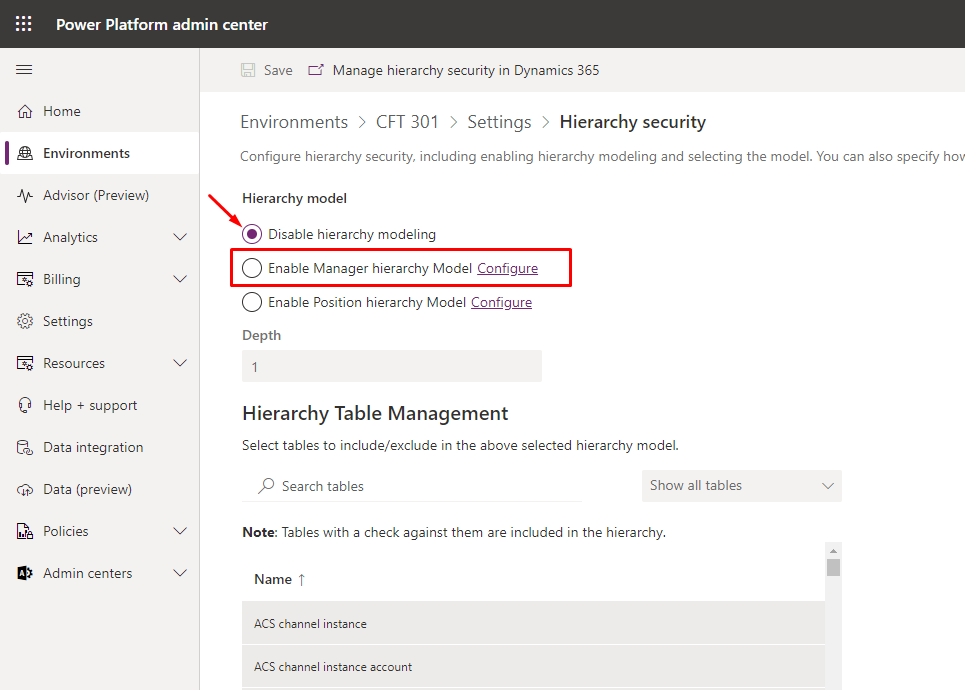
  3. By default, these will be Disabled by default. Then, you can turn on the one which you want and configure the same.

  4. In order to Configure the Manager Hierarchy Model, you can refer this post below –
    Manager Hierarchy Settings in Dynamics 365 CE
  5. In order to Configure the Position Hierarchy Model, you can refer this post below –
    Position Hierarchy Settings in Dynamics 365 CE

Hope this was useful!

Thank you!

Position Hierarchy Settings in Dynamics 365 CE

In this post, you’ll learn how to configure Position Hierarchy for Dynamics 365 CE environment –


Let’s first look at the scenario which we want to look at and then how we can configure the Hierarchy to limit and show the Positions of the Users the intended data.

Scenario

Let’s consider the below scenario on who report to whom in the org CFT300 based on the below Positions in the Org –

In the above example,

  1. Salesperson should see then own records.
  2. VP of Sales should say their own records and of Salesperson roles too.
  3. Executive Director should see their own records and only those of VP of Sales, but not Salesperson roles.


Position Hierarchy

Given that you already know how to navigate to Hierarchy Settings in Power Platform Admin Center, refer the below to understand how to configure the same based on the above scenario –

  1. Once you are in the Hierarchy Settings in the Environment’s Settings area in Power Platform Admin Center –


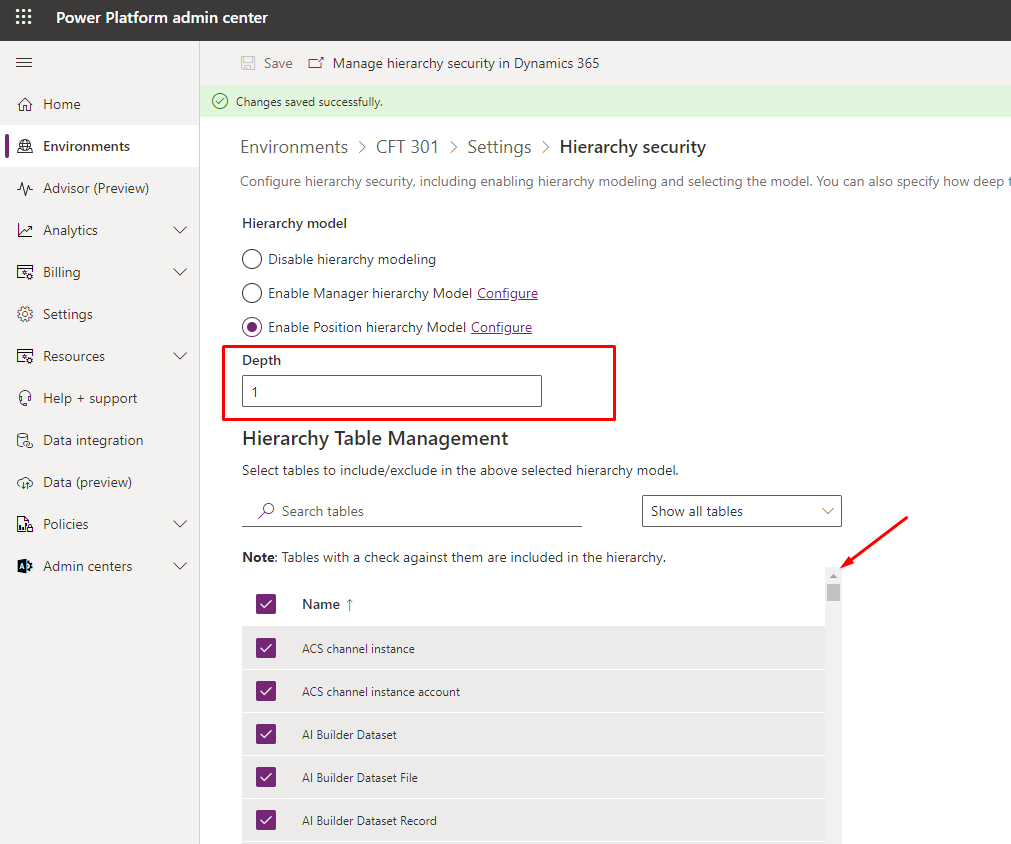
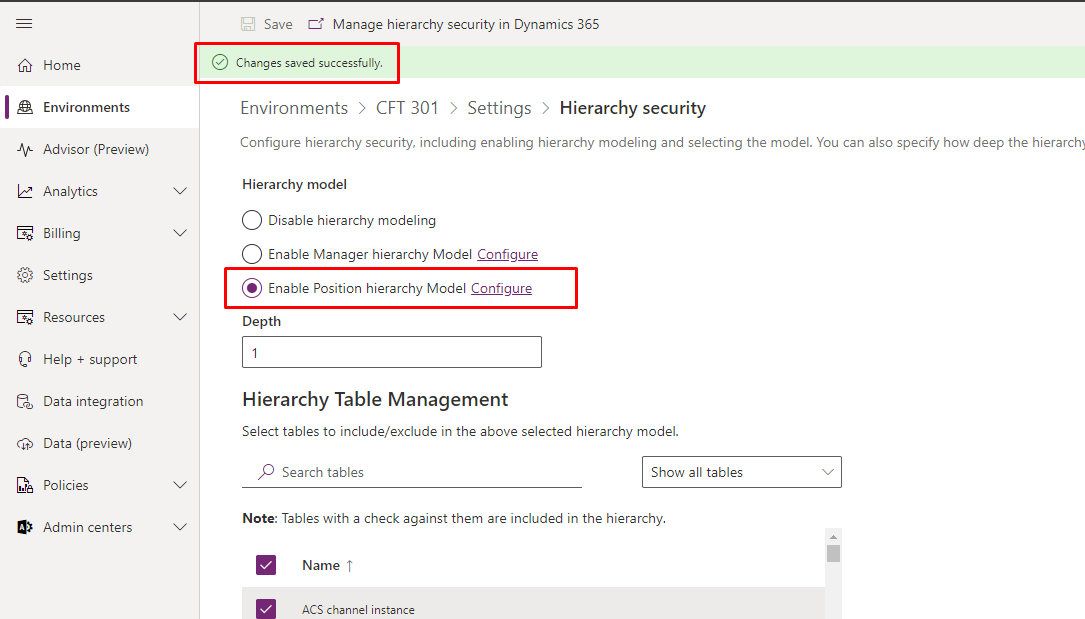
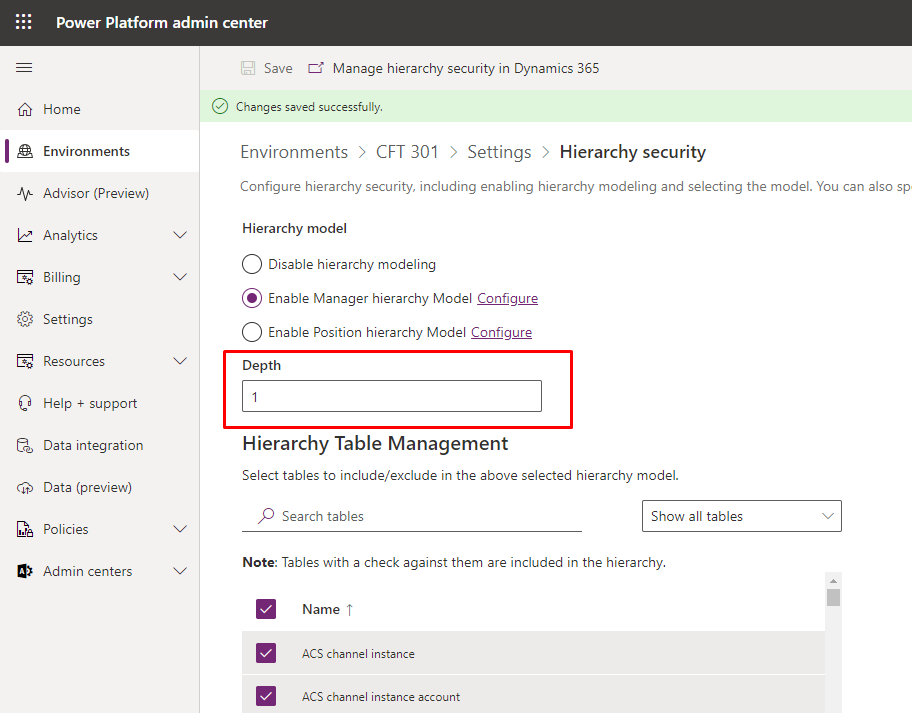
  2. Now, you can select Enable Position hierarchy Model and click on Save to apply the Position Hierarchy Model access to your environment. Once Saved, you’ll see as below.

  3. The Depth defines how many levels of Positions should a User be able to access records of other user in other positions in a top-down approach.

  4. Let’s click on Configure in order to start setting up the Positions in the Org.

  5. Now, based on the diagram above, I’ll create the Position hierarchy on this page

  6. Now, based on the same, I’ve created the below Positions in a hierarchy


    And the tree looks like this –

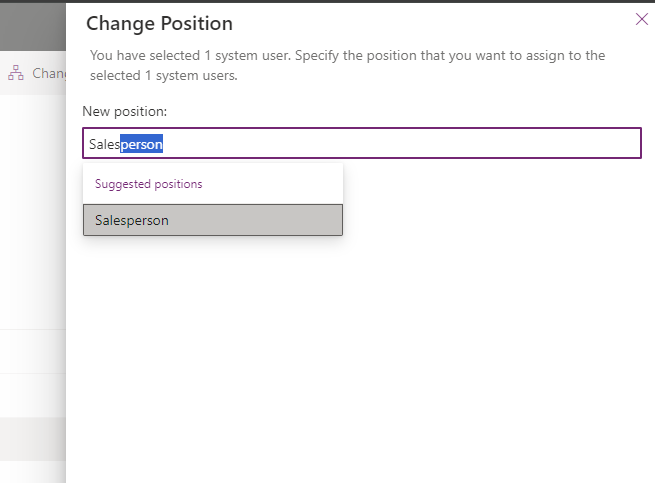
  7. Now, next is to assign these Positions to different Users in Power Platform Admin Center. If you go to Users and select any of the Users, you’ll see Change Position button on the ribbon.

  8. Then, you can find the Position you created which you want to give to the Users. Select it and Save it on the Pane.

  9. Complete the process for all the Users who need to be having one of the Positions you created.


    So based on this, Jack Green will be the Executive Director and will be able to access Amit Prajapati’s records and not Vidit Gholam’s or Ethan Rebello’s records.

    Also, the selected Tables are the ones to which the Position Hierarchy should apply.


    Now, based on the above setup and the Scenario provided, let’s look at how the records will be visible to the Users in the hierarchy.

Dynamics CRM Records access based on the Position Hierarchy Security –

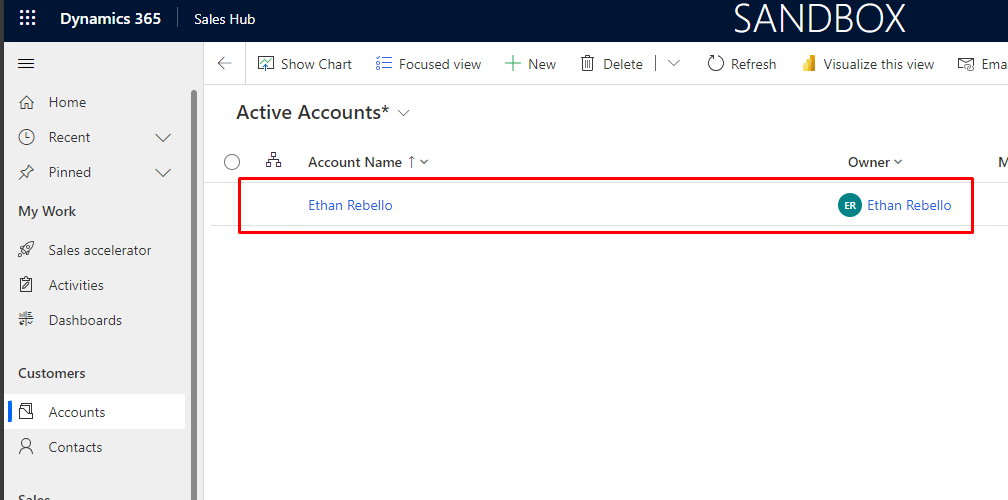
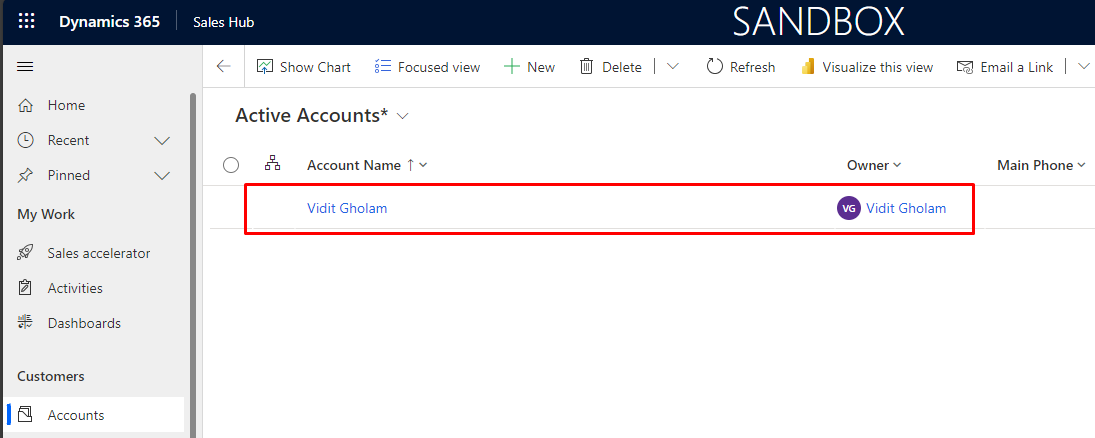
  1. Let’s start reviewing from the bottom of the hierarchy. Vidit and Ethan, both will see their own record in the Active Accounts view and no one else’s based on the Hierarchy Settings.
    Also, note that the Read privilege for all the Users in their Security Roles is set to “Users” and not “Organization“.

    Ethan Rebello


    Vidit Gholam

  2. We move 1 level up to Amit Prajapati – he’ll see his own record and also Vidit’s and Ethan’s records in Active Accounts view.

  3. And Jack Green can access his own record and as he’s the Executive Director and can see VP of Sales position records, he’ll see only Amit’s records for Accounts and not Ethan’s and Vidit’s.


    This will change if we increase the Depth to 2, 3 and onward based on the hierarchy structure.

Hope this was useful!

Thank you!

Manager Hierarchy Settings in Dynamics 365 CE

In this post, you’ll learn how to configure Manager Hierarchy for Dynamics 365 CE environment –


Let’s first look at the scenario which we want to look at and then how we can configure the Hierarchy to limit and show the Managers the intended data.

Scenario

Let’s consider the below scenario on who reports to whom in the Org CFT300 used in this example –

In the above example,

  1. Manager of Vidit Gholam and Ethan Rebello is set as Amit Prajapati.
  2. Manager of Amit Prajapati is Jack Green.

And this structure looks as below in Dynamics 365 CRM environment –

Note: Please note that in order to set Hierarchy Settings correctly, the Read privileges on the intended entity must be set to “User” level. If it is set to “Organization”, the the User will anyway be able to access everyone’s records despite Hierarchy Security Settings in place.

Manager Hierarchy

Given that you already know how to navigate to Hierarchy settings in Power Platform Admin Center, refer the below to understand how to configure the same based on the above scenario –

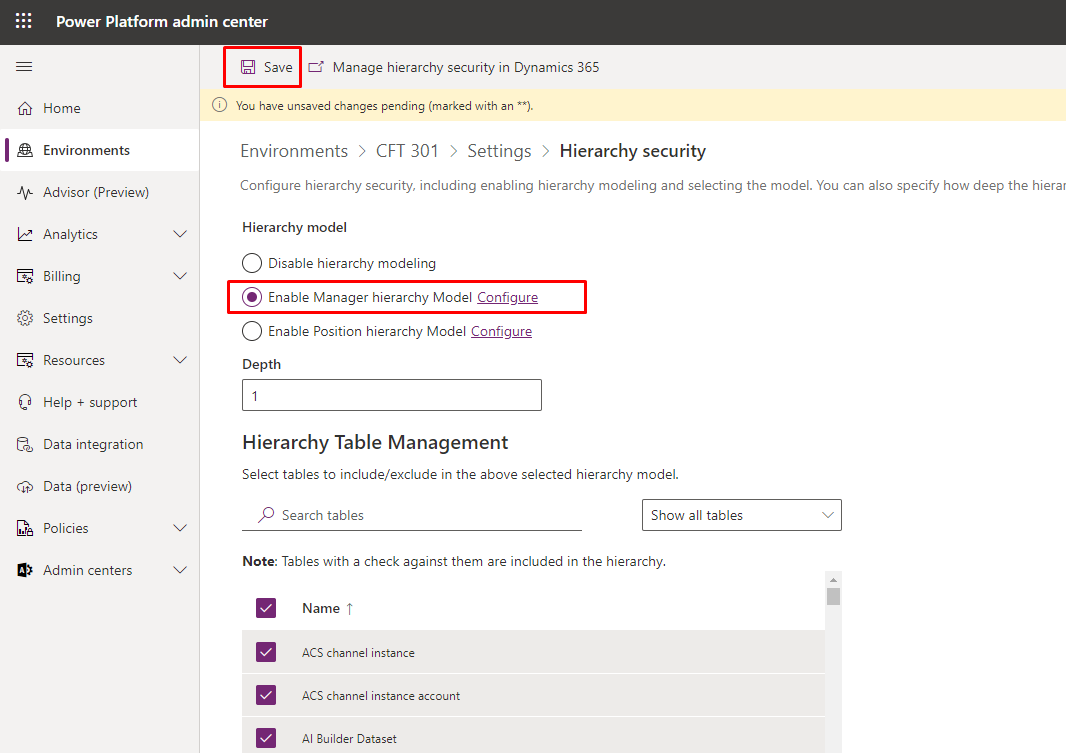
  1. Once you are in the Hierarchy Settings in the Environment’s Settings area in Power Platform Admin Center –

  2. Now, you can select Enable Manager hierarchy Model and click on Save to apply the Hierarchy Model access to your environment.

  3. The Depth defines how many levels should a Manager be able to access records of the Users in the top-down approach.
  4. You’ll also need to set the Users’ Manager in Power Platform Admin Center. If you go to the Users and select any 1 of them, you’ll see Change Manager button on the ribbon.

  5. And, search the User who should be the Manager of the User which you are editing.


    So based on this, Jack Green will only be able to access Amit Prajapati’s records and not Vidit Gholam’s or Ethan Rebello’s records.

    Also, the selected Tables are the one to which the Hierarchy Security should apply.


    Now, based on the above setup and the Scenario provided, let’s look at how the records will be visible to the users in the hierarchy.


Dynamics CRM Records access based on Manager Hierarchy Security –

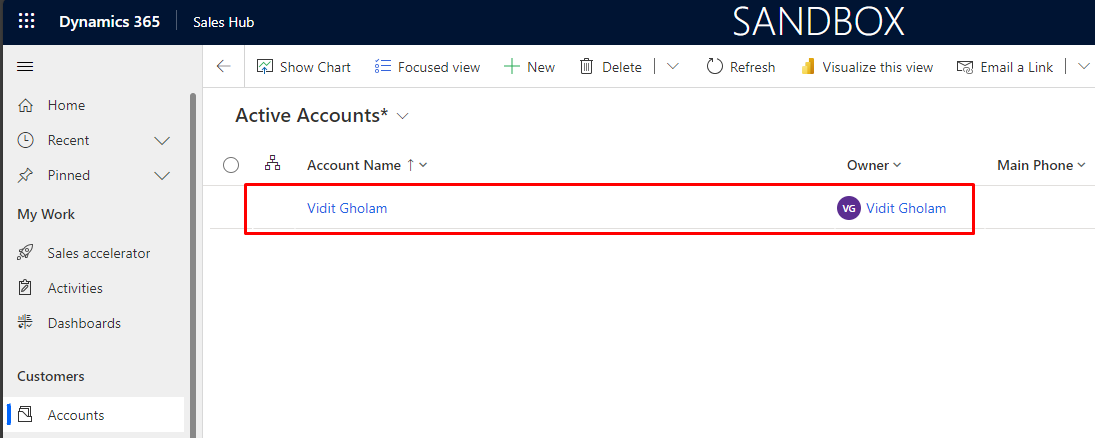
  1. Let’s start reviewing from the bottom of the hierarchy. Vidit and Ethan, both will see their own record in the Active Accounts view and no one else’s based on the Hierarchy Settings.
    Also, note that the Read privilege for all the Users in their Security Roles is set to “User” and not Organization” level.

    Ethan Rebello


    Vidit Gholam –

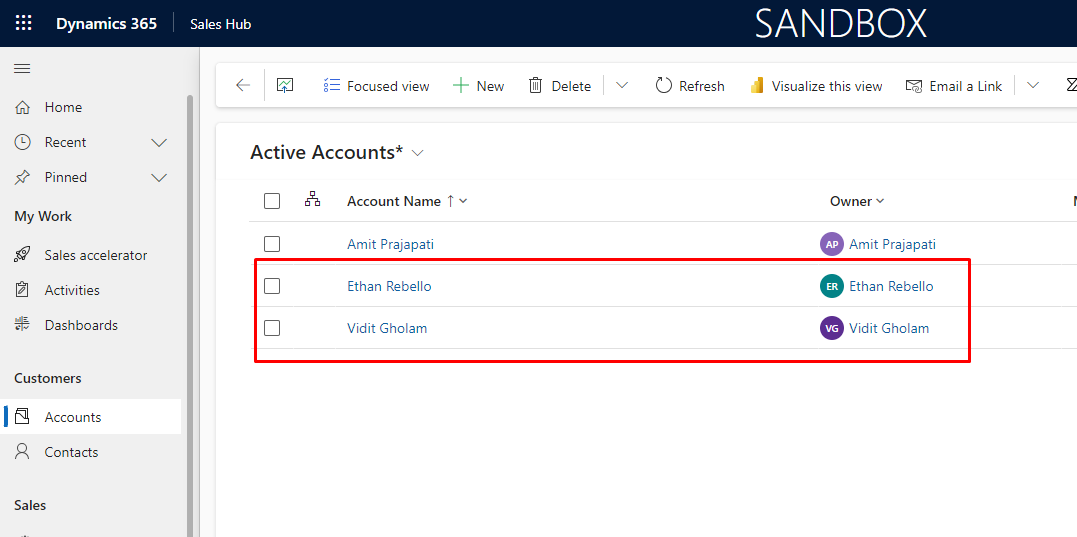
  2. We move 1 level up to Amit Prajapati – he’ll see his own record and also Vidit’s and Ethan’s records in Active Accounts view.


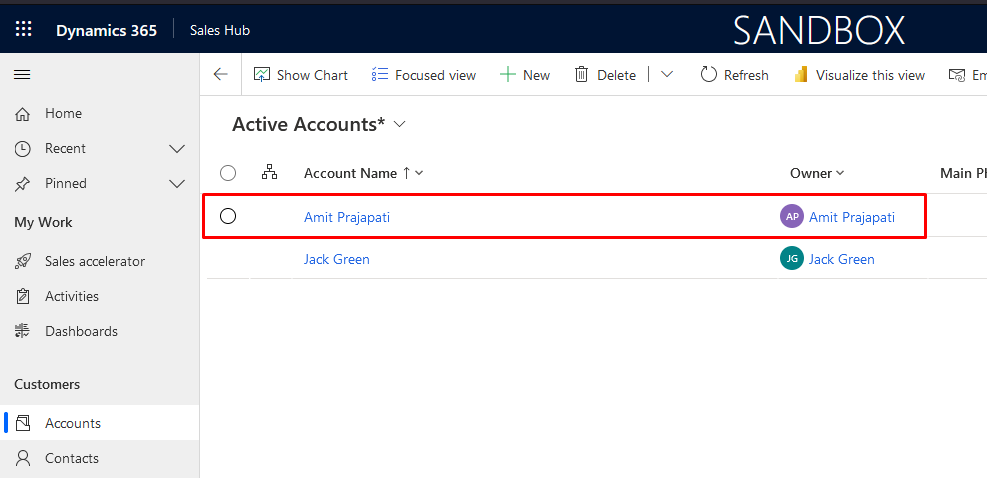
  3. And Jack Green can access his own record and as he’s the Manager of Amit Prajapati, he’ll only see Amit’s records for Account and not Ethan’s and Vidit’s.


    This will change is we increase the depth to 2, 3 and onward based on the hierarchy structure.

Hope this was useful!

Thank you!

Time and Materials Billing Backlog table in Project Operations

Even wondered what is Time and Materials Billing Backlog table in Project Operations which you see in the Sitemap but you might not be sure what records are in it –

Time and Materials Billing Backlog

Here’s the purpose of Time and Materials Billing Backlog entity –

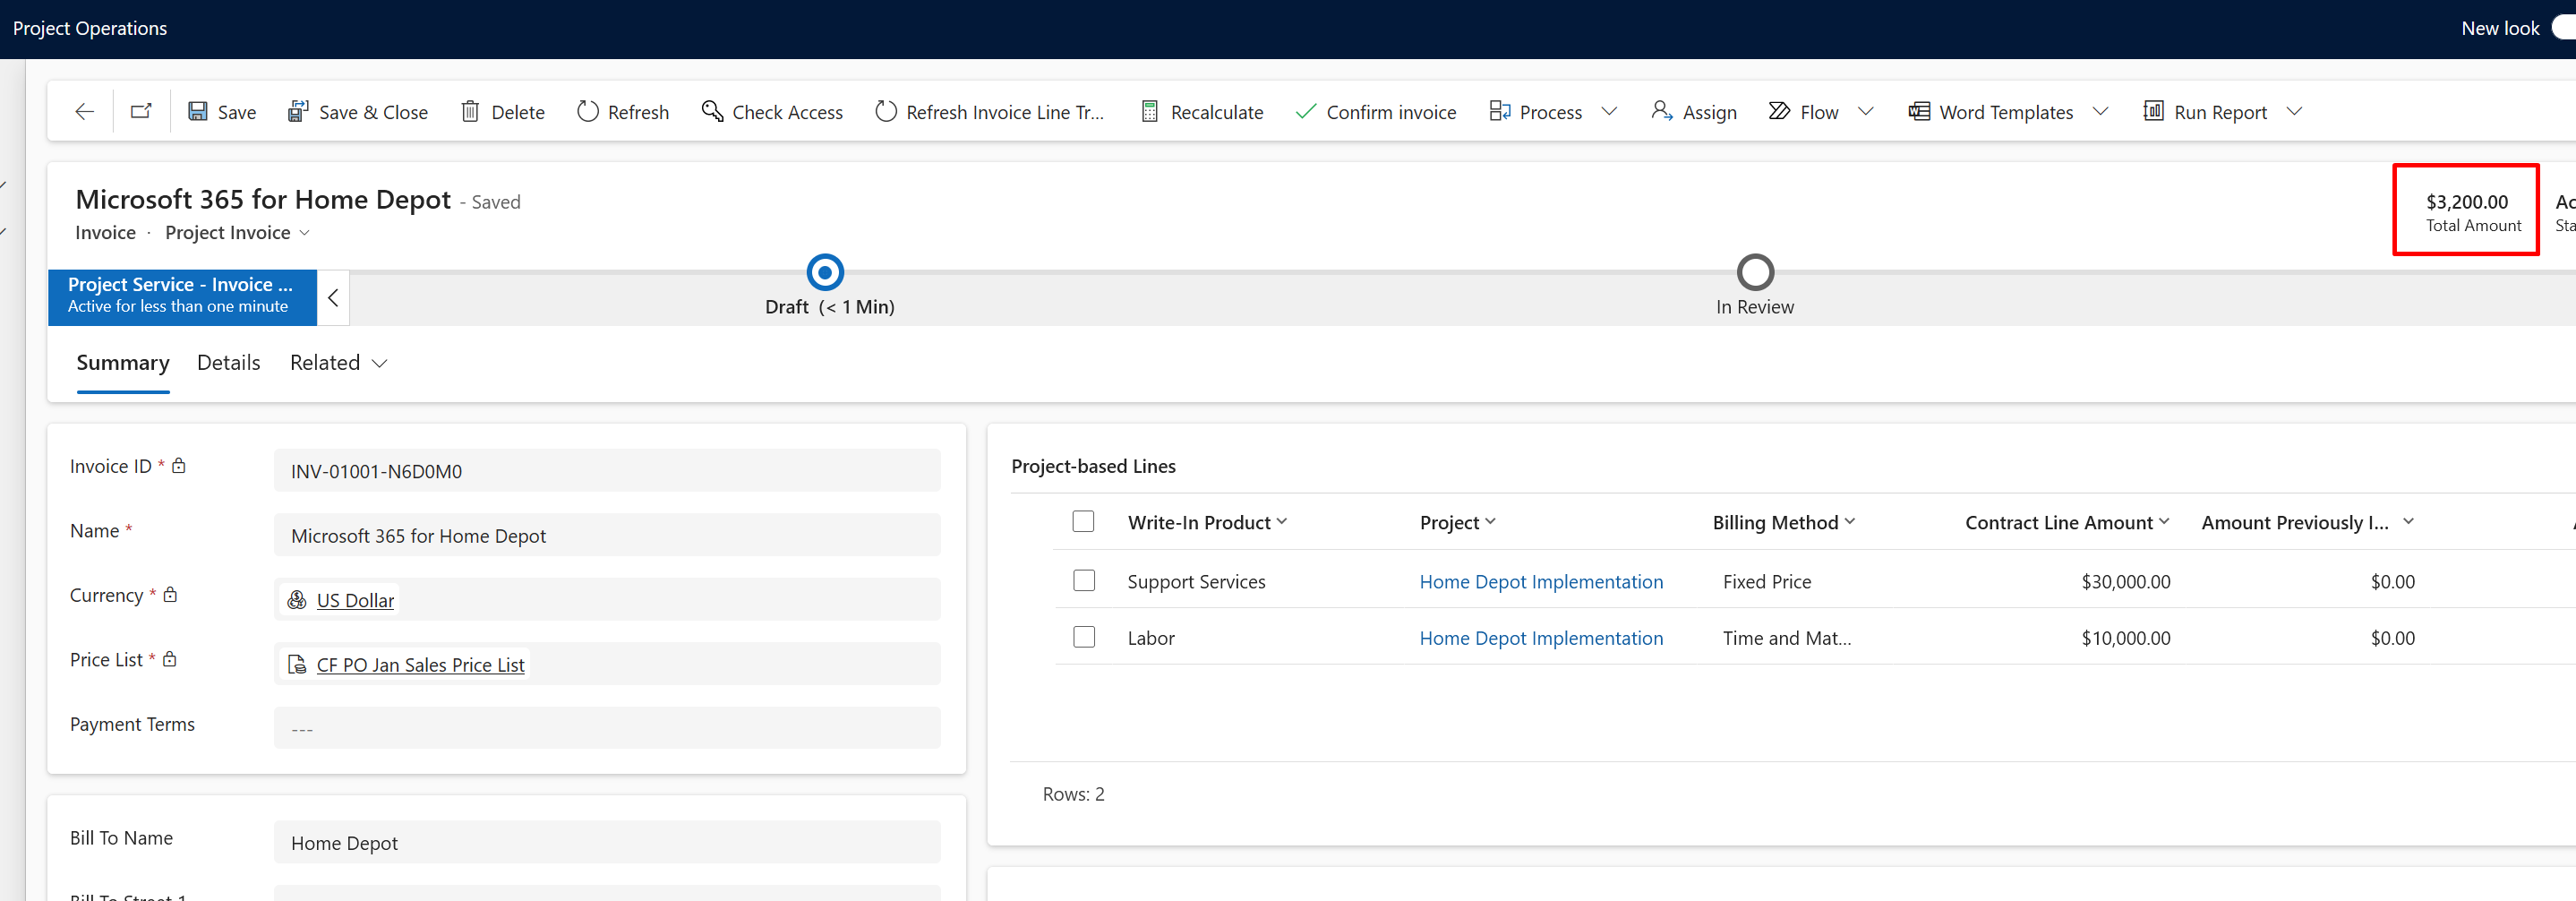
  1. Given that you have 2 Time Entries Submitted for Approval to the Project Management / Account Manager.

  2. When the Time Entries are Submitted, the Approver receives them for Approval. The Project Approver can then Approve the Time Entries.

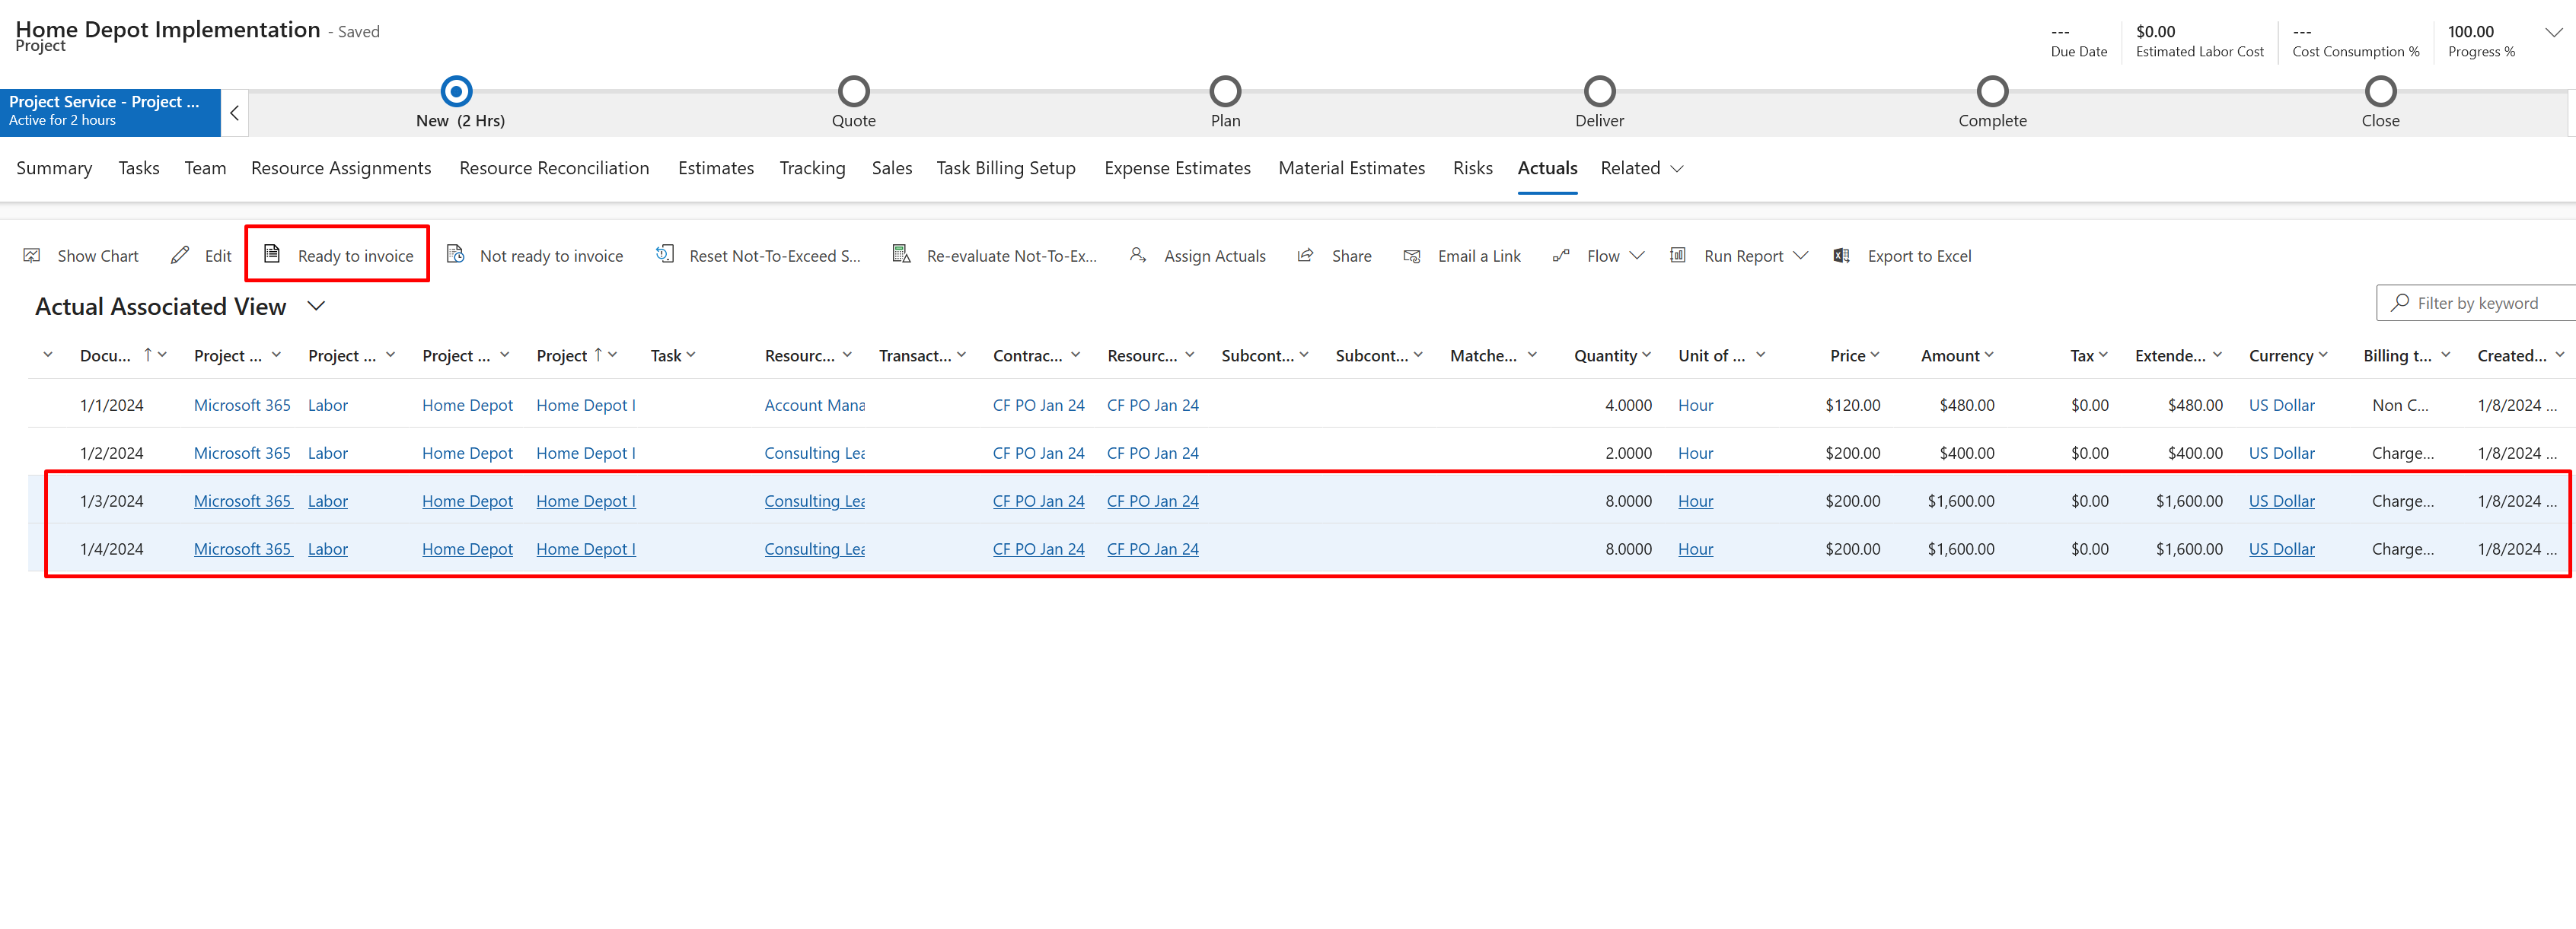
  3. Once they Approve the Time Entries, they are turned into Actuals (msdyn_actual) in Project Operations.
    Then, Actuals are then Supposed to be marked as Ready to Invoice.

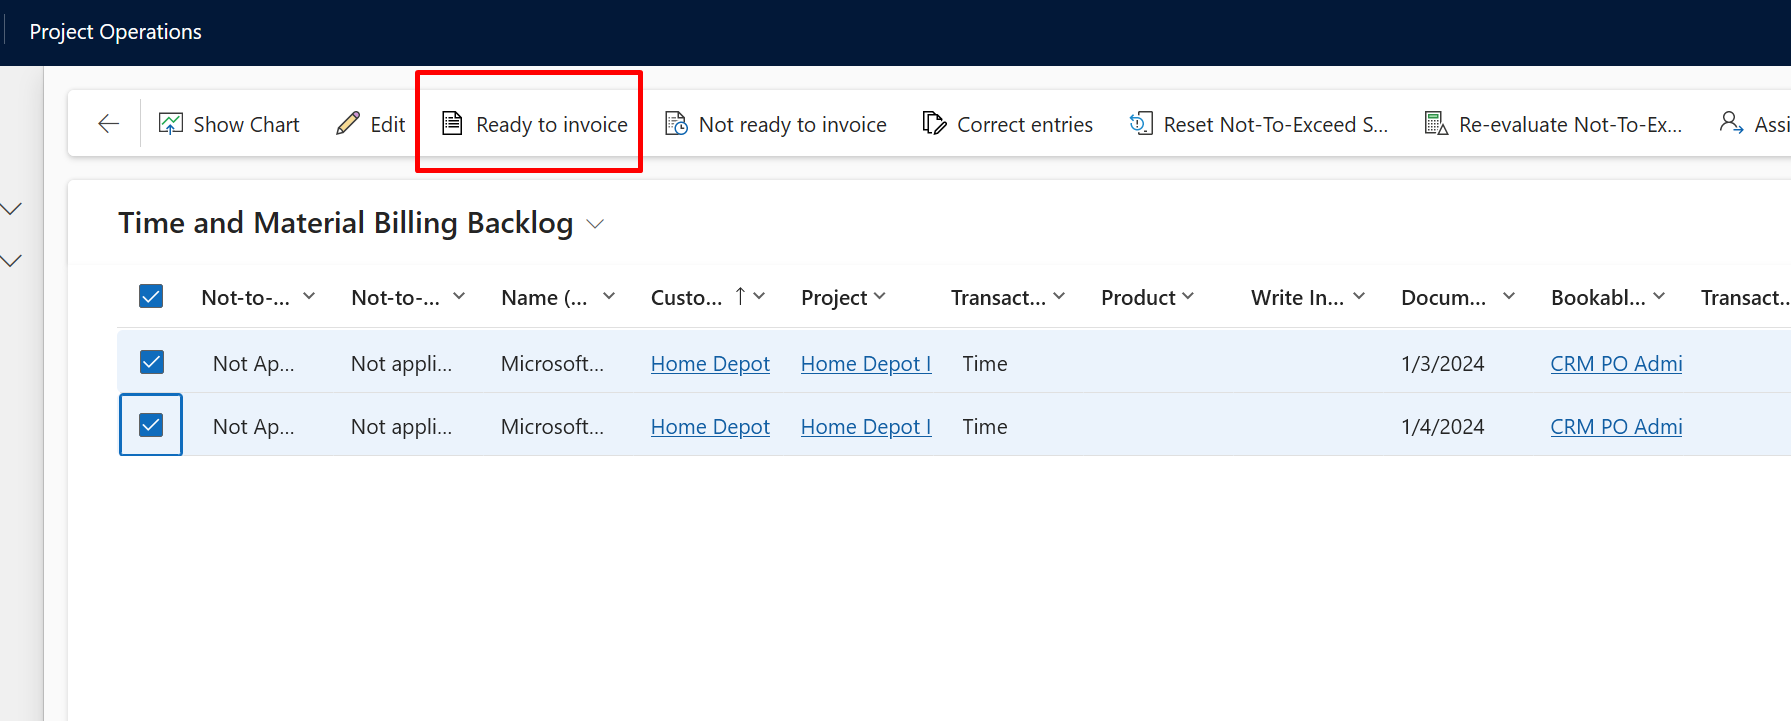
  4. So, when the Actuals are the created and even when they are marked Ready to Invoice, that’s when they appear in Time and Materials Billing Backlog view.
    This table is in fact Actuals table itself! 😊 (There’s no Time and Entry Billing Backlog as a separate Table in Dataverse).

  5. In fact, Accounting managers or Project Managers can Ready the Actuals from the Time and Materials Billing Backlog table itself.

  6. Now, then the Invoice is created for the ready Actuals, they are added to Invoice Lines

  7. And then, they are removed from the Time and Materials Billing Backlog view.

Hope this was useful!

Thank you!
Create Project Plan using Copilot in Project Operations

Now that you must have enabled Copilot for Project Operations [If not, you can refer this post to learn how you can enable Copilot for Project Operations – Enable Copilot for Project Operations]

Note: Please note that this is a Preview feature at the time of writing this post and hence, not recommended for Production usage.

Enable Copilot For Project Operations

First, you need to ensure that Copilot is enabled for your Project Operations environment – Enable Copilot for Project Operations

Once this is enabled, you’ll be able to see Copilot on the ribbon button on the Project. Let’s look at the same in the below section.

Task Plan

Now that you have Copilot enabled for Project Operations, you can now create Task Plans for a Project in Project Operations –

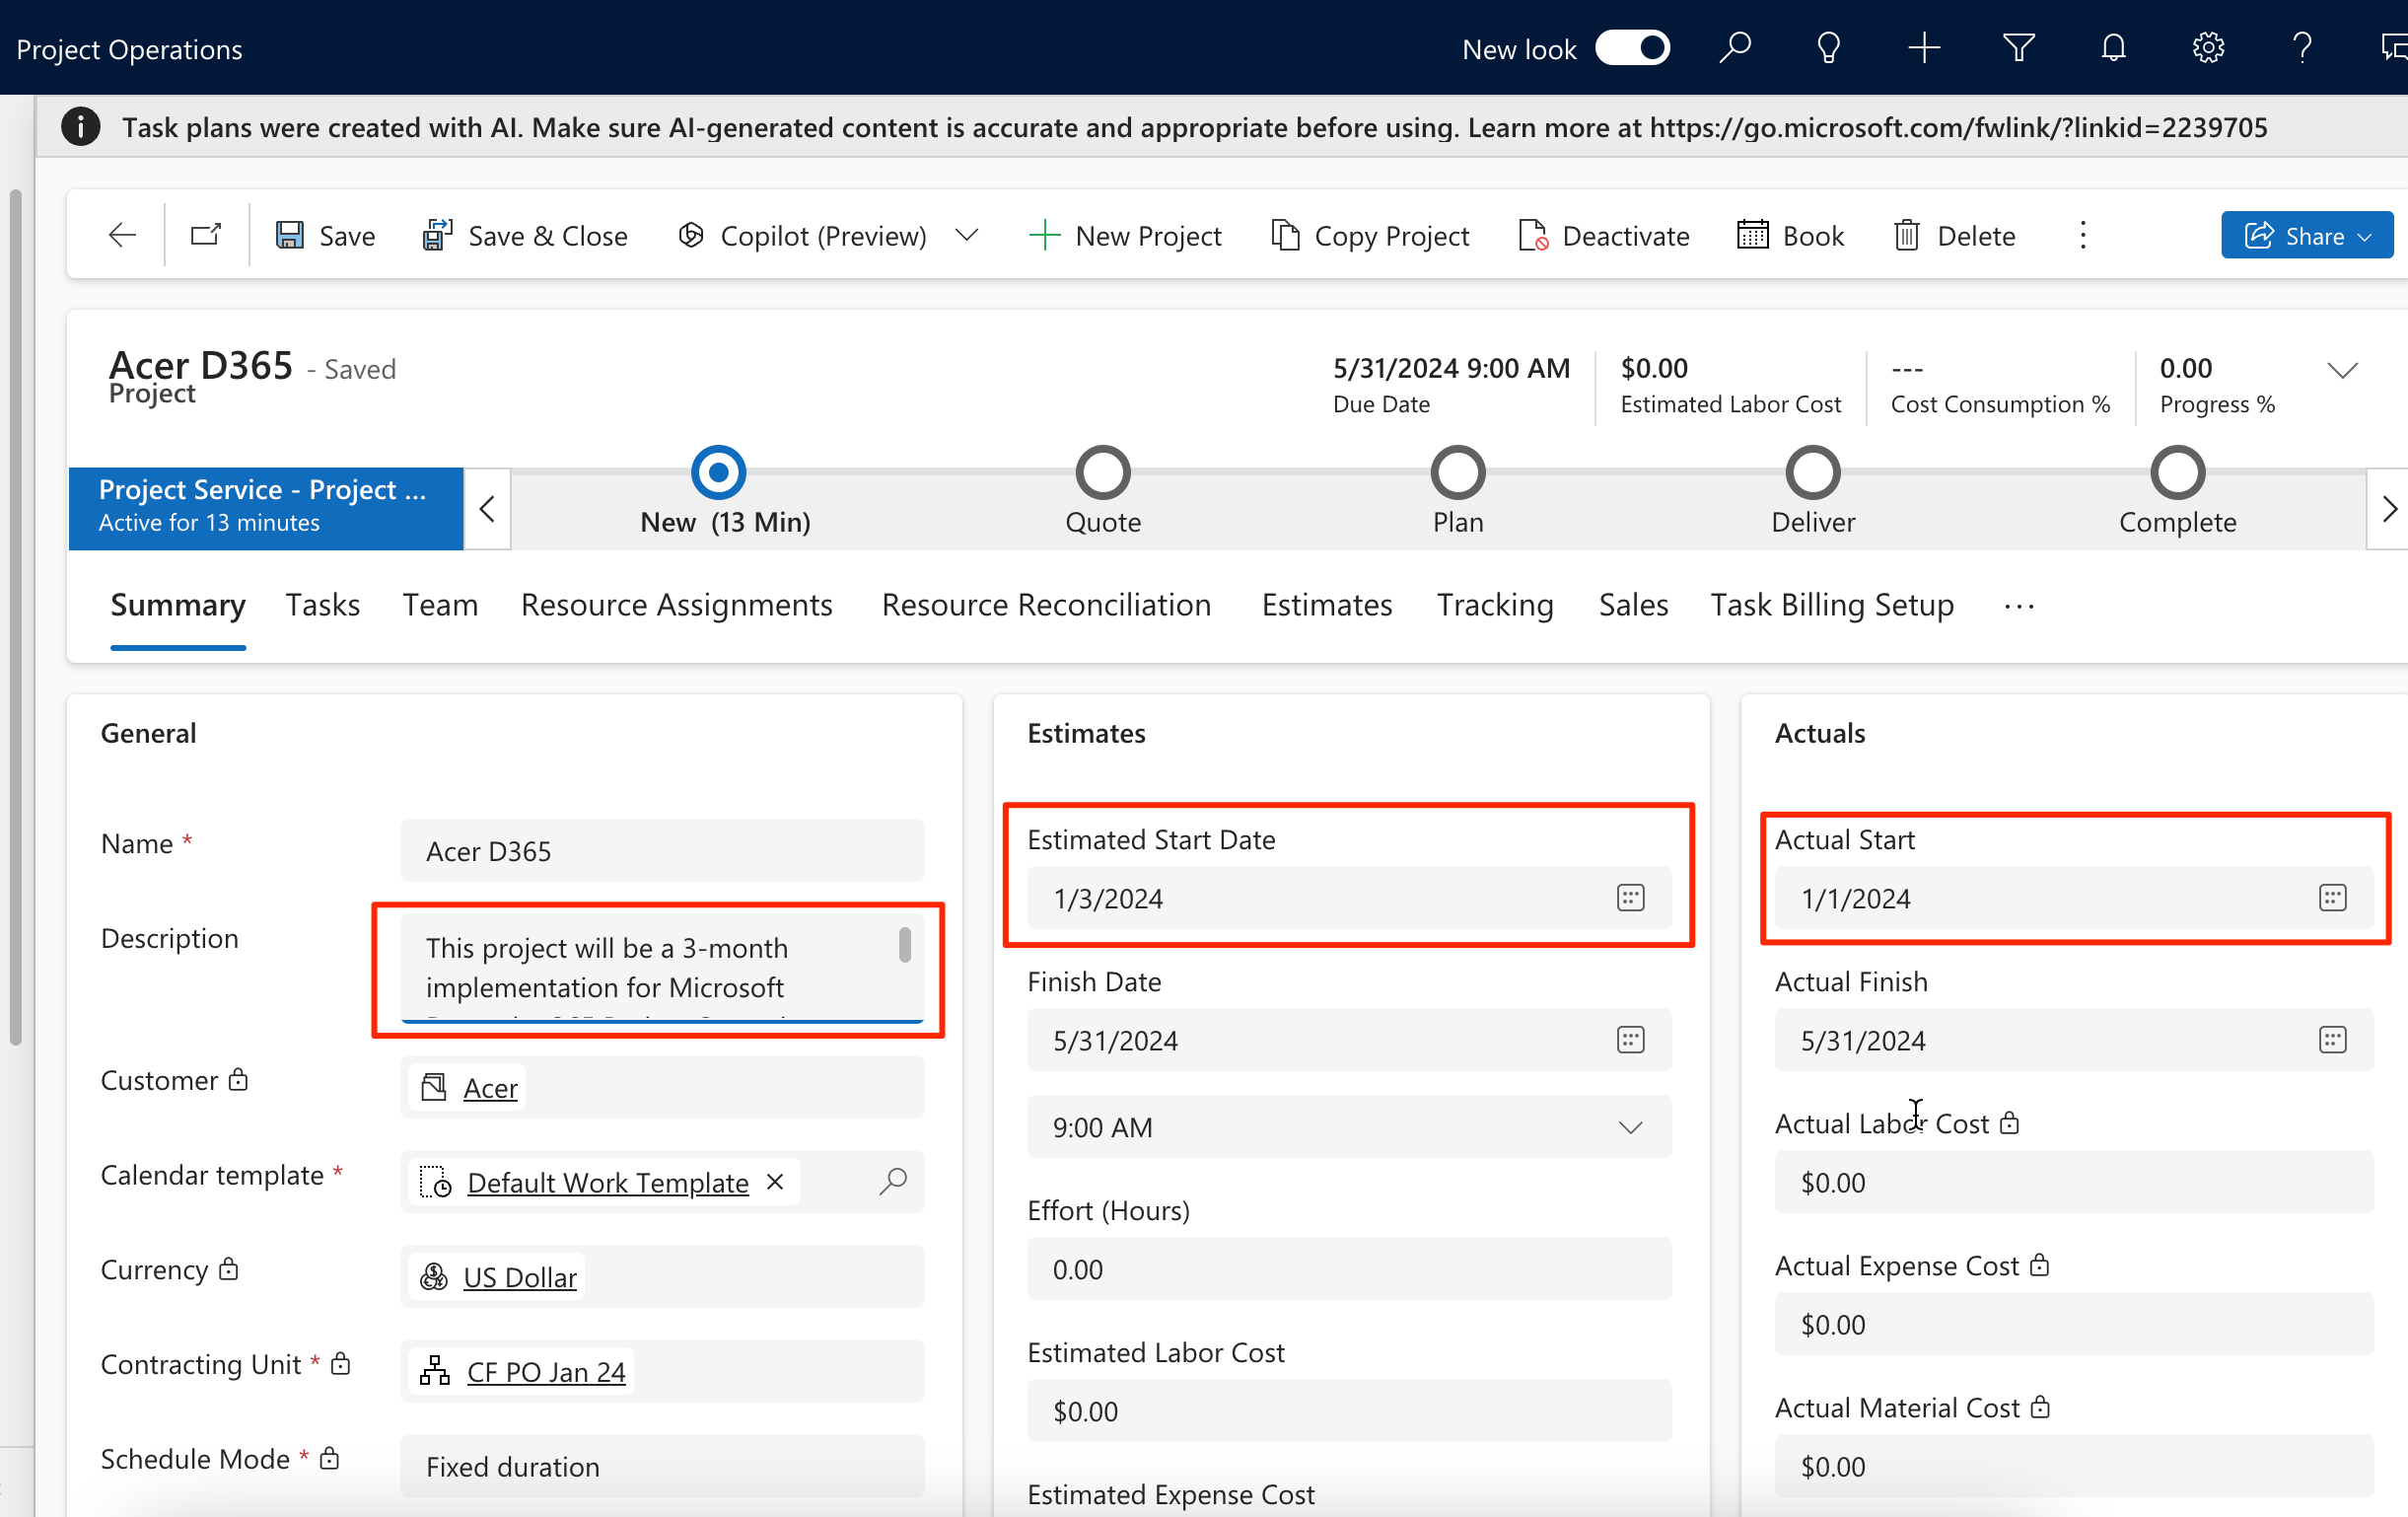
  1. Before you proceed to trying to create a Task Plan, the Copilot in Project Operations will look for data on the Project record such as the Description of the Project, Start Dates, End Dates etc as reference point in order to understand what type of Tasks are to be created.


    The sample Description I put for this Project is – “This project will be a 3-month implementation for Microsoft Dynamics 365 Project Operations with integration to F&O system. This project will involve developers to design, architect, develop code, test and deploy the same.

  2. Once Project details are in place and the Project doesn’t have a Project Plan yet. It should look something like this and having Copilot button on the ribbon visible.

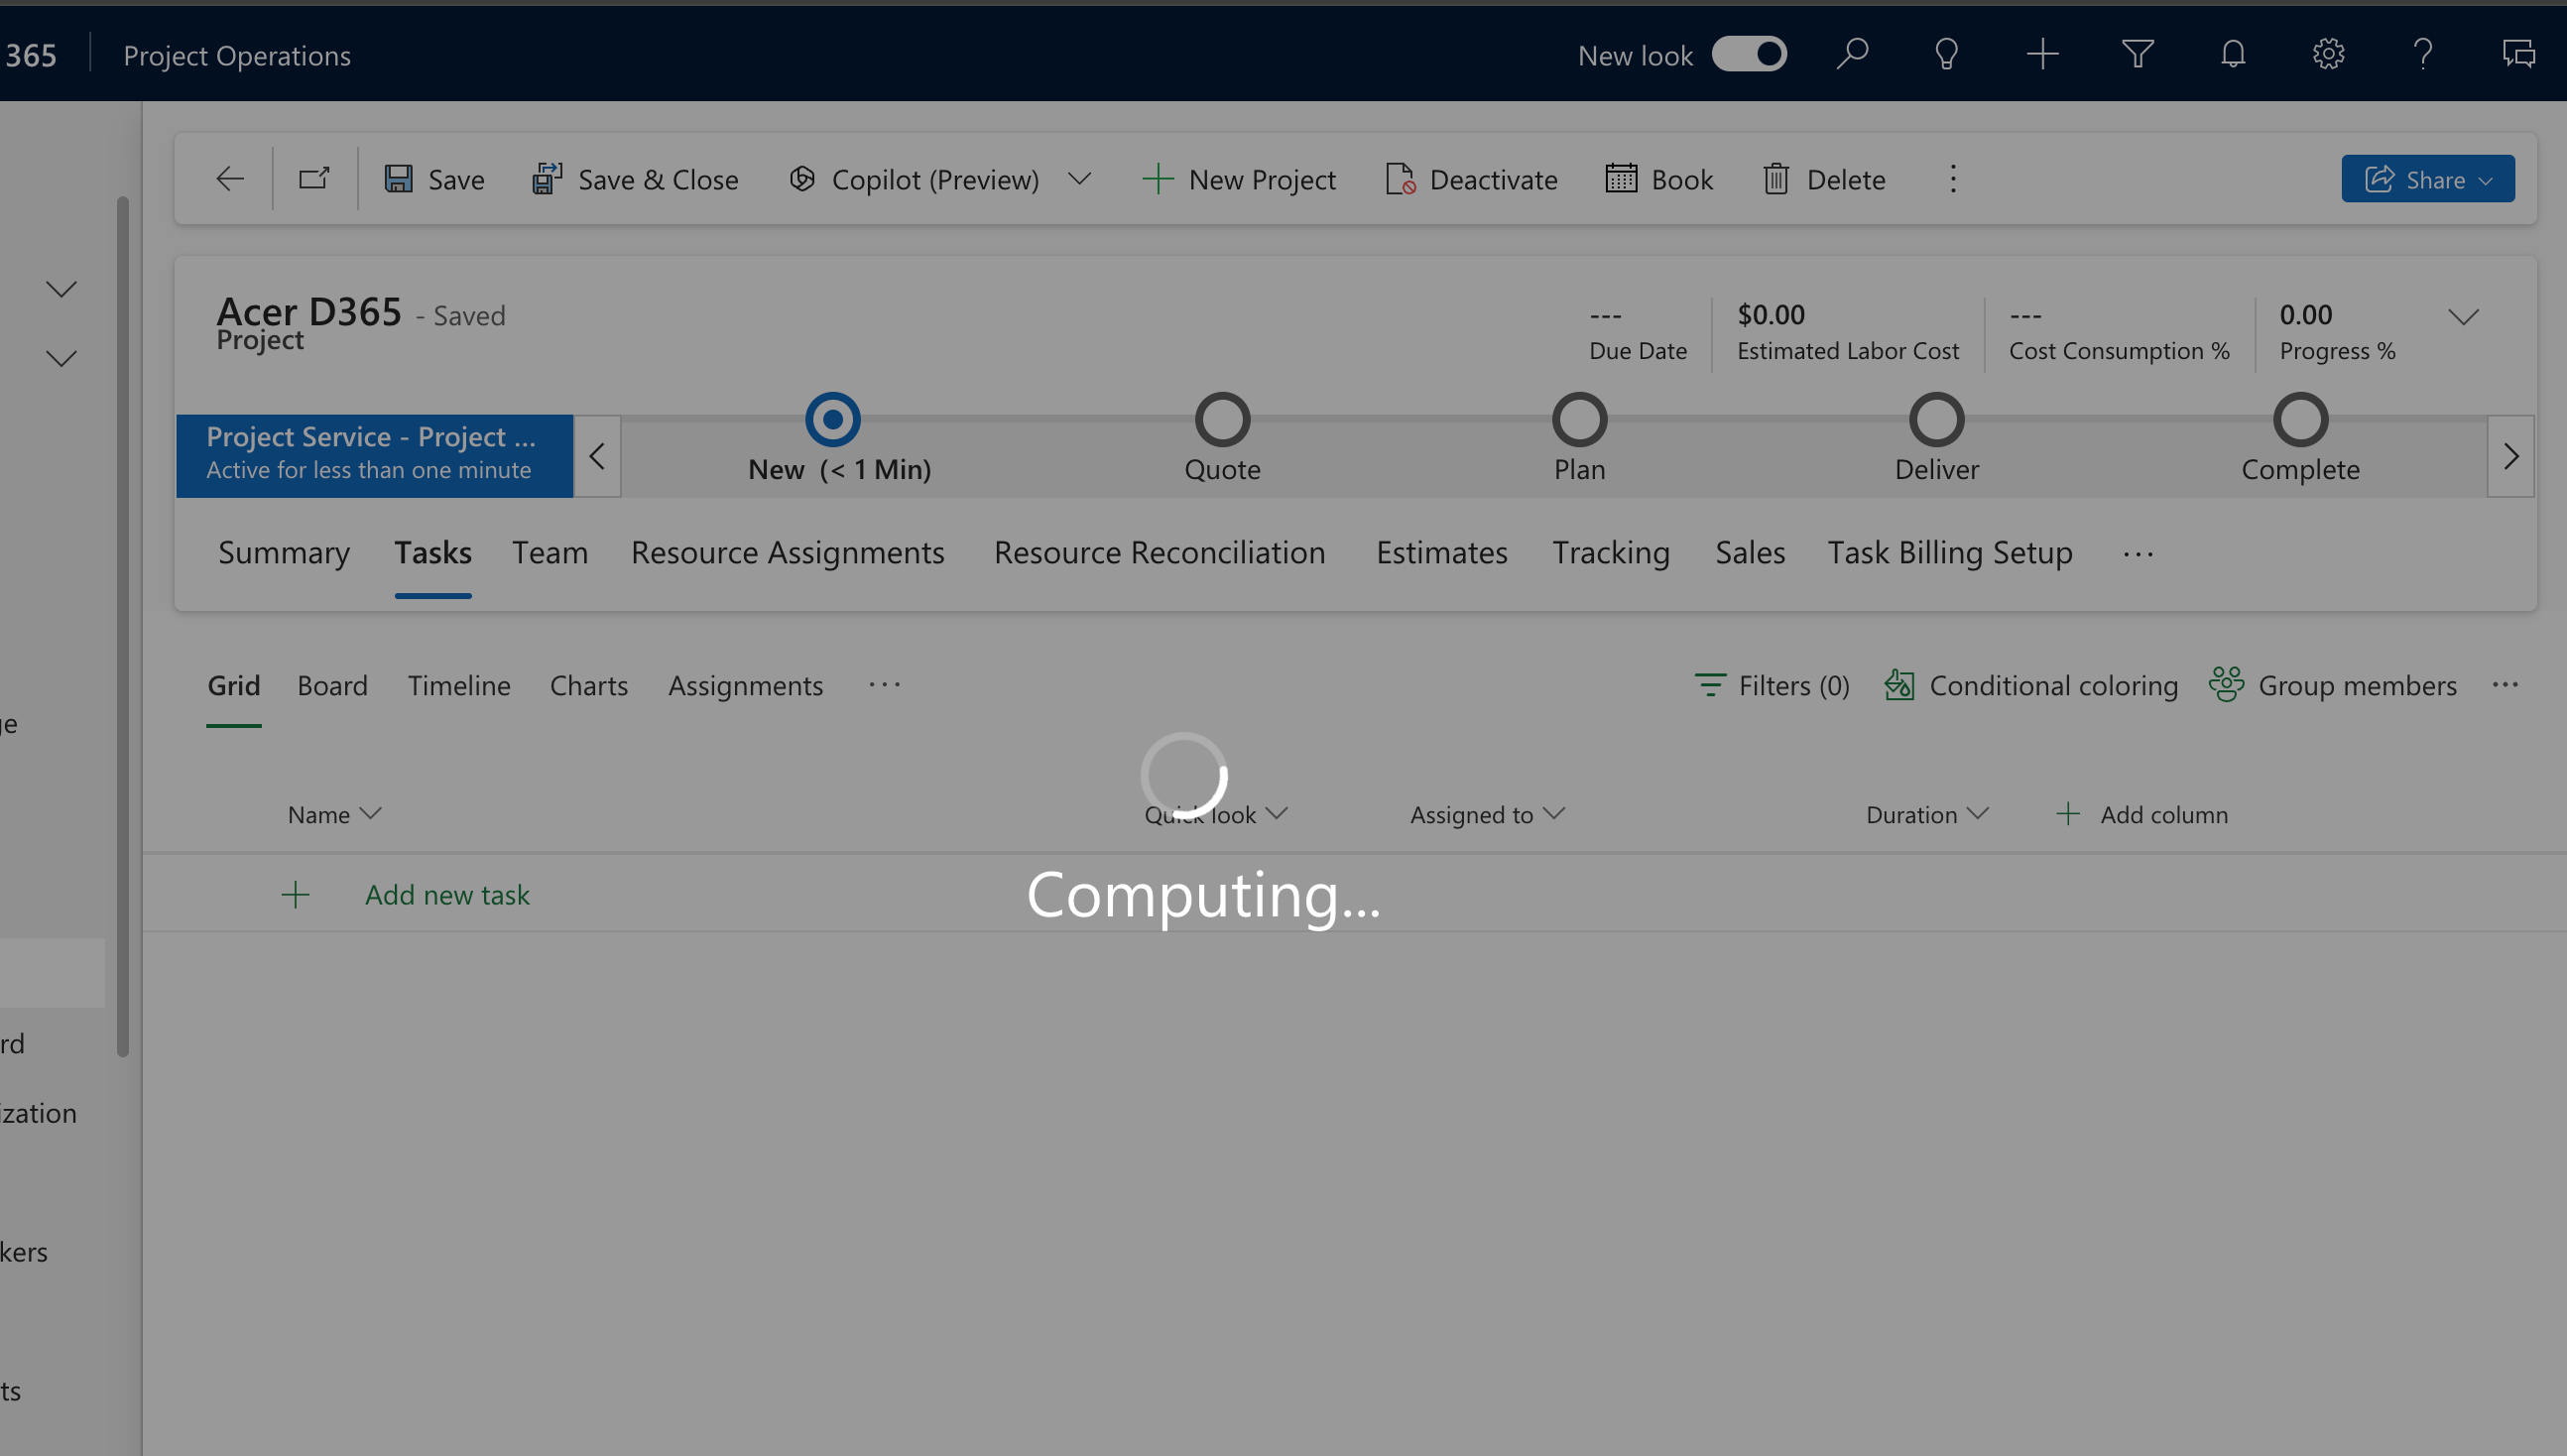
  3. If you expand the menu, you’ll see that it has an option called as Task Plan. Click on it and it’ll begin processing operations and show loading screen while it processes in the background.


    And the loading screen will keep showing messages like Computing, Collecting, analysing etc.

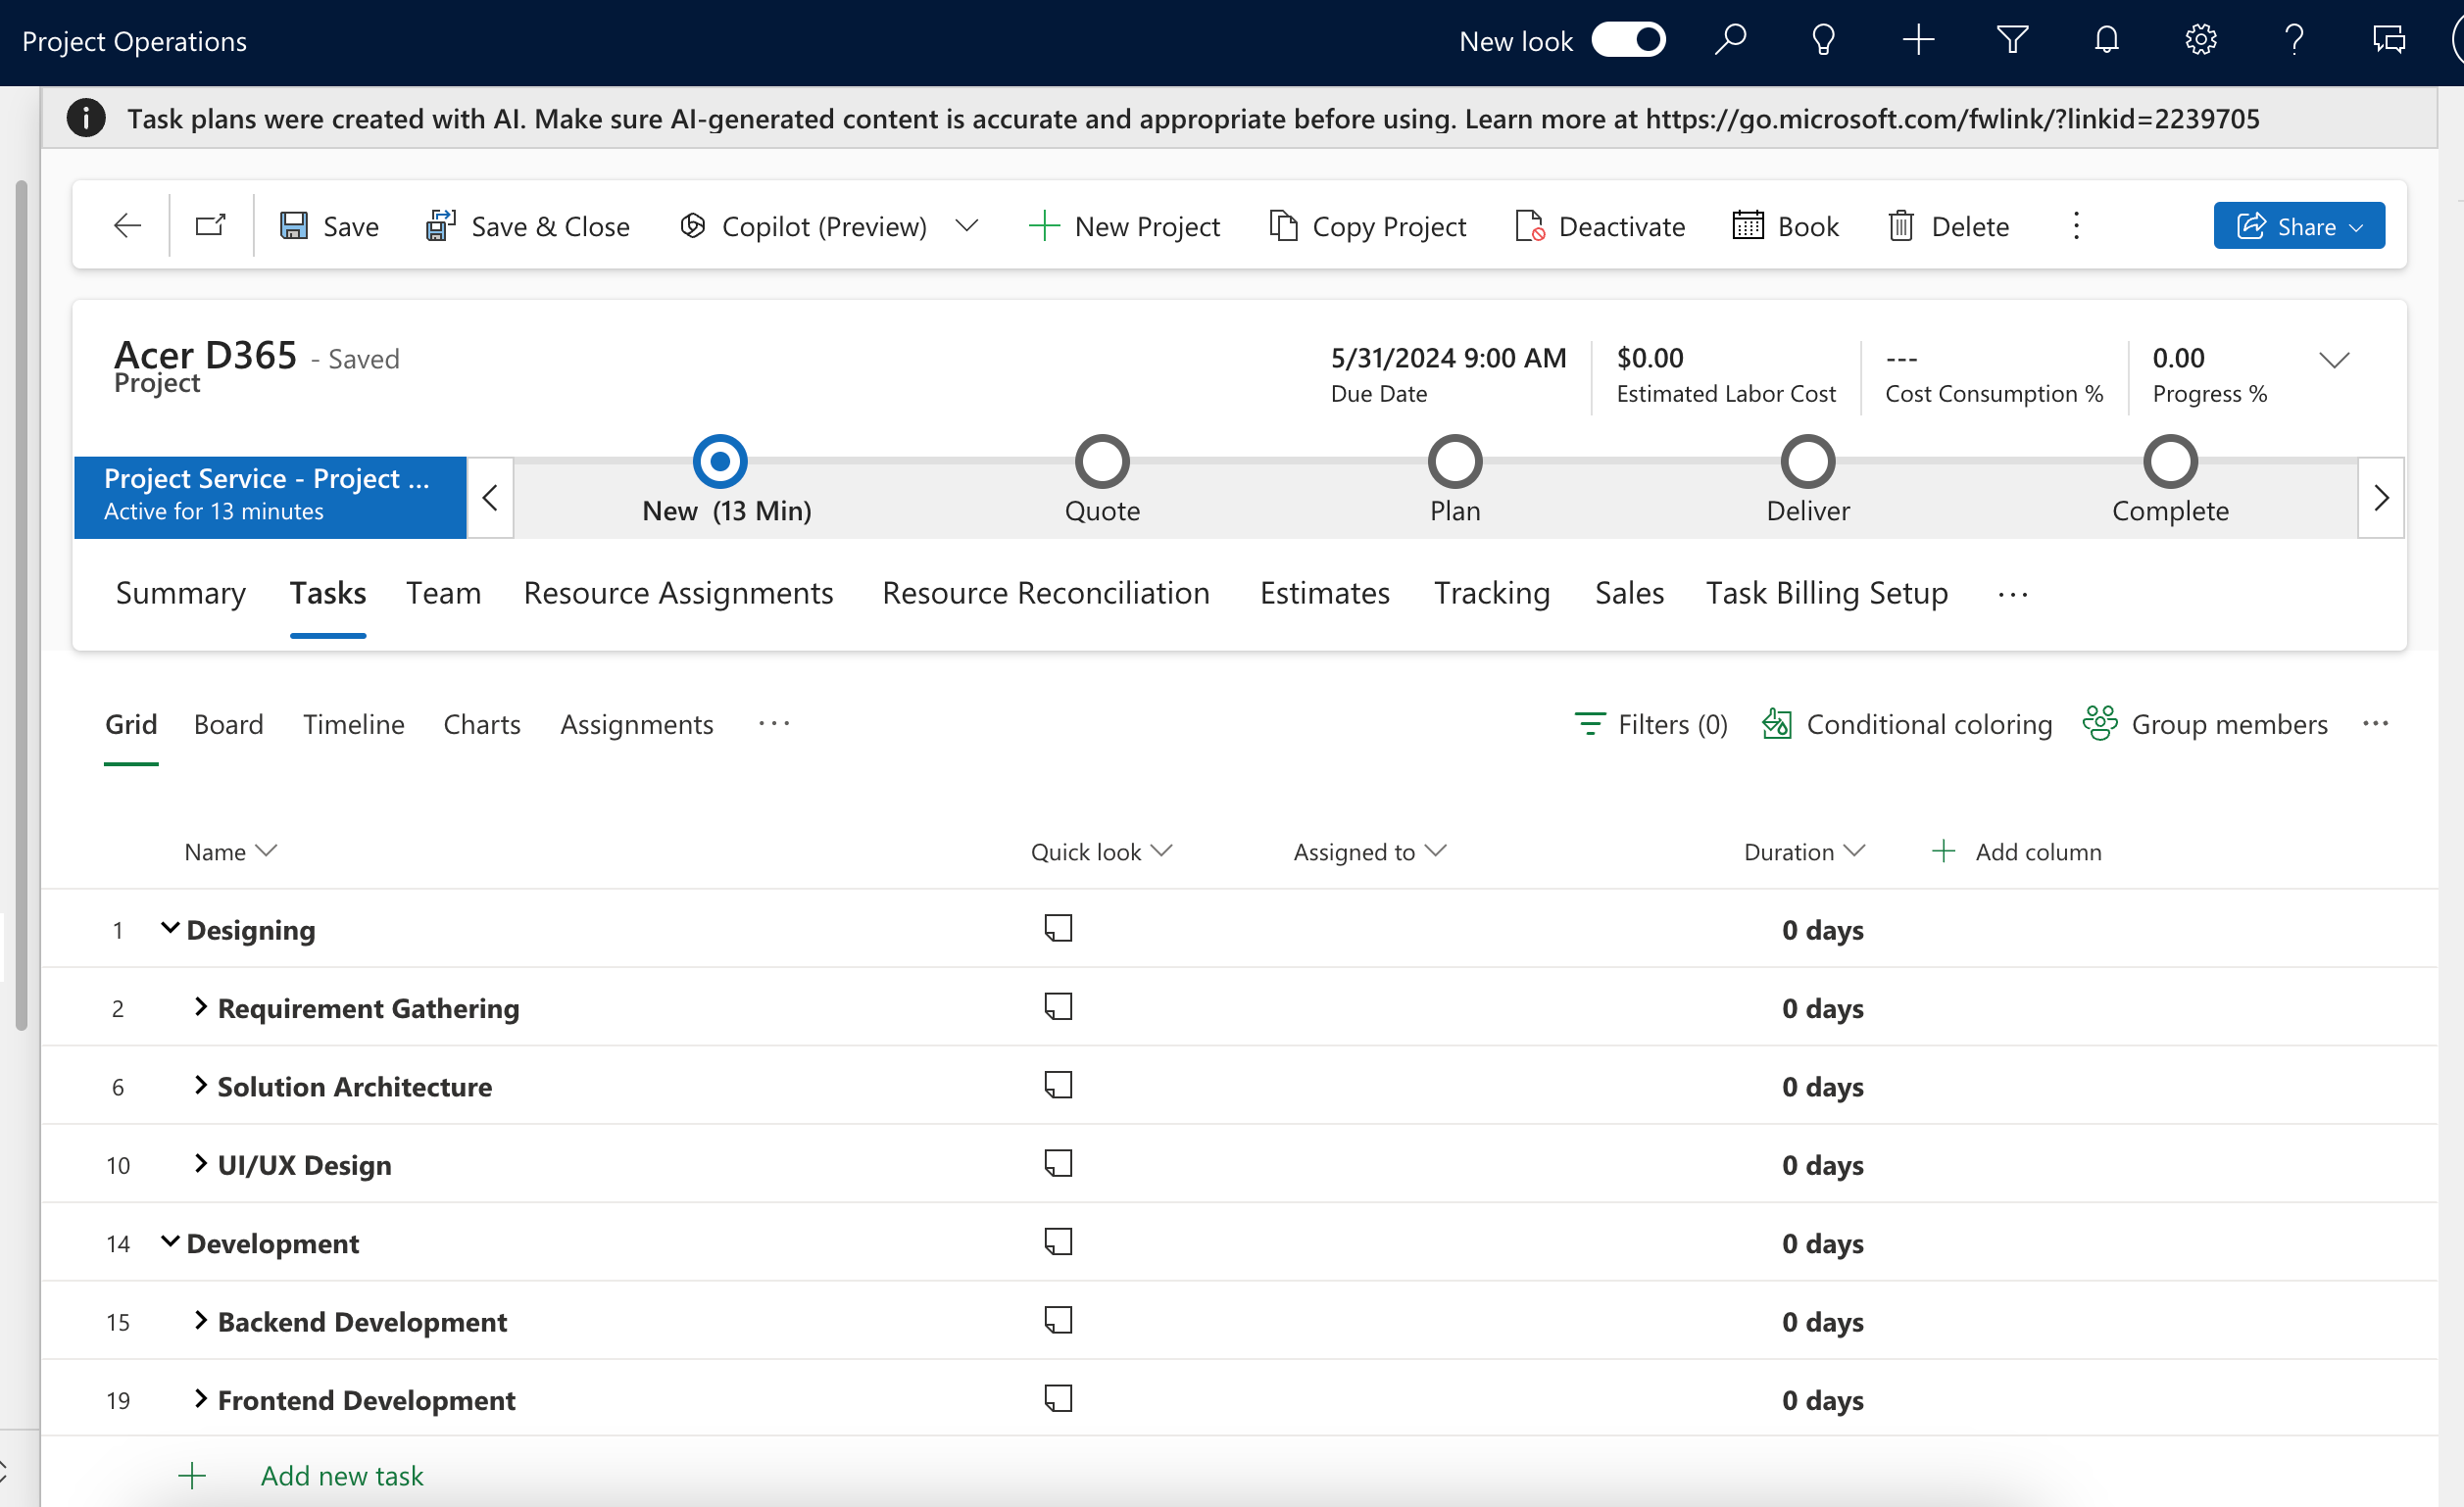
  4. In a few moments, it’ll process successfully and you’ll see Tasks being generated in the Tasks pane on the Project. Note that it’ll only segment into tasks and sub-tasks based on the Description and Start/End Dates – it won’t assign anyone or estimate any hours.

Here’s Microsoft Documentation on how the Task Plan feature works. Please note that this in Preview at the time of writing this post – https://learn.microsoft.com/en-us/dynamics365/release-plan/2023wave1/finance-operations/dynamics365-project-operations/generate-project-plans-using-project-manager-copilot?WT.mc_id=DX-MVP-5003911

Hope this post was useful!

Thank you!

Enable OneNote Integration for Dynamics 365 Sales environment

Since collaboration tools like Teams, SharePoints are a norm, so is OneNote. Here’s how you can enable OneNote Integration in your Dynamics 365 CRM Instance –

Settings

Given that you are a Dynamics 365 Administrator, you can navigate to Power Platform Admin Center of your environment –

  1. Go to the Settings on the Environment you want to enable OneNote Integration on

  2. Once you are in Settings, you can expand Integration section and then click on Document management settings.

  3. Then, you’ll be redirected to the classic UI and there, you can select Enable OneNote Integration (provided that SharePoint Based Document Integration is already enabled).

  4. It’ll open up this dialog box and you’ll see the pre-enabled OneNote for the tables which you want to enable. You can choose the ones you want to enable OneNote Integration for and click Submit. This dialog box will then close.


  5. Also, double-check on the entity level if OneNote Integration is turned On or not.

  6. Once this is done, you can refresh the record on which the OneNote Integration is enabled and click on + on the Timeline to show the Activity options. You’ll see OneNote appear as well.

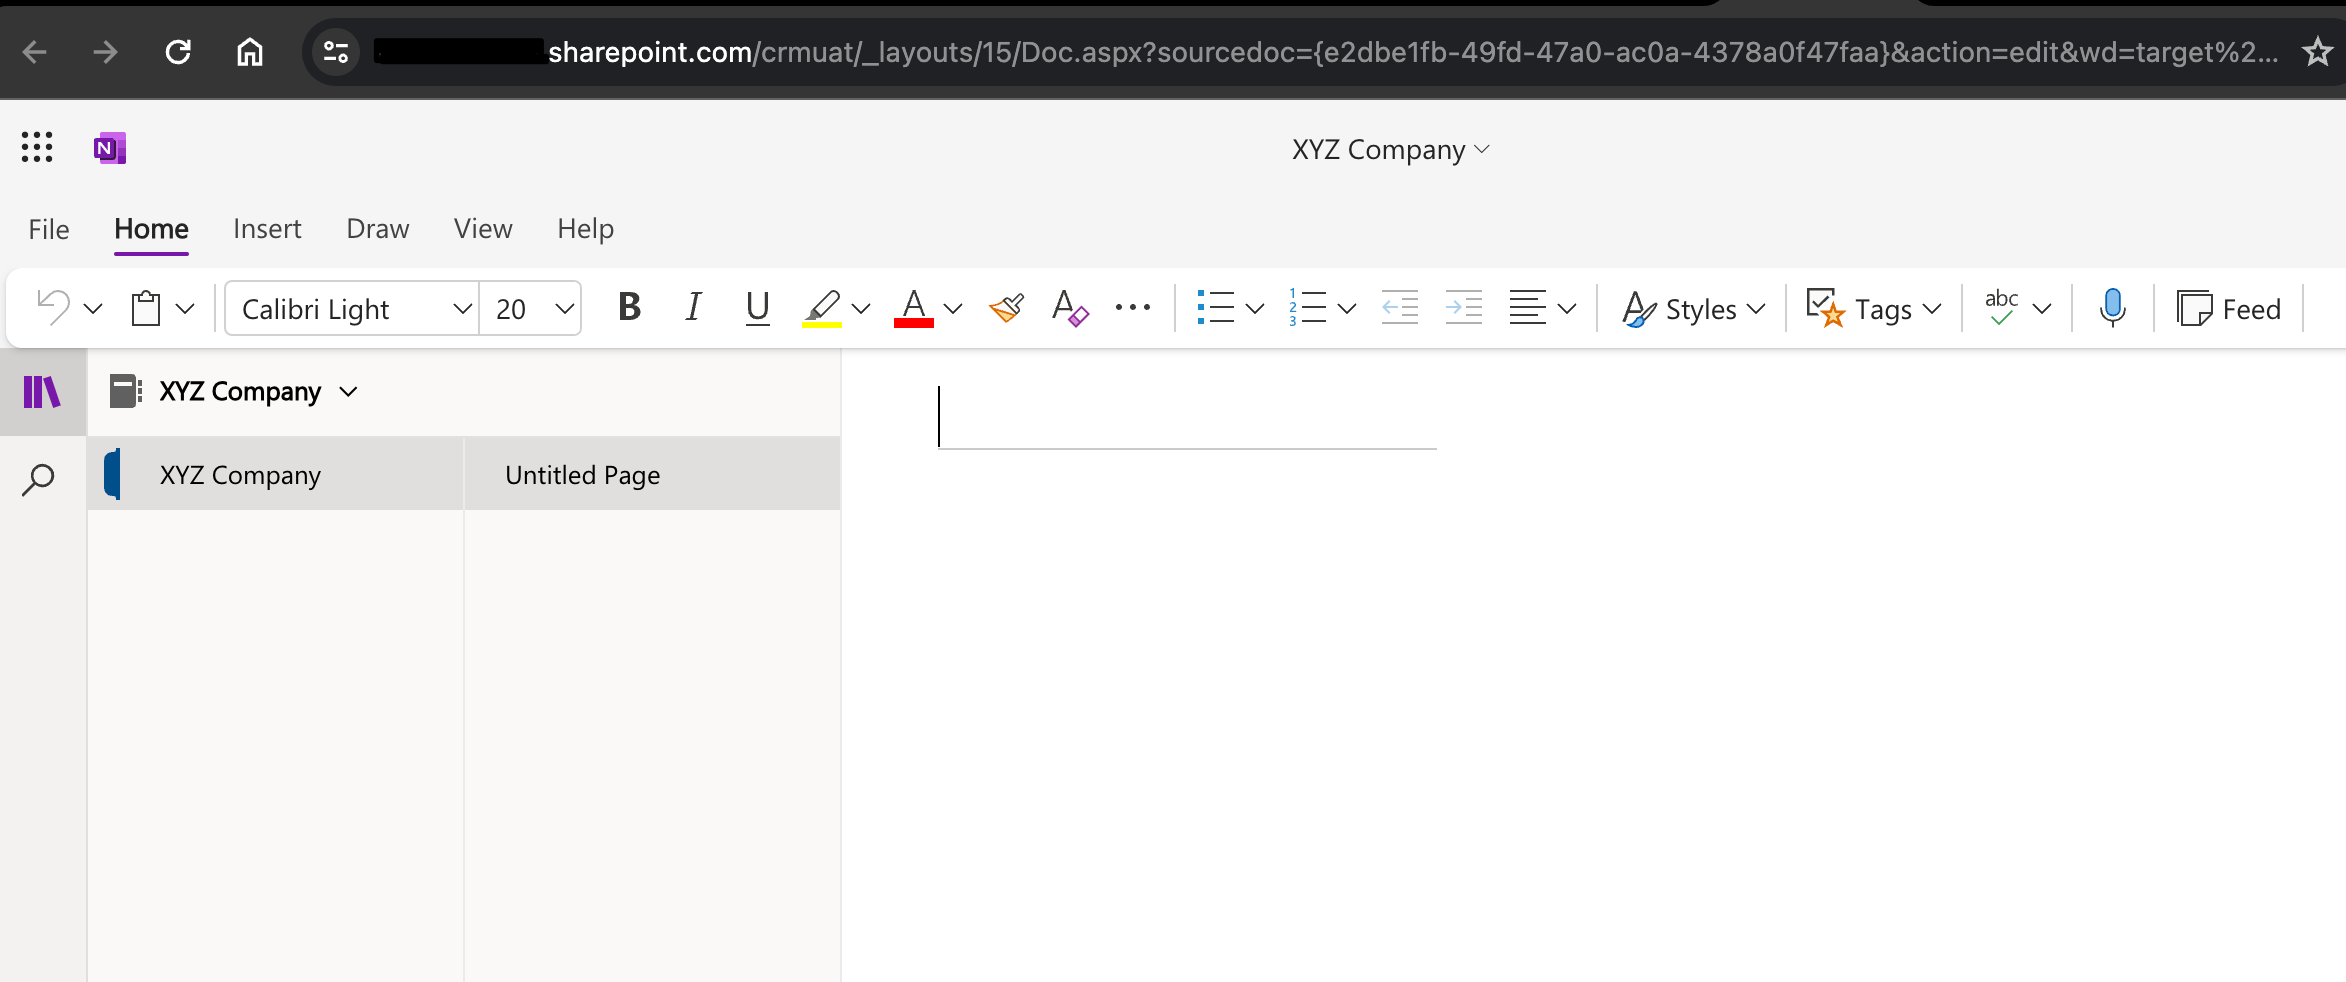
  7. Once you click on it, it’ll be redirected to SharePoint location where the OneNote notebook is created.

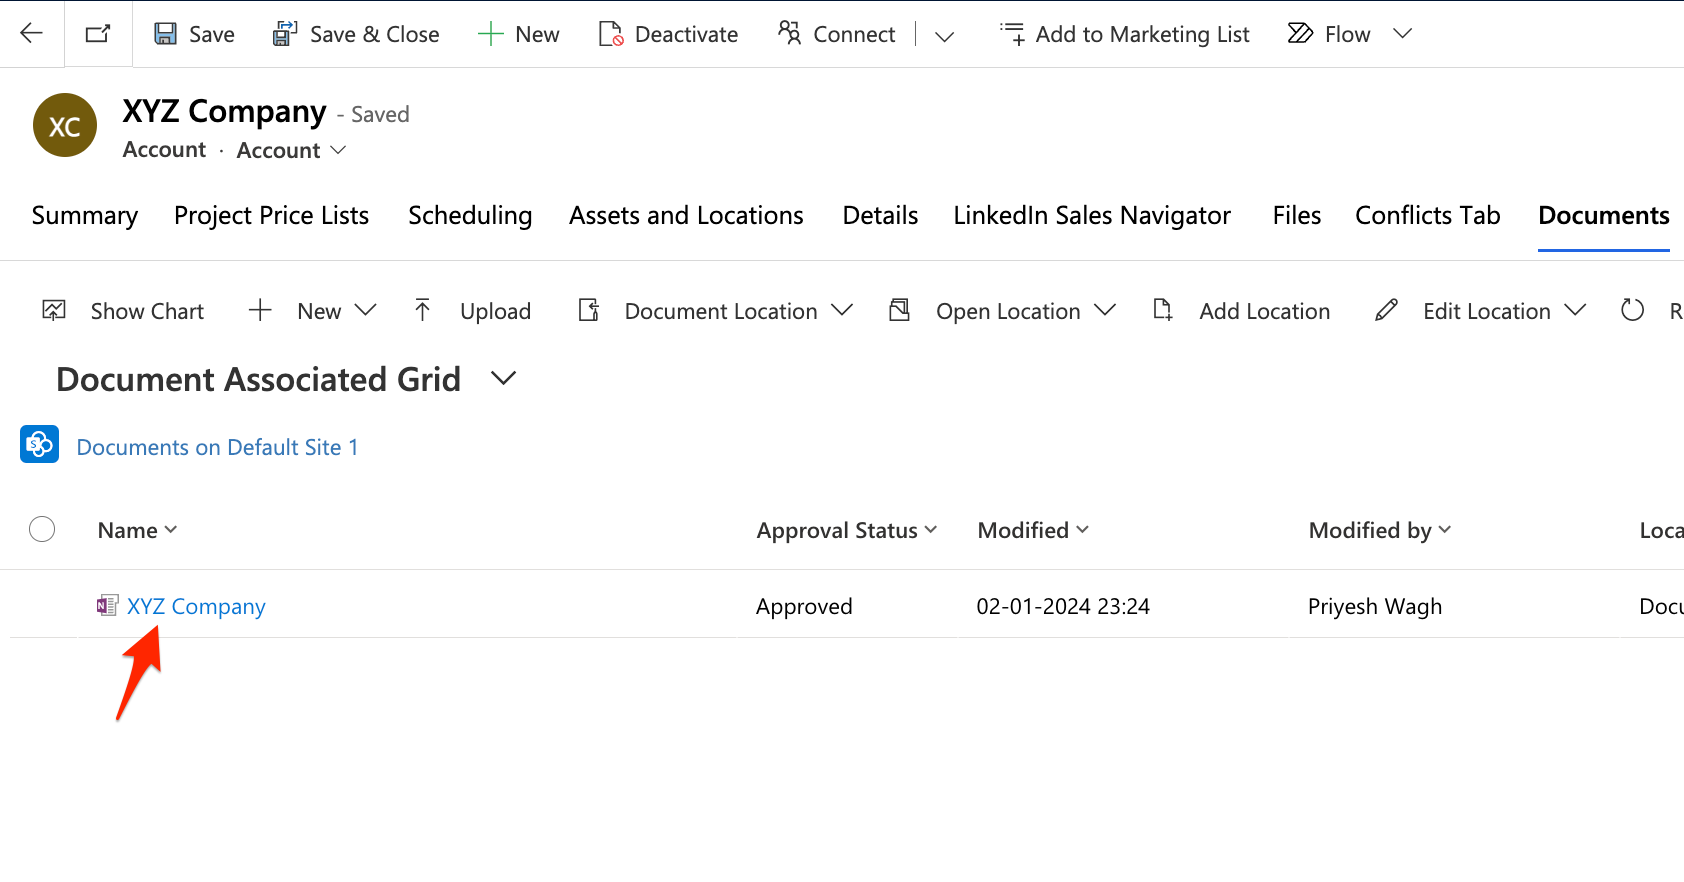
  8. Now, when you come back on the record and click on Related section and go to Documents. You’ll see the OneNote notebook appear there in the record.


Thank you!
Setting up Project Operations Lite | Blog Series

I felt that I should document steps to setup a Project Operations Lite Trial environment for everyone who’s trying to spin up a Project Operations Instance and trying to get the basic setup done as of January 2024.

Hopefully, this blog series will help you to quickly access and understand the info you need to setup your Project Operations Lite trial environment –

Provisioning a Project Operations Trial

BlogDescription
Starting a Project Operations Lite Trial EnvironmentDescribes how you can provision a new trial for Project Operations Lite and

Setting up Master Data in Project Operations Lite

BlogDescription
Setting Up Default Organizational Unit, Cost and Sales Price List in Project Operations LiteFind and rename a default Organizational Unit, attach a Cost Price List to the default Org Unit and also create a Sales Price List
(Roles, Prices will be added in preceding post)
Resource Roles and adding Role Prices to Cost and Sales Price List in Project OperationsReview and Create Resource Roles, Add Resource Roles to Sales and Cost Price Lists

Billing / Invoicing

BlogDescription
Time and Materials Billing Backlog table in Project OperationsExplains what Time and Materials Billing Backlog table in Dataverse in Project Operations is used for.

Copilot for Project Operations

BlogDescription
Enable Copilot for Project OperationsEnable / Disable Copilot as a feature for Project Operations
Create Project Plan using Copilot in Project OperationsCreate a Project Plan for your Project using Copilot based on the Description and other details on the Project record.

Here are some Power Automate posts you want to check out –

  1. Select the item based on a key value using Filter Array in Power Automate
  2. Select values from an array using Select action in a Power Automate Flow
  3. Blocking Attachment Extensions in Dynamics 365 CRM
  4. Upgrade Dataverse for Teams Environment to Dataverse Environment
  5. Showing Sandbox or Non Production Apps in Power App mobile app
  6. Create a Power Apps Per User Plan Trial | Dataverse environment
  7. Install On-Premise Gateway from Power Automate or Power Apps | Power Platform
  8. Co-presence in Power Automate | Multiple users working on a Flow
  9. Search Rows (preview) Action in Dataverse connector in a Flow | Power Automate
  10. Suppress Workflow Header Information while sending back HTTP Response in a Flow | Power Automate
  11. Call a Flow from Canvas Power App and get back response | Power Platform
  12. FetchXML Aggregation in a Flow using CDS (Current Environment) connector | Power Automate
  13. Parsing Outputs of a List Rows action using Parse JSON in a Flow | Common Data Service (CE) connector
  14. Asynchronous HTTP Response from a Flow | Power Automate
  15. Validate JSON Schema for HTTP Request trigger in a Flow and send Response | Power Automate
  16. Converting JSON to XML and XML to JSON in a Flow | Power Automate

Resource Roles and adding Role Prices to Cost and Sales Price List in Project Operations

Now that in the previous blog posts of this series, the Organization Units, Cost Price and Sales Prices were setup – Setting Up Default Organizational Unit, Cost and Sales Price List in Project Operations Lite, let’s look at what Roles (or Resource Roles) are and how you can add them to the Price Lists

Resource Roles

Let’s see how we can add Resource Roles –

  1. Navigate to Resources Area and then select Resources sub-area in Project Operations App.

  2. Now, navigate to Roles on the Sitemap and you’ll see some existing Roles already available out-of-the-box

  3. If you open any existing roles, you’ll see that Billing Types the type/behavior of the Role which we’ll discuss in further sections.

    Now, let’s add the Resource in both Cost and Sales Price Lists in the next section.

Add Role in Cost Price List

Now, lets assume we want to assign a Cost Price to the Consulting Lead role (which is of type Chargeable). Let’s see below on how we can do this –

  1. Navigate to the Organizational Units in Settings area in Project Operations since it’s easy to go than to find the Cost Price as you might not remember the exact name every time.
    Open the Organization Unit record which is your default Organization Unit for the PO environment.

  2. Now, since we had already associated a Cost Price in the previous sections, you can open the Price List.

  3. Now, once you open the Cost Price List, go to Role prices tab and click on + New Role Price to add the existing Role to this price list and define the Cost of the Role to the organization.

  4. Now, make sure you select the Role and also select the Organization Unit even if you have selected the Cost Price List from the Organization Unit. That’s because you can add multiple prices for the same role across different Organization Units.

    I’m keeping a sample Cost Price of $150

  5. Once you Save and Close, the Role Price will be defined in this Cost Price for this Org Unit.


    Alternatively, let’s also add the same Role in the Sales Price List as well from this series.

Add Role in Sales Price List

Let’s also add the same Consulting Lead role to the Sales Price List as well –

  1. Navigate to the Sales area and then look for Price Lists. Look for the Sales Price List you created for your organization.

  2. In the Sales Price list, go to Role Prices and click on Add New Role Price

  3. Now, as Sales Prices are supposed to be higher than Cost Prices, I’m using a Price of $240 for the Consulting Lead which was $150 in the Cost Price

  4. And once you Save and Close, it’ll be added to the Sales Price list as shown below.

Hope this post was useful!

Here are some Power Automate posts you want to check out –

  1. Select the item based on a key value using Filter Array in Power Automate
  2. Select values from an array using Select action in a Power Automate Flow
  3. Blocking Attachment Extensions in Dynamics 365 CRM
  4. Upgrade Dataverse for Teams Environment to Dataverse Environment
  5. Showing Sandbox or Non Production Apps in Power App mobile app
  6. Create a Power Apps Per User Plan Trial | Dataverse environment
  7. Install On-Premise Gateway from Power Automate or Power Apps | Power Platform
  8. Co-presence in Power Automate | Multiple users working on a Flow
  9. Search Rows (preview) Action in Dataverse connector in a Flow | Power Automate
  10. Suppress Workflow Header Information while sending back HTTP Response in a Flow | Power Automate
  11. Call a Flow from Canvas Power App and get back response | Power Platform
  12. FetchXML Aggregation in a Flow using CDS (Current Environment) connector | Power Automate
  13. Parsing Outputs of a List Rows action using Parse JSON in a Flow | Common Data Service (CE) connector
  14. Asynchronous HTTP Response from a Flow | Power Automate
  15. Validate JSON Schema for HTTP Request trigger in a Flow and send Response | Power Automate
  16. Converting JSON to XML and XML to JSON in a Flow | Power Automate

Enable Copilot for Project Operations

Recently, you must have observed Copilot being introduced in every other Microsoft Business and M365 applications. Dynamics 365 Project Operations too being no exception! Here’s how you can get the same

Enable Copilot in Project Operations

Here’s how you can enable Copilot in Project Operations –

  1. In Project Operations app, Navigate to Settings in the SiteMap area –


  2. Then, Navigate to Parameters. Then, open the Parameter record itself (Avoid click on the Default Organization Unit as it’ll take you to the Org Unit record and not the intended Parameter record).

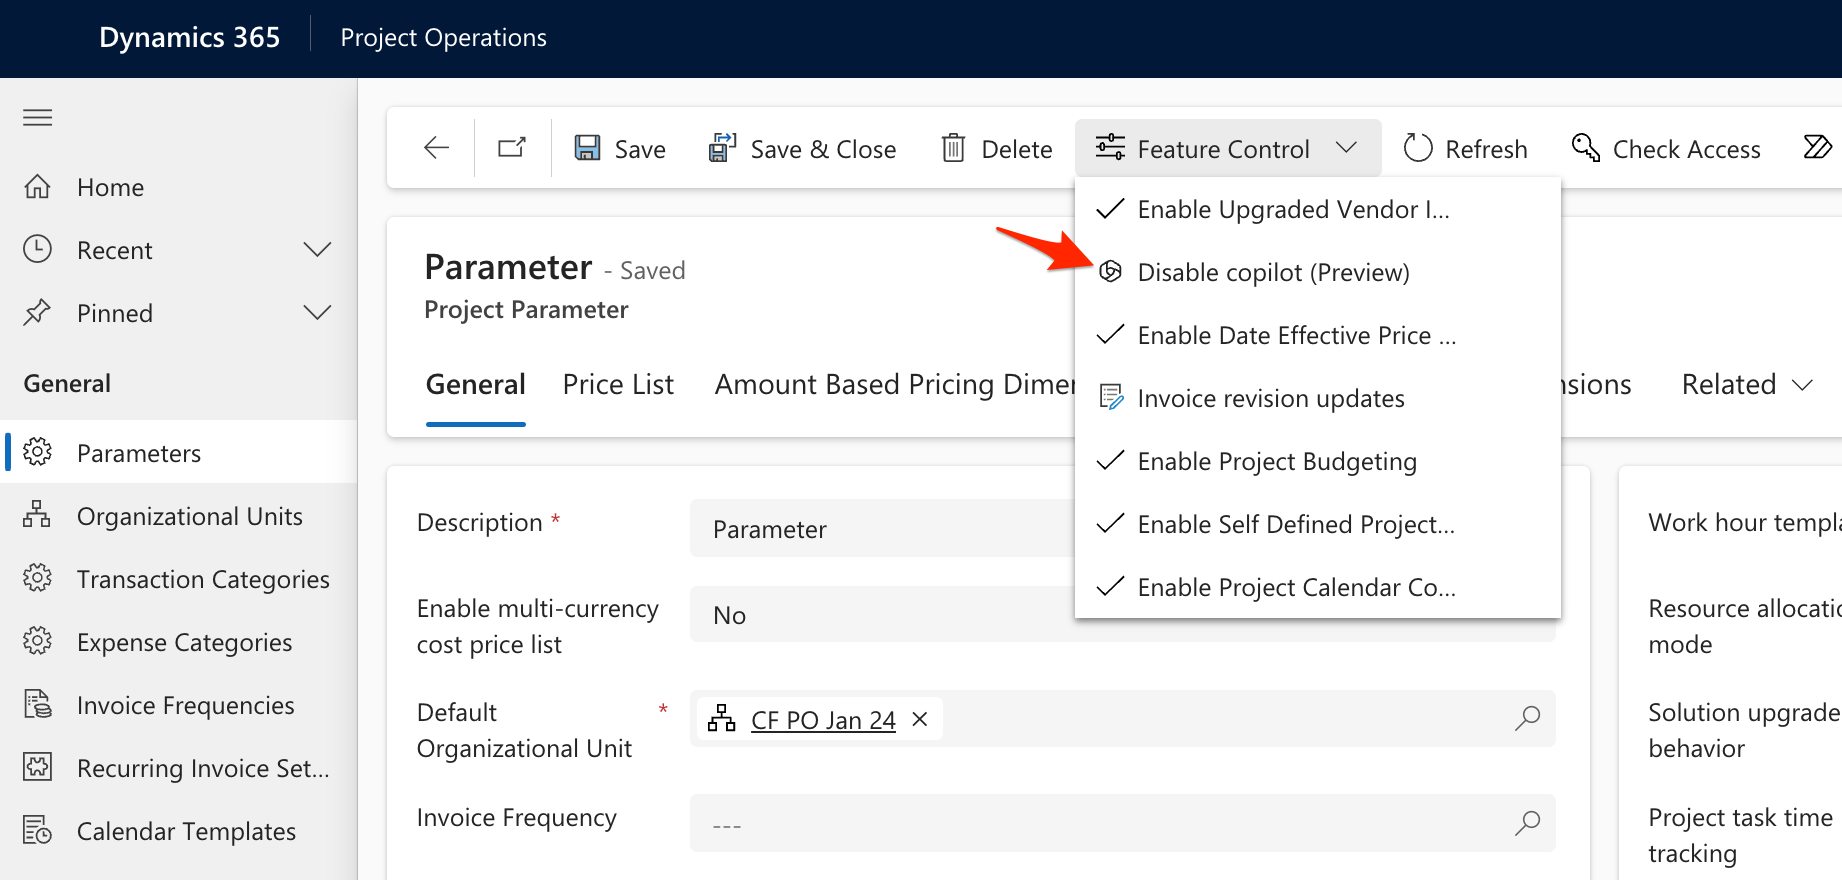
  3. Then, you can drop down from the Feature control and see that the Copilot option is available to enable for you.

  4. Once you click on it, it’ll ask you for confirmation. Click OK if everything looks good to you.


    It takes a few moments for Copilot to be enabled for Project Operations environment.

Disable Copilot

Here’s how you can disable Copilot if not needed –

  1. In case you don’t want to use Copilot and want to disable it, you can open the Parameter record in Project Operations’ Settings area and drop down from the Feature Control ribbon button to find that you can now Disable Copilot if it is in enabled state.

Hope this post was useful!

Thank you!