While using a Canvas App on Desktop, or when it’s embedded in Dynamics 365 CE, it’s a nice design decision to highlight the Gallery items on which your mouse is pointing on as you navigate/scroll.
Default Behavior
By Default, the Gallery Items remain visually static and don’t show any effect if you move your mouse over the items.
That’s because the Transition effect on the Gallery items is set to None by default.
Transition Effects on Gallery Items [Pop & Push]
As you’ve seen the Default behavior, let’s also look at the 2 effects that are available to us
Pop
Select the Gallery and then on the right-hand side, look for Transition field, it’ll be set to None by default. Change it to Pop.
Now, in Pop, the effect will be as below –
Push
Similarly, like Pop, Push will have the reverse effeect of pressing into the item hovered.
Again, when Gallery is selected, set the Transition to Push in the menu, save the changes and check again.
The Push effect will be as follows –
Here’s a quick YouTube video for the same –
Hope this was useful!
Here are some more Canvas Power Apps posts you might want to check –
As Dataverse connector keeps getting updated from time to time, here’s a new Search rows (preview) Action which you must be seeing in the Dataverse connector in Power Automate. Let’s see how we can use this Action.
As it suggests, that this is still in preview! So kindly take a note of that.
Search Rows (Preview)
Search rows is an Action in the Dataverse connector and you’ll be able to see it like this
Enable Relevance Search
Let’s assume you went ahead and used this connector in your Flow without having Relevance Search enabled in your D365 CE organization, you’ll see the Search Rows throw the below error.
And the error is described as –
To make Search Rows work, Relevance Search must be enabled for you Dynamics 365 CE / CRM environment. Head over to the System Settings in Dynamics 365 under Settings > Administration > System Settings. And in General tab, look for Relevance Search option, check-mark it and save.
Let’s see how this Action from the Dataverse connector will work –
Now, once you have selected the Search rows action, below are the features which I’ll explain one by one –
Let’s first look at the last item i.e. Return row count. As it says, will result the count of results returned if set to Yes. Will return -1 if set to No.
And the short Summary of the same is: Search Type: “simple | full” There are 2 types called as simple and full. Default = simple. Both have different functions within them that you can use on the Search Term.
Search Mode: “any | all” By Default – any. This defines if any criteria of the Search Term is to be considered or all must be true based on different syntax and operators used.
Row Count denotes how many records should the results Return which is standard across other Dataverse actionss.
Also, Row Filter uses OData style filtering which we’ll omit in this example to keep it simple. 😊
Now, let’s enter a Search Term and keep it simple, I’ll pick an example: “Contoso“. Next, look at the Table filter – If I leave it blank it’ll search for Contoso across all Tables in Dataverse.
Result to show from all Tables as per the above Search rows term –
Now, I’ll add account and contact (I do have some records in the Opportunity as well which has the keyword ‘Contoso’. So those will be filtered out)
And the result will be as follows –
And if we look at the Raw Outputs to see how data is retrieved, we get the below –
Now, let’s look at Sorting. Now, in the Sort by filter, I’ll enter the field name ‘name‘ and desc as the order of the Sort. And then, we’ll check the results
And the results were as below –
Next, let’s look at Facet Query. basically, it drills down on the Results which are already returned as a part of the main query and serve as metadata for the same to gather similar information together. Here’s how I enter a Facet query – Ex: contact.address1_city. Meaning, it’ll return Address 1: City from all the returned Data and store it under Facet Query.
Now, when we run this, we’ll get the following results –
Let’s look at what Skip Rows does. It’ll only omit the records from the already returned Results. Example: Even if the Result returned 5 records, it’ll Omit/Skip first x records. But still show that the Results returned are whatever the Query is supposed to return.
In the below example, out of 5, I’ll skip 4 rows.
And when you run the Query, you’ll find that the Record Count is 5, but only 1 entry was available in the Output.
Which Columns are Searchable?
There are 2 points to keep in mind to know and configure which all columns will the Search be performed on.
If you are aware of how you can configure the Quick Find views in Dynamics 365 CE, same is applicable here since this works off of Relevance Search itself. In any Table/Entity’s Quick Find view, make sure the columns are selected in the Add Find Columns
The ones selected in Find Columns are the ones on which the Search will be performed.
Here’s a YouTube video I made to demonstrate the same –
Hope this was useful!
Here are some more Power Automate / Cloud Flow posts you might want to check –
Formerly, Learning Path – A complete new overhaul for guided help is Custom Help Panes in Dynamics 365
Enable Custom Help Panes
Access your System Settings for enabling this feature in your organization –
Go to Settings > Administration > System Settings. Then switch “Enable Custom Help Panes and Guided Tasks” to Yes if already set to No.
Creating Custom Help Panes
Let’s see how you can configure these Custom Help Panes in your Dynamics 365 CE environment for different environments –
For example, for Contact entity, if you navigate to the Question Mark option on your top navigation bar, a Custom Pane will show up. If the above System Settings is not turned on, it’ll navigate to Microsoft Docs instead.
It’ll expand the Pane as follows. You can then click on the three vertical dots as shown and click on Edit –
Once you Edit, you’ll open the Custom Help Pane editor on which you can start configuring the Help Pane. You can Start Editing the Pane. You can start by entering the Title and then move down to add different Help items to the Pane.
Now, I’ve added Title of the Page to Contact Help. You’ll see Save button at the button where you can Save the progress. Now, I’ll go to Insert and add a Section. The first item is Insert a Section.
Open clicking Insert Section, I can add a title to it. Now, I’ll label this section as General. And it will appear as below.
Now, you can click inside the General section and can add rest of the items there.
Next, I’ll insert a Link into the General section.
And I’ll complete the below Info for the Link.
It’ll appear as below –
Next, I’ll Edit the Pane again. And select Coachmark.
And add Coachmark details as follows –
Now, you can drag to where the Coachmark should be highlighted when clicked. Now, when you click on the generated Link, the coachmark will prompt.
Next, let’s insert a Balloon.
Enter details on the Balloon like the Link title, actual Title as it should appear on the Balloon and the Details it should read out. Finally, drag the Balloon to the element.
And here it drag it to a relevant field.
And finally, when the link is clicked in the Pane, the Balloon will appear as below.
Next, Let’s insert a Video.
And enter the URL of the video and set preferences accordingly.
Once Inserted, it’ll look like below.
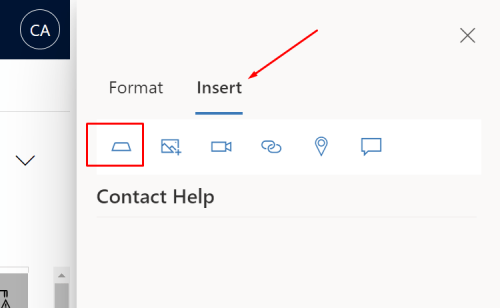
Now, the final Items which we will insert here is an Image.
And it’ll ask me for a Image URL which is accessible over the Internet.
And it’ll appear as below –
I’ve also added a YouTube video explaining the above steps in case anything from the above was not already clear –
Help Page record
In Dynamics 365, the Help Page record looks as follows if you do an Advanced Find –
You can even move this between environments within solutions itself. You can test this out in the new make.powerapps.com Solutions and Add an Existing Help Page as shown below –
Hope this was helpful!
Here are more Dynamics 365 CE/CRM posts you might want to check out –
Let’s see how we can suppress critical information about the Flow to the caller HTTP Application while sending back a response.
Scenario
The Flow will send Header information back while sending a HTTP Response to the caller HTTP Request.
Here’s how the Flow will look – Note, that we are sending a Custom Header along as well.
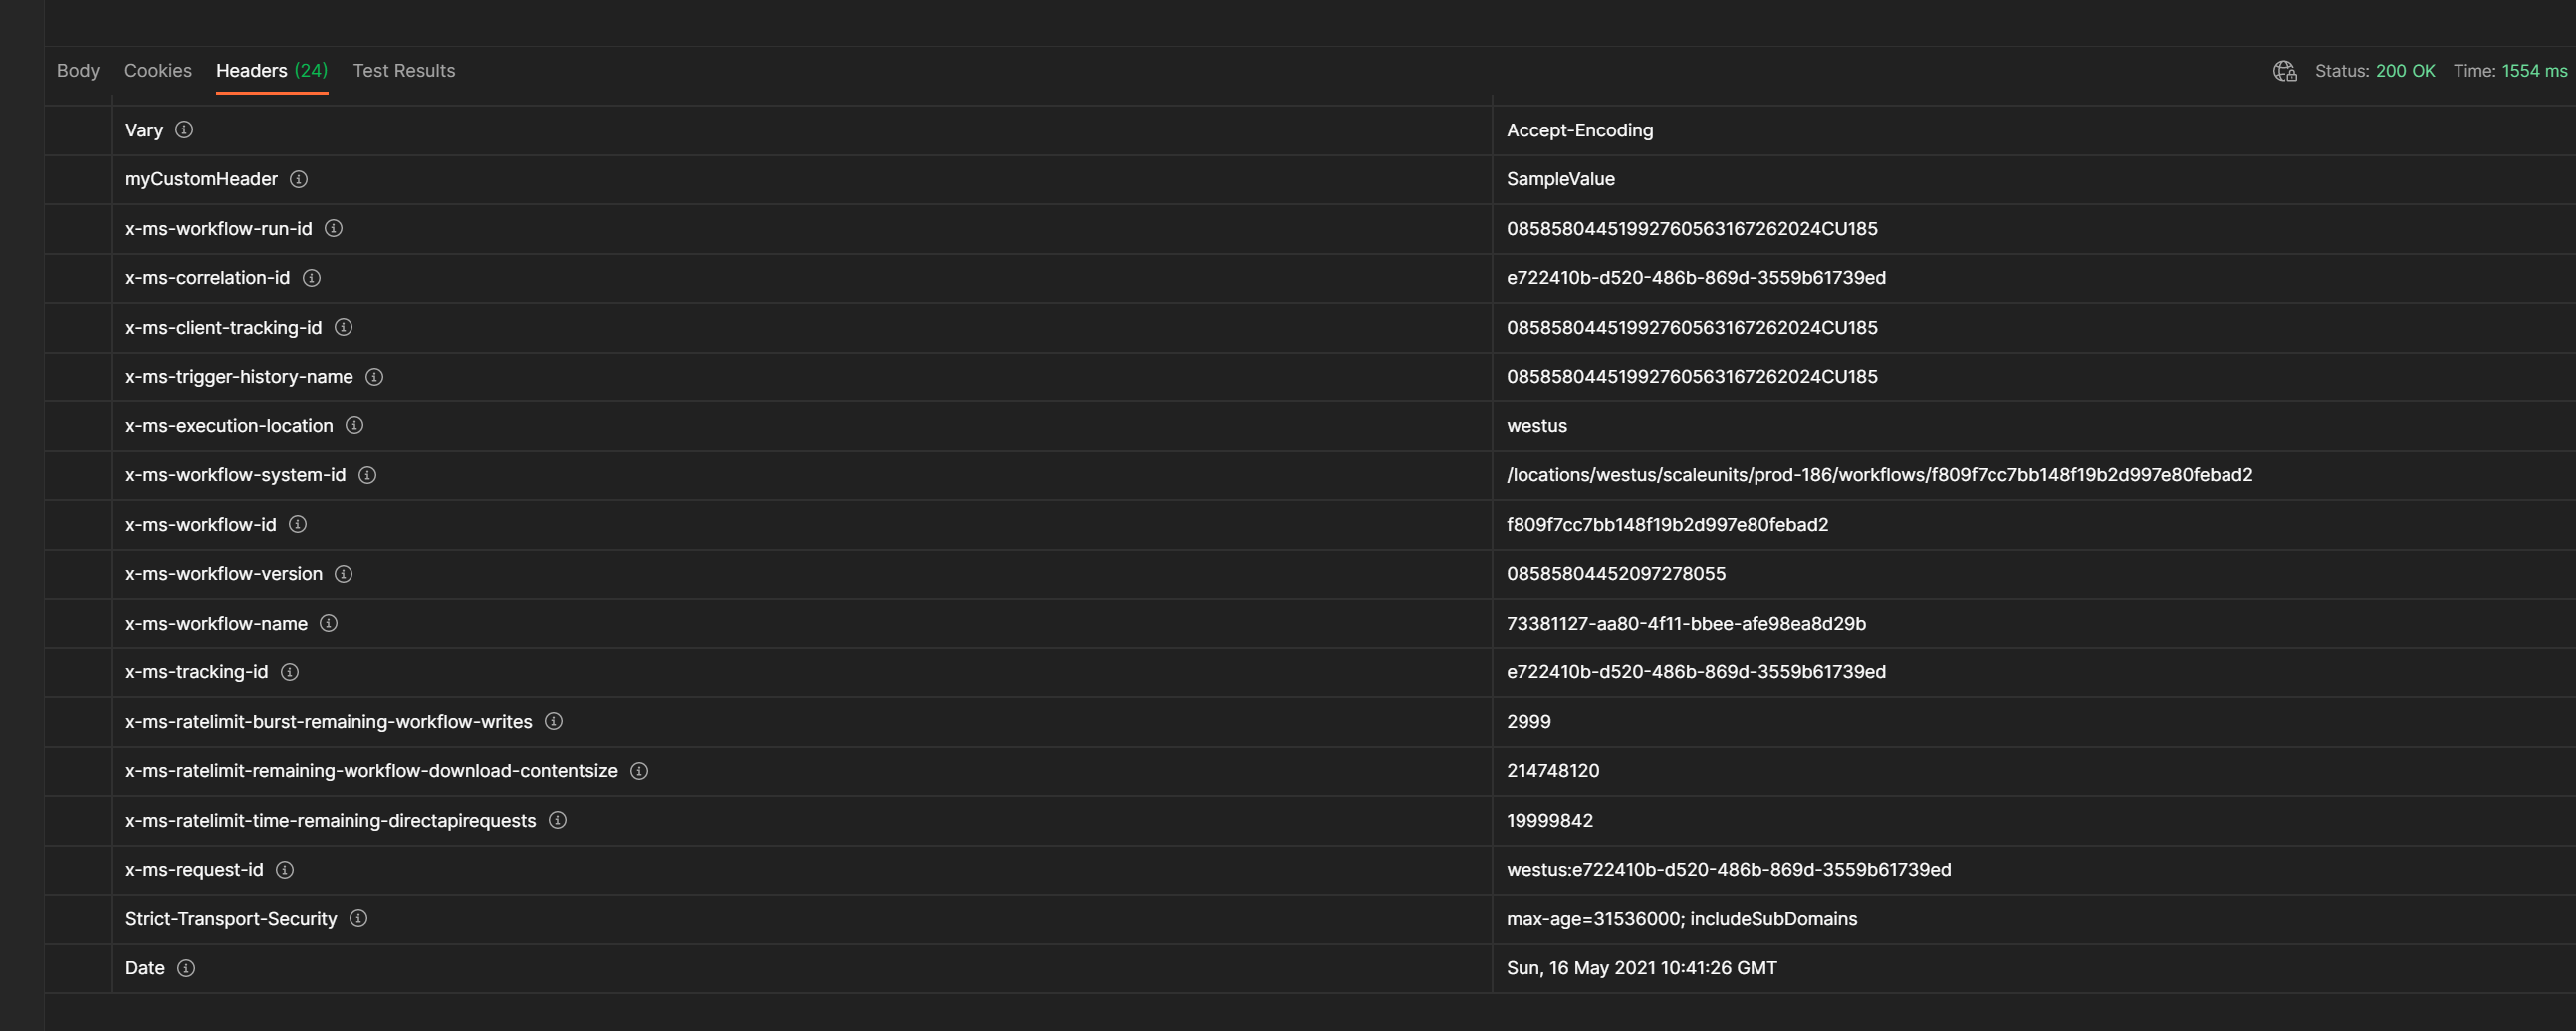
And along with this info, the follow Header information will also be visible in the calling application. We’ll use Postman to check this scenario.
You’ll see that a lot of Headers have been sent back along with our Custom Header.
And you’ll see whole lot of Headers that expose the Flow details in these Headers. Let’s see how we can cut this information short and not send back any unnecessary information to the HTTP Request we’ve received.
Suppress Workflow Headers in HTTP Request
Let’s see how with a simple tweat, we can avoid sending the Workflow Header information back as HTTP Response.
We go to the Settings of the HTTP Request Trigger itself as shown below –
Now, you see the option, Suppress Workflow Headers, it will be OFF by default.
Your turn it ON,
Now, let’s try to make a call again and see the difference. Going back to the Postman, we Send another request post you’ve saved the workflow changes above. We see that only 10 Headers are sent as opposed to 24 as seen without suppressing the info.
And if we see what Headers are sent back, we see along with our Custom Header, only the ones which are required will be sent suppressing all the critical information. This is a good practice to suppress Workflows that don’t give out information in production scenarios which are not required by end application.
I’ve also made a quick YouTube video of the same. Check it out as well –
Hope this was useful!
Here are some more Power Automate / Flow posts you might want to check –
So let’s say you want to auto-navigate from a Screen to some other Screen in a Canvas Power App. [Or any other operation for that matter!]
The purpose of this post is to demonstrate how you can use a Timer control in Canvas Power App to automate some operations in your Canvas Power App!! So let’s see this scenario of navigating between screens
Scenario
Let’s consider this scenario. You want to display a Splash Screen on your App upon submission of a record notifying the user about some short info and then redirecting to the Main Screen. You don’t want the user to press a button but only want to redirect automatically after 4 seconds, for example.
Here’s your Home Screen, Main Screen and Success Splash Screen. In this scenario, you want to create a New Record in NewAccountScreen, then redirect to SuccessScreen upon record submission. And once the timer times out as specified, you need to redirect from SuccessScreen to Home Screen.
Here’s how the Success Screen will look –
Using Timer to Navigate between Screens
Now, let’s look at how we can achieve this –
Take a Timer control on the SuccessScreen. Here’s how you can add a Timer from the Input menu.
Now, the Timer will appear as below. You will need to hide this later on. For now, we’ll keep this on screen to see the behavior and design the logic.
Now, we need to set a few parameters of the Timer – Duration, you can specify in milliseconds here. Example: 3000 i.e. 3 seconds
Next, you’ll need to set the Start flag. By default, this is set to false. The Start is triggered when the value it set to True. This needs to be dynamically set from elsewhere i.e. in this example, you’ll need to trigger from where you come to this screen so that the Timer starts the countdown.
Now, the way I set this is, first I create a variable from the place where I want to trigger the Timer to go-off. From the Form Submission screen in this case. Now, if you see below, I’m Submitting the Form i.e. creating a new record. Then, I’m navigating to the SuccessScreen. And, finally, I’m creating and setting a variable called startTimer and set the value to true. As the Start property of the Timer accepts a Boolean value.
Then, I’ll set this variable to the Start.
Then, you’ll need to set what needs to happens when the Timer ends. So, you have to write the OnTimerEnd property as to what will happen once the Timer ends. Here, you’ll Navigate to the ‘Home Screen’ as per our scenario and then also, set the startTimer flag to ‘false’ since you want to reuse this again for the next submission.
That’s it!! Let’s see how this will work. And you can absolutely have any different scenario which you want to do with a Timer.
While using Dataverse connector [formerly known as Common Data Service (Current Environment) connector] for different operations, List Rows is one of the common Actions we use in Flow implementations with Dataverse.
If using FetchXML Query as filter is your choice, there one of the most common issues with an XML is having an Invalid XML due to the special characters in the data we are passing. Many times, this issue goes unidentified since we end up checking only syntax!
Here’s what you can also add as an additional check to escape the special character scenario in FetchXML query in a List Rows action.
Invalid XML Issue – Special Character
Let’s look at one of the common examples where you’ll see this error on runtime when a FetchXML issue appears
You have a Flow wherein you are using FetchXML query to list records in Dataverse connector using List Records action.
But when happens is, when this Flow Runs, it results in an error on the List Records step.
And if you look at the right hand pane for the error, it could be a Invalid XML error which you would get in Dataverse (or while working in Dynamics CRM if you have experienced in the past).
So, let’s look at what could be wrong in this case among several other reason of using FetchXML and getting syntactical errors. If you look at my XML below, it looks like there could be some parameters that have special characters in them and hence, your XML might fail if not anything else.
Let’s look at how we can resolve the same.
encodeURIComponent() function
As a solution to this, you can use the encodeURIComponent function in Flow to counter this problem –
Now, in ideal cases, you parameters could be coming in from elsewhere which you would add in the FetchXML as parameters. Let me store the same in a sample String Variable for now.
In the Value, I’ll look for an expression called as encodeUriComponent()
Then, I simply enter the value which I’ll pass on to the Fetch XML filter to be used later on. And then I enter the value in the function.
And it looks like this in your variable.
Now, you just pass this on to the Fetch XML itself.
One of the most common scenarios is to be able to perform a Search on the Dataverse table like Accounts, Contacts etc. across multiple columns. Just like you would do on a Quick Search in a Dynamics 365 CE (CRM).
Let’s see how we can replicate this using Search() function in Canvas Power App to implement Search across multiple columns in a Canvas Power App.
Gallery and Search Control
As a typical setup, I’ll implement a Gallery control to populate all Accounts and have the Search Text Input control for the user to enter the search term. Let’s see how we can set this up quickly –
I’ve added a Gallery control that will populate the Accounts from the Dynamics 365 (Dataverse) instance and I’ve added a Search which is a Text Input which user can use to enter the Search term.
Here are the fields which are selected to be displayed on the Gallery. Account Name will be shown larger in bold and below is the City to give it a subtitled look.
Once this is set, we’ll look for Items of the Gallery and proceed to modify it. You’ll see the Default Items populated already based on how you populated the Gallery when you connected to your Dataverse. Let’s modify this.
Now, we’ll clear the Items formula bar and then write the below Search() function – Search – Denoted by Blue arrow, Search() function is used in Canvas Apps to Search from a Data Source but first selecting thee data source in the first parameter, then the Search Term and finally listing all thee columns of the data source separated by commas. Here’s thee official documentation of the Search functionality as provided in Microsoft – Docs https://docs.microsoft.com/en-us/powerapps/maker/canvas-apps/functions/function-filter-lookup?WT.mc_id=DX-MVP-5003911
Accounts – Denoted by Green Arrow, Accounts if the Data Source i.e. thee Dataverse environment which is fetching theee Accounts table and populating the Gallery.
SearchInput.Text – Denoted by Orange arrow, SearchInput.Text is the text which users will enter to Search from the Dataverse i.e. from Accounts table in order to show up.
Fields – Denoted by Red Underline, the fields can be listed from the Data Source and the Search will be carried out amongst those columns.
Working
Now, let’s see how this will work –
By default, if the Search Box is blank, all the records will be shown.
Once, users start to enter text into the same, the Items of the Gallery will start populating based on the Search.