Perform a changeset request in Dataverse connector in Power Automate

You must’ve noticed Perform a changeset request in the Dataverse connector in Power Automate.

Purpose of this Action is to perform batch of available Dataverse connector actions successfully or rollback the batch performed inside this changeset request.

Here’s what it does.

Perform a changeset request

Here’s how to use the connector action

  1. Select Perform a changeset request in the Dataverse connector Actions list.

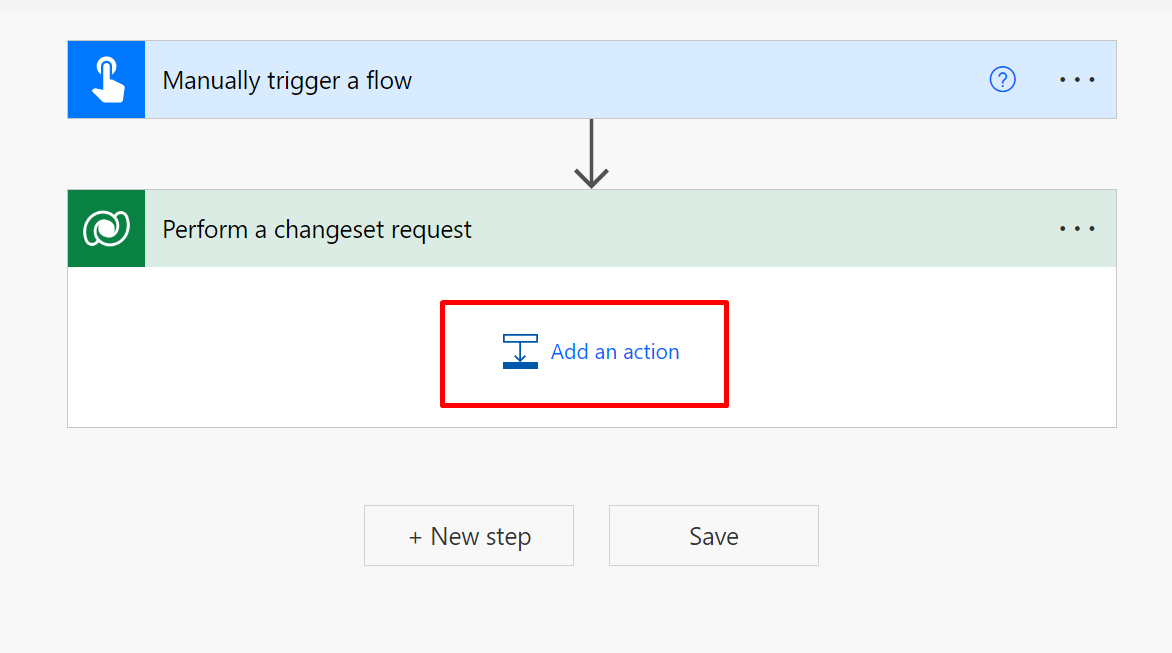
  2. Now, since this works like a batch of operations to perform all actions successfully or “rollback” operations, you’ll see this working like a Scope but only for Dataverse actions.

  3. You have the below Actions available to perform.

  4. Now, let’s design an example changeset batch here.
    First, I’ll create an Account and then a Contact.

  5. When this Flow runs, for example, if the Contact creation fails, the Account creation too will be rollbacked unlike having these steps outside of the “Perform a changeset request” action.


  6. Please note that the Outputs of the Changeset request itself or even within the steps within a changeset request cannot be captured or referred to in Dynamic Content.

Hope this helps!

Advertisement

Authenticate Dataverse connector using Service Principal in a Power Automate Flow

Many times, users/admins are not comfortable using their credentials being used as Connections. Some connectors do provide the ability to authenticate using Service Principal.

Let’s jump into this! ๐Ÿ˜Š

Setting Up App Registration for Dynamics 365 CRM

Here’s how you setup an App Service to be used as a Service Principal for Dataverse connector in Power Automate –

  1. Go to the Azure Portal (https://portal.azure.com/) and the look for Azure Active Directory.

  2. In Azure Active Directory, look for App Registrations in the menu.

  3. Now, create a + New registration record.

  4. Now, give this App Registration a suitable name. And you can select your preferences on how the tenant type should be. I’ve left it to Single tenant or simplicity of the example.

  5. Now, once this is created, go to the API Permissions section.

  6. Now, look for a button to Add a permission.

  7. Then, select Dynamics CRM and select it.

  8. Once this is selected, you’ll get to select user_impersonation. Then, clicked Add permissions.
  9. Once added, you’ll see that the Status column is blank. Then, click on Grant admin consent for <TenantName>.

  10. Once you click on Grant admin consent button, you’ll be asked for confirmation. Confirm the same.

  11. Once you confirm, you’ll see the status as Granted as shown below.

  12. Then, go to Certificates and secrets. Once in that, click on + New client secret.

  13. You’ll be asked the the Description, do so and Save it.

  14. Now, you need to copy the value onto Notepad.

  15. Now, let’s move to adding this App Registration to the Power Platform Admin Center so that you can then give appropriate permissions so that it can be used for Authentication into Dataverse.

Add Application User in Power Platform Admin Center

Go to the Power Platform Admin Center (https://admin.powerplatform.microsoft.com/) and the to the Environments section and select the correct Dataverse environment –

  1. Select the environment which will have your Flow that will use the Dataverse connection in question.
    And click Settings.

  2. Now, expand Users + permissions section and look for Application Users.

  3. Now, in Application Users, you’ll need to add the App Registration as a User and give Roles. Now, click on + New app user.

  4. Now, click on + Add an app.

  5. Now, any App Registration that has not yet been created in the current environment as user will automatically appear. Select the one you created – “Dataverse Service Principal” in this case and click on Add.

  6. Now, select the BU.

  7. Next, click on Security Roles’ pencil to give roles.

  8. I’m just giving System Administrator for simplicity of example.

  9. Now, you should be good to create this user. Click on Create.

  10. Finally, your Application Record will look like this –

  11. Now that your Application User is set in Dynamics / Power Platform Admin Center, you are all set to add this to authenticate the Dataverse Connector in Power Automate. Let’s do that!

Authenticating using Service Principle in Dataverse action

Now, let’s say you are starting a Flow with the Dataverse connector –

  1. Select the Dataverse trigger you want to use. I’ll pick a common one.

  2. Now, click on the three dots and look to add a new Connection if it already authenticated using the logged in user which is the default behavior.

  3. Now, you’ll see the option to select –

  4. Now, you’ll see these fields to fill in.

  5. Now, first give the connection itself a suitable name.

  6. Now, for Client ID – Go to the App Registration in Azure and look for the Client ID in the information section. It’ll look like this –


    Paste it in the Client ID field and it’ll look like this –

  7. Now, look for Client Secret – open the Notepad where you saved the Secret we copied while creating the Client Secret record in Azure.

  8. Now, finally – Go to the App Registration record and you’ll find the Tenant ID here –


    And paste is where it says Tenant. Now, Create this connection!
  9. Ensure that the Connection is selected.

  10. I’ll just add an extra variable in order to save this simple Flow and then we’ll create an Account (simple example if you see the screenshot below) in order to Run this Flow.
    My Flow looks ready to be tested.

  11. Now, I’ll create an Account in my Dynamics 365 CRM.

  12. And the Flow would have Run already.

Validate

In order to ensure the connection is run by the Service Principal itself, you can do this –

  1. In advanced options, you can choose to “Run as” as “Flow owner


  2. And when you check the details in the Flow Run, you can check the attribute in the trigger “RunAsSystemUserId

  3. And if you check this GUID, it belongs to the Dataverse Service Principal user we set up.


    And that’s how you can setup to run the Dataverse action to use Service Principal instead of user credentials!

Hope this was useful!

Here are some Power Automate posts you want to check out โ€“

  1. Select the item based on a key value using Filter Array in Power Automate
  2. Select values from an array using Select action in a Power Automate Flow
  3. Blocking Attachment Extensions in Dynamics 365 CRM
  4. Upgrade Dataverse for Teams Environment to Dataverse Environment
  5. Showing Sandbox or Non Production Apps in Power App mobile app
  6. Create a Power Apps Per User Plan Trial | Dataverse environment
  7. Install On-Premise Gateway from Power Automate or Power Apps | Power Platform
  8. Co-presence in Power Automate | Multiple users working on a Flow
  9. Search Rows (preview) Action in Dataverse connector in a Flow | Power Automate
  10. Suppress Workflow Header Information while sending back HTTP Response in a Flow | Power Automate
  11. Call a Flow from Canvas Power App and get back response | Power Platform\
  12. FetchXML Aggregation in a Flow using CDS (Current Environment) connector | Power Automate
  13. Parsing Outputs of a List Rows action using Parse JSON in a Flow | Common Data Service (CE) connector
  14. Asynchronous HTTP Response from a Flow | Power Automate
  15. Validate JSON Schema for HTTP Request trigger in a Flow and send Response | Power Automate
  16. Converting JSON to XML and XML to JSON in a Flow | Power Automate

Thank you!
Remove attachments from Dynamics 365 CRM Notes using Power Automate | Dataverse

If you are looking to remove or delete the attachments from Notes (Annotation entity) in Dynamics 365 CRM / Dataverse (and not delete the Note itself), hopefully this will help!

Disclaimer: I’m not covering ‘how you can save your attachments elsewhere’, I’m only covering how you can delete from Notes given that you have handled your attachments before deleting them.

Identifying Attachments

Here are some points which will help you identify once attachments are included when you create a Note in Dynamics 365 / Dataverse.
Note that these are not in Attachments entity.

  1. You can have a Flow that is triggered on the create of a Note (annotation) in Dataverse.
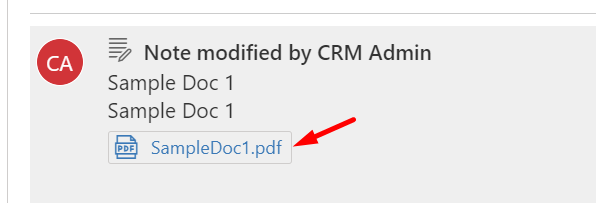
    So here, the Document is Note is attached on a Note.


    And the Trigger of the Dataverse connector in Flow is on the create of a Note

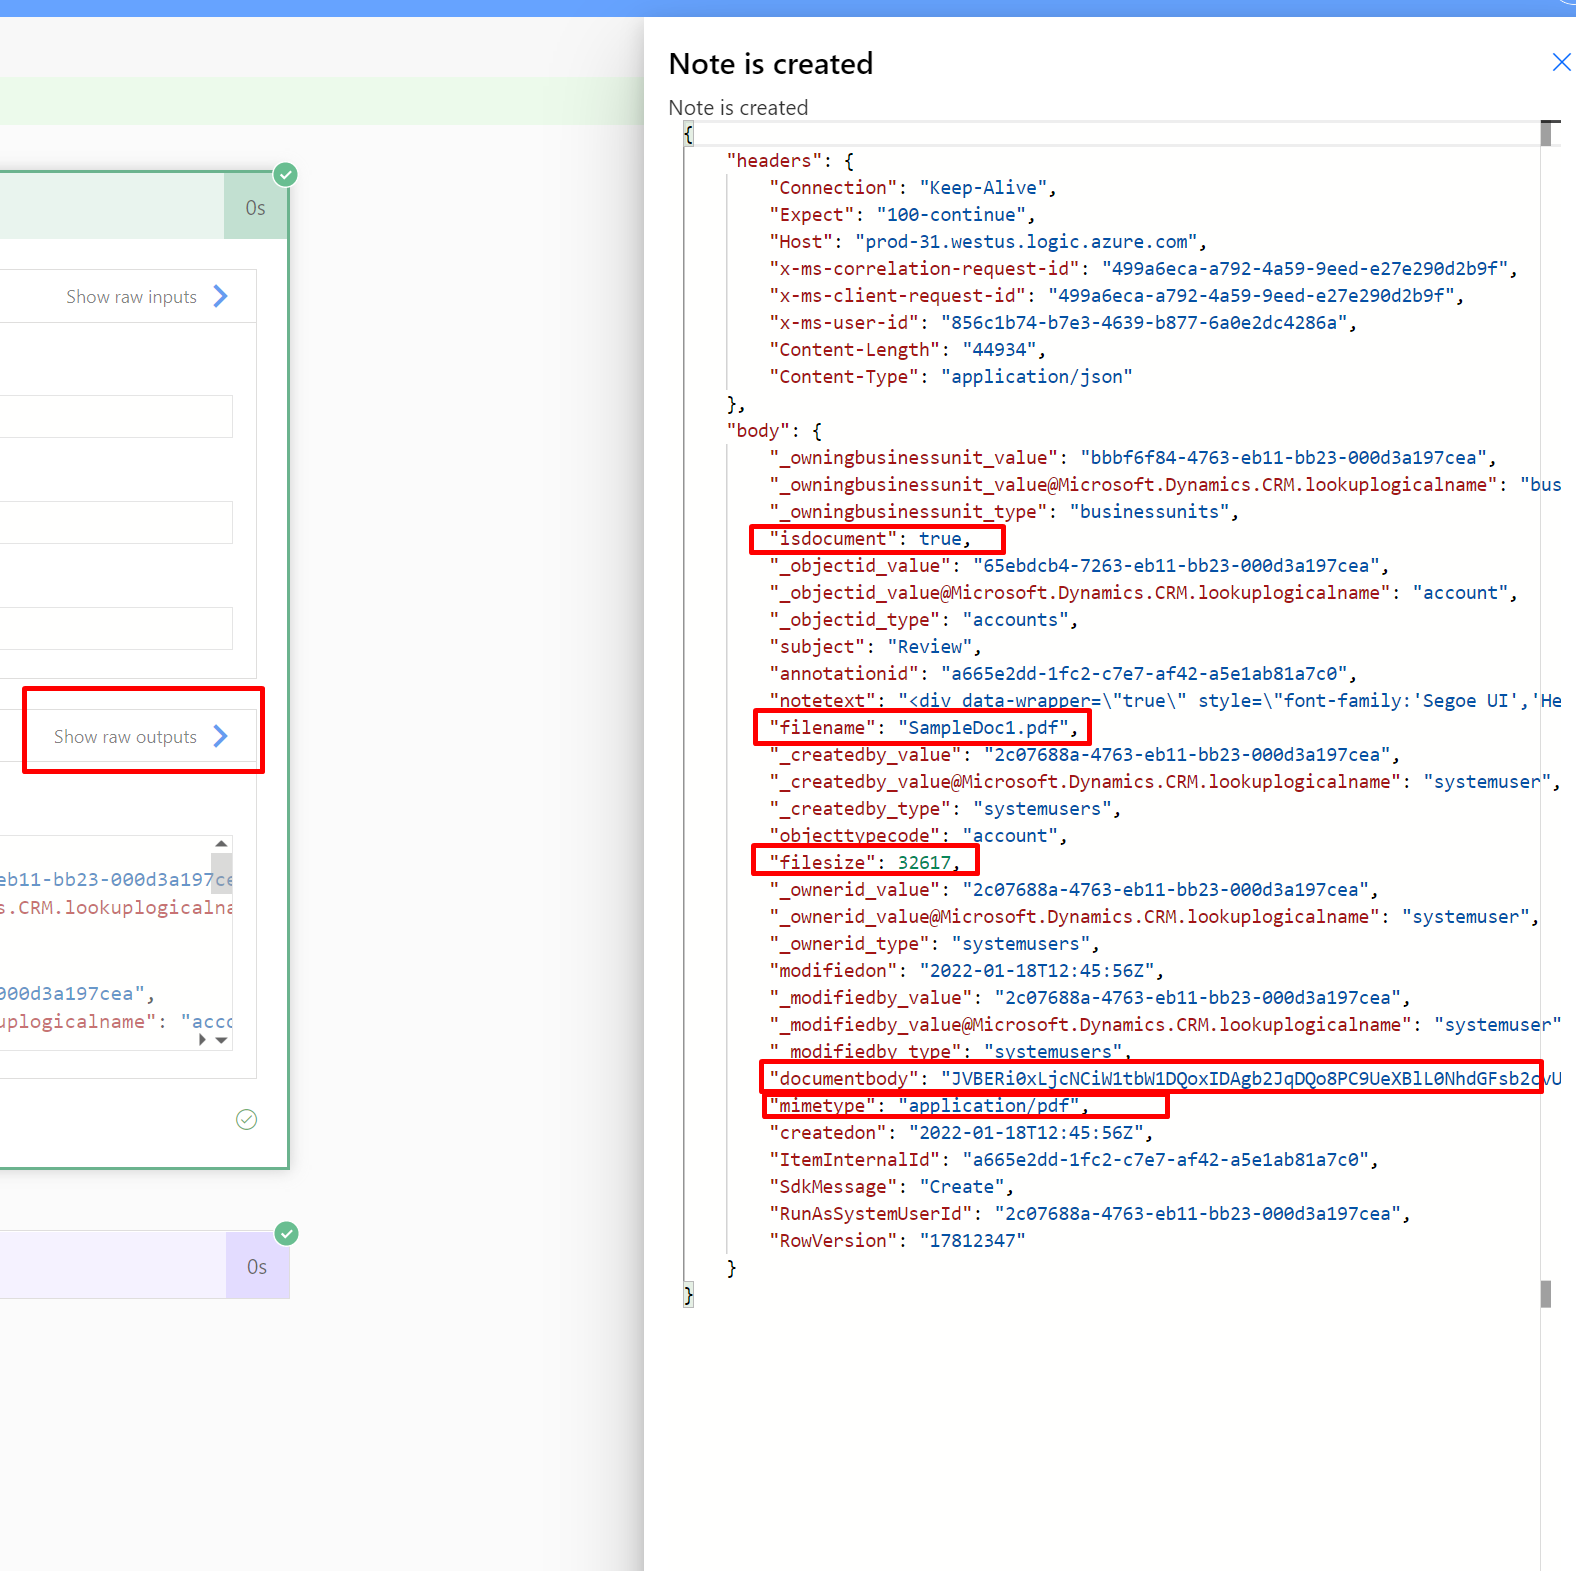
  2. And when the Note is attached, the triggerOutputs body will show this data that denotes the attachment on the Note.

Clearing Attachments

Here’s how you can clear the attachments from the Notes (by not deleting the actual note). If you want to move to SharePoint, it’s a recommendation, but that’s not something I intend to cover here (Assuming you are doing something with the attachments and then wanting to delete them) –

  1. Now, in this example, I’m attaching a Note which will be further cleared using the Update step which I’ll show.


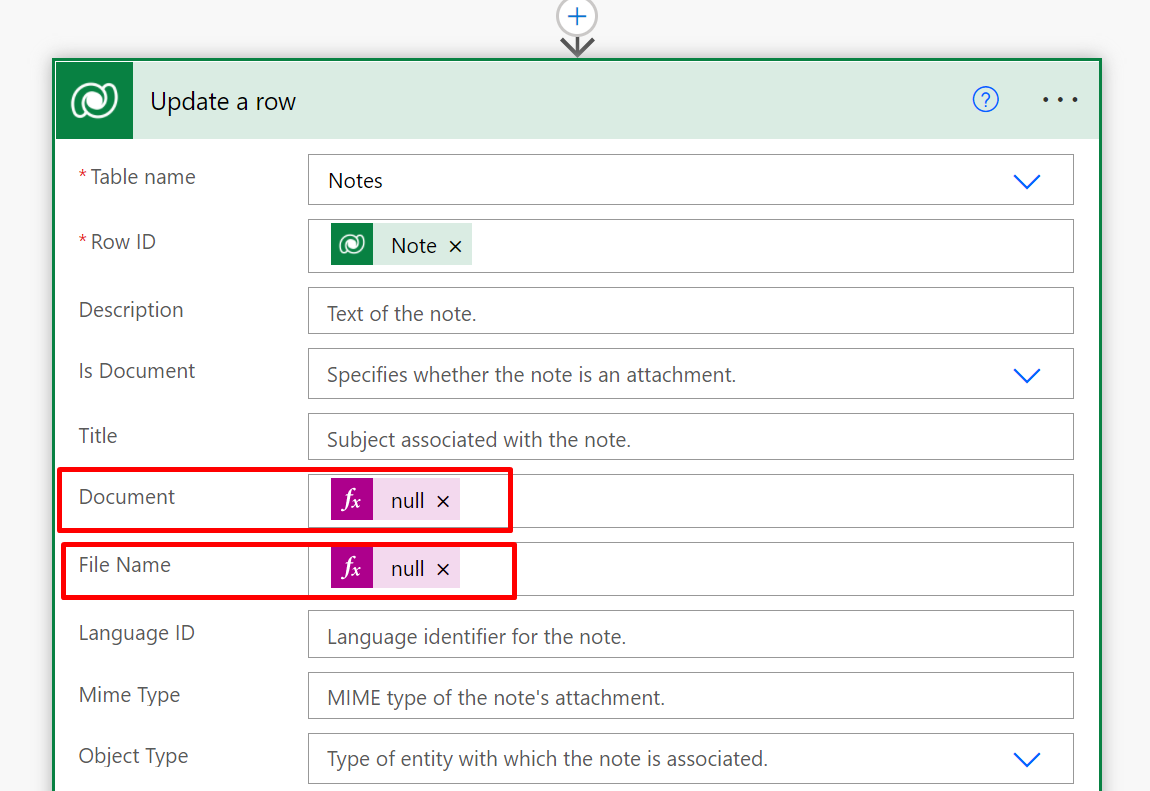
  2. Here’s an update step I have on the same Note which will set the Document Body & Name to null in order to clear the attachment.


  3. To test this, I had another Flow which is triggered on the update of the Note i.e. the step above.
    Once there’s nothing in the Document (documentbody), the filesize will be 0 & isdocument flag to false automatically. Also, setting the Name to Null is important – Else, you’ll still see the attachment on the Note (Just that you can’t open it)


  4. And when you refresh the Timeline, you’ll see that the attachment is now removed.

Hope this was helpful! Here are some more Dynamics 365 posts which you might be interested in –

  1. Enable SharePoint Online integration Dynamics 365 | Power Platform Admin Center
  2. Dynamics 365 Storage Utilization | Dataverse Storage | Power Platform Admin Center
  3. Use Hierarchy in Roll Up Fields in Dynamics 365 CRM
  4. Filter records in a View owned by a Team you are a member of | Dynamics 365 CRM
  5. Get GUID of the current View in Dynamics 365 CRM JS from ribbon button | Ribbon Workbench
  6. Dynamics 365 App For Outlook missing on SiteMap in CRM? Use shortcut link [Quick Tip]
  7. Import lookup referencing records together in Dynamics 365 CRM | [Linking related entity data during Excel Import]
  8. Excel Importing Notes (Annotation) entity in Dynamics 365 CRM
  9. Enable/Disable the need to Approve Email for Mailboxes in Dynamics 365 CRM CE
  10. Call Azure Function from Dynamics 365 CRM using Webhooks
  11. Show Ribbon button only on record selection in Dynamics CRM
  12. Accessing multiple occurrences of a field in Business Process Flow using JS in D365 CRM

Thank you!!

Configure Dataverse Search in Power Platform Admin Center | Dynamics 365

Relevance Search in Dynamics 365 CRM recently got renamed to “Dataverse Seach” as you might have seen some updates.

Here’s how to configure the Dataverse Seach in the new Solutions Explorer!

Scenario

Now, in case you search on the Global Search bar for a record and the table which it lies in doesn’t show up – In this case table I’m looking in is ‘Subscription’ – that means that this entity is not configured for Dataverse Search

Dataverse Search

Here are some points on the Dataverse Search –

  1. Dataverse search is enabled directly is you are opted in to 2021 Wave 2 Updates on your environment.
    Go to https://admin.powerplatform.microsoft.com/ and open the desired environment’s Features section from Settings.


    You’ll find that Dataverse Search is already ON.


  2. Now, navigate to https://make.powerapps.com/ to configure the Dataverse Search for a specific entity.
    Go to Solutions and look for the Solution which has your entity
    In this example, I’ll use the custom entity I’ve created called as ‘Subscription’

  3. In any solution which has this entity, I can click on Overview on the left.


    And then if you look at the right hand side – click on Manage Index


  4. It’ll show the entity which is not enabled for Search – But, notice that it is unchecked – means it is not enabled.


    Now, enable and save it


Check if Table is enabled for Dataverse Search

  1. Enable the Table for Search Results. Now, when you are in the Solution in the new Solution Explorer – Look for the Table. In my example, it is Subscription table.
    I’ll open the Settings of the Table.


  2. In the Settings of the Subscription table, you’ll need to expand the Advanced options.


  3. Now, scroll below and you’ll see the option for Appear in Search Results is enabled.


  4. And once this is enabled, the results will show up in Dynamics 365

Indexed Columns

Now, here’s how to understand the count of Indexed columns. Limit of 950 columns is imposed in a Dynamics 365 environment.
Refer Microsoft’s Official Post – https://docs.microsoft.com/en-us/power-platform/admin/configure-relevance-search-organization#select-tables-for-dataverse-search?WT.mc_id=DX-MVP-5003911

  1. Here’s a snippet from the above mentioned Microsoft Docs to show the count of Indexed Columns calculated towards a Dataverse Search

Hope this helped!

Here are some more Canvas Power Apps posts you might want to check –

  1. Transition effect on Gallery Items when hovered over in a Canvas Power App | [Quick Tip]
  2. Navigate Screen automatically based on Timer in Canvas Power App | Power Platform
  3. Search on multiple columns from a Dataverse table in a Canvas Power App Gallery control | Power Platform
  4. Call a Flow from Canvas Power App and get back response | Power Platform
  5. Enable Custom Code Components (PCF Controls) to be imported in a Canvas Power App | Quick Tip
  6. Retrieve Hashtags from Text in a Canvas Power App | Power Platform
  7. Rich Text Control for Canvas and Model-Driven App | Quick Tip
  8. Setting Correct Default Mode for Forms in a Canvas App | [Quick Tip]
  9. Rating Control to represent data from Dataverse in a Canvas Power App | Power Platform
  10. Clear a field value & Reset Form in a Canvas Power App [Quick Tip]
  11. Get Dynamics 365 field metadata in a Canvas App using DataSourceInfo function | Common Data Service
  12. Implement character length validation in a Canvas Power App | Power Platform

Thank you!