Permanently Delete a User in Entra ID

In case you are managing Users in Microsoft 365, a Deleted User still exists in Soft Delete state for 30 days.
Here’s how you can immediately delete the user permanently!
Please do this when you are entirely sure that you want to delete the User as this a permanent step and won’t get back the User once deleted.

Azure Admin Portal

Here’s how you can access the Azure Portal and then delete the User –

  1. Unlike M365, go to Azure Portal (https://portal.azure.com/#home), then look for Entra ID

  2. Then, look for Users.

  3. In Users, go to Deleted Users.

  4. There, you’ll find the Soft Deleted Users, select the User you want to delete and then click on Delete Permanently.

  5. You’ll need to refresh the page after a few moments to see that the User is not gone.


    Hope this is useful!

Thank you!

Power Platform self-service analytics Data Export to Data Lake [Preview] | Power Platform Admin Center

Now, you can also export the Analytics Data to Azure Data Lake in order to further extend the derive rich data analytics!
At the time of writing this post, this feature is in Preview (As you’ll also see from the screenshots below)

This is a great feature where you can extract this Data into Data Lake and then further enrich and derive rich Power BI reporting based on your use-case.

In case you are new to understanding Azure Data Lake and pricing, you can review this – https://azure.microsoft.com/en-gb/solutions/data-lake/?WT.mc_id=DX-MVP-5003911

Data Export (Preview)

In Power Platform Admin Center (https://admin.powerplatform.microsoft.com/), here’s how you can setup Data Export –

  1. Navigate to Data Export in Power Platform Admin Center given that you have appropriate rights –


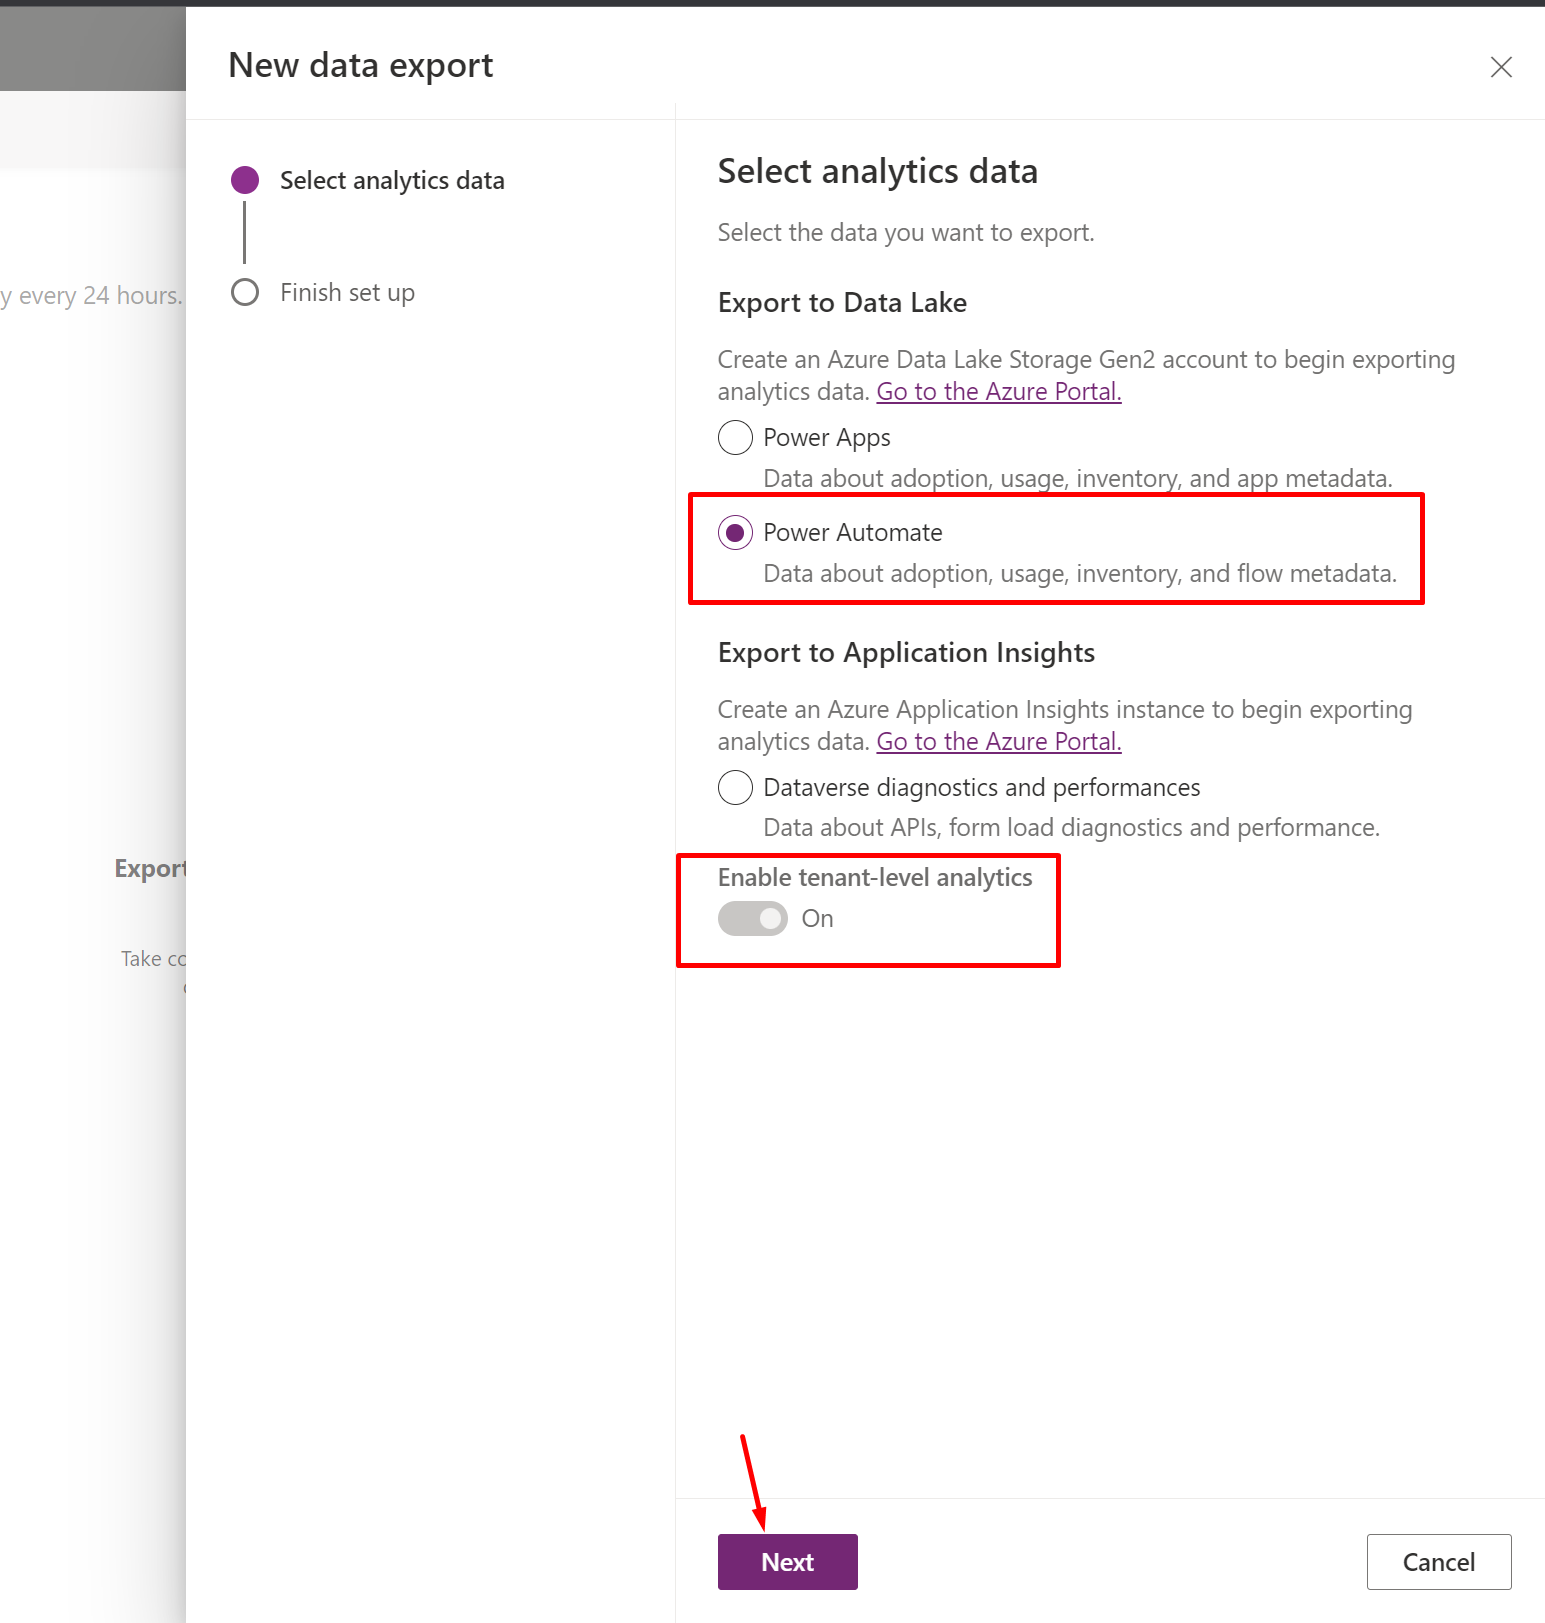
  2. Then, you’ll get to choose amongst the Power Apps or Power Automate data to be exported to Data Lake.

  3. In this example, I’ll choose Power Automate. As I select Power Automate, you’ll see that Tenant-Level Analytics are required and hence, already considered as Yes. If not, you’ll need to Enable Tenant-Level Analytics while doing this step – Here’s another post on how to Enable and Use Tenant Level Analytics –


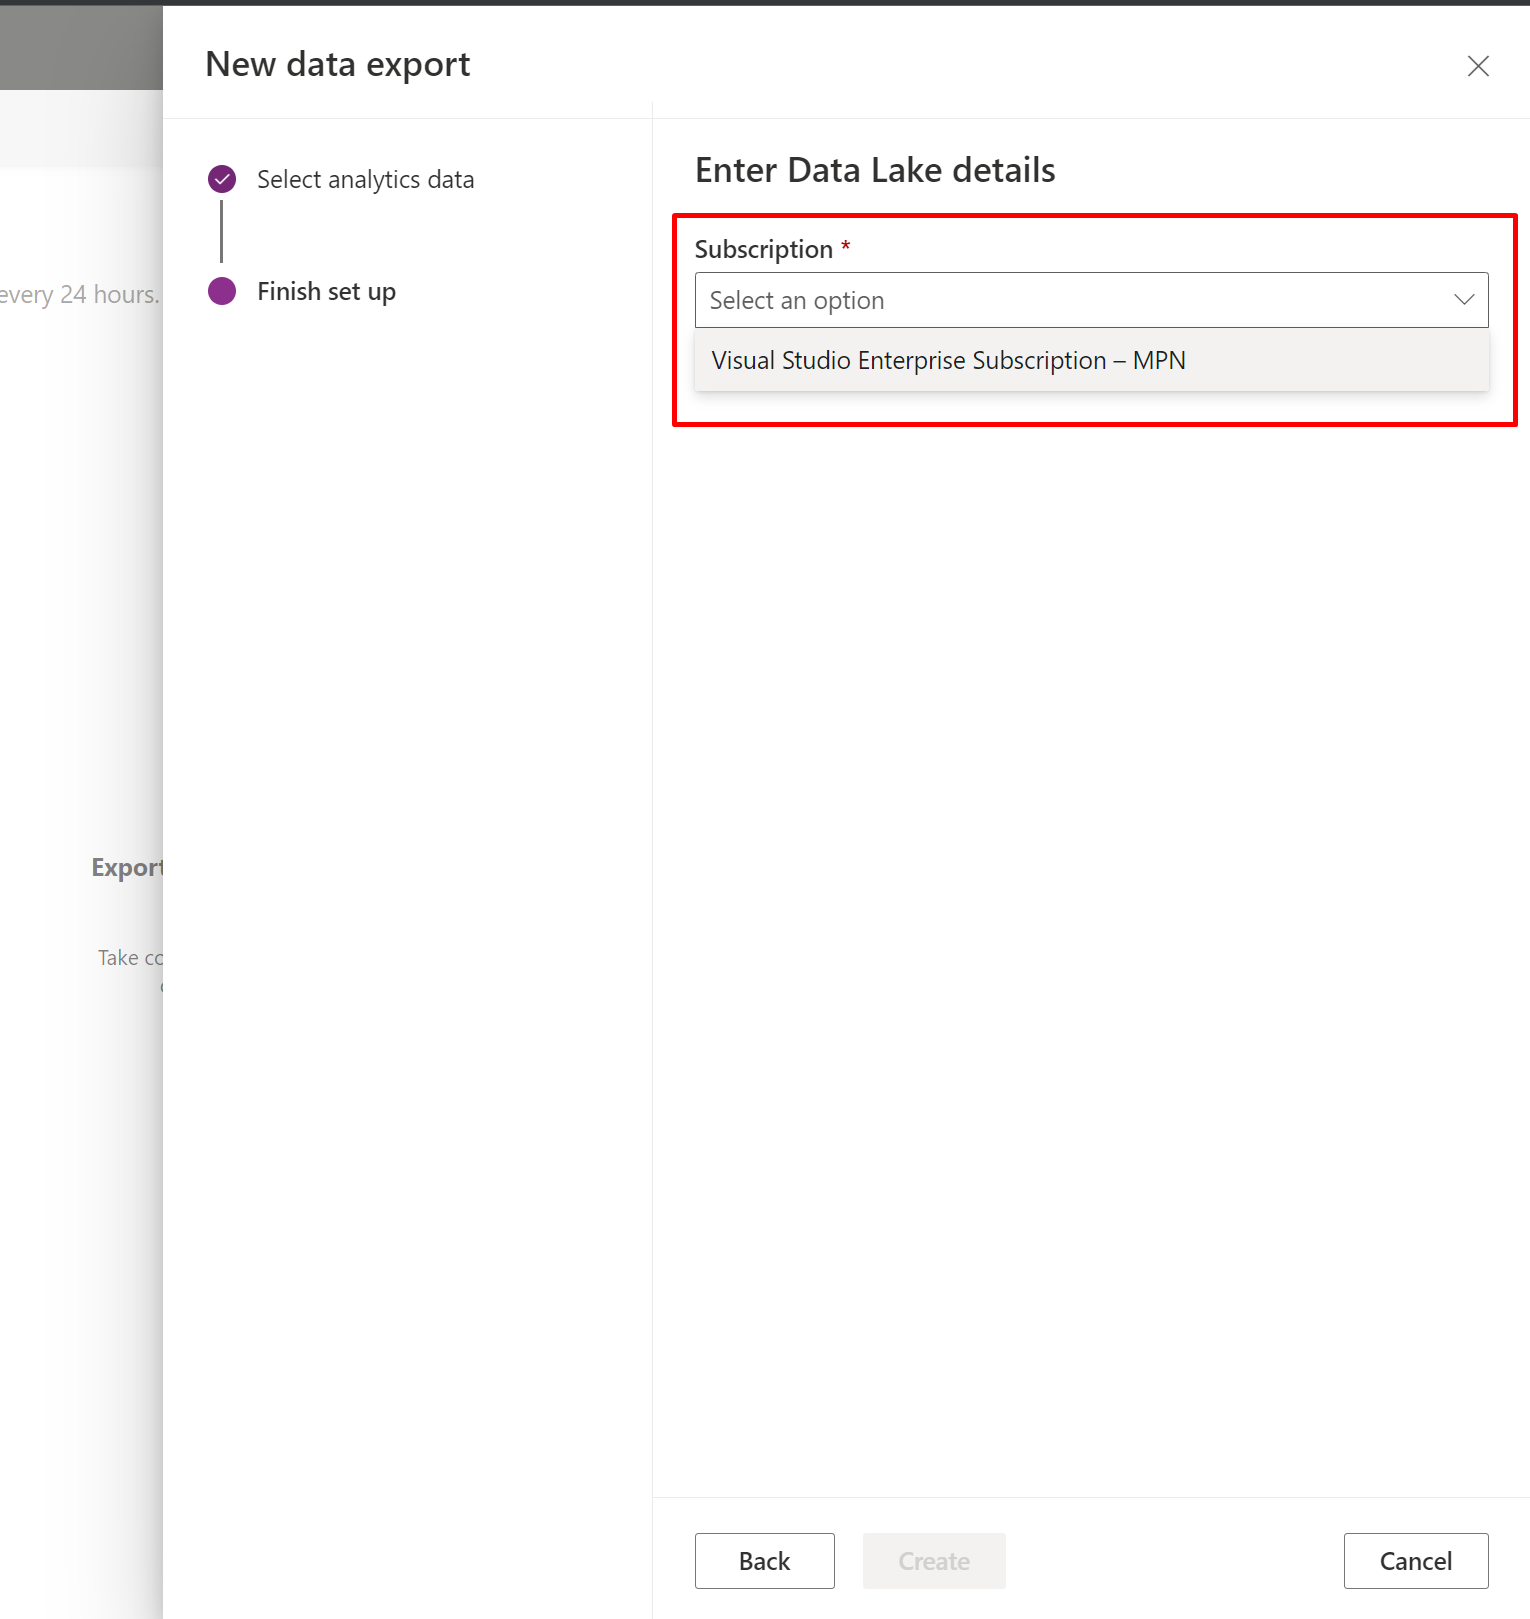
  4. Now, In the next section you’ll need to choose the Subscription.


  5. Further, select the Resource Group and eventually, the Storage Account as well.


    And Storage Account is selected as well.

  6. Once everything looks good, you can click on Create.

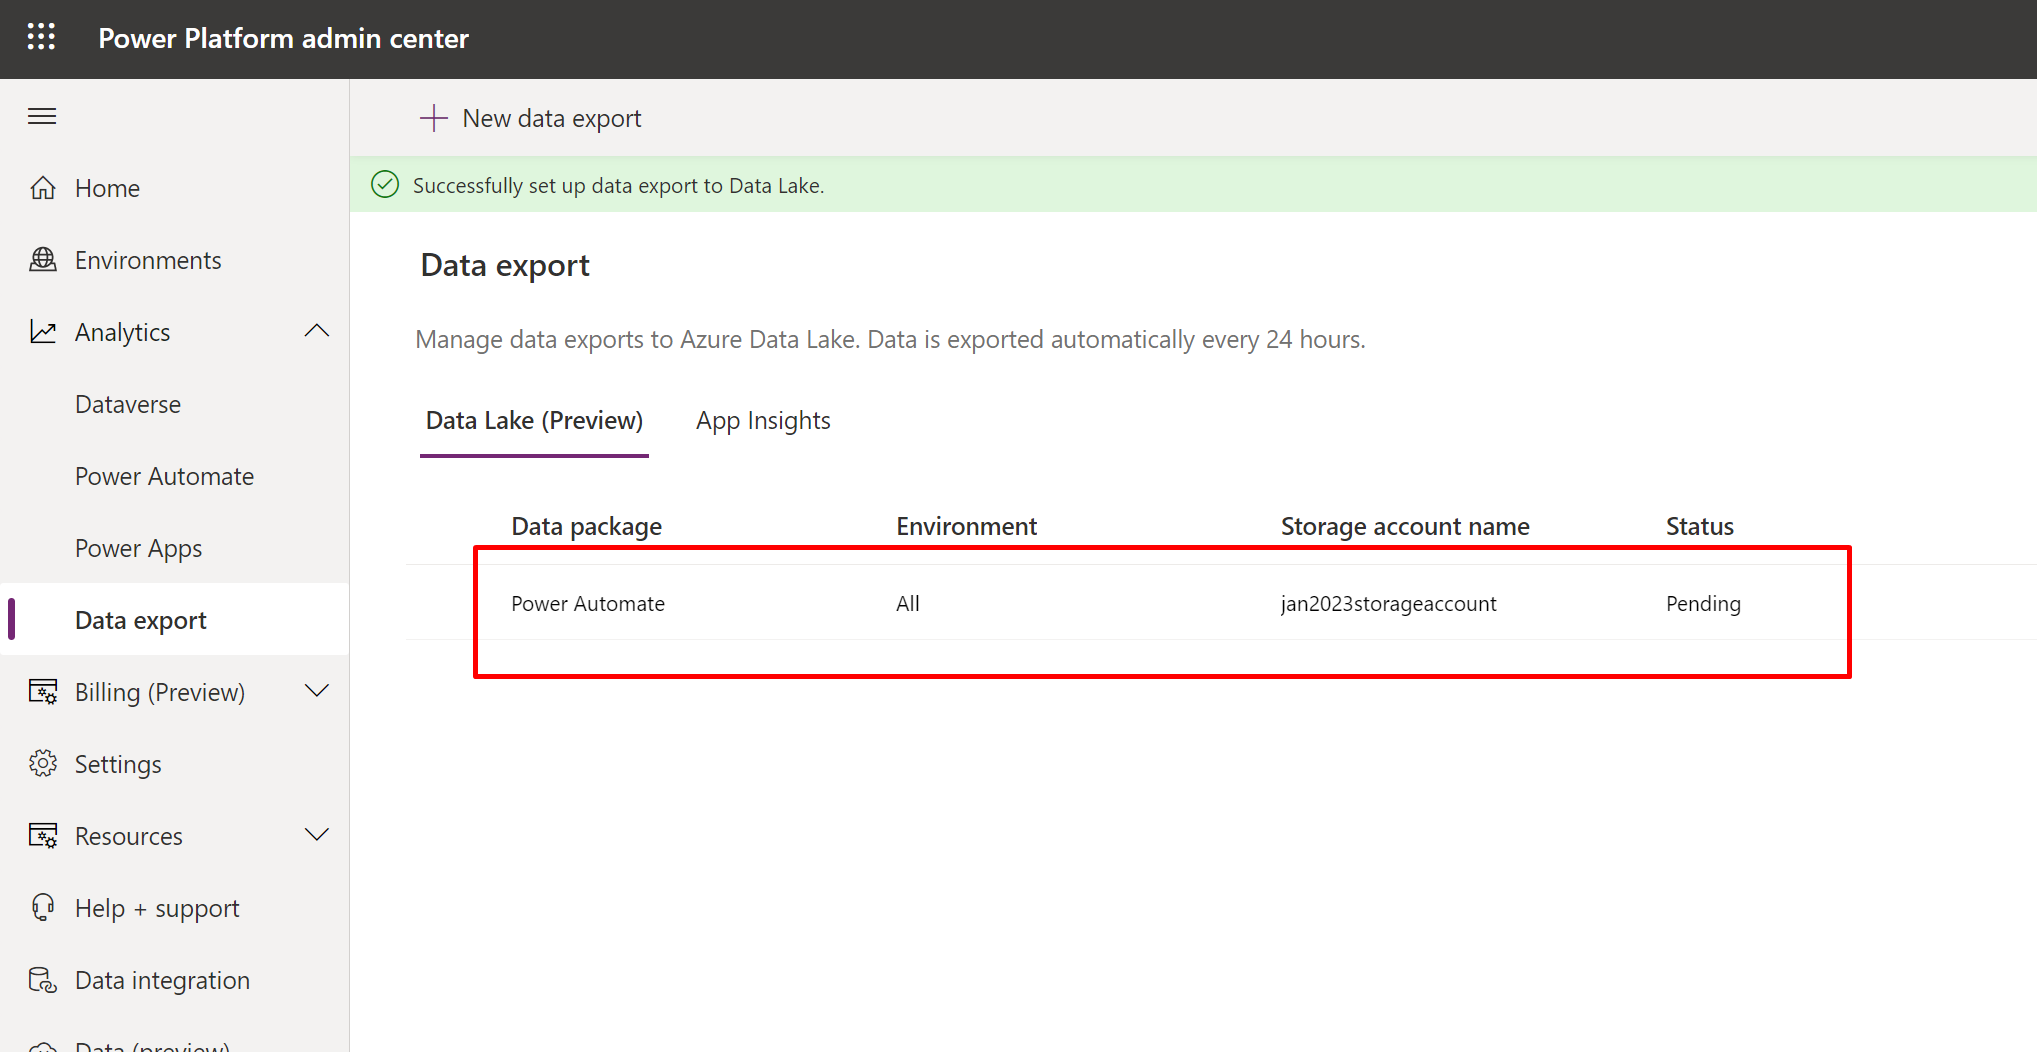
  7. In a few moments, this will appear in Data Lake section of the Data Export. It will take up to 24 hours for the data to first start showing in Data Lake.

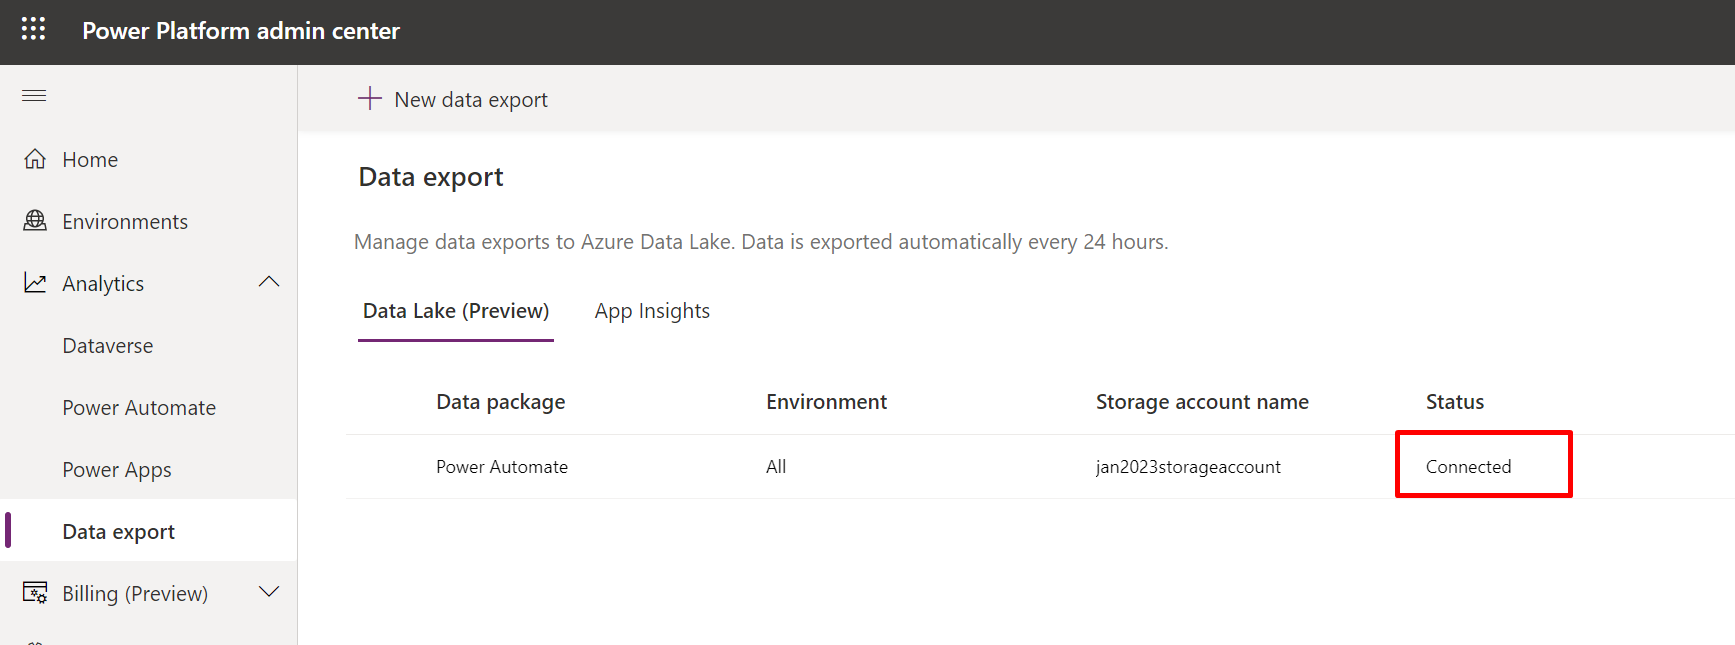
  8. Once this is completed after about 24 hours, you’ll see the status of the Data Lake data package changed to connected.


Data Export to Data Lake

Let’s look at the Azure Storage Explorer to connect to our Data Lake and see the Power Platform data – In case you are looking to install Azure Storage Explorer, here’s a post – Microsoft Azure Storage Explorer | Getting Started

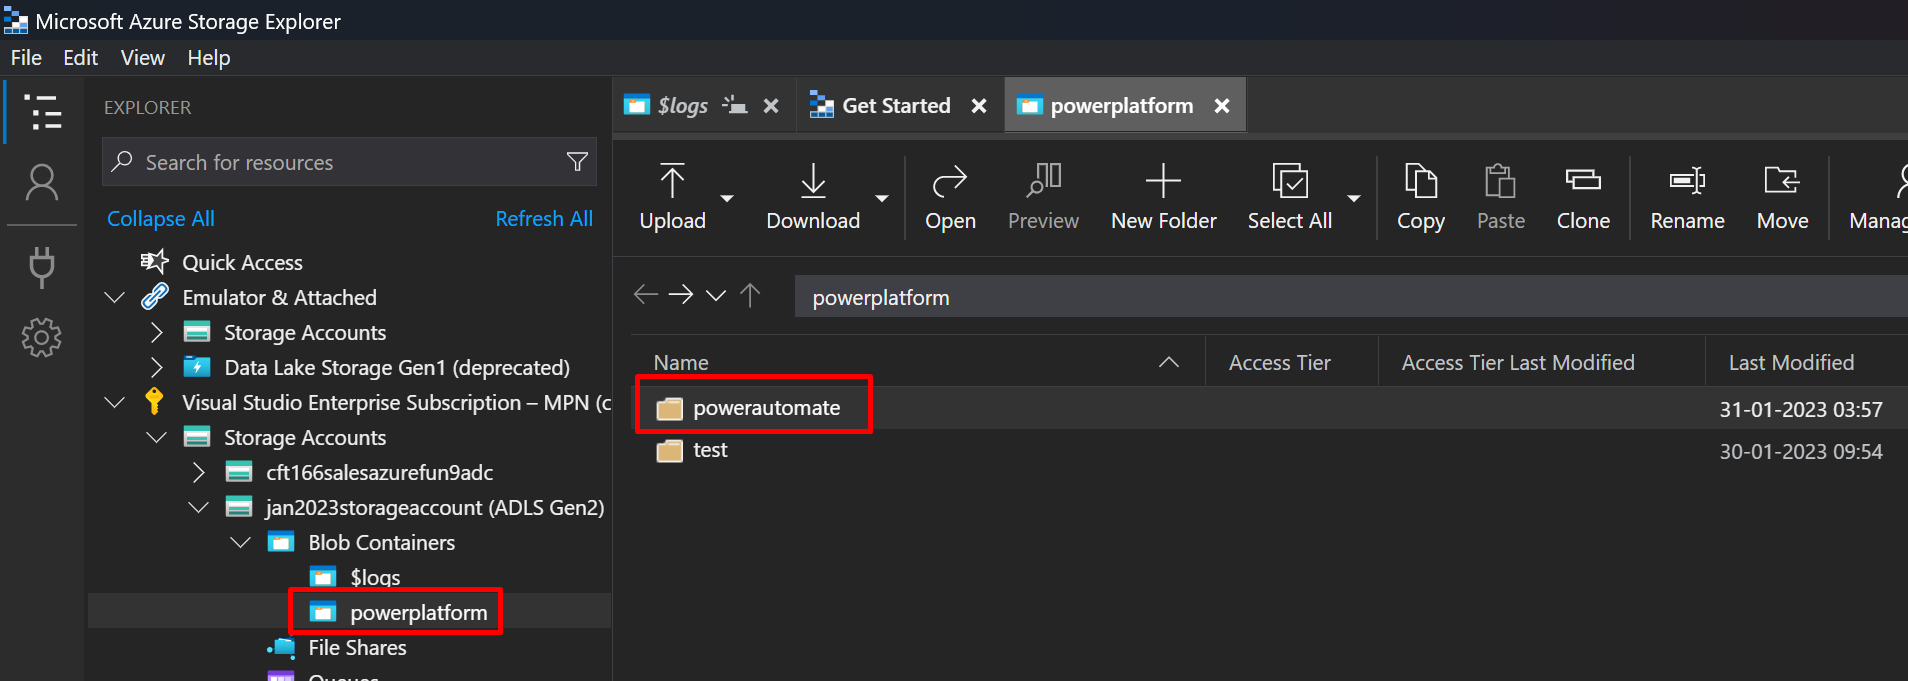
  1. Once authenticated to the correct environment in Azure Storage Explorer, here’s what you would see in the ADLS Gen 2 (In case you want to create ADLS Gen 2 storage account, you can review this post – Create ADLS Gen 2 Storage Account for Azure Data Lake)
    You’ll see powerplatform folder show up.

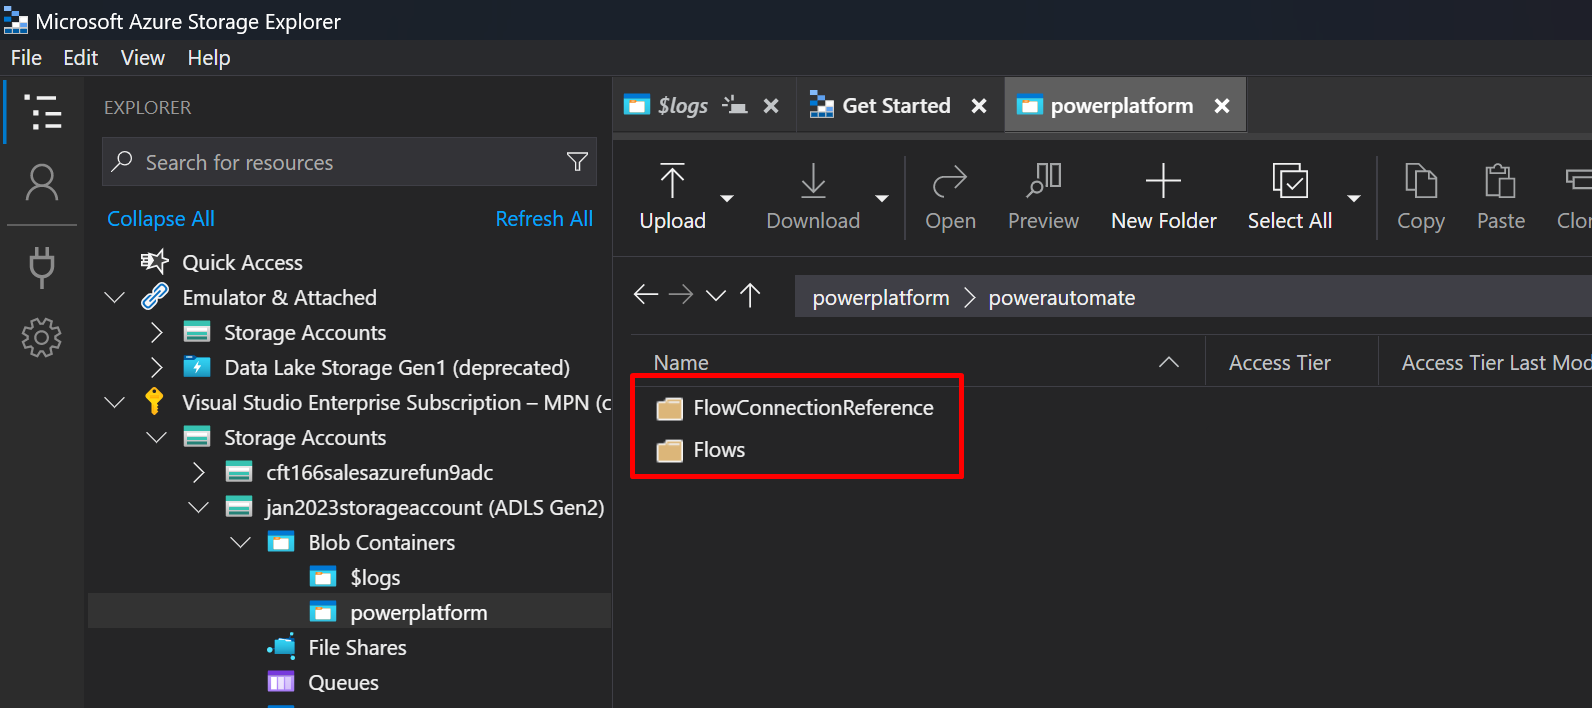
  2. If you open this folder, since we had chosen Power Automate, it’s folder will be created.

  3. And let’s go in Flows folder to see the data. You’ll find json files of the same. You can double click to open it and it’ll open in whatever editor you have installed.

  4. In this case, I had VS Code, so here’s what the Flow data looks like –

  5. Likewise, you can dig deeper in this data and use this further for your reporting!

Here’s Microsoft Learn Document on the same – https://learn.microsoft.com/en-us/power-platform/admin/self-service-analytics?WT.mc_id=DX-MVP-5003911

Here’s Microsoft Learn Docs for Tenant-Level Analytics – https://learn.microsoft.com/en-gb/power-platform/admin/tenant-level-analytics#how-do-i-enable-tenant-level-analytics?WT.mc_id=DX-MVP-5003911

Hope this helps!

Here are some Power Automate posts you want to check out –

  1. Select the item based on a key value using Filter Array in Power Automate
  2. Select values from an array using Select action in a Power Automate Flow
  3. Blocking Attachment Extensions in Dynamics 365 CRM
  4. Upgrade Dataverse for Teams Environment to Dataverse Environment
  5. Showing Sandbox or Non Production Apps in Power App mobile app
  6. Create a Power Apps Per User Plan Trial | Dataverse environment
  7. Install On-Premise Gateway from Power Automate or Power Apps | Power Platform
  8. Co-presence in Power Automate | Multiple users working on a Flow
  9. Search Rows (preview) Action in Dataverse connector in a Flow | Power Automate
  10. Suppress Workflow Header Information while sending back HTTP Response in a Flow | Power Automate
  11. Call a Flow from Canvas Power App and get back response | Power Platform\
  12. FetchXML Aggregation in a Flow using CDS (Current Environment) connector | Power Automate
  13. Parsing Outputs of a List Rows action using Parse JSON in a Flow | Common Data Service (CE) connector
  14. Asynchronous HTTP Response from a Flow | Power Automate
  15. Validate JSON Schema for HTTP Request trigger in a Flow and send Response | Power Automate
  16. Converting JSON to XML and XML to JSON in a Flow | Power Automate

Thank you!

Microsoft Azure Storage Explorer | Getting Started

If you are wondering how to get and setup the Microsoft Azure Storage Explorer – Here’s this post!

Azure Storage Explorer

Here’s how you can download and setup Microsoft Azure Storage Explorer.

  1. Search For Azure Storage Explorer and you’ll see something as below –

  2. Once you open the azure.microsoft.com link, you’ll see the below –
    Drop down to select Windows. And the Setup will will be prompted to save on your browser (or directly download based on your browser settings)

  3. And it’ll appear that it has been downloaded to your machine.

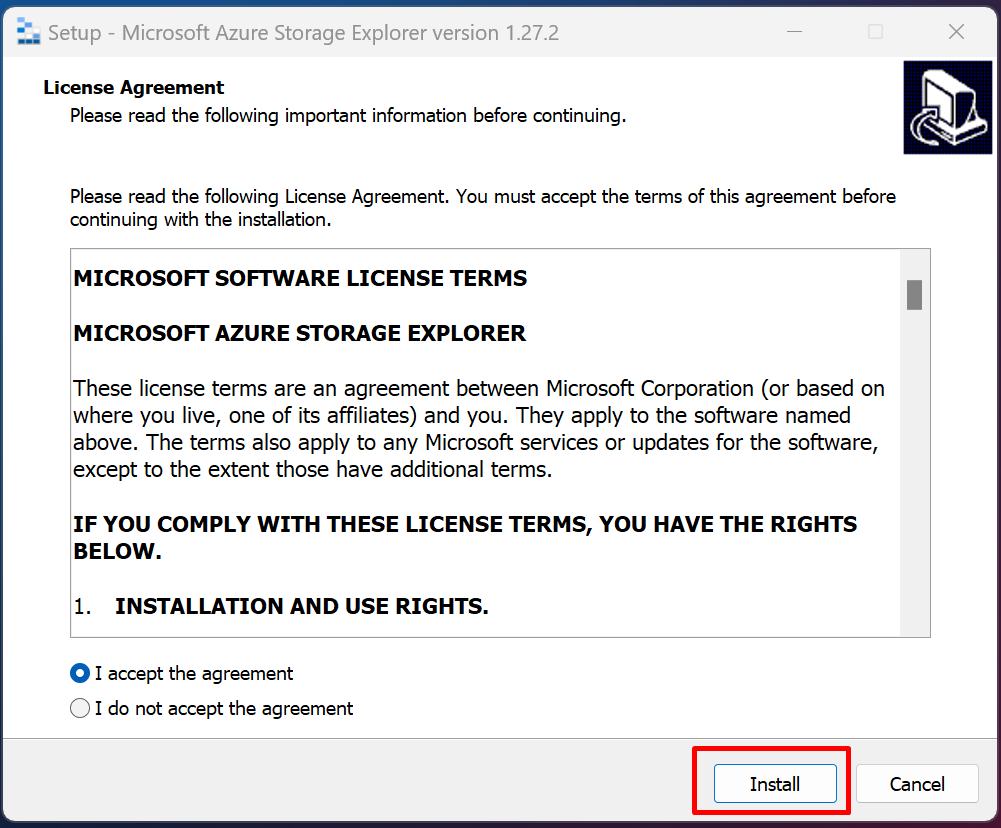
  4. Now, click on the Setup and let it start. Accept the Terms if everything looks OK to you, then click on Install


  5. It’ll then ask you where to setup and what it should call on the system. Standard stuff.


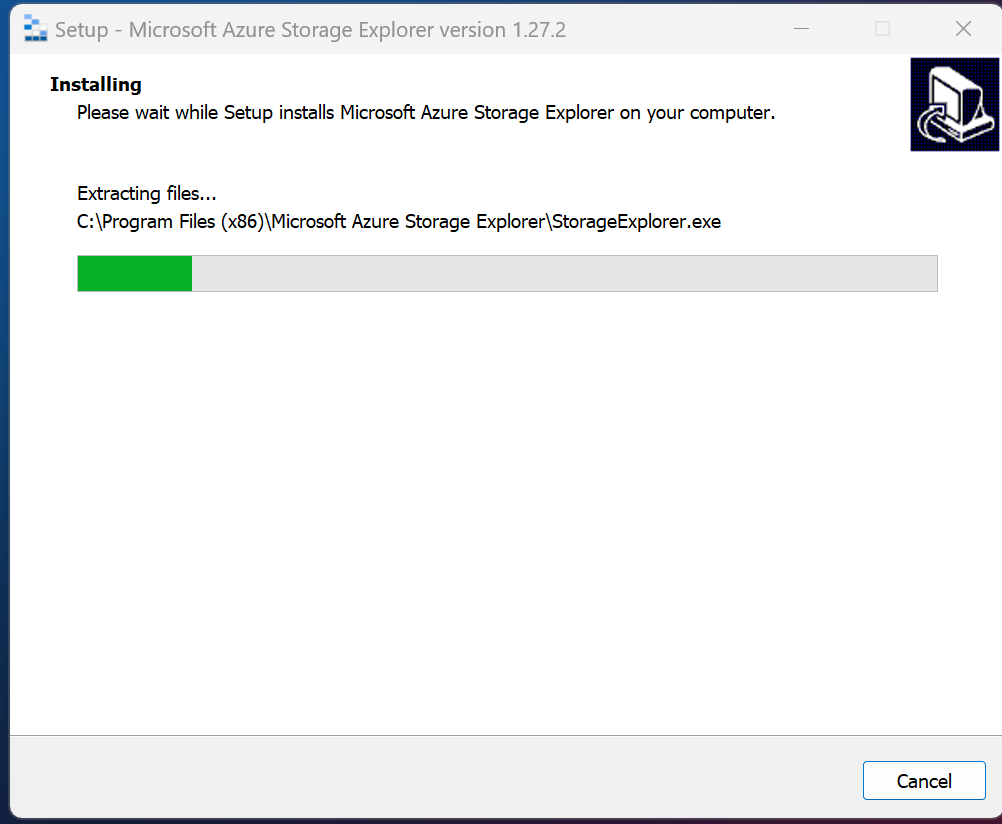
  6. Then, installation will begin.


  7. Then, open it up when finished.

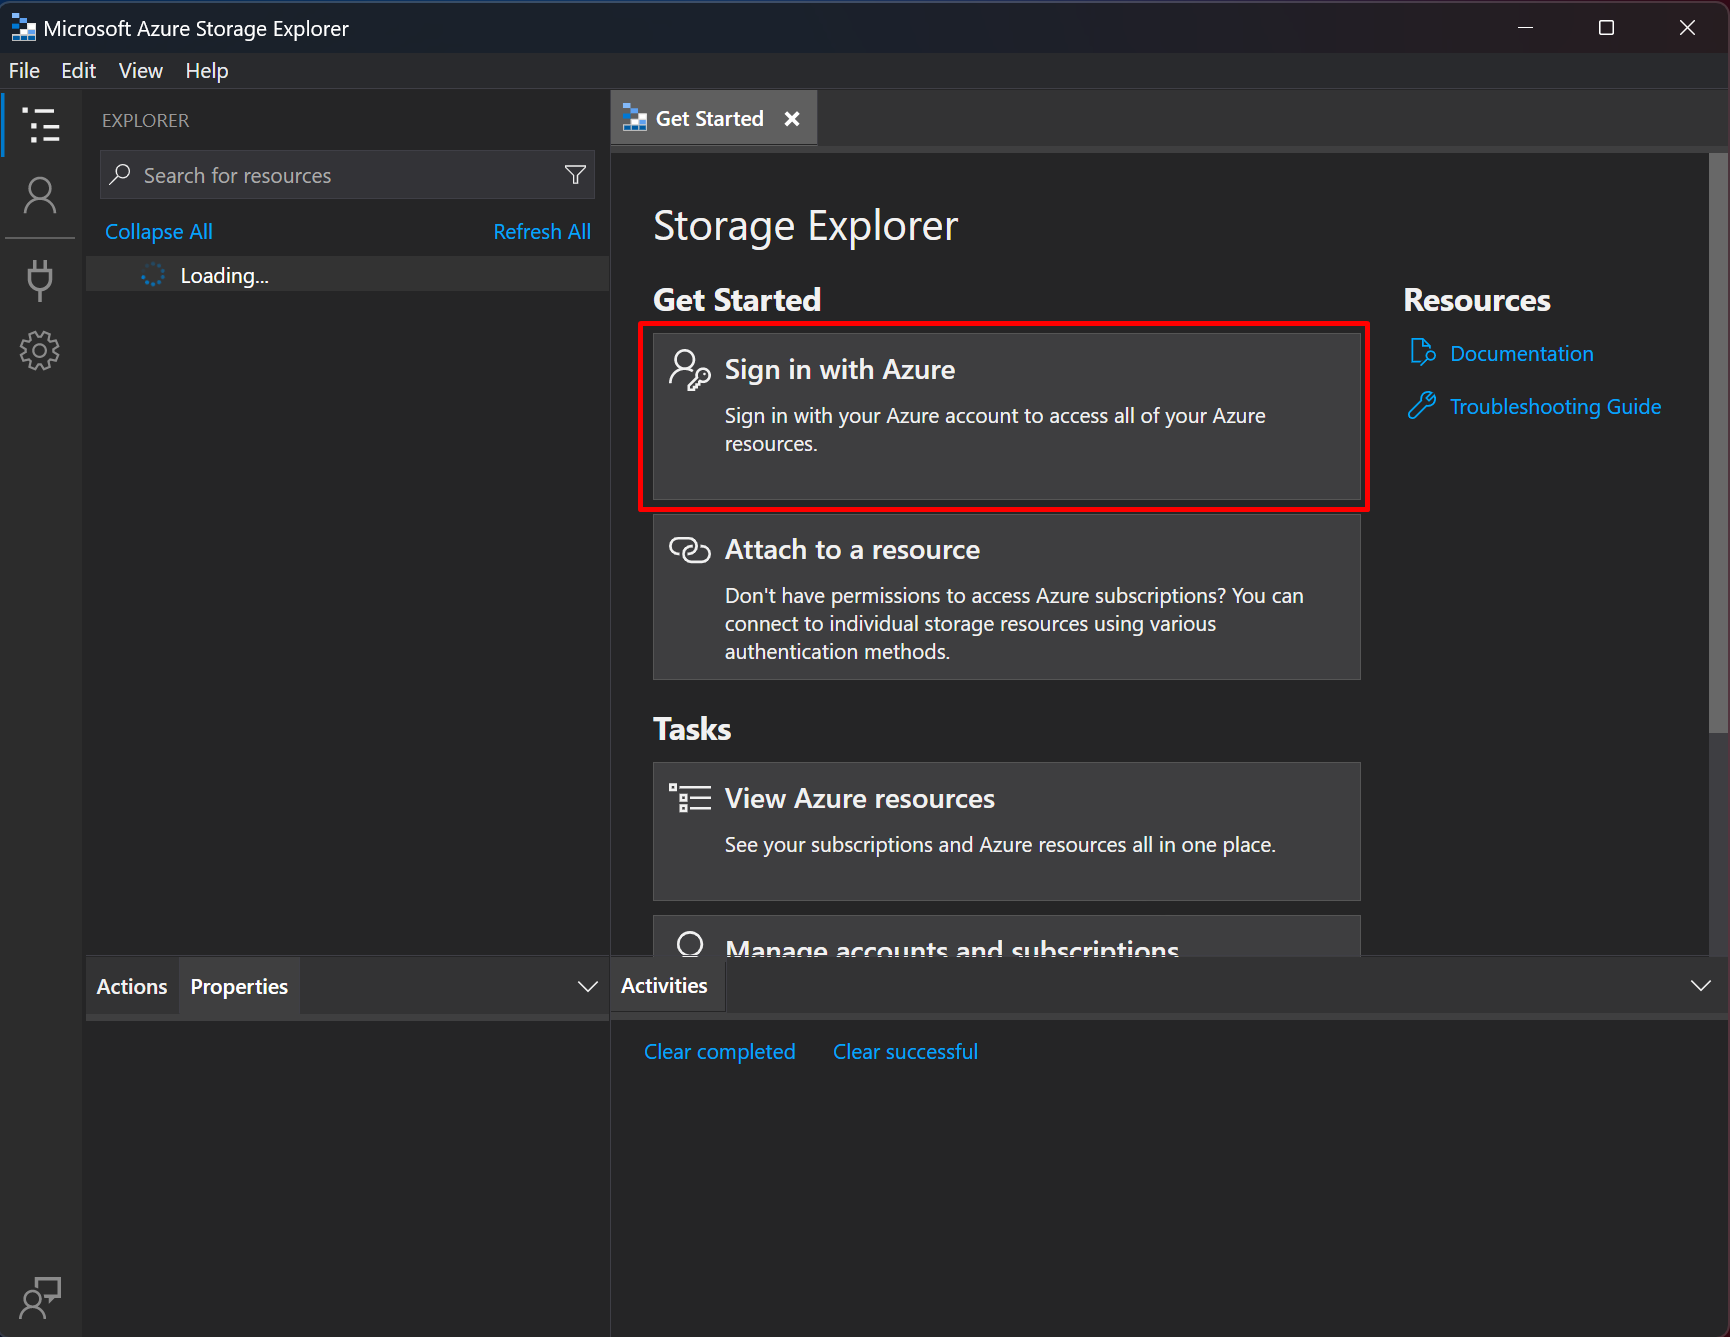
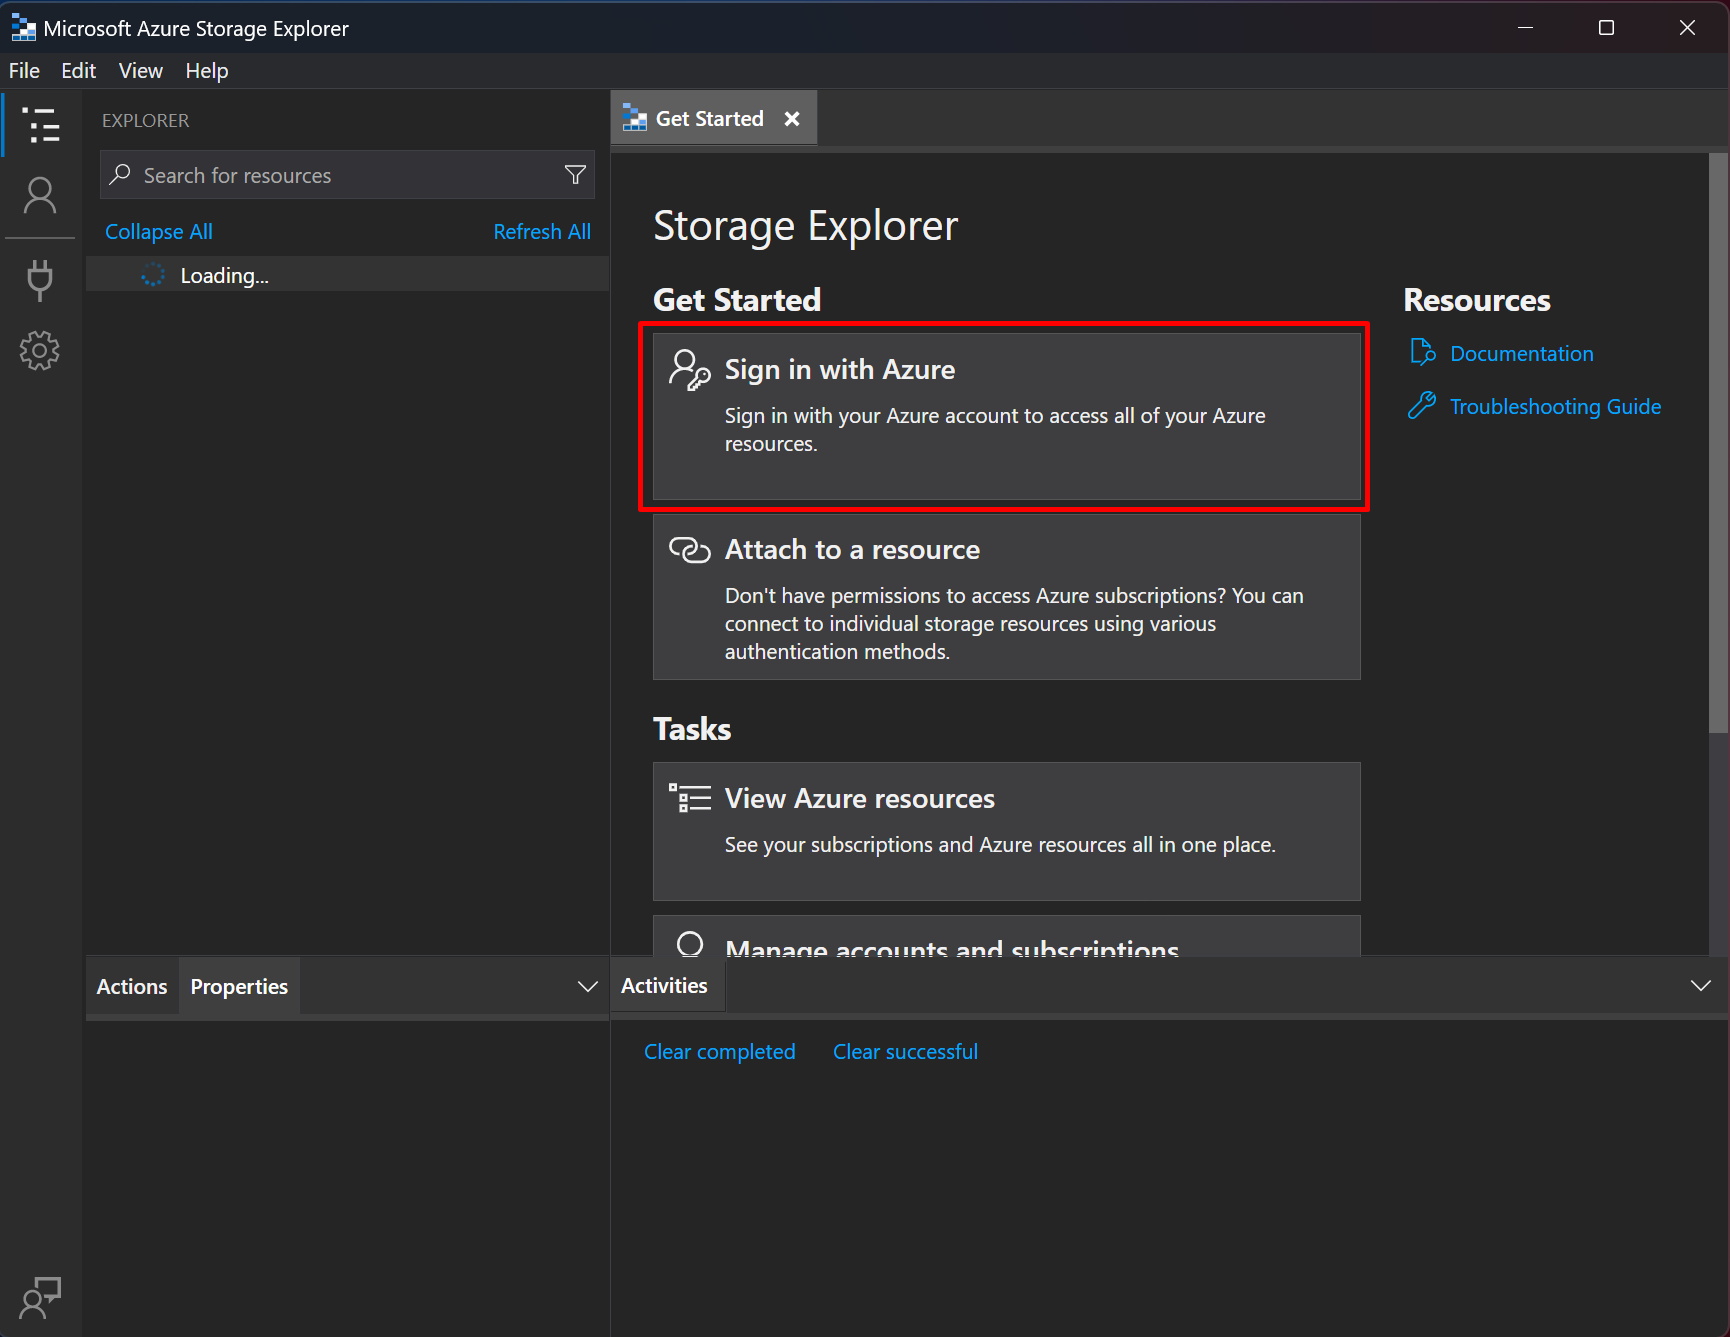
  8. Now, this will come up. You are now ready to Sign-In!

Sign In with Azure in Microsoft Storage Explorer

Now, picking up from the step above, here’s how you sign in –

  1. Click on the Sign In with Azure if that’s your case unless you are trying other options in this wizard.

  2. If your Azure is usual one to login, can you simply click on Azure and click Next.


  3. Then, you’ll be asked to authenticate. Enter your credentials and authenticate like you would for any Microsoft Account.

  4. Once successful, you’ll see this and you can close the window.

  5. Now, if you open the App, it’ll detect your Azure Subscription if you have one.
    If it looks correct, you can simply click on Open Explorer.

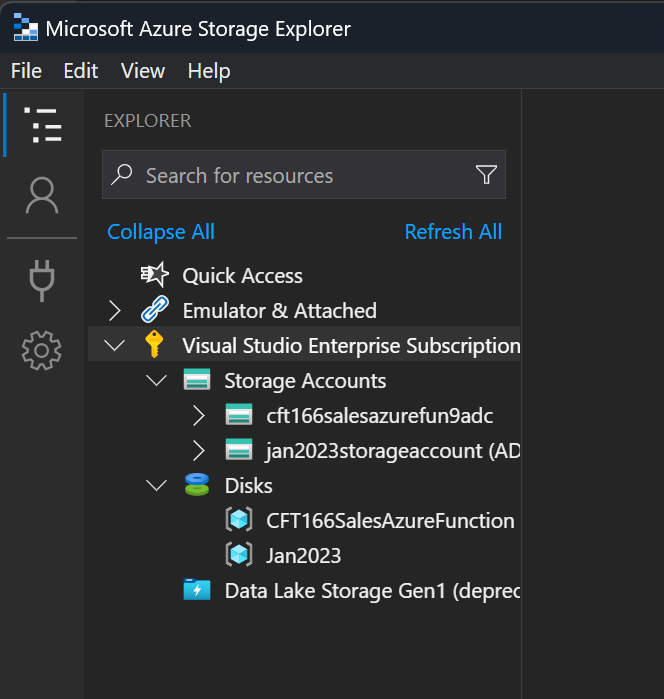
  6. Once opened, you can expand on the Subscription and see all your Storage Accounts.

Hope this helps!

Here are some Power Automate posts you want to check out –

  1. Smart Buttons in Ribbon Workbench | XrmToolBox
  2. Hide options from OptionSet using JavaScript in Dynamics 365 CRM
  3. Select the item based on a key value using Filter Array in Power Automate
  4. Select values from an array using Select action in a Power Automate Flow
  5. Blocking Attachment Extensions in Dynamics 365 CRM
  6. Upgrade Dataverse for Teams Environment to Dataverse Environment
  7. Showing Sandbox or Non Production Apps in Power App mobile app
  8. Create a Power Apps Per User Plan Trial | Dataverse environment
  9. Install On-Premise Gateway from Power Automate or Power Apps | Power Platform
  10. Co-presence in Power Automate | Multiple users working on a Flow
  11. Search Rows (preview) Action in Dataverse connector in a Flow | Power Automate
  12. Suppress Workflow Header Information while sending back HTTP Response in a Flow | Power Automate
  13. Call a Flow from Canvas Power App and get back response | Power Platform
  14. FetchXML Aggregation in a Flow using CDS (Current Environment) connector | Power Automate
  15. Parsing Outputs of a List Rows action using Parse JSON in a Flow | Common Data Service (CE) connector
  16. Asynchronous HTTP Response from a Flow | Power Automate
  17. Validate JSON Schema for HTTP Request trigger in a Flow and send Response | Power Automate
  18. Converting JSON to XML and XML to JSON in a Flow | Power Automate

Thank you!

Setting up Billing Policy for Dataverse Environments in Power Platform for Azure Pay-As-You-Go plan | Microsoft Azure

Pay-as-you-go has been recently announced with Azure and I too wanted to explore this topic myself on my trials Dataverse/D365 Sales environment as well as my Microsoft Azure trial subscription which I started.

Disclaimer: Please note that I’m exploring this topic and sharing as I go on. Hence, I’ll continue to write further topics as I proceed. Please try on your Dataverse trial & Microsoft Azure trial subscription to identify / estimate the costs your actual implementation will incur.

I also recommend going through the below Microsoft Learn Pages for detailed information on pricing and meters of the Pay-as-you-go model –

Detailed Microsoft Docs for Pay-as-you-go: https://learn.microsoft.com/en-us/power-platform/admin/pay-as-you-go-overview?WT.mc_id=DX-MVP-5003911

Power Apps Pricing: https://powerapps.microsoft.com/en-us/pricing/

Pay-as-you-go Meters: https://learn.microsoft.com/en-us/power-platform/admin/pay-as-you-go-meters?tabs=image?WT.mc_id=DX-MVP-5003911

Let’s see how we can get started!

Setting up Billing Policy

Here’s how you create Billing Policy in Power Platform –

  1. In Power Platform Admin Center (https://admin.powerplatform.microsoft.com/), you can see Policies section. If you expand the same, you can see Billing Policies.

  2. Here, you can start by creating a new Billing Policy

  3. You can give it an appropriate name. And it doesn’t allow you to have spaces.

  4. Next, you’ll be asked to select the Subscription you wan to assign the Billing Policy under.
    Notice the error below. My Free Trial Azure Subscription doesn’t have a Resource Group created yet. Hence, this need to be present.


  5. Since at this point, I don’t have a Resource Group under the Azure Subscription I selected, I need to go to Azure Portal (https://portal.azure.com/), search for Resource Groups

  6. Since you might not have any Resource Group right away, you can create one.


  7. I’ll just give it a name which I can identify with.


  8. I’ll validate and Create the same in Azure.


  9. Resource Group will be created here.


  10. Now, when I come back to Power Platform, if I reselect the Azure Subscription, I’ll now see that the Resource Group I created is showing up.

  11. I’ll select the same and select United States as the Region.
    And click on Next.


  12. In the next steps, I can select which all Environments should be included in the Policy. Then, I can click on + Add to policy.

  13. You can see the Added to policy tab now showing your environment. Once you are satisfied with the selection, you can click on Next.

  14. Final step is to now Review and confirm the policy you are creating.

  15. It’ll take a moment to start provisioning. Then, you’ll see the status as Provisioning.

  16. Once completed, the status will show as Enabled.


  17. Now, when you go back to Azure Portal and open the Resource Group, you’ll find a Deployment show up


  18. Open it up and you’ll see a Deployment created.

  19. And if you open the Deployment, you can see the DataverseBilling which we had set up in Power Platform.


  20. And this point, you are now setup with using Pay-As-you-go plan for your Dataverse environment(s).

    Note: Further, I’ll write follow up posts as I explore Pay-as-you-go scenarios and experience myself.

Hope this helps!

Here are some Power Automate posts you want to check out –

  1. Select the item based on a key value using Filter Array in Power Automate
  2. Select values from an array using Select action in a Power Automate Flow
  3. Blocking Attachment Extensions in Dynamics 365 CRM
  4. Upgrade Dataverse for Teams Environment to Dataverse Environment
  5. Showing Sandbox or Non Production Apps in Power App mobile app
  6. Create a Power Apps Per User Plan Trial | Dataverse environment
  7. Install On-Premise Gateway from Power Automate or Power Apps | Power Platform
  8. Co-presence in Power Automate | Multiple users working on a Flow
  9. Search Rows (preview) Action in Dataverse connector in a Flow | Power Automate
  10. Suppress Workflow Header Information while sending back HTTP Response in a Flow | Power Automate
  11. Call a Flow from Canvas Power App and get back response | Power Platform\
  12. FetchXML Aggregation in a Flow using CDS (Current Environment) connector | Power Automate
  13. Parsing Outputs of a List Rows action using Parse JSON in a Flow | Common Data Service (CE) connector
  14. Asynchronous HTTP Response from a Flow | Power Automate
  15. Validate JSON Schema for HTTP Request trigger in a Flow and send Response | Power Automate
  16. Converting JSON to XML and XML to JSON in a Flow | Power Automate

Thank you!

Skip requirement to enter authentication method in M365 Login | Turn off Security Defaults

If you newly created a an M365 tenant, this is what you’ll be forced to by to enter authentication methods in this Security Defaults feature –

In most cases, even clicking on Skip for now option doesn’t help and I’m forced to enter an alternate authentication method.
Ideally, for Production purposes, you should keep this turned on. Only if you are on a trial and the tenant you are working on is for learning purposes, it is OK to turn this off.

Turn Off Security Defaults in Azure Portal

Here’s how you can turn off the Security Defaults requirement from the Azure Portal –

  1. Navigate to Azure Portal (https://portal.azure.com)

  2. Again, you’ll see this message so you can choose to skip this since we want to disable the Security Defaults.

  3. Then, go to Azure Active Directory

  4. Once in Azure Active Directory, look for the Settings in the left hand pane.

  5. In Properties, at the bottom you’ll see the Manage Security defaults button.

  6. It would be turned on by default (Yes) which you’ll need to switch to No.

  7. Once you switch to No, you’ll need to select either of the below reasons as to why you are switching it off. I just entered N/A in the Others reason, your reason could be different.

  8. Once you Save it, that’s all. Now you can just close the Window and try to Login again.

Logging in without Security Defaults

When the Security Defaults is turned off, you can see that the login screen will no longer ask you to enter an authentication method –

  1. When you enter password.

  2. And when you sign in, you’re no longer asked to enter a method for authentication and you’re already logged in past that step.

Hope this was helpful! Here are some more Dynamics 365 posts which you might be interested in –

  1. Dynamics 365 Storage Utilization | Dataverse Storage | Power Platform Admin Center
  2. Use Hierarchy in Roll Up Fields in Dynamics 365 CRM
  3. Filter records in a View owned by a Team you are a member of | Dynamics 365 CRM
  4. Get GUID of the current View in Dynamics 365 CRM JS from ribbon button | Ribbon Workbench
  5. Dynamics 365 App For Outlook missing on SiteMap in CRM? Use shortcut link [Quick Tip]
  6. Import lookup referencing records together in Dynamics 365 CRM | [Linking related entity data during Excel Import]
  7. Mailbox Alerts Hide/Show behavior in Dynamics 365 CRM
  8. Excel Importing Notes (Annotation) entity in Dynamics 365 CRM
  9. Enable/Disable the need to Approve Email for Mailboxes in Dynamics 365 CRM CE
  10. Call Azure Function from Dynamics 365 CRM using Webhooks
  11. Show Ribbon button only on record selection in Dynamics CRM
  12. Accessing multiple occurrences of a field in Business Process Flow using JS in D365 CRM

Thank you!!

Create Application Users for Dynamics 365 environment | Power Platform Admin Center

Here’s how you now set up Application Users in Dynamics 365 CRM from the Power Platform Admin Center instead from the Classic UI and let’s see how the process is eased.

Classic UI

Previously, you used to see Application Users view in the Dynamics 365 CRM under Settings > Security > Users.


But it’s not longer available. Instead, you now go to the Power Platform Admin Center.

Register App in Power Platform Admin Center [PPAC]

Now, once you are in the Power Platform Admin Center, you can go to the Environment section –

  1. First, let’s say this is your App in your Azure’s Active Directory in the App Registrations. And now you want to create an Application User in Dynamics CRM for this App.

  2. Now, you can go to the PPAC (https://admin.powerplatform.microsoft.com/) and in Environments, look for your D365 CRM/Dataverse environment.

  3. In Settings, you’ll see Users, expand the same and you’ll see Application Users which is now it’s own separate option.

  4. Now, you’ll see the Registered Apps I have already and you can add from the “+ New App User” button above.

  5. Now, select the + Add an app button

  6. And you’ll see the complete list of all the Apps that are in your Azure’s Active Directory. Select the one your just created and click Add.

  7. And then finally click Create once you Add the App you want to create Application User for.

  8. And now, you’ll see the App added as an Application User for your environment.

  9. Now, you also need to provide Security Roles based on the requirement. Select the App User, and click on Edit security roles once available.

  10. In my case, I’m giving 3 Roles which I need to give and click Save.

  11. Now, I’ll also see how many Roles have been given to the App User.

Hope this was helpful! Here are some more Dynamics 365 posts which you might be interested in –

  1. Setup Postman to connect to Dynamics 365 CRM using OAuth 2.0 | Azure App Registration
  2. Dynamics 365 Storage Utilization | Dataverse Storage | Power Platform Admin Center
  3. Use Hierarchy in Roll Up Fields in Dynamics 365 CRM
  4. Filter records in a View owned by a Team you are a member of | Dynamics 365 CRM
  5. Get GUID of the current View in Dynamics 365 CRM JS from ribbon button | Ribbon Workbench
  6. Dynamics 365 App For Outlook missing on SiteMap in CRM? Use shortcut link [Quick Tip]
  7. Import lookup referencing records together in Dynamics 365 CRM | [Linking related entity data during Excel Import]
  8. Mailbox Alerts Hide/Show behavior in Dynamics 365 CRM
  9. Excel Importing Notes (Annotation) entity in Dynamics 365 CRM
  10. Enable/Disable the need to Approve Email for Mailboxes in Dynamics 365 CRM CE
  11. Call Azure Function from Dynamics 365 CRM using Webhooks
  12. Show Ribbon button only on record selection in Dynamics CRM
  13. Accessing multiple occurrences of a field in Business Process Flow using JS in D365 CRM

Thank you!!

Setup Postman to connect to Dynamics 365 CRM using OAuth 2.0 | Azure App Registration

If you want to test the WEB API in Dynamics 365 CRM using Postman, here’s what you need to do to setup Postman to connect to Dynamics 365’s Web API

There are 2 parts to this setup –

  1. Registering an App in Active Directory.
  2. Configuring Postman to utilize the App to connect to Dynamics 365.

So, let’s look at how we do this!

Register an App in Azure

The first step is to register an App in your Azure’s Active Directory so that you can use it to test using your Postman on your machine –

  1. Go to the Azure Portal (https://portal.azure.com/) and the look for or search for Azure Active Directory

  2. In AAD, look for App Registrations.

  3. Now, register a new App in the App Registration

  4. Enter the details of the App Registration so you can identify what the App is for. Since I’m using this for Postman testing, I’ll enter something like – “Postman WEB API
    Also, since in most cases your Azure environment could be different, it’s recommended to select Accounts in any organizational directory (Multitenant), but it’s up to you based on how you can to secure this!
    Since, I’m testing on my local machine using Postman, I’ll enter http://localhost

    And finally click on Register.

  5. Once this is registered, you’ll see the details like any other Azure resource and look for Client ID and copy the same and save it somewhere temporarily.

  6. Next is updating the Manifest to support this setup.
    Set the “allowPublicClient” flag to true and “oauth2AllowImplicitFlow” to true as well.

  7. Once the Manifest is updated, it should look like this –

  8. Final step is to give permissions for Dynamics 365 to this App we just created. Go to API Permissions tab from the left-hand menu and click on + Add a permission button.

  9. Look for the Dynamics CRM option and select it.

  10. Select it and then click on Add permissions.

  11. Once added, you’ll need to Grant Permissions. At this moment when it’s not granted, the Status can be seen as blank.

  12. Select Yes to Grant Permissions.

  13. Once granted, the Status will be updated as follows – the status of Granted for [OrgName] will appear

  14. And we are done setting up the App in Azure Portal to be utilized by Postman to test Dynamics 365 Web API locally.

Setting up Postman

Now that we have the App setup, open Postman and we’ll utilize the above created App to establish a connection with Dynamics 365 CRM using OAuth2.0 –

  1. In your Dynamics 365 CRM environment, capture the OAuth URL in your Customization > Developer Resources section

  2. Enter this in a new Tab in your Postman and if you directly try to test this, you’ll get 401 Unauthorized.

  3. Now, we’ll have to configure the Authorization tab to be able to authenticate into Dynamics 365 CRM using the App registration we created in Azure in steps above.

  4. Now, enter the details we have captured so far –
    Token Name – Enter a suitable Token name
    Grant Type – Select Implicit if not already set.
    Callback URL – The callback URI should be http://localhost based on what we set in Azure in above steps.
    Auth URL – Here’s how you can get the Auth URL for your Dynamics 365 environment -> OAuth 2.0 URL for Dynamics 365
    Client ID – This should be what you saved above from the Azure App Service. Refer to step #5 in the Setting up App in Azure section above in this post. This should be the Application ID.

    Once all this is entered, click on Get New Access Token

  5. Once you click on Get New Access Token, you’ll need to authenticate into the environment as you usually get while connecting from Browser.
    Enter credentials and authenticate.

  6. Once this connection and the permissions are correctly validated, you’ll get a message like this –

  7. And it’ll show you this dialog box where you need to simply click on the Use Token button.

  8. You’ll then see the token as below –

  9. And you’re set!! Now, you can simply test using Postman.

Testing using Postman

Now that you are authenticated, you can click on Send and see that you are now able to retrieve the Web API

Hope this was helpful! Here are some more Dynamics 365 posts which you might be interested in –

  1. Dynamics 365 Storage Utilization | Dataverse Storage | Power Platform Admin Center
  2. Use Hierarchy in Roll Up Fields in Dynamics 365 CRM
  3. Filter records in a View owned by a Team you are a member of | Dynamics 365 CRM
  4. Get GUID of the current View in Dynamics 365 CRM JS from ribbon button | Ribbon Workbench
  5. Dynamics 365 App For Outlook missing on SiteMap in CRM? Use shortcut link [Quick Tip]
  6. Import lookup referencing records together in Dynamics 365 CRM | [Linking related entity data during Excel Import]
  7. Mailbox Alerts Hide/Show behavior in Dynamics 365 CRM
  8. Excel Importing Notes (Annotation) entity in Dynamics 365 CRM
  9. Enable/Disable the need to Approve Email for Mailboxes in Dynamics 365 CRM CE
  10. Call Azure Function from Dynamics 365 CRM using Webhooks
  11. Show Ribbon button only on record selection in Dynamics CRM
  12. Accessing multiple occurrences of a field in Business Process Flow using JS in D365 CRM

Thank you!!

OAuth 2.0 URL for Dynamics 365

If you are new to using connecting to Dynamics 365 using OAuth 2.0, here’s an Auth URL you’ll need for your external applications / Postman testing of Web APIs in Dynamics 365 CRM.

URL for OAuth2.0 for Dynamics 365 CRM

The URL is: https://login.microsoftonline.com/common/oauth2/authorize?resource=[URL of the D365 Environment]

In the square brackets, you can put the URL of your Dynamics 365 CRM environment itself like shown below –

And then the URL should be: https://login.microsoftonline.com/common/oauth2/authorize?resource=https://cft158.crm.dynamics.com/

Hope this was helpful! Here are some more Dynamics 365 posts which you might be interested in –

  1. Dynamics 365 Storage Utilization | Dataverse Storage | Power Platform Admin Center
  2. Use Hierarchy in Roll Up Fields in Dynamics 365 CRM
  3. Filter records in a View owned by a Team you are a member of | Dynamics 365 CRM
  4. Get GUID of the current View in Dynamics 365 CRM JS from ribbon button | Ribbon Workbench
  5. Dynamics 365 App For Outlook missing on SiteMap in CRM? Use shortcut link [Quick Tip]
  6. Import lookup referencing records together in Dynamics 365 CRM | [Linking related entity data during Excel Import]
  7. Mailbox Alerts Hide/Show behavior in Dynamics 365 CRM
  8. Excel Importing Notes (Annotation) entity in Dynamics 365 CRM
  9. Enable/Disable the need to Approve Email for Mailboxes in Dynamics 365 CRM CE
  10. Call Azure Function from Dynamics 365 CRM using Webhooks
  11. Show Ribbon button only on record selection in Dynamics CRM
  12. Accessing multiple occurrences of a field in Business Process Flow using JS in D365 CRM

Thank you!!