Microsoft Loop is now in GA for Microsoft 365 work accounts

Microsoft Loop is now Generally Available for work accounts in Microsoft 365. Here’s an exciting new product that will make collaboration fun and productive!

Here’s Microsoft’s Announcement article on the same – https://techcommunity.microsoft.com/t5/microsoft-365-blog/microsoft-loop-built-for-the-new-way-of-work-generally-available/ba-p/3982247?WT.mc_id=DX-MVP-5003911

But, let me summarize first impressions of the same!

Accessing Loop in Microsoft 365

Given that you have the correct access for Loop services in M365, here’s how you can access and use Loop in your Organization –

  1. Go to https://loop.microsoft.com/. You’ll be taken to the Welcome page which looks like this.
    You can click on the Loop logo on the top-left to see all the Workspaces you have access to.

  2. You can start of my creating your own Workspaces.

  3. Name your Workspace based on the purpose or the project.

  4. And you’ll have the Workspace ready to create your Pages and Links in the Workspace.
    If you click on the + icon, you’ll be able to create new sections like Pages and Links.
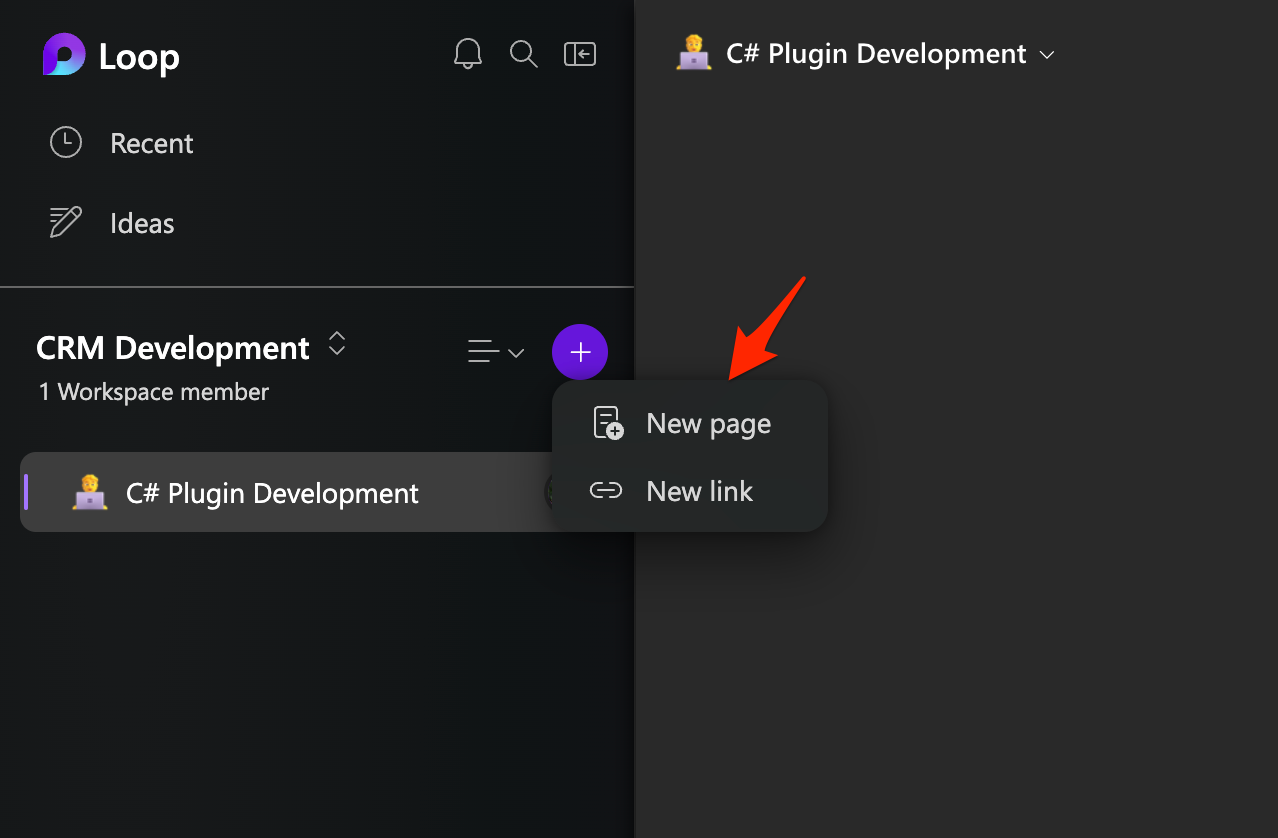
  5. In the Pages itself, you can start adding Loop components and generating content as below –
    Slash (/) to insert a Loop component

  6. And you can tag people/content using @
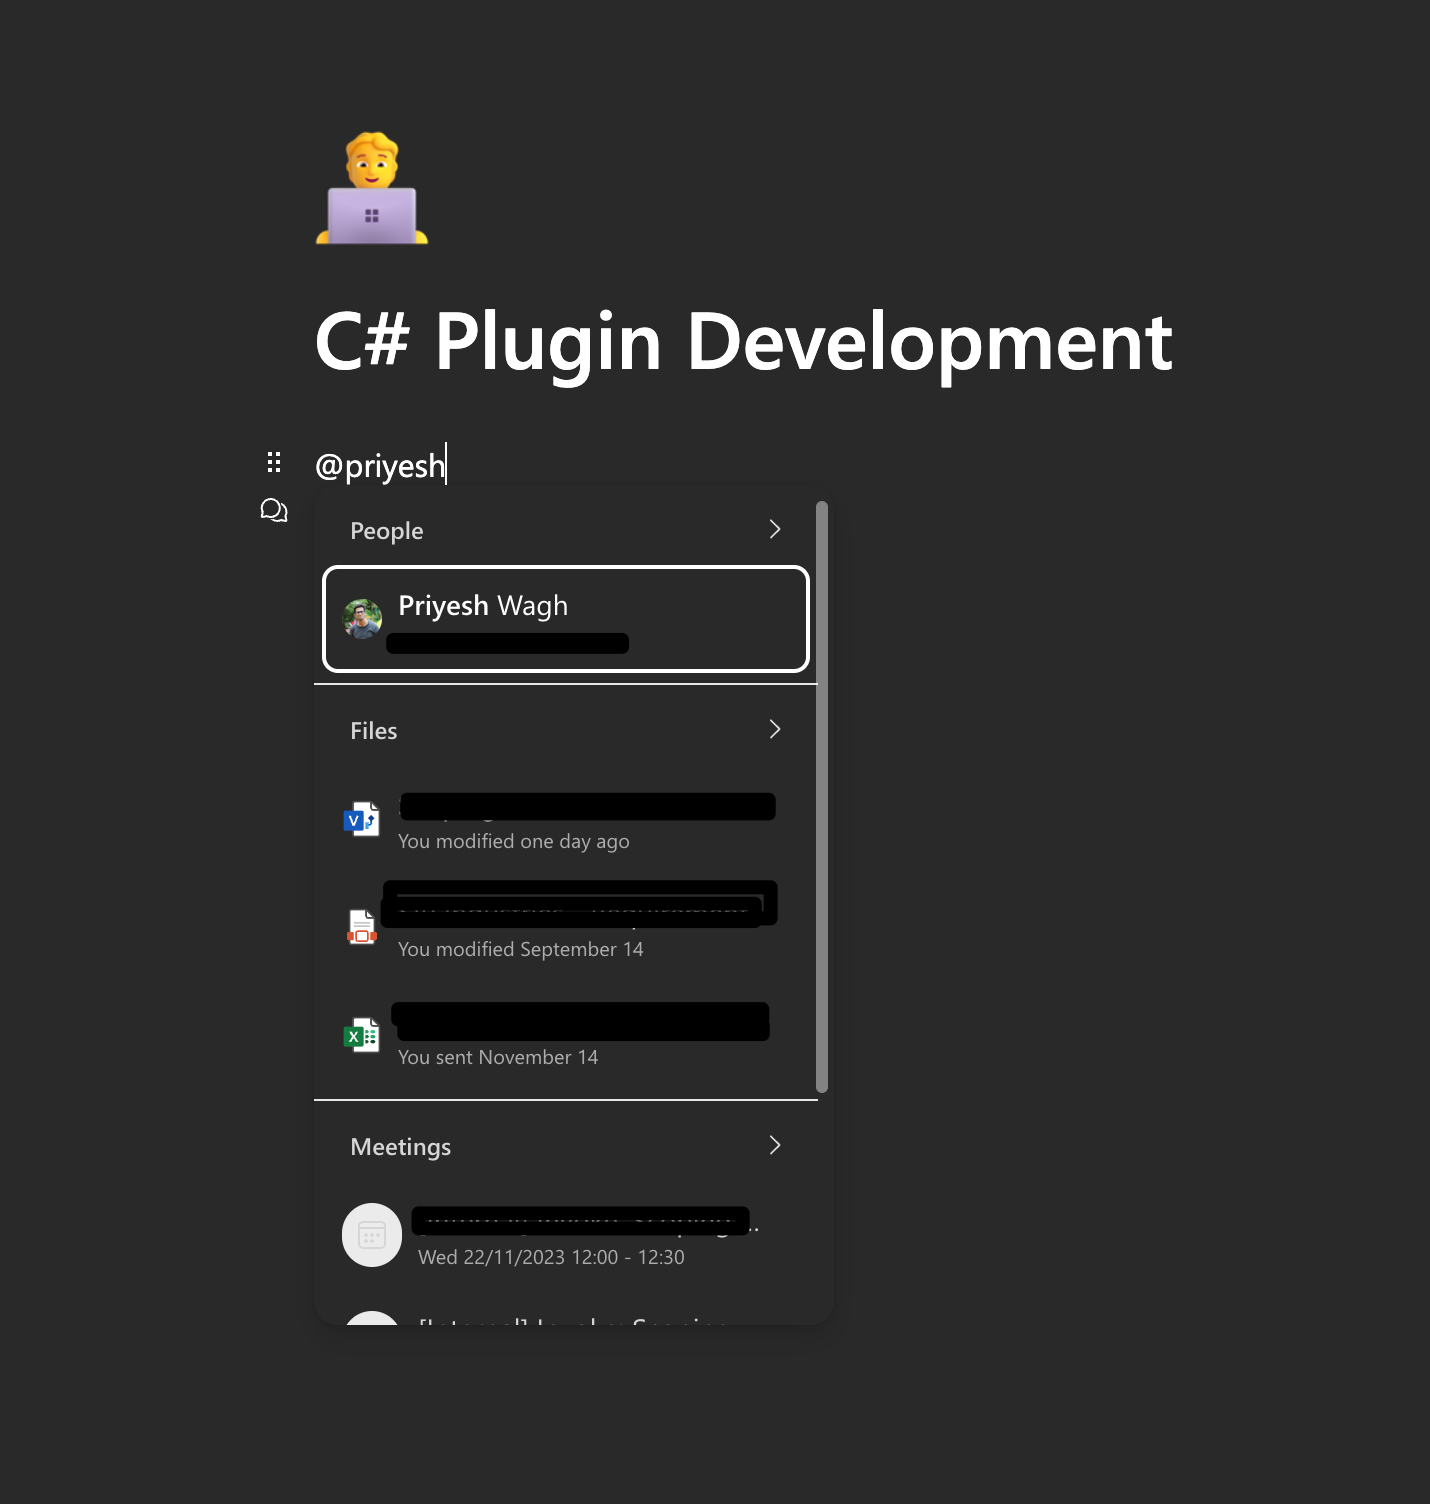
  7. In the Tag menu itself, if you scroll to the very bottom you’ll be able to change the Editor Settings.


    And this is what the Editor Setting menu looks like where you can change the settings which suit your needs.

And you can explore further what all Loop can do! I believe there are more features coming soon!

Ensure Loop is available for the Organization

By default, Loop is enabled for the your organization. However, you can double check as below –

  1. Given that you might be having Global Admin access to your tenant, you can go to the Org Settings.

  2. And you can see that the workspace access have been given to all the users.

Licensing

Having one of these Microsoft 365 licenses will let you use advanced features of Microsoft Loop –

  1. Microsoft 365 Business Standard
  2. Microsoft 365 Business Premium
  3. Microsoft 365 E3
  4. Microsoft 365 E5


Detailed Documentation here on the Licensing requirements – https://support.microsoft.com/en-us/office/loop-access-via-microsoft-365-subscriptions-92915461-4b14-49a4-9cd4-d1c259292afa?WT.mc_id=DX-MVP-5003911

In case you don’t have the correct required licenses, you’ll still be able to access Loop but won’t be able to create Workspaces or use any advanced features. Typically, you’ll see a screen like this –

Hope this helps!

Here are some Power Automate posts you want to check out –

  1. Select the item based on a key value using Filter Array in Power Automate
  2. Select values from an array using Select action in a Power Automate Flow
  3. Blocking Attachment Extensions in Dynamics 365 CRM
  4. Upgrade Dataverse for Teams Environment to Dataverse Environment
  5. Showing Sandbox or Non Production Apps in Power App mobile app
  6. Create a Power Apps Per User Plan Trial | Dataverse environment
  7. Install On-Premise Gateway from Power Automate or Power Apps | Power Platform
  8. Co-presence in Power Automate | Multiple users working on a Flow
  9. Search Rows (preview) Action in Dataverse connector in a Flow | Power Automate
  10. Suppress Workflow Header Information while sending back HTTP Response in a Flow | Power Automate
  11. Call a Flow from Canvas Power App and get back response | Power Platform\
  12. FetchXML Aggregation in a Flow using CDS (Current Environment) connector | Power Automate
  13. Parsing Outputs of a List Rows action using Parse JSON in a Flow | Common Data Service (CE) connector
  14. Asynchronous HTTP Response from a Flow | Power Automate
  15. Validate JSON Schema for HTTP Request trigger in a Flow and send Response | Power Automate
  16. Converting JSON to XML and XML to JSON in a Flow | Power Automate

Thank you!
Power Automate Cloud Flows designer using Copilot | Now in GA

As Microsoft rolled out using Power Automate Cloud Flows designer using Copilot on 8th Nov 2023, here’s a look at how you can use it in your scenarios while designing Cloud Flows!

Copilot in Power Automate

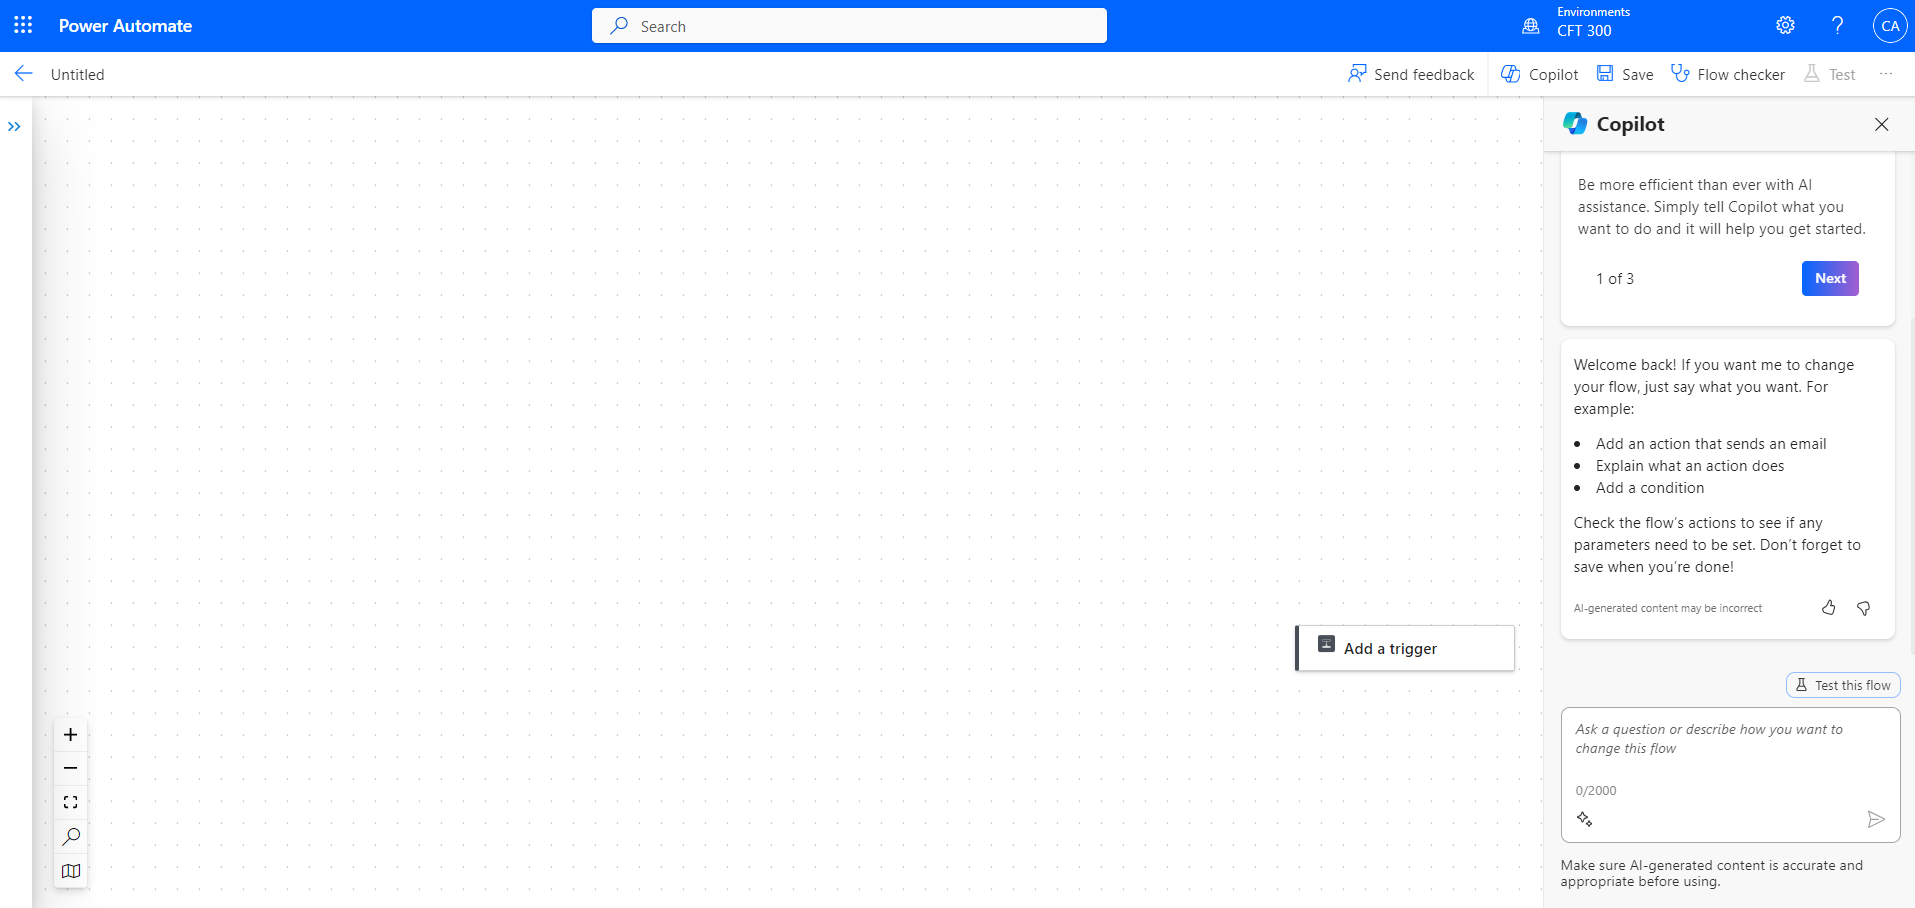
As you might have noticed by now (based on the currently supported region you are in), Copilot is enabled in Power Automate Flow Designer directly!

  1. You’ll notice that the Designer’s look and feel is new and refined than the previous UI. Of course, I’ll need time to get familiar with this in coming days. 😊
    But I’ll share with you what I learnt so far.

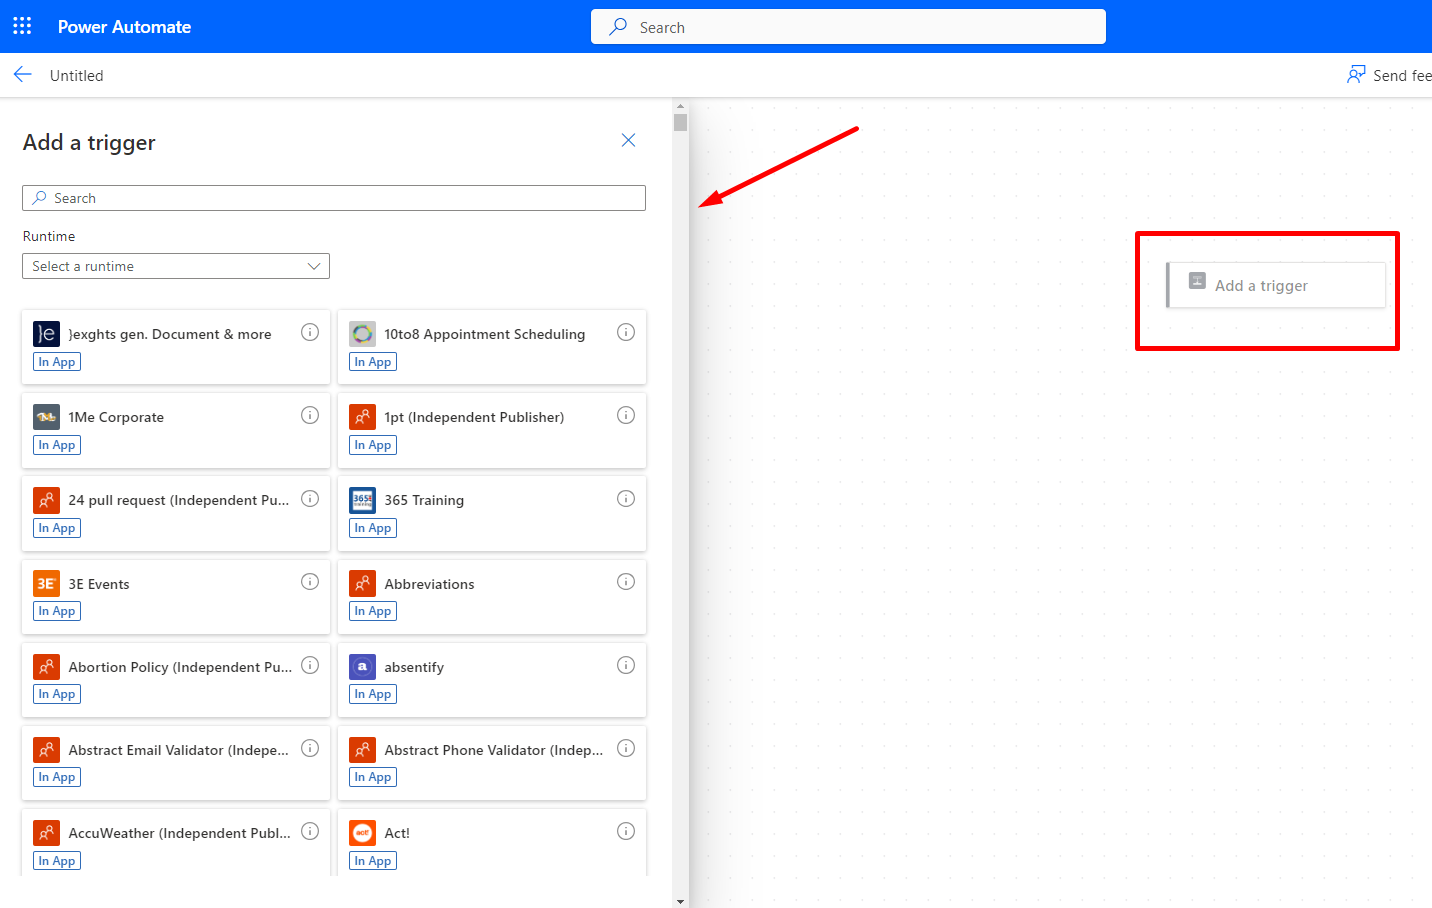
  2. Next, when you click on the Step, the Properties are on a left hand side pane so you don’t see a menu dropping down in your screen as before which needed you to scroll that used to make your Action go above the screen from the top

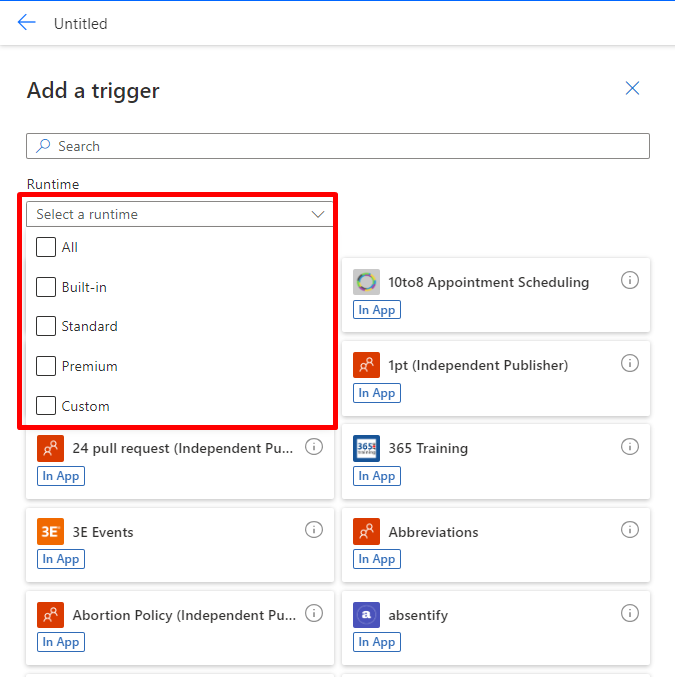
  3. Once the Property pane appears, you can select the different types of Triggers available from the Runtime menu which was previously a Tab within the Action selection dialog box.

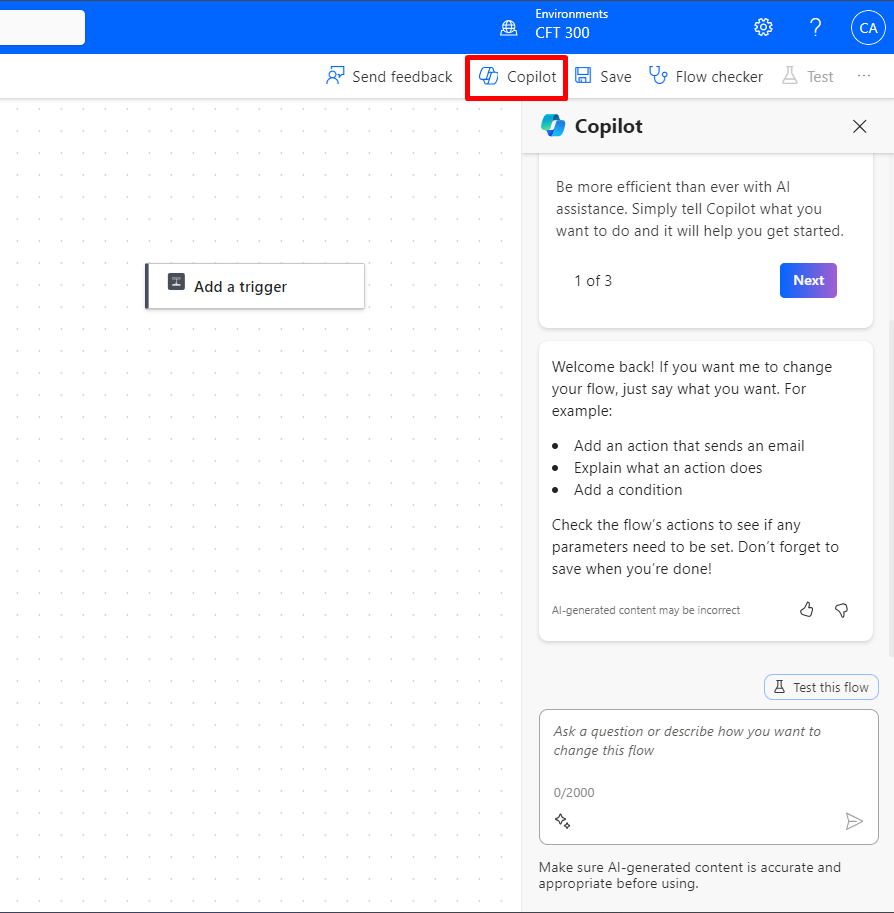
  4. On the right hand side, you can see the Copilot button to show and hide the Copilot pane where you can type in your Commands.

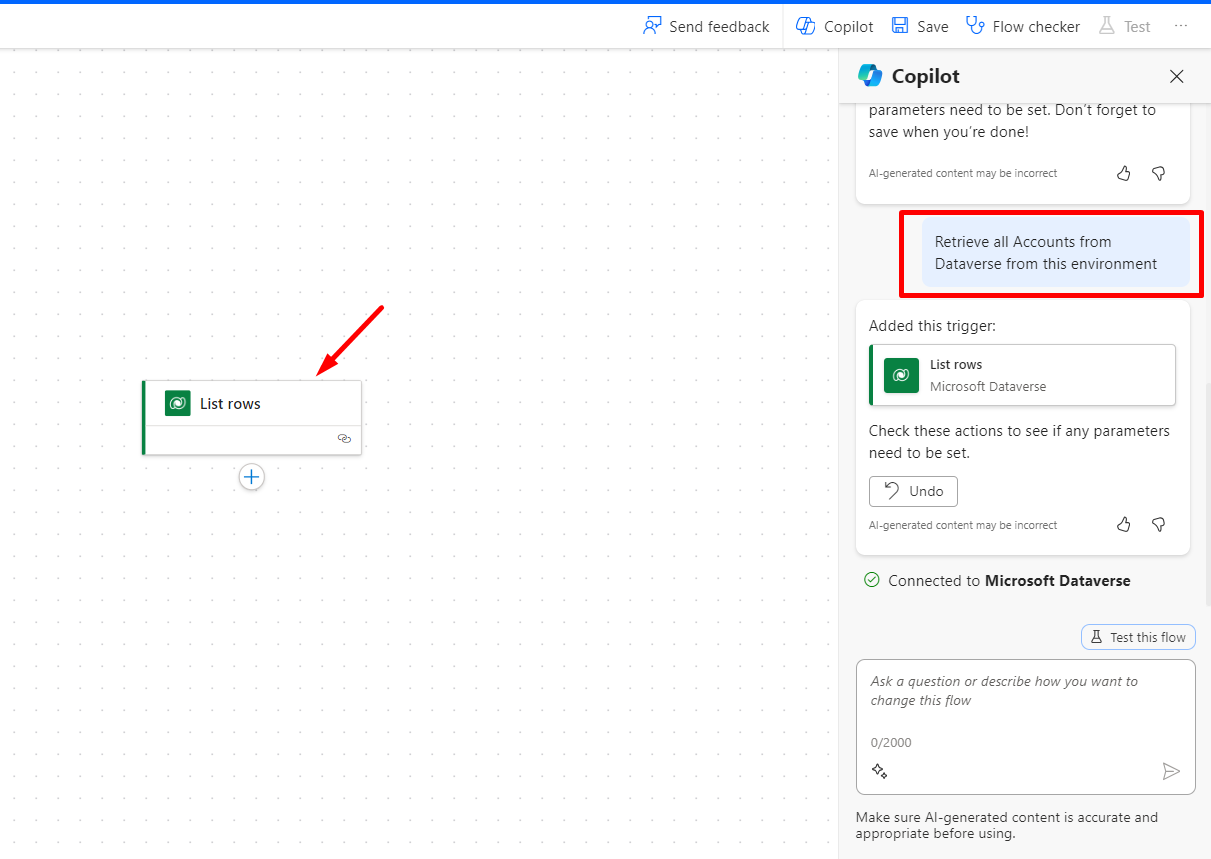
  5. Example, I can type in a query in natural language to retrieve records from Dataverse, for example. Here’s how it looks.
    My request is then turned into an appropriate trigger retrieving the correct information I was looking for.

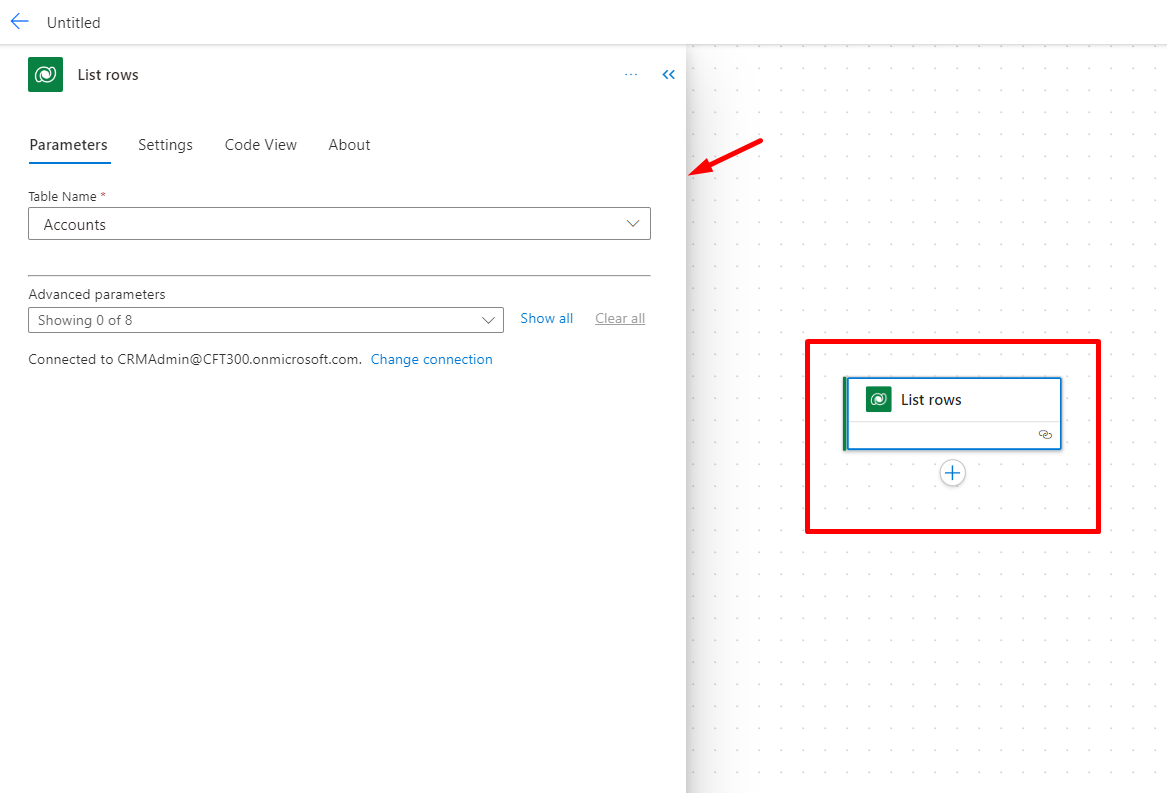
  6. And if I check what was retrieved, I can click on this trigger to reveal the Properties and verify/change if I need to.

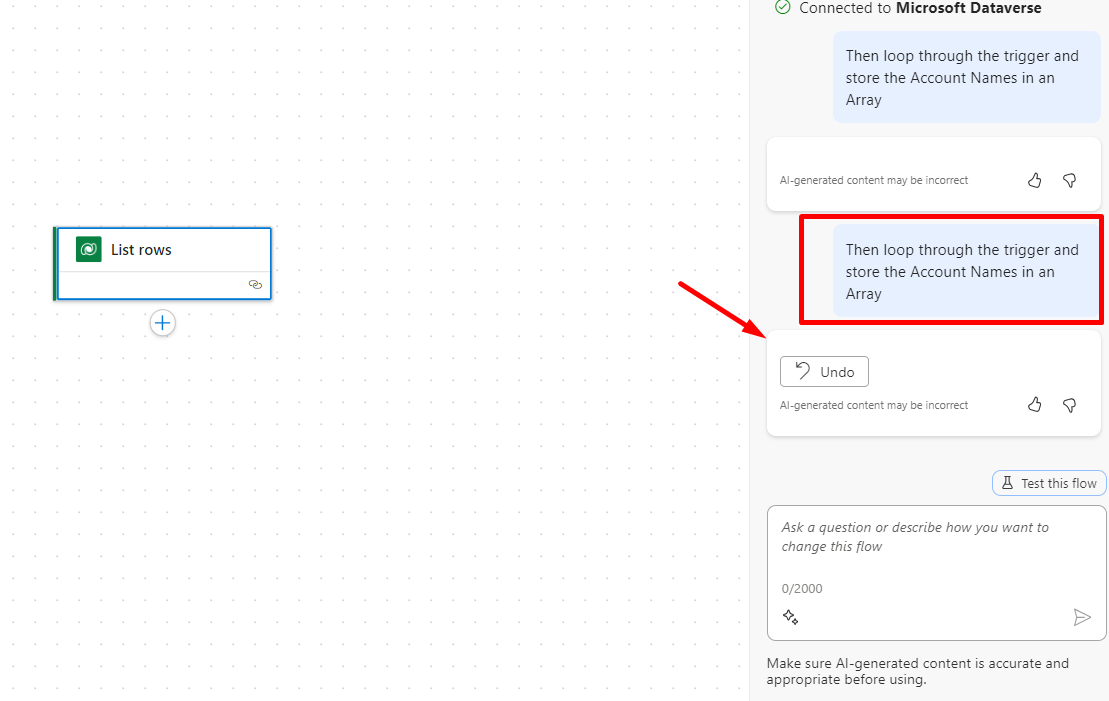
  7. In case there’s something that isn’t clear to understand. You won’t be returned with any action taken on the Flow itself – probably you

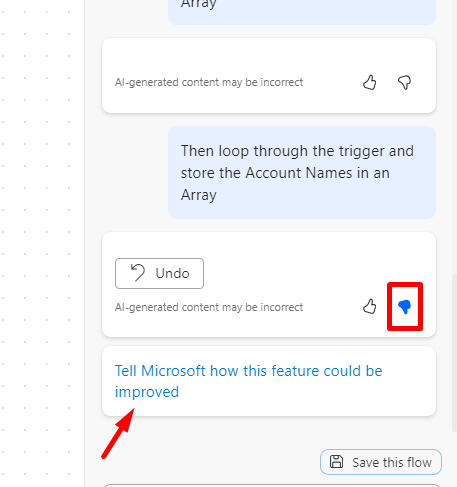
  8. Then, you can simply click on the thumbs down icon and submit your feedback.

  9. I faced an issue while submitting Feedback but I think I might be missing something or this is being fixed still.


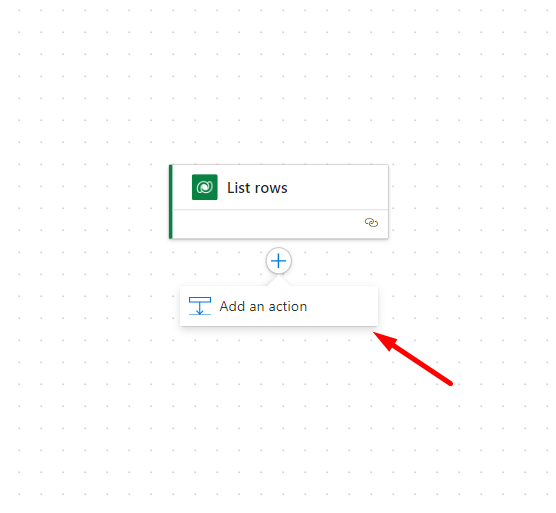
  10. Further, here’s how the Add an action works – it simply reveals the pane on the right hand side which was previously a flyout menu.


Overall, the visual improvement helps in identifying with the structural flow of logic better and I’m looking forward for more updates on this is coming days/weeks and months!


For now, you can always go back to the classic designer by clicking on the ellipses and then selecting


Here’s a link to the Microsoft post on the announcement of this feature – https://learn.microsoft.com/en-gb/power-platform/release-plan/2023wave2/power-automate/use-power-automate-cloud-flows-designer-copilot?WT.mc_id=DX-MVP-5003911

Hope this helps!

Thank you!

Read Excel File from SharePoint Online and create Records in Dataverse | Power Automate Flow

One of the most common scenarios is to be able to pick an Excel spreadsheet from a SharePoint Document location and create records in Dataverse.

There are several ways to do this. But, one of the most common scenarios could be to use Power Automate Flow and use Excel Online and SharePoint Online connectors to perform this operation!

Scenario

Here’s the scenario which you can expand on and fit the same according to your Use Case –

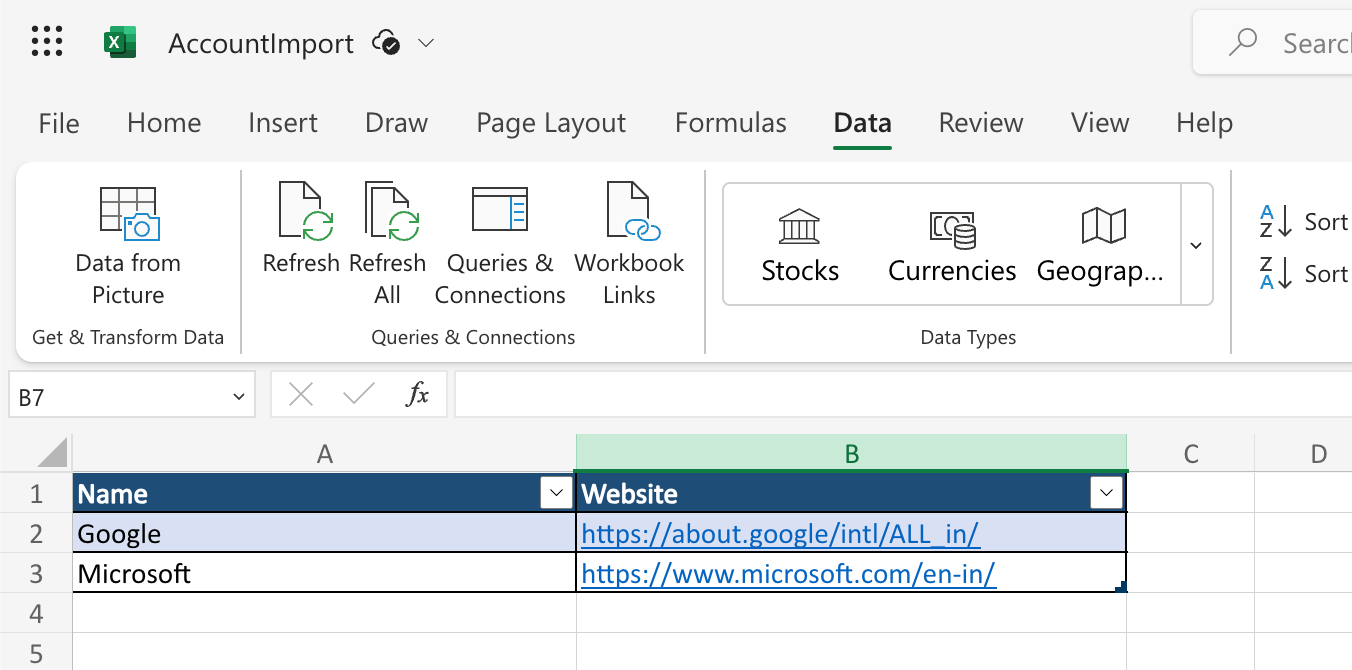
  1. There’s a file in a SharePoint Document location called as AccountImport.

  2. This file has some Account information that needs to be inserted in Dataverse
    Here’s the Excel content which has a Table in it.


  3. And this data needs to be Inserted in Dataverse [You can either Automate this Flow, Make it On Demand — based on whatever is suitable for you]


    Let’s create an On-Demand Flow in order to pick this File and then insert into Dataverse.

Power Automate Flow

Here’s the Power Automate Flow which we’ll create. For the same of this example and to keep it simple, we’ll create an On-Demand Flow –

  1. Create an On-Demand Flow in Power Automate [You could even choose to run the Flow when a SharePoint file is created or changed or even to Run the Flow once every day — depending on what best suits your case]
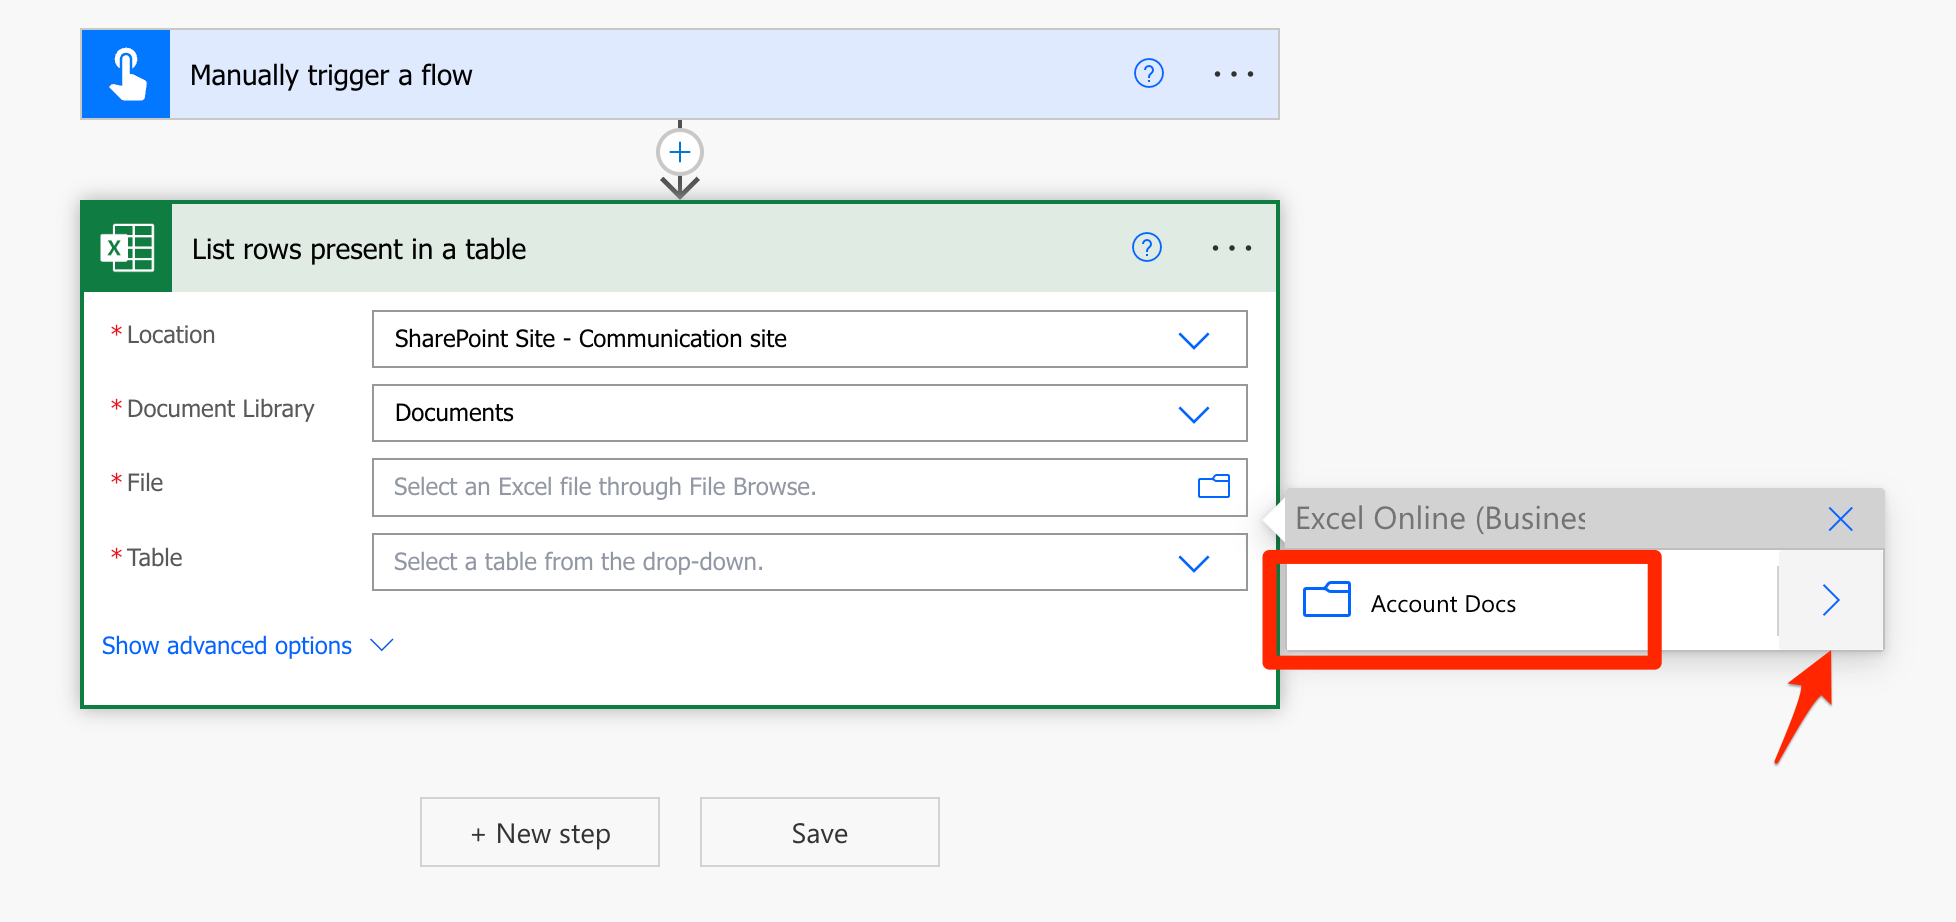
    Then, look for the action called as List rows present in a table from Excel Online connector

  2. In this Action, you can select what SharePoint Site is to be selected where you have the File in the Document Location.
    Also, then select the Document Library where the Documents reside. That’s the ideal place where you would want to place your Documents.
    Finally, select the File itself by navigating from the Folder icon on the File property as shown below.


    And then select the File once you find it.

  3. Once you have selected the File, the Table itself will be available to pick up from the Table property. Make sure to convert the Excel data into a Table.

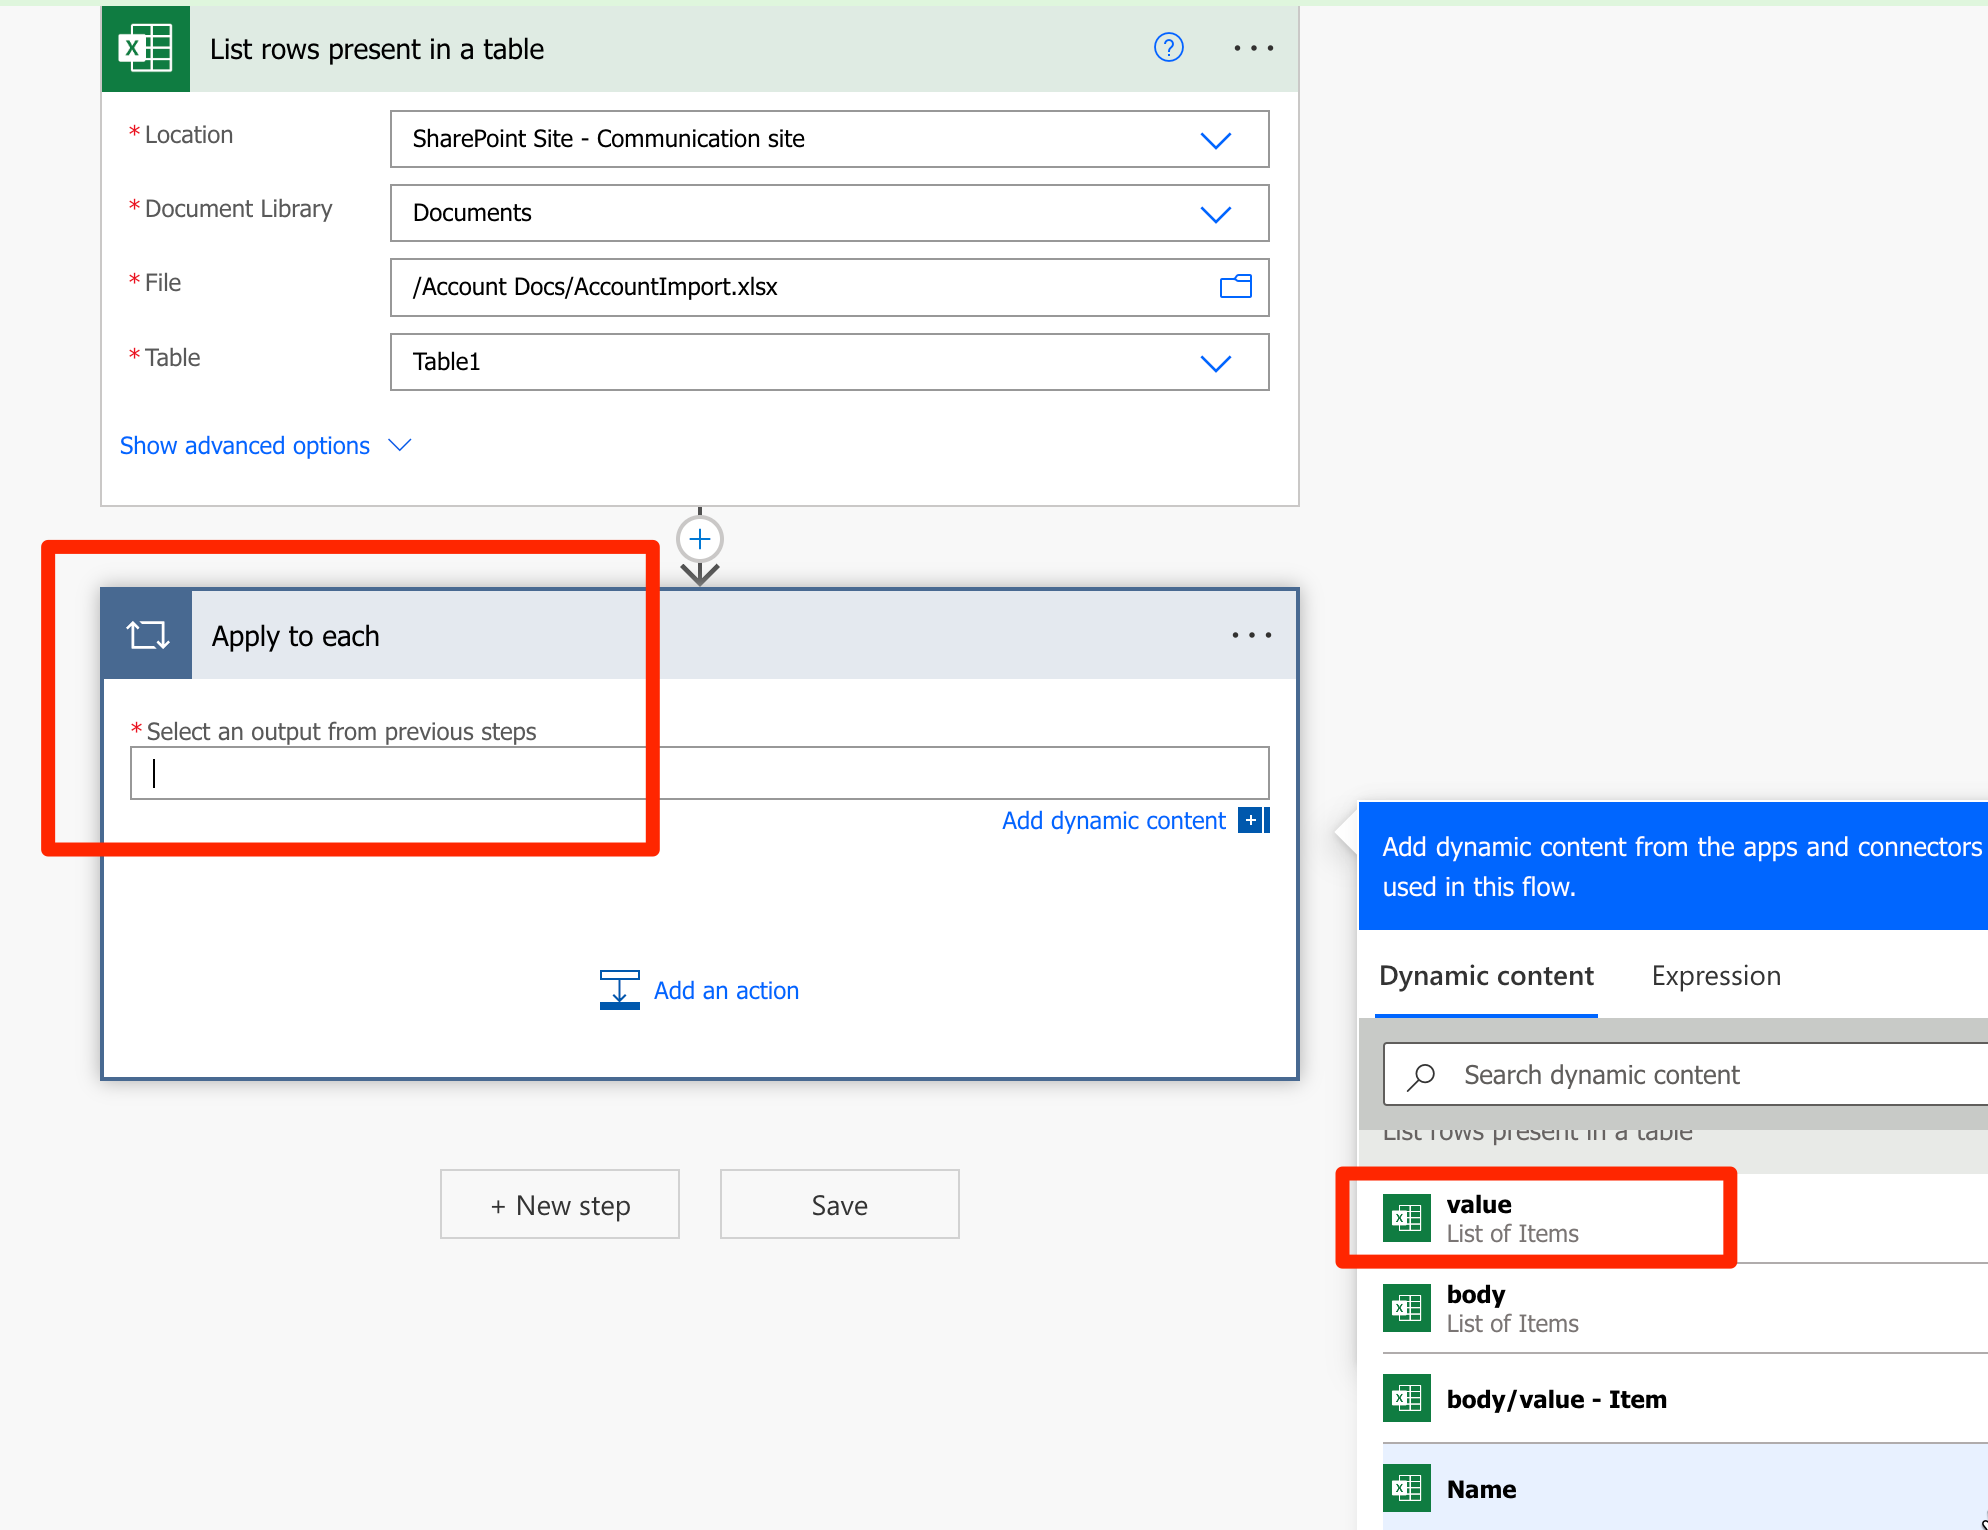
  4. Now, once all the Properties are set on the List rows present in a table action, select a For Each loop in the Flow.
    And in the Inputs, give value (List of Items) from the List rows present in a table action which we just completed above.
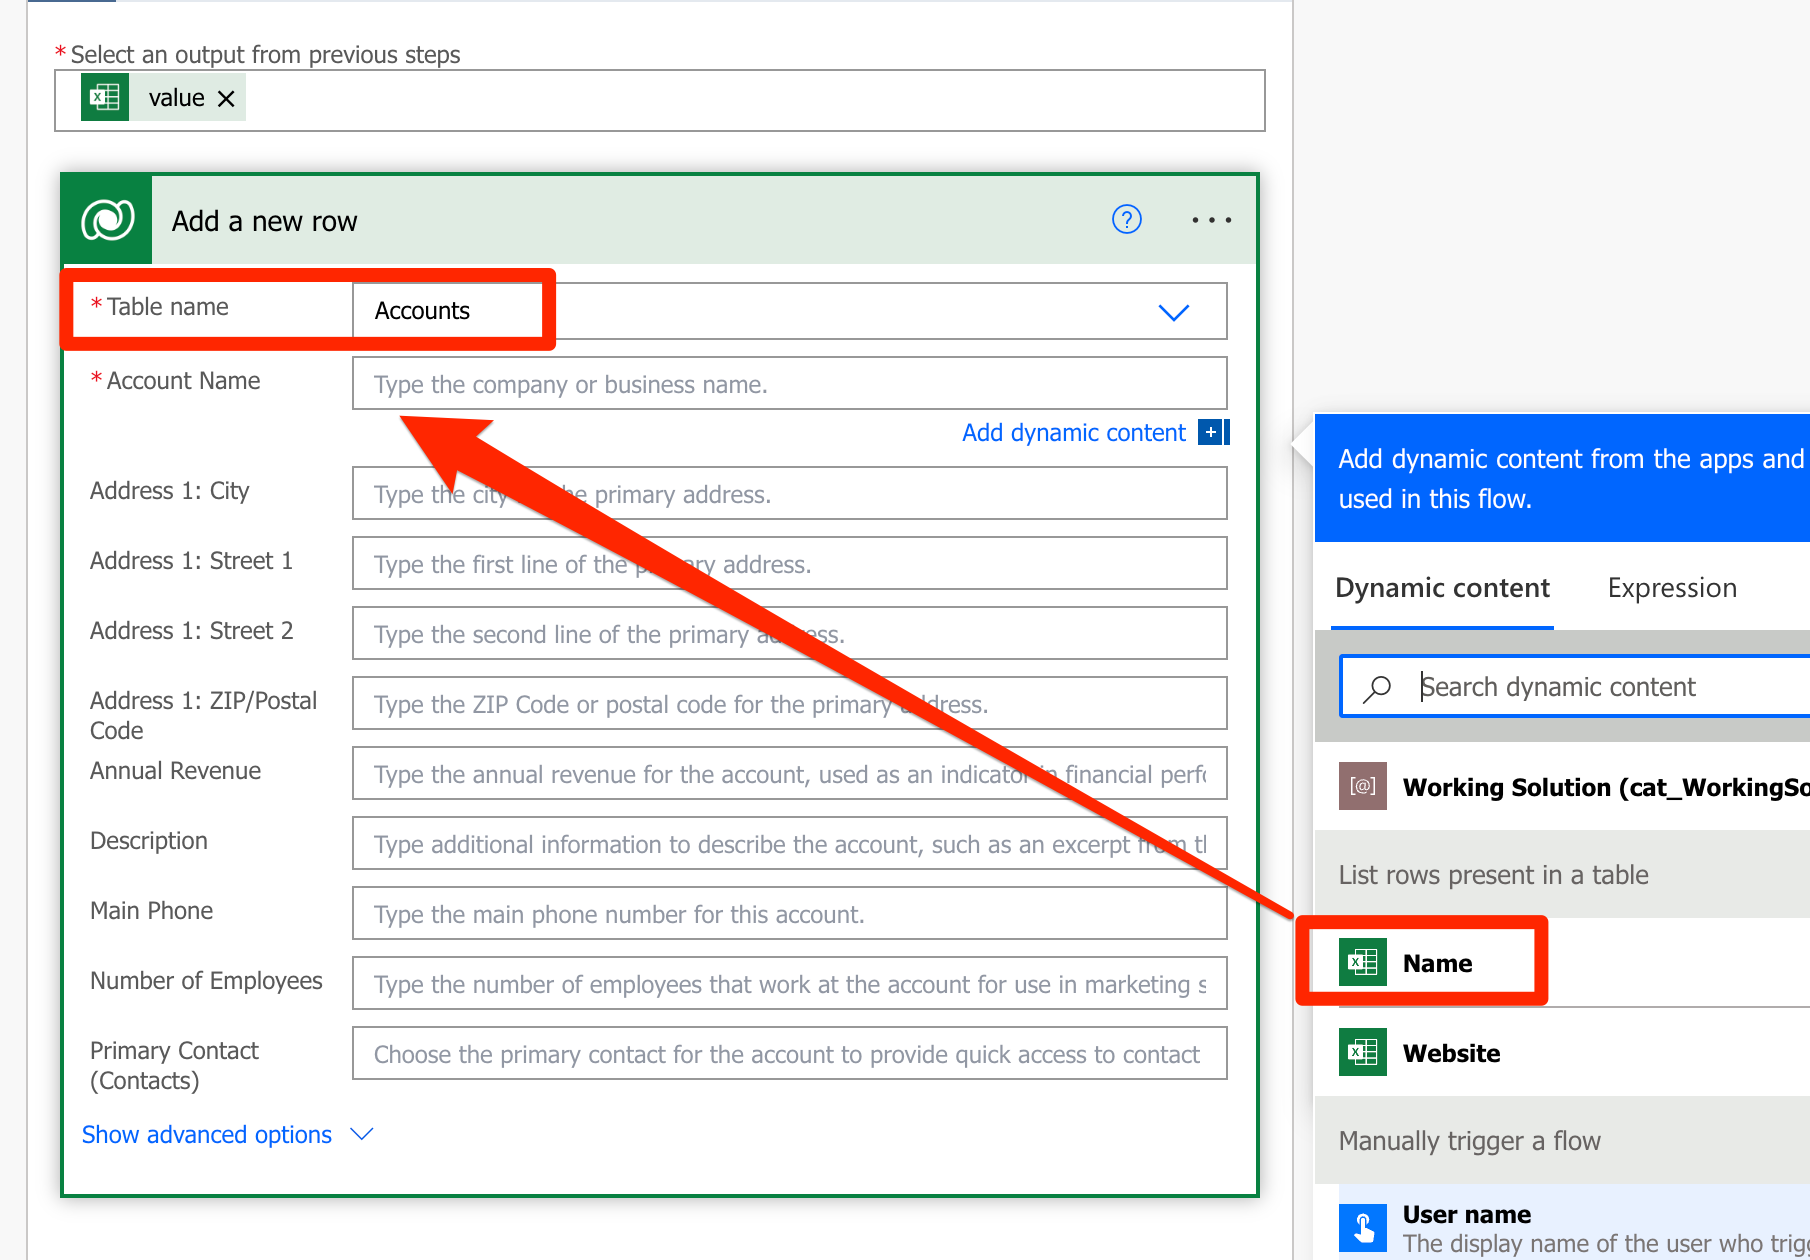
  5. Once this is set, select Add a new row action from the Dataverse connector in order to create the records sequentially in Dataverse.

  6. Here, map the Columns to the fields in Dataverse. Firstly, select the Table in Dataverse you want to insert these records into.
    Then, select the fields from the Excel which the Excel connector itself separated out for you.

  7. Once you complete all the Fields from the Excel to the Dataverse connector.
    Save and Test the connector itself.
    This will create the records in Dataverse (Dynamics CRM)


    And it’ll Run in a few moments and succeed if everything goes right.


Dataverse Records

Now, let’s see the Flow in action –

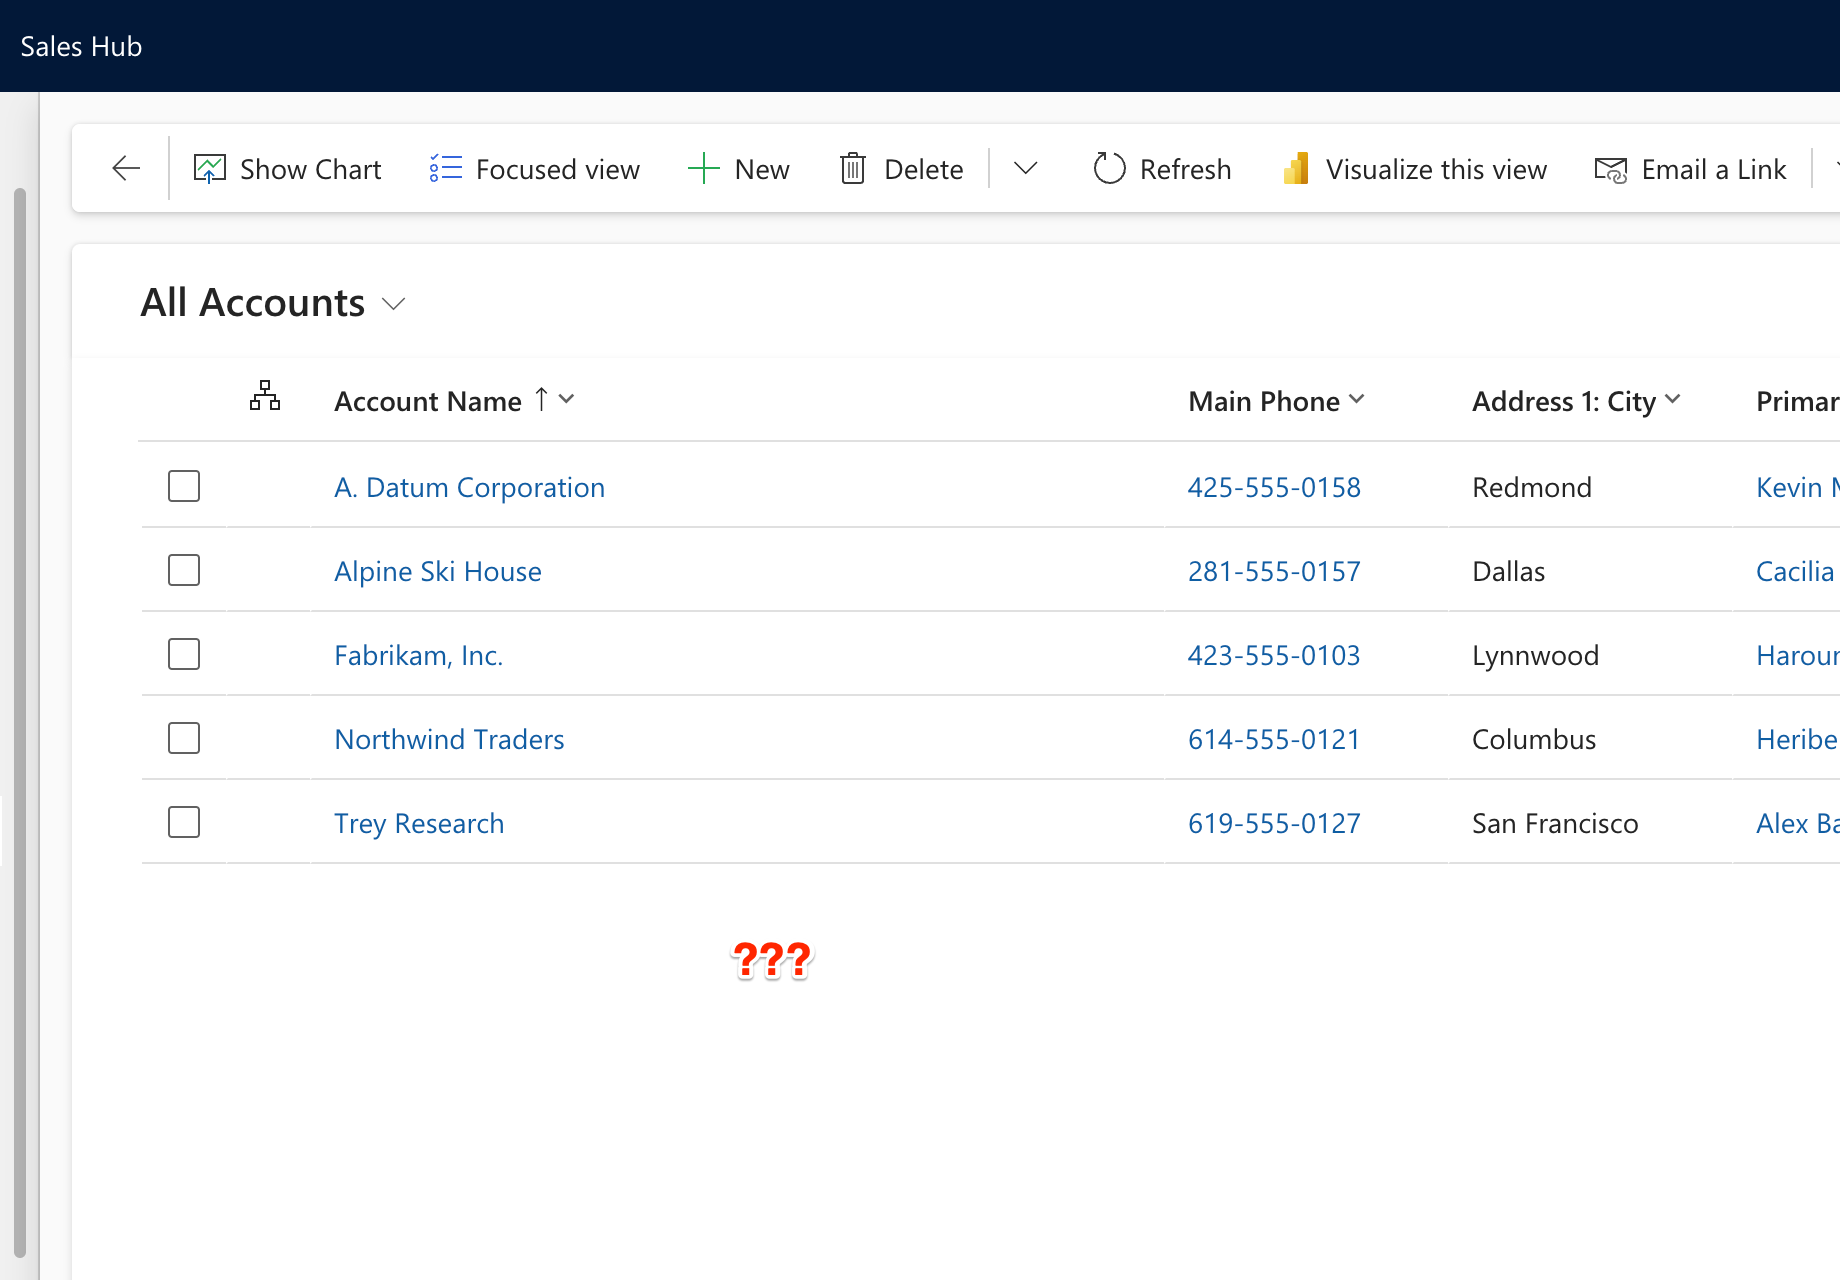
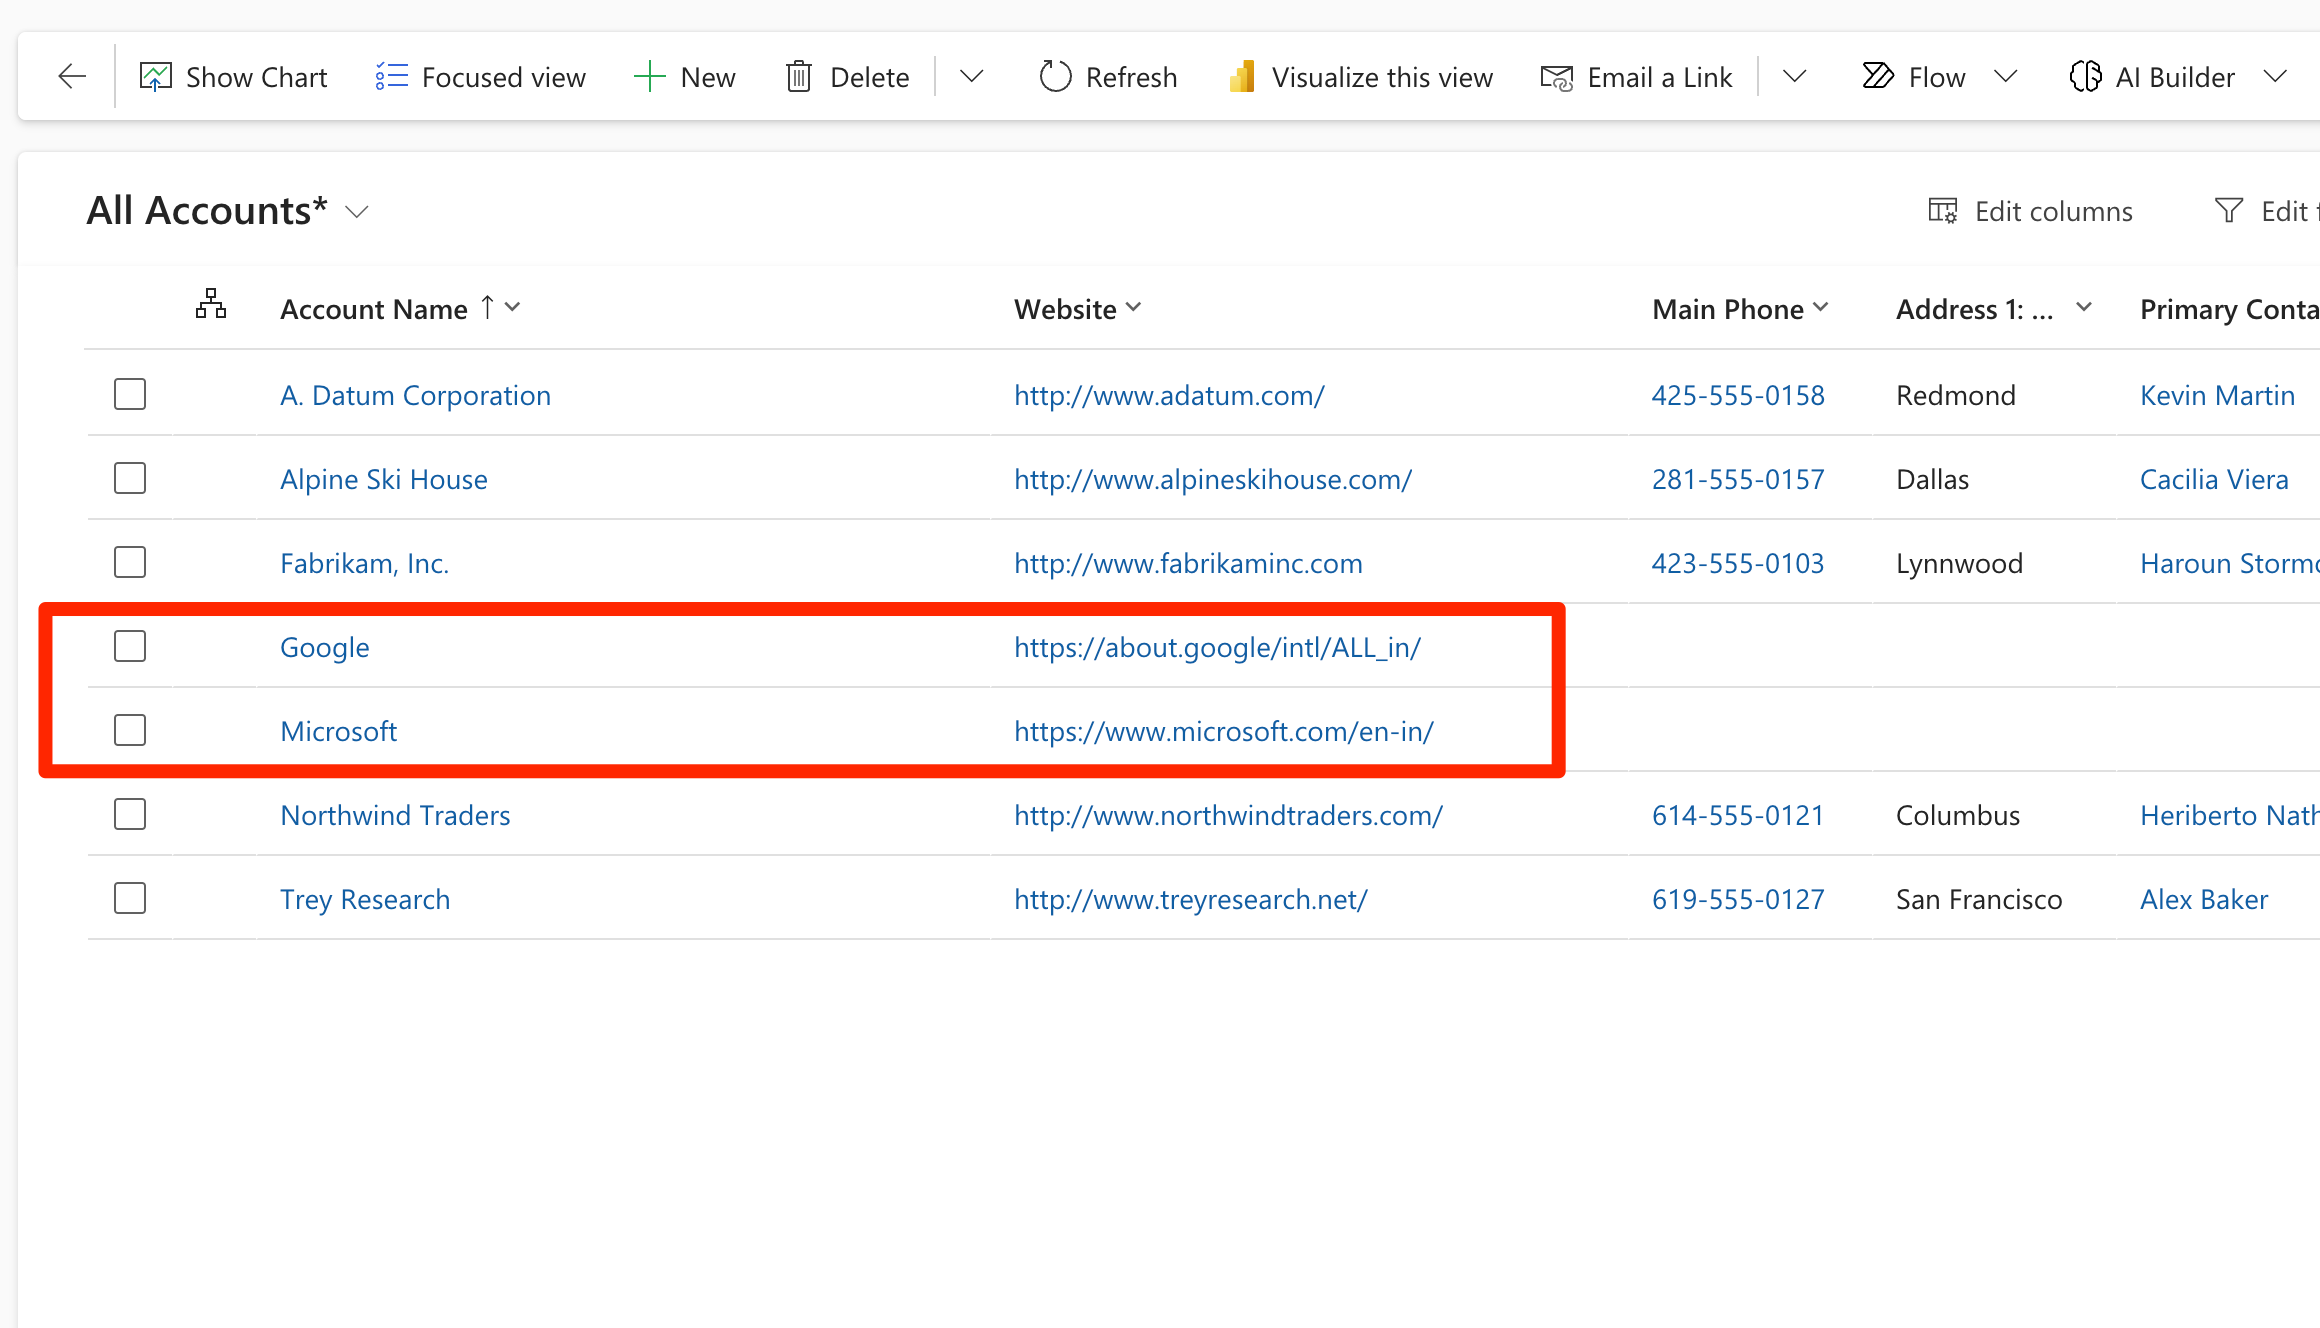
  1. Because this is an on-demand Flow, you can Run it whenever you want. And when it Runs successfully, records in the Dataverse will be created as shown below


Hope this helps!

Here are some Power Automate posts you want to check out –

  1. Select the item based on a key value using Filter Array in Power Automate
  2. Select values from an array using Select action in a Power Automate Flow
  3. Blocking Attachment Extensions in Dynamics 365 CRM
  4. Upgrade Dataverse for Teams Environment to Dataverse Environment
  5. Showing Sandbox or Non Production Apps in Power App mobile app
  6. Create a Power Apps Per User Plan Trial | Dataverse environment
  7. Install On-Premise Gateway from Power Automate or Power Apps | Power Platform
  8. Co-presence in Power Automate | Multiple users working on a Flow
  9. Search Rows (preview) Action in Dataverse connector in a Flow | Power Automate
  10. Suppress Workflow Header Information while sending back HTTP Response in a Flow | Power Automate
  11. Call a Flow from Canvas Power App and get back response | Power Platform
  12. FetchXML Aggregation in a Flow using CDS (Current Environment) connector | Power Automate
  13. Parsing Outputs of a List Rows action using Parse JSON in a Flow | Common Data Service (CE) connector
  14. Asynchronous HTTP Response from a Flow | Power Automate
  15. Validate JSON Schema for HTTP Request trigger in a Flow and send Response | Power Automate
  16. Converting JSON to XML and XML to JSON in a Flow | Power Automate

Thank you!
Dataverse Low-Code Plugins | Dataverse Accelerator | [Preview]

So by now, you must’ve come across Dataverse Low Code Plugins quite a lot if you’re following Dynamics 365 Wave Updates.

Here’s a post that demystifies and summarizes what Low Code Plugins are all about and how you can start implementing the same.

Note: Please note that this is in Preview at the time of writing this post. Hence, this feature is not recommended for Production use.

What are Dataverse Low-Code Plugins?

Here’s what Low-Code plugins are about in Dataverse –

  1. Low Code plugins let you write server side business logic without having to write custom .NET code and register manually on the Dataverse.
  2. Currently, this is in Preview and once this is out of Preview, a lot of features are expected to be released for Low Code plugins.
  3. You can create 2 types of Low Code Plugins –
    • Instant [On Demand]
    • Automated [Based on a Dataverse event]

Let’s see how you can get started in using Low Code Plugins in Dataverse.

Getting Started

Here’s how you can get started on Low-Code Plugins in Power Platform.

  1. Ensure that you have the Dataverse Accelerator App installed on your environment. From 1st Oct 2023, all new environments have the Dataverse Accelerator App installed in their environments.

  2. Now, you can run the Dataverse Accelerator in Power Platform App Make [https://make.powerapps.com/environments/] –

  3. Usually you’ll see a Play button when you hover over the Dataverse Accelerator App listing, but alternatively, you can also click on the three dots (ellipses) and choose Play.

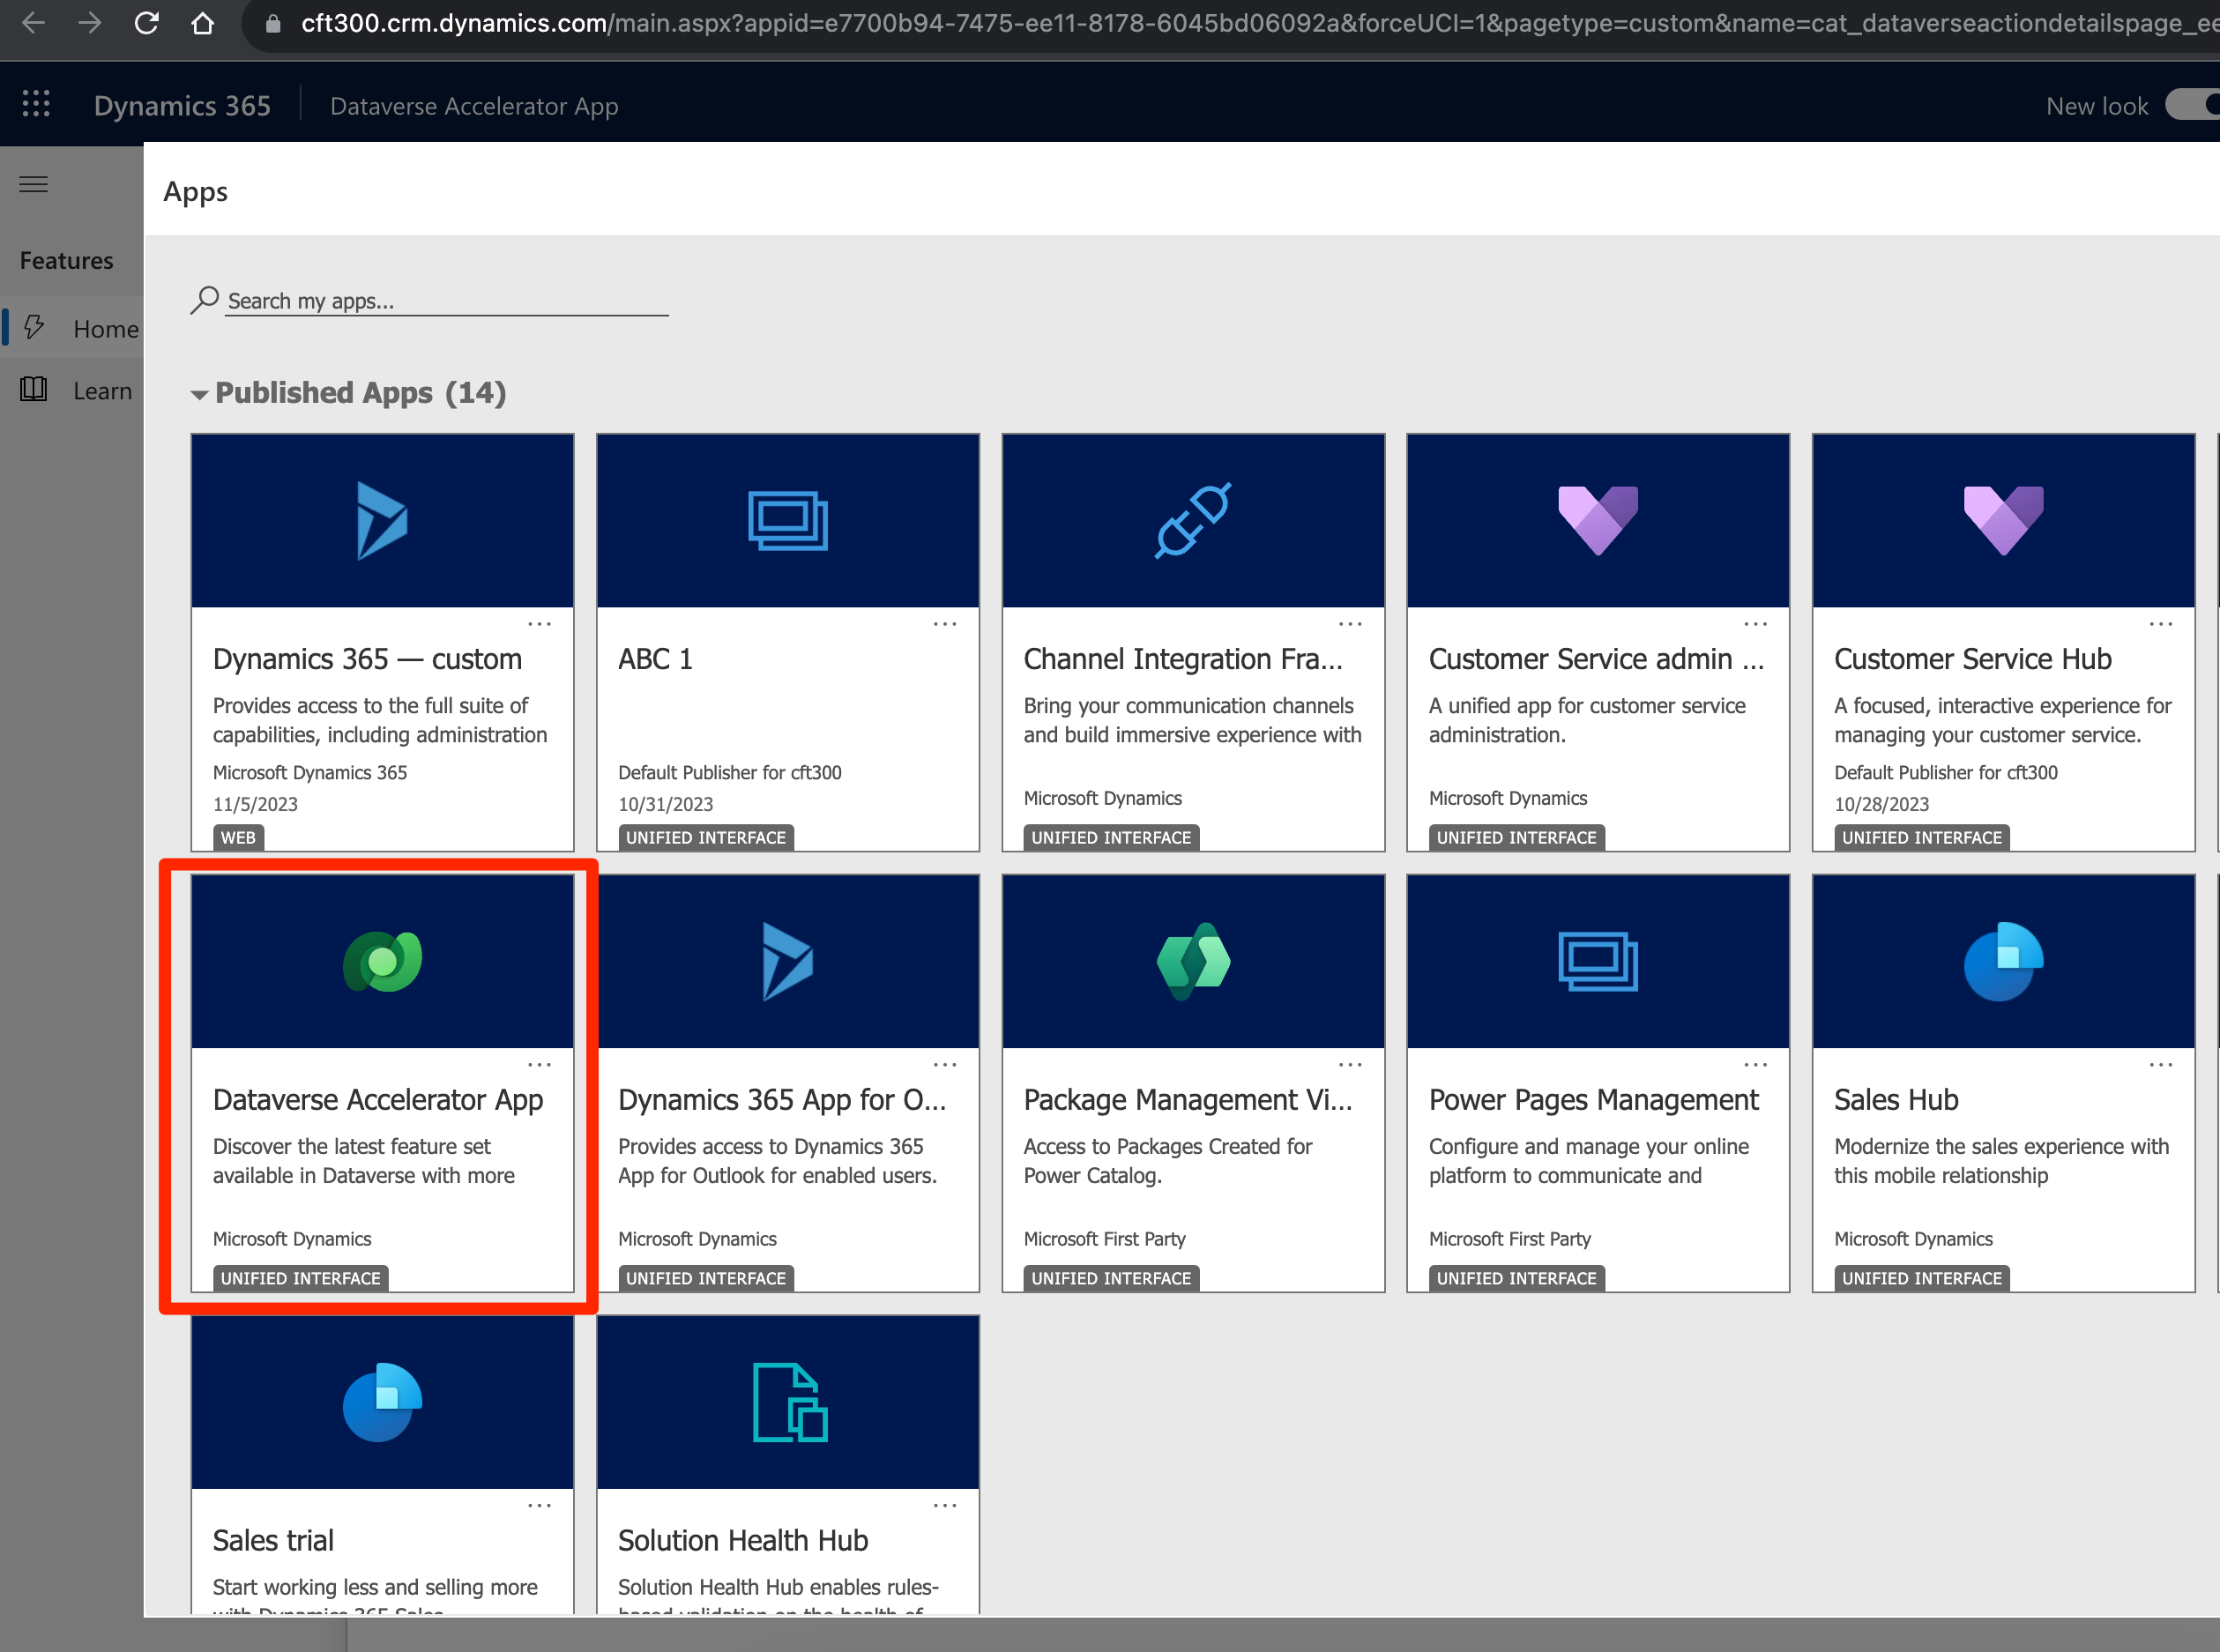
  4. You can even Dataverse Accelerator as an App in your Dynamics 365 CRM Sales environment just like other Model-Driven Apps

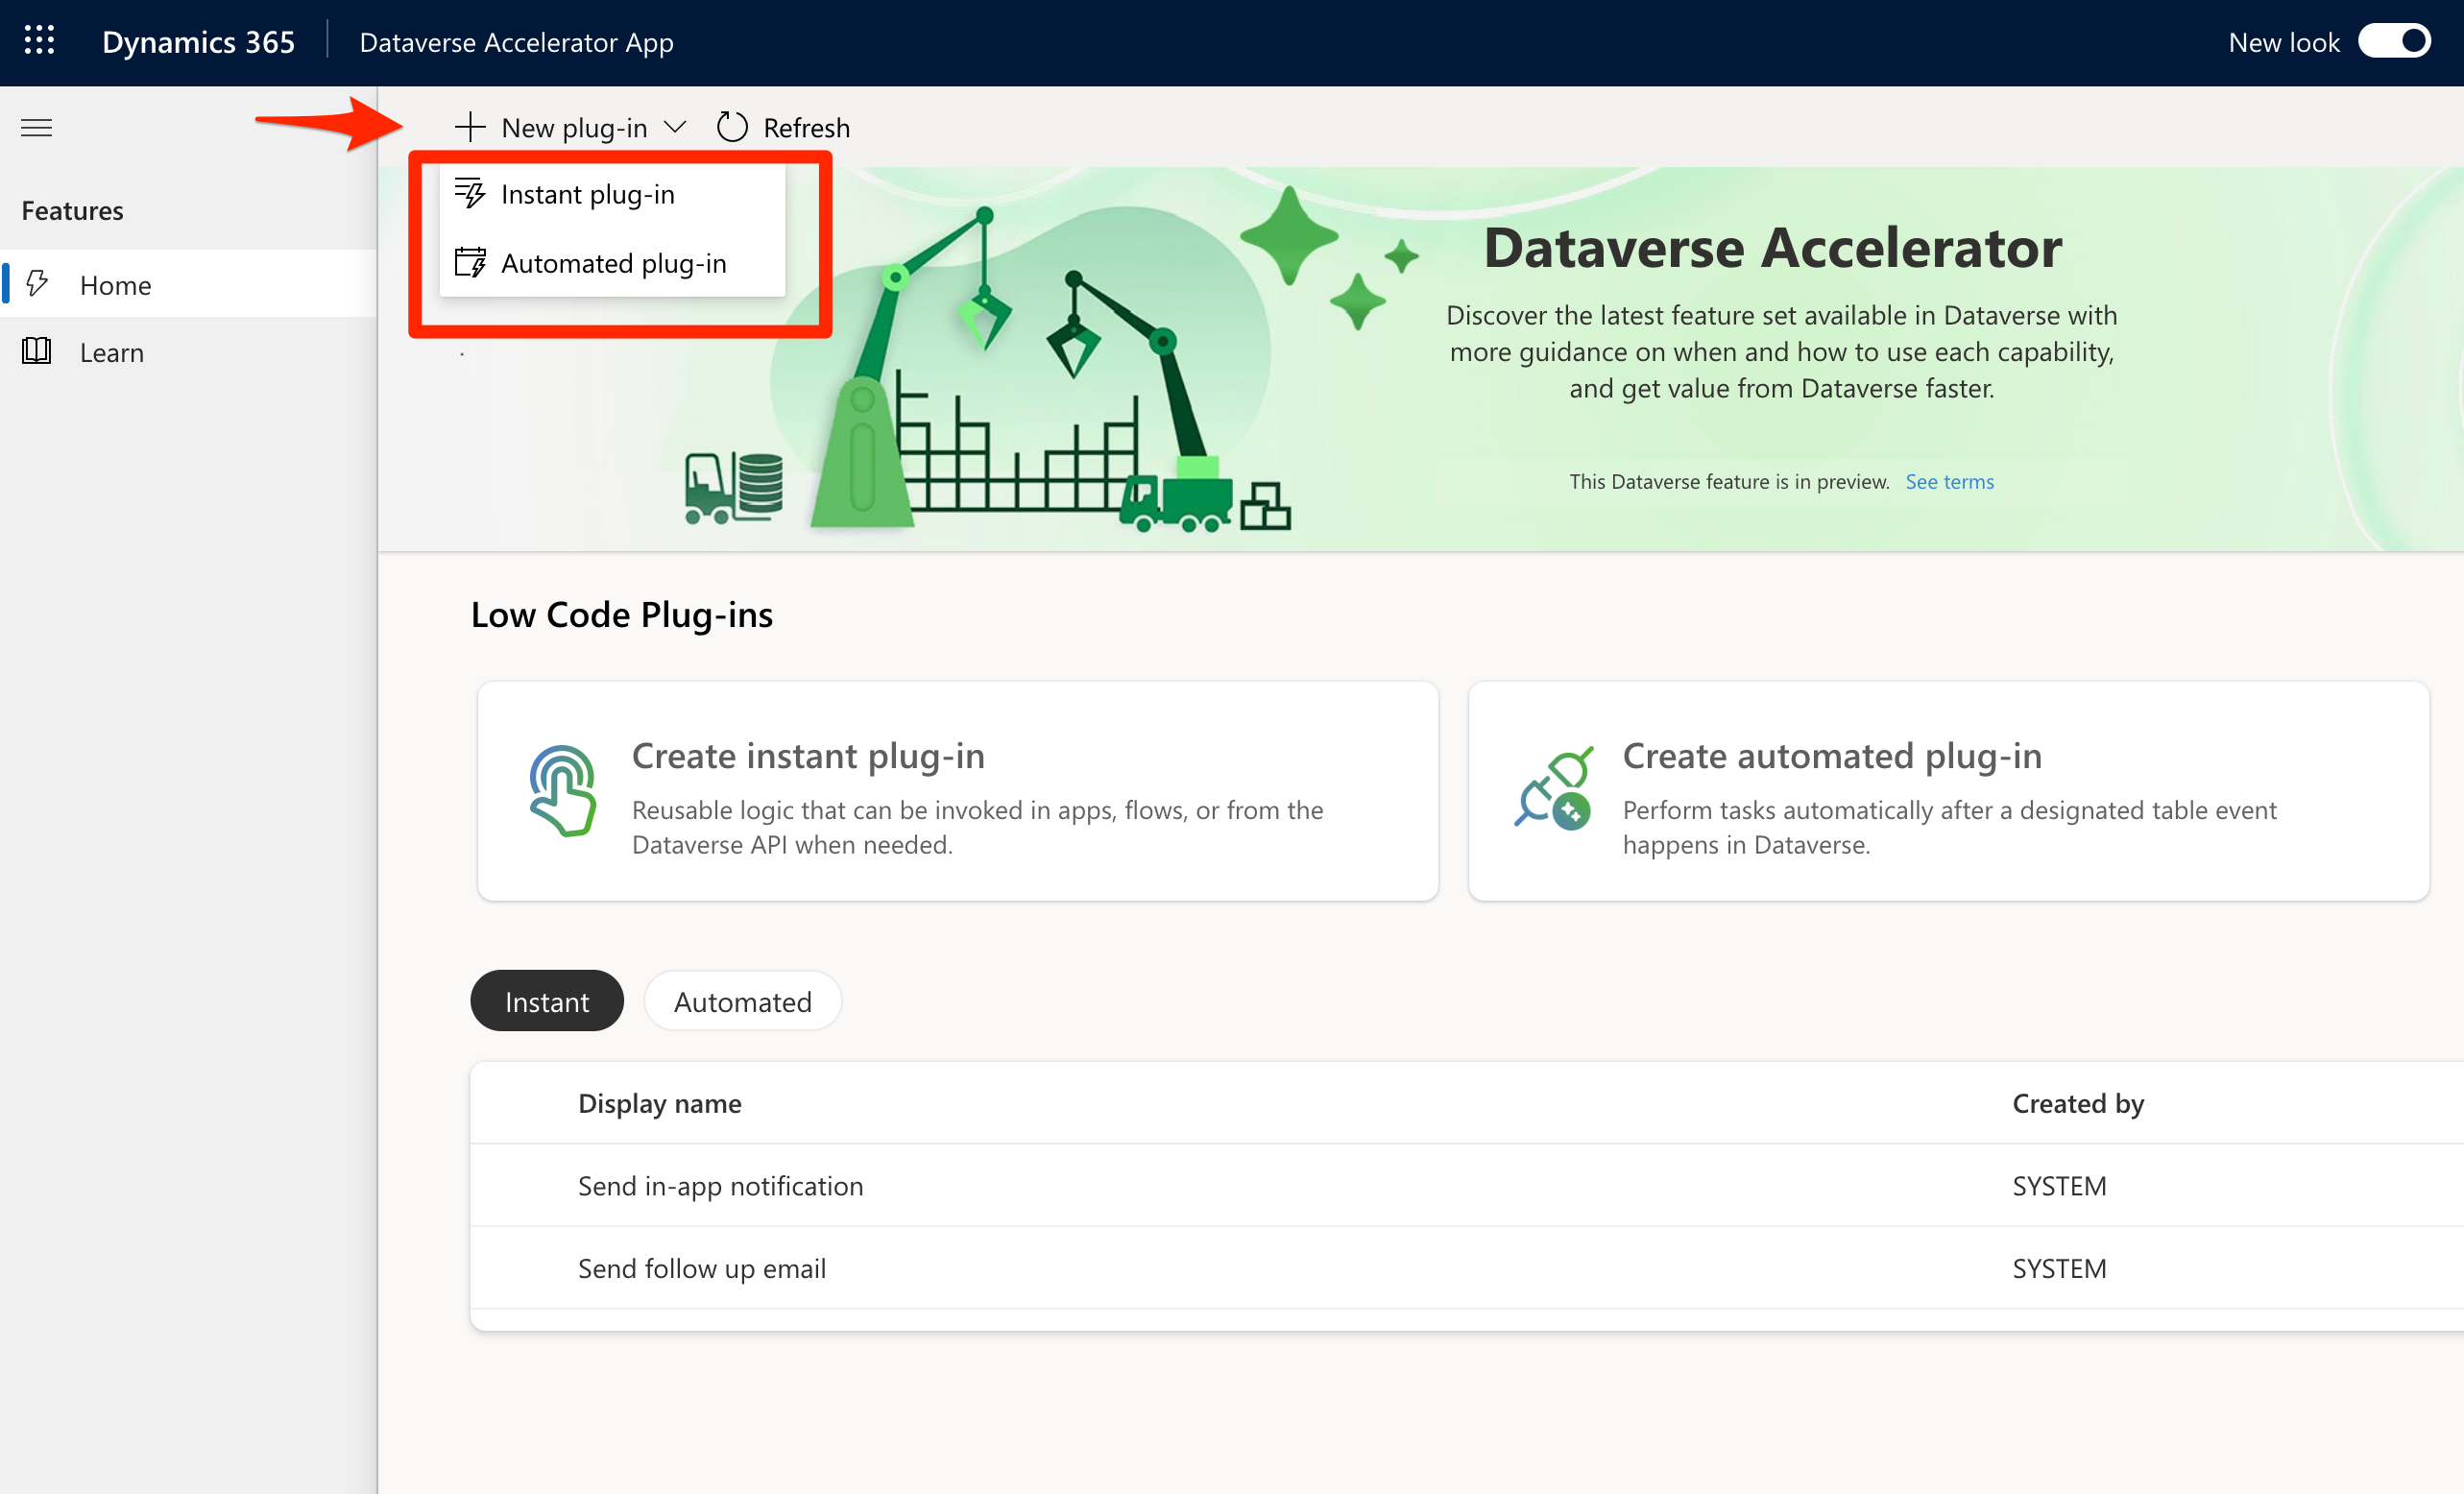
  5. When the App opens in the new tab on your browser, you’ll see that it looks similar to the Power Apps Maker Portal, you can now see that you’ll get an option to create a new Plugin –
    You can create 2 types of Plugins – Instant and Automated.


    Or even using the large buttons on the Home Screen

  6. In this example, I’ll create an Automated plugin that will do some Action when an Account is Updated.
    Example: So simply when any field is updated on the record, Description field will be updated with the value “This is my first Low Code Plugin“.
    So, when I click on Create automated plug-in, I get to define the Name of the Low Code Plugin and details like when it should be triggered.

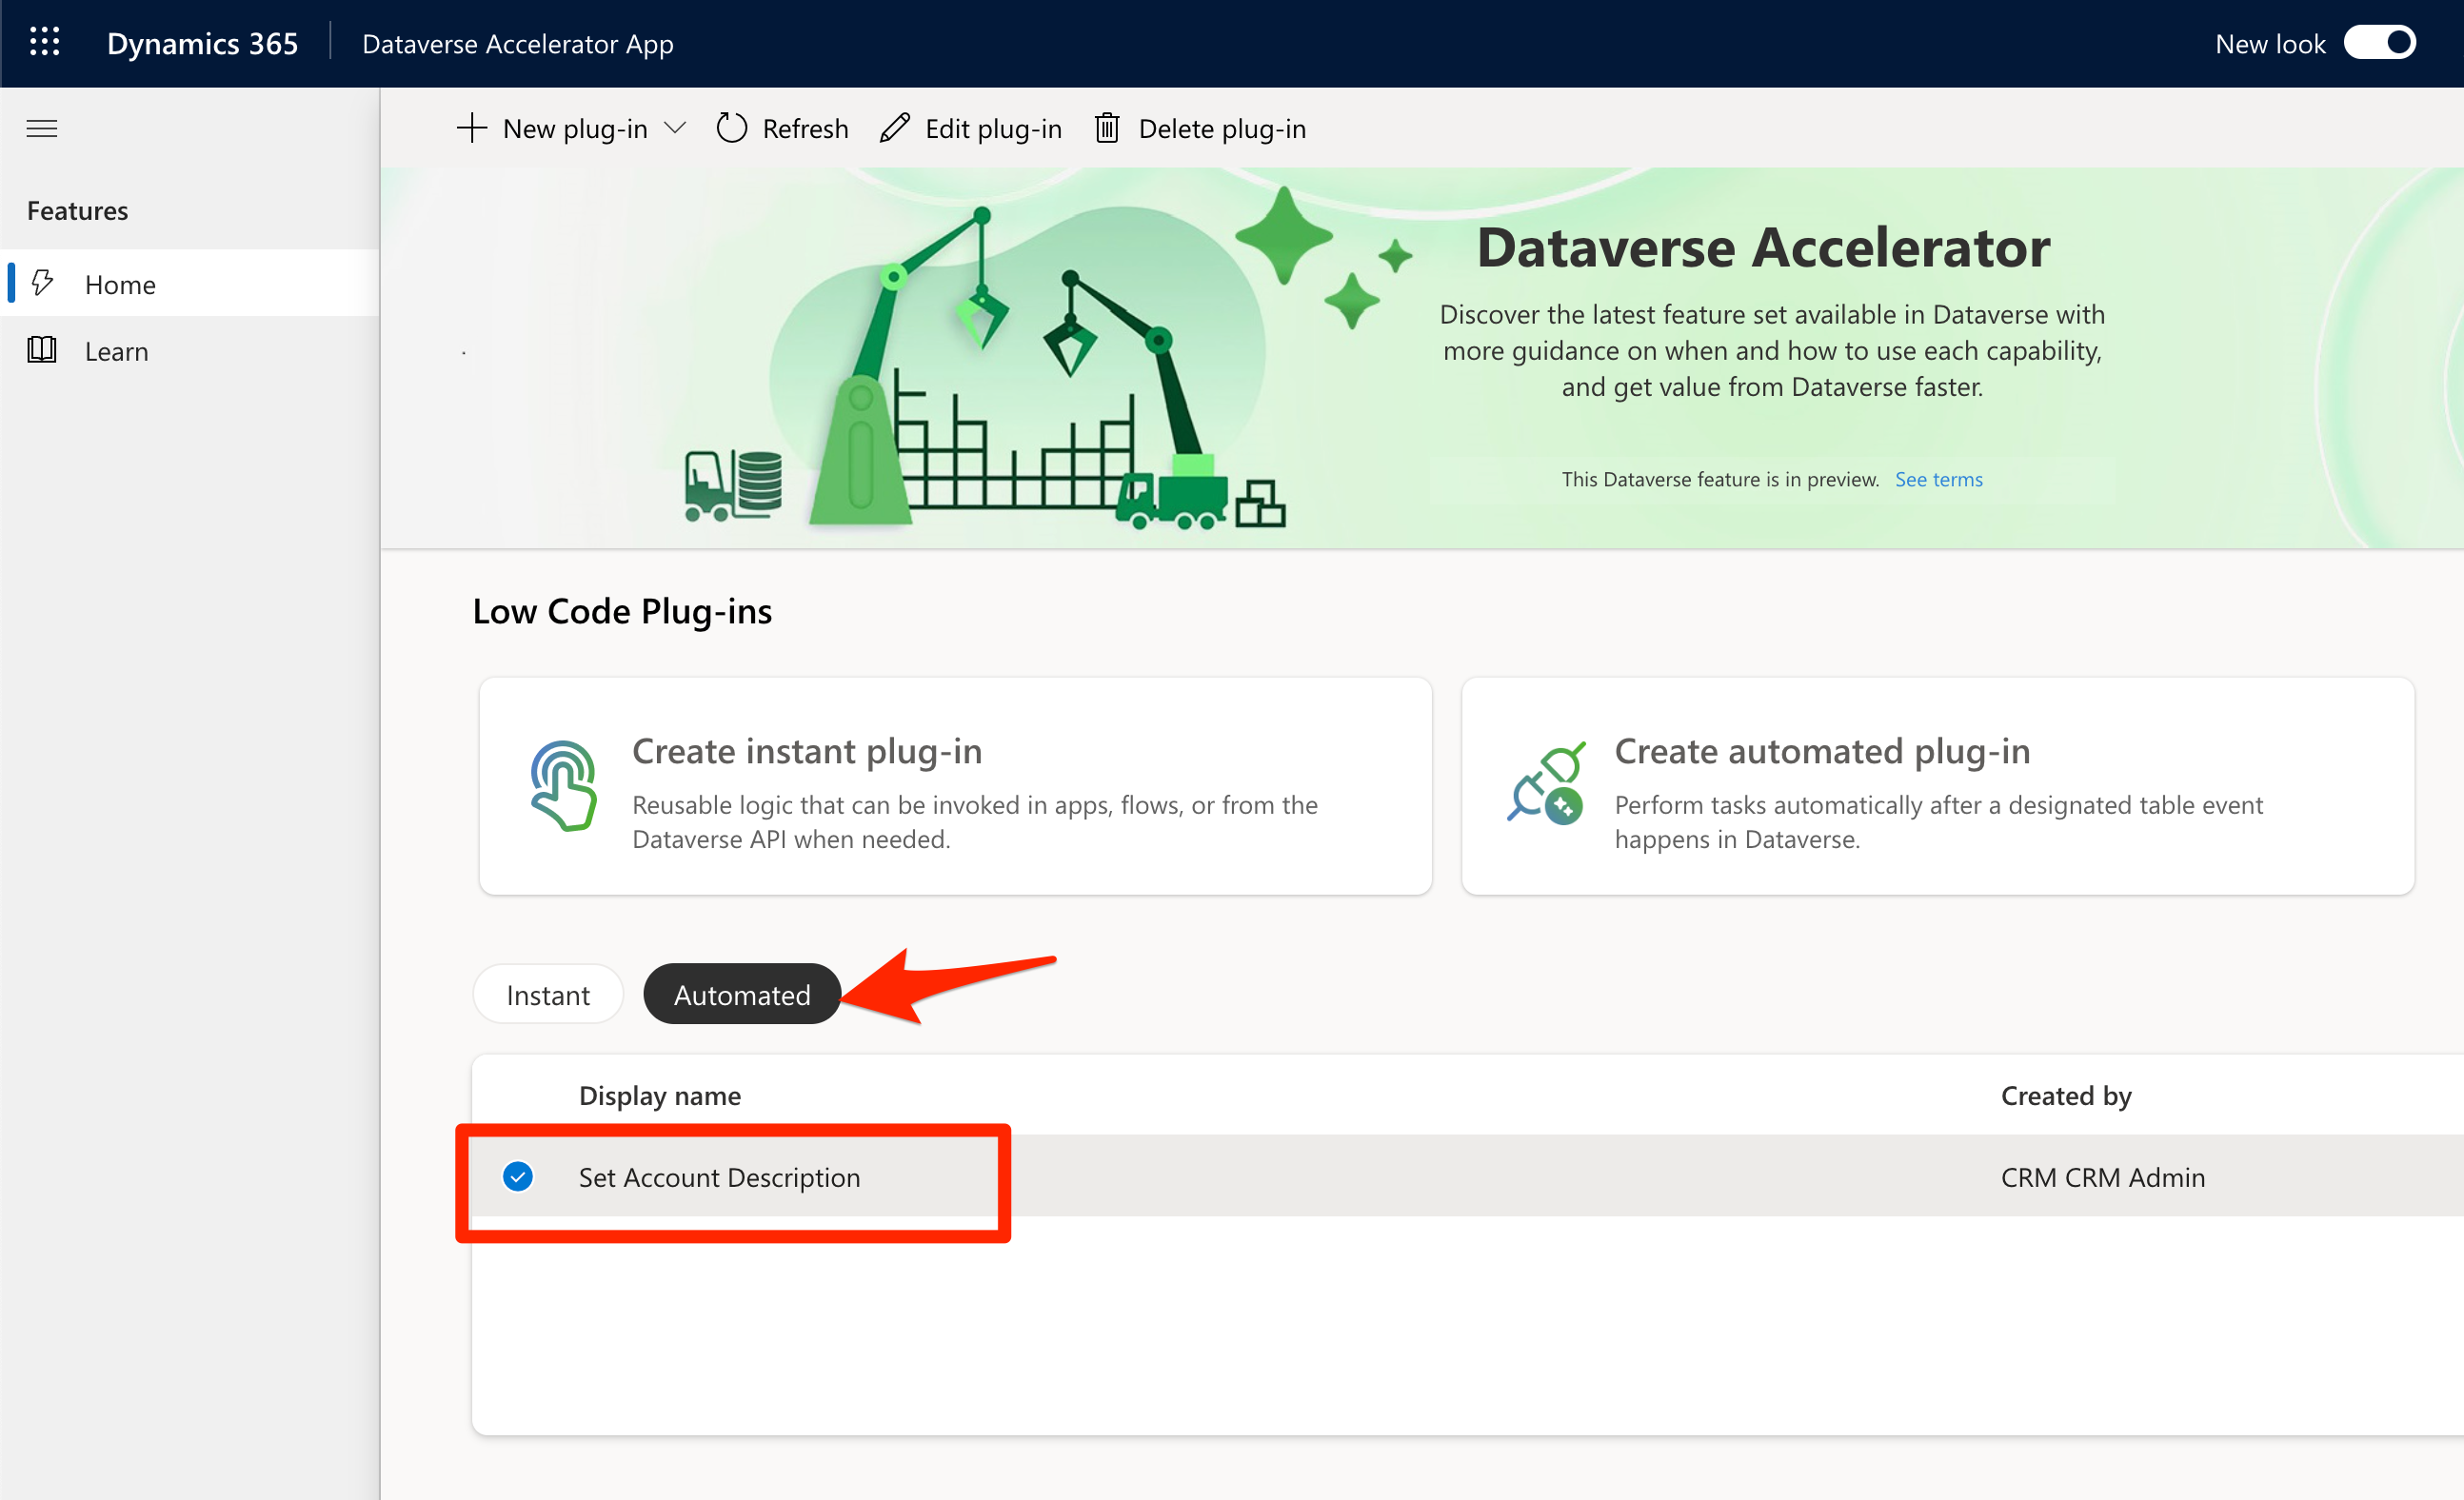
  7. Once you save this, your Plugin will appear in the Automated plugins list in Dataverse Accelerator.


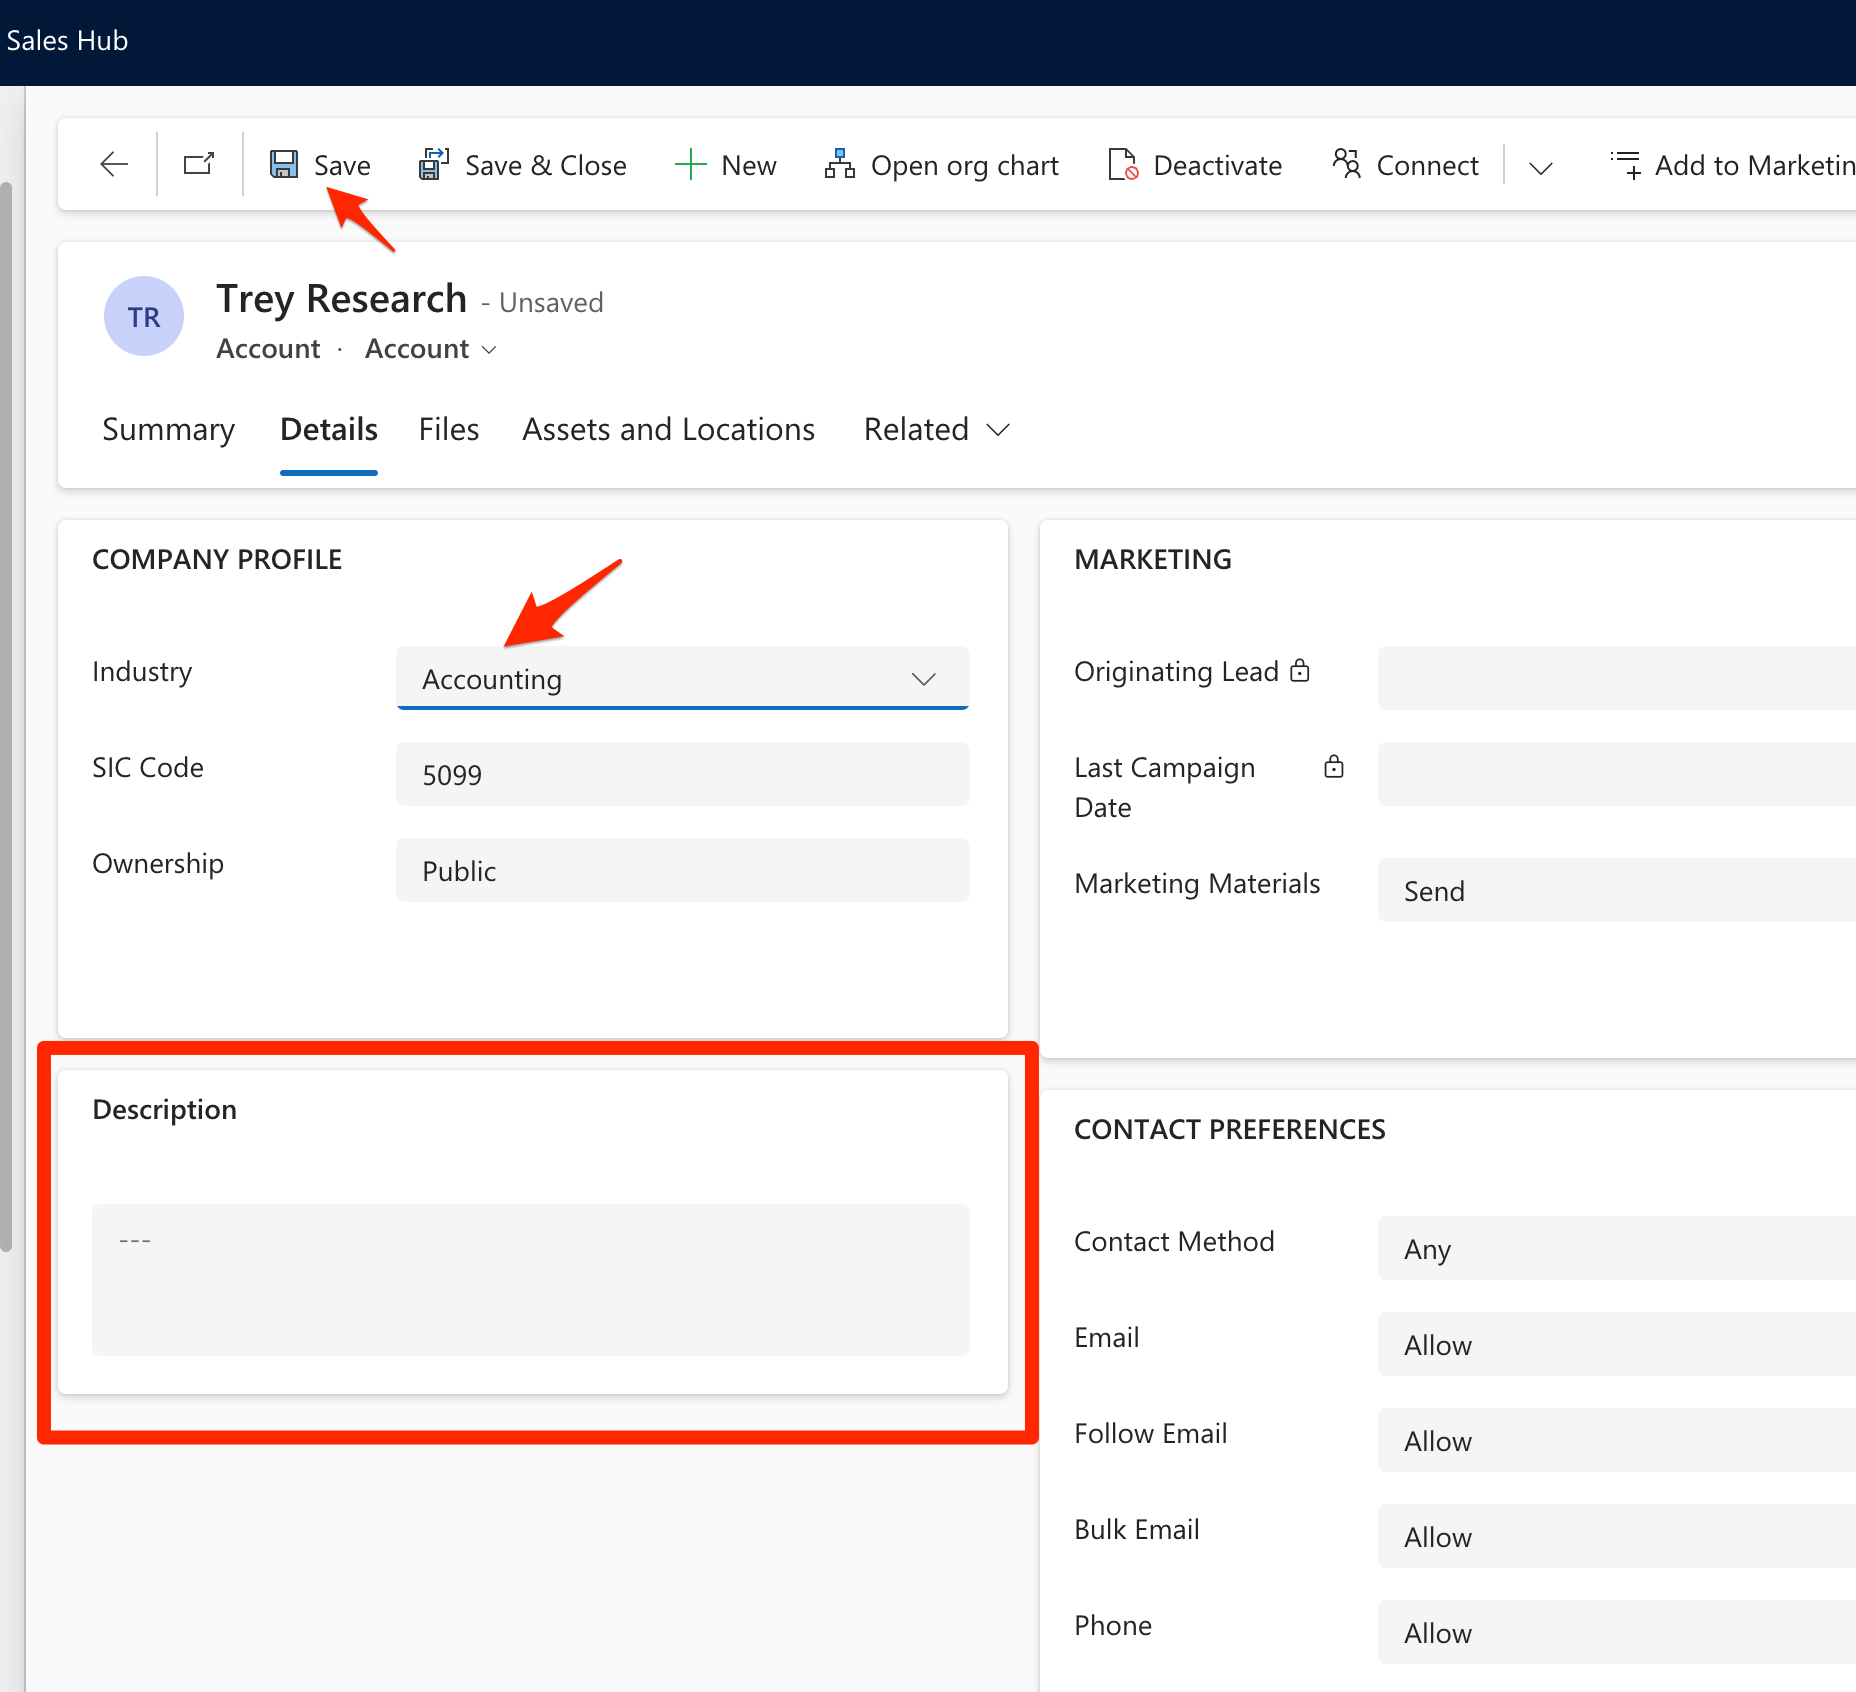
  8. Now, once you edit the record, notice that the field is blank –

  9. And when you Save the record, the Description field will be updated with the value as mentioned in the Formula of the Plugin.


Low Code Plugin Power Fx [Preview]

Here’s where you start learning Power Fx for Low Code plugins. Please note that a lot of Formulas are currently not supported as of the day of writing this post – https://learn.microsoft.com/en-us/power-apps/maker/data-platform/low-code-plug-ins-powerfx?WT.mc_id=DX-MVP-5003911

Hope this helps!

Here are some Power Automate posts you want to check out –

  1. Select the item based on a key value using Filter Array in Power Automate
  2. Select values from an array using Select action in a Power Automate Flow
  3. Blocking Attachment Extensions in Dynamics 365 CRM
  4. Upgrade Dataverse for Teams Environment to Dataverse Environment
  5. Showing Sandbox or Non Production Apps in Power App mobile app
  6. Create a Power Apps Per User Plan Trial | Dataverse environment
  7. Install On-Premise Gateway from Power Automate or Power Apps | Power Platform
  8. Co-presence in Power Automate | Multiple users working on a Flow
  9. Search Rows (preview) Action in Dataverse connector in a Flow | Power Automate
  10. Suppress Workflow Header Information while sending back HTTP Response in a Flow | Power Automate
  11. Call a Flow from Canvas Power App and get back response | Power Platform
  12. FetchXML Aggregation in a Flow using CDS (Current Environment) connector | Power Automate
  13. Parsing Outputs of a List Rows action using Parse JSON in a Flow | Common Data Service (CE) connector
  14. Asynchronous HTTP Response from a Flow | Power Automate
  15. Validate JSON Schema for HTTP Request trigger in a Flow and send Response | Power Automate
  16. Converting JSON to XML and XML to JSON in a Flow | Power Automate

Thank you!
Enable App Auto-Updates in Power Platform Admin Center | [Preview]

Sometimes, Apps need to be up to date in order for some features to run effectively. Power Platform Admin Center now allows you to select Third-Party Publishers for an Environment to allow automatic App Updates in your defined Maintenance Window slots.

Enable Auto-Updates

Here’s how you turn on Auto-Updates for certain Publishers in your environment –

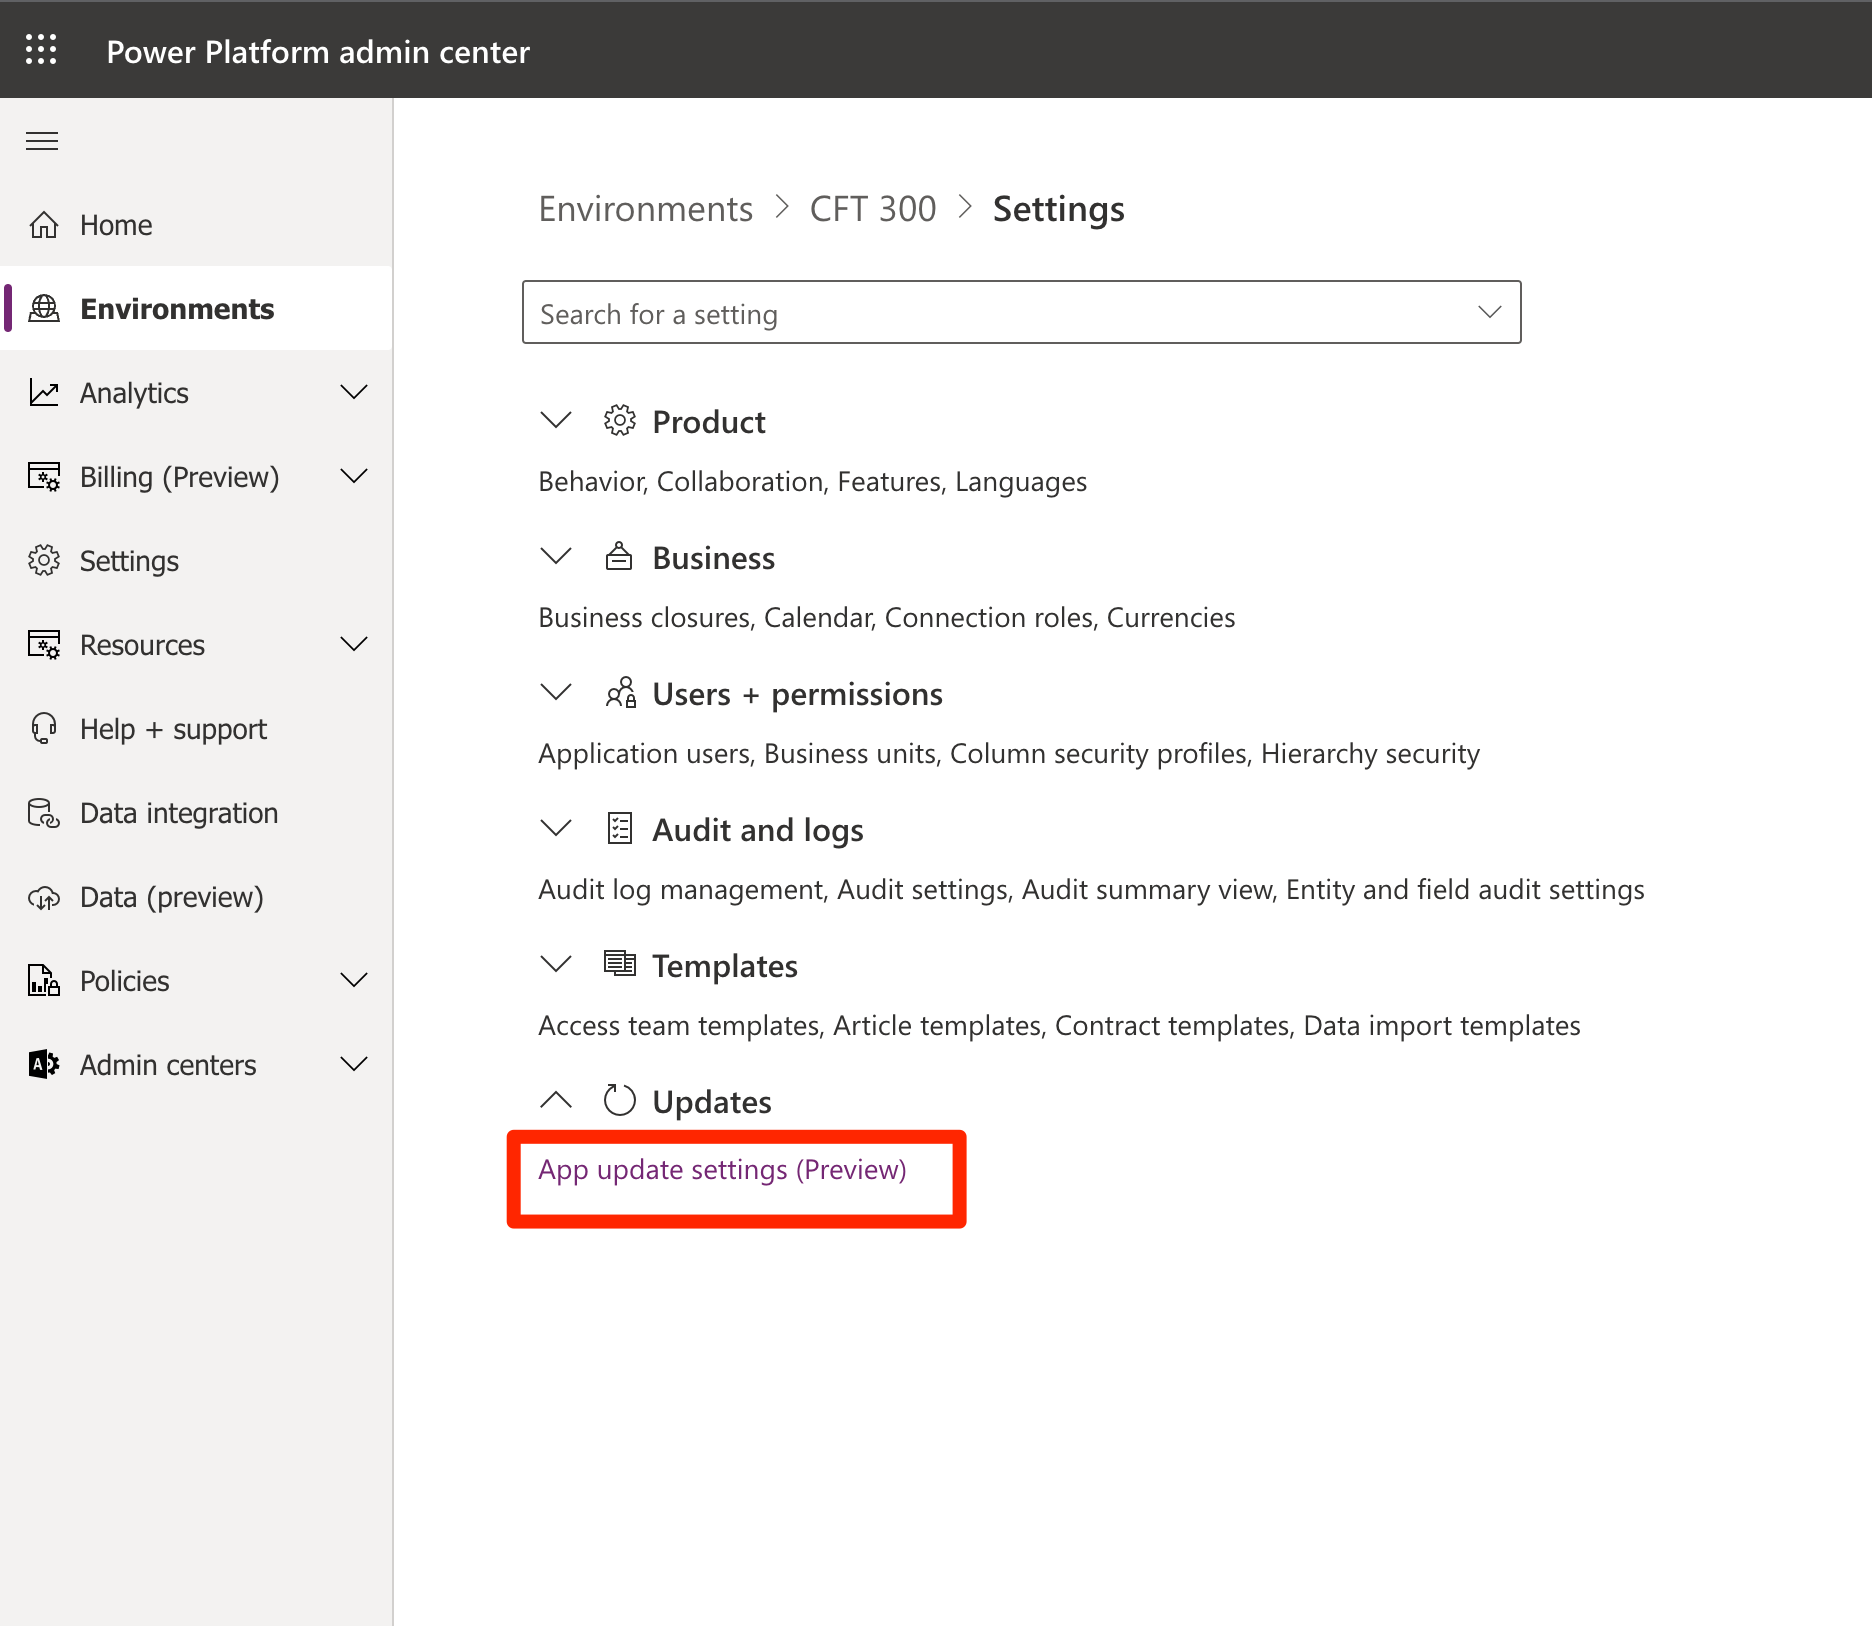
  1. Go to the Environmnent itself in Power Platform Admin Center given that you have correct Admin access. [https://admin.powerplatform.microsoft.com/environments]

  2. Then, look for Updates and then App Update Settings

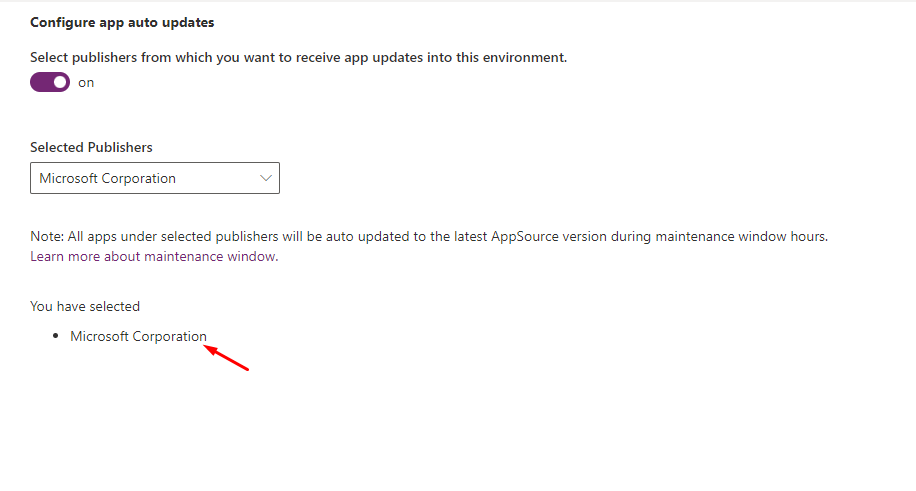
  3. Then, turn On Select publishers from which you want to receive app updates to this environment.

  4. Finally, select the Publisher which you want to receive Automatic App Updates on.

  5. And once you select, you’ll see the selection as below to show which apps are allowed to auto-update in your Maintenance Window Hours.

Hope this helps!

Here are some Power Automate posts you want to check out –

  1. Select the item based on a key value using Filter Array in Power Automate
  2. Select values from an array using Select action in a Power Automate Flow
  3. Blocking Attachment Extensions in Dynamics 365 CRM
  4. Upgrade Dataverse for Teams Environment to Dataverse Environment
  5. Showing Sandbox or Non Production Apps in Power App mobile app
  6. Create a Power Apps Per User Plan Trial | Dataverse environment
  7. Install On-Premise Gateway from Power Automate or Power Apps | Power Platform
  8. Co-presence in Power Automate | Multiple users working on a Flow
  9. Search Rows (preview) Action in Dataverse connector in a Flow | Power Automate
  10. Suppress Workflow Header Information while sending back HTTP Response in a Flow | Power Automate
  11. Call a Flow from Canvas Power App and get back response | Power Platform
  12. FetchXML Aggregation in a Flow using CDS (Current Environment) connector | Power Automate
  13. Parsing Outputs of a List Rows action using Parse JSON in a Flow | Common Data Service (CE) connector
  14. Asynchronous HTTP Response from a Flow | Power Automate
  15. Validate JSON Schema for HTTP Request trigger in a Flow and send Response | Power Automate
  16. Converting JSON to XML and XML to JSON in a Flow | Power Automate

Thank you!