D365 Quick Tip: Audit User Access in Dynamics 365 v9 CRM

One of the most common asks as an administration is to know when the user started accessing the system and from where.

In your Dynamics 365 Customer Engagement apps, you can enable Auditing for User Access.

Enable Auditing of User Access

You need to enable this feature once you enable Auditing on Organization level. Then, you can enable User Access Auditing as well

Navigate to Settings > Administration > System Settings and under Auditing tab

OR

Settings > Auditing > Global Audit Settings
systemSettings

Once the Auditing for User Access has started, the Audit Summary will record this –
userAuditStarted

And whenever a User logs into Dynamics 365 via the Web Application, Phone app or WebServices that provide authentication, the Auditing will be logged as shown below –

auditRecording

The Operation will be Access and the Event will be User Access via Web or User Access via Web Services.

If you want to enhance user login, you can quickly enable Multi-Factor Authentication for the users, read my blog on MFA here – Office 365 Admin: Quickly Enable Multi-factor authentication for users

Hope this quick tip helps. πŸ™‚

Use Learning Path for your D365 v9.x Organization – Part 1 | Setup

Learning Path an intuitive feature as compared to Customized Help. Customized Help will take you to an entirely different section whereas Learning Path will guide you through the application when you use the system. This is a multi-part blog series which will walk-through the setup of Learning Path and use of Guided Task and Sidebar in Learning Path.

Also, I’ve you’ve already setup Learning Path on your org, you can read my post on using Sidebars in Learning Path –Β Use Learning Path Learning Path for your D365 v9.x Organization – Part 2 | Sidebar

And Guided Tasks is here –Β Use Learning Path for your D365 v9.x Organization – Part 3 | Guided Tasks

Learning Path is available on Customer Engagement and the organization must be on D365 December 2016 Update or later.

Let’s look at how you can enable this for your Organization

Opt-In for Learning Path

  1. First step is to go to Settings > Administration > System Settings. Under General Tab, find β€˜Enable Learning Path’ and β€˜Enable Learning Path Authoring’. Make sure β€˜Use custom Help for customizable entities’ is set to No.
    optIn
  2. When you chose to enable Authoring, a confirmation will be asked for your consent according to Microsoft policies.
    confirmAuthoring

Learning Path Authoring Group

  1. When you’ve opted in for Learning Path Authoring, and in your navigation you go to Training > Content Library under Learning Path.
    lpSiteMap
  2. But you’ll be treated with this message below because you’ve not yet been added to the Group in Office 365.
    lpError

Add to Learning Path Authoring Group in O365

  1. In your Office 365 Admin Center, navigate to Groups as shown below
    authoringGroupInO365
  2. And you should add the Sys Admin user to the Learning Path Author groups as shown below –
    adminAddedToGroup

    Sync Roles in Content Library

    When you’ve enabled Learning Path successfully, you will need to check which Security Roles are enabled in Learning Path designer. The content is shown to users based on the precedence of their security roles.

    1. Navigate to Content Library, you’ll find Configuration button on top as shown below –
      configApp
    2. Under configuration, you’ll see Sync Role button which will sync security roles with Customer Engagement security roles. You can set your precedence of Security Roles before you Sync Roles.
      syncRoles
    3. Click Yes to confirm, it takes a few minutes while it’s happening in the back end.
      confirmSync
    4. Upon completion, you’ll see this message and you know you’re done.
      syncDone
    5. Once everything is setup, you’ll be ready to use Guided Task and Sidebar in Learning Path which I’l be covering in further blog posts in this series.
      lpReady


Here’s Part 2 –Β Use Learning Path Learning Path for your D365 v9.x Organization – Part 2 | Sidebar

And Part 3 –Β Use Learning Path for your D365 v9.x Organization – Part 3 | Guided Tasks

Use setFormNotification (Client side JS) in D365 v9 while Real-Time workflow is executing

Often, when a real-time workflow is being executed in the background, users don’t know how long it will take for the processing to finish. setFormNotifications in D365 v9 come handy!

Scenario

Here’s how I put my scenario –

  1. I call the Real-Time workflow using JS, example, on change of a certain field or the JS being called from the Ribbon button.
  2. The JS will trigger the Real-Time workflow I have.

Now, while the Real-time workflow is running, the user doesn’t know it has been called and should the user retry the same action? Here’s when the form notification is vital.

While the processing is happening, the message will remain as a notification on the form. Once the processing is complete, the notification will be cleared.

JS Implementation

For the JS code implementation, the function to call the workflow needs ProcessJS which is available on https://github.com/PaulNieuwelaar/

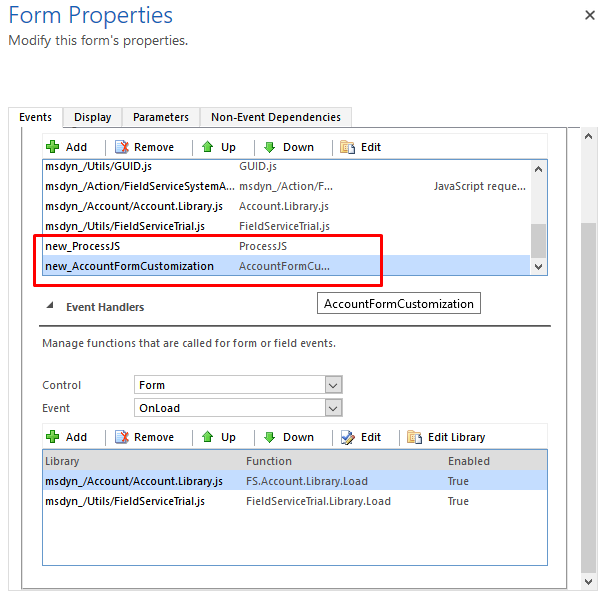
  1. So on the Form, I’ll add my file after ProcessJS file.
    formProperties
  2. Here’s the Account Form code I wrote. I created a JS file to call the Real-Time workflow.
    jsCode
  3. In the above code, the Xrm.Page.ui.setFormNotification(Message, Type of notification, Unique Identifier); This will set the notification.
  4. Page.ui.clearFormNotification(UniqueIdentifier); will clear the notification from screen.
  5. Using this, When the Process enters in Processing mode, the message is shown on screen as β€œPlease wait while processing”
    messageShown
  6. And once the execution is finished successfully, the notification is cleared.
    wfExecuted
    notificationCleared

Similarly, you can even use this approach for WebAPI calls and have clearFormNotification set in the Success/Failure callbacks.

Hope this helps!

BPF Process Stage Name not populating on records in D365 v9 [Deprecated] and workaround.

At times, users are unaware of the deprecation announced for D365 v9 version earlier in 2018 or simply, they’re not aware whether to look for deprecation announcements. One of the most common instances I’ve come across lately are when people complaining about the Process Stage Name entity not updating post the v9 update.

missingData

Deprecated Feature – Process

So when you try to add these columns in you entities’ views, you’ll see that StageID (Process Stage) is now shown as Deprecated.

deprecatedField

Read More About It Here

Here’s the Microsoft link where this is stated and other deprecations for upcoming D365 versions:

https://docs.microsoft.com/en-us/dynamics365/get-started/whats-new/customer-engagement/important-changes-coming#legacy-process-related-attributes-in-entities-are-deprecated

Alternative/Workaround

But, it is important that you also have a workaround at hand to keep the data up to date. Here’s a quick workaround to get the Stage Name.

  1. Create a custom Single Line of Text field on the entity that you need the Stage name on. In this case, Opportunity entity.
  2. Create a Real-time Workflow on the BPF entity itself. In this case, it was the Opportunity Sales Process BPF’s entity called as β€˜Opportunity Sales Process’.
    wfCreate
  3. The workflow will be triggered when the Process is Applied and then Active Stage field is updated on the BPF.
    wfBody
  4. And in the Step, it will only update the Opportunity’s custom field to the Active Stage.
    wfUpdateStep
  5. That way, you can have the Stage Name data in your custom field and use that instead.
    populatedDate

Hope this helps! πŸ™‚

Create a New Record button for Activity Type entity using Ribbon Workbench: D365

Problem

Typically, when you create a new Activity type of entity and you want a Create button for the same, it just appears in the Other Activities fly-out button and not on the Main ribbon in Activities to be specific.

currentProblem

And you can’t simply drag it out in the Ribbon Workbench since it is a dynamic button.

dynamicMenu

So, in this blog, I’ll create a button to open a new Create record form for my Activity type of entity called Assignment.

Customization

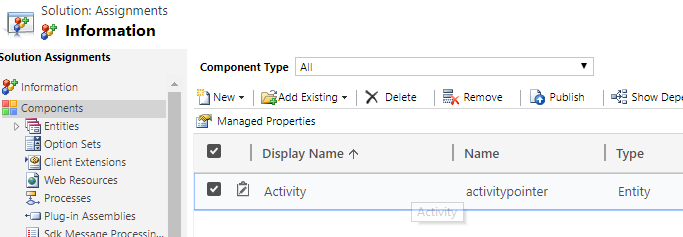
  1. Create a new Solution in your D365 environment and only add Activity entity into it.
    createSolution
  2. Load this solution into Ribbon Workbench and on the Main ribbon, add a button and give it a Name and Icon
    Note: Since there was no space in the Activity Ribbon, I had to sacrifice on of the least used Activities I had.
    sacrificeButton
  3. On that, I created a new Command and provided the below parameters –
    commandParameters
    Make sure you enter the name of your entity in String Parameter shown above correctly, in my case, it is new_assignment.
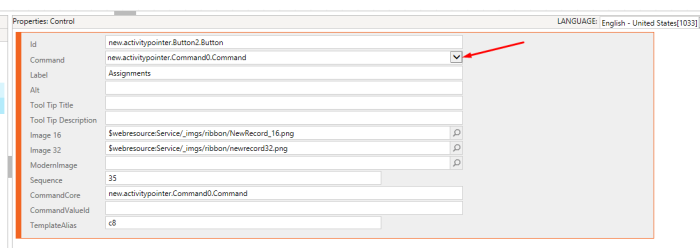
  4. Attach this Command to the Button
    mapButton
  5. Now Publish and check.

Create Assignment Button in Action

Now, when I go to Activities, I see my button called Assignments

buttonAppears


And when I click it, it open the full form for the Assignment entity

newForm

Hope this was quick!

Enable Gamification for your D365 Organization

It’s relevant to not only engage customers but also to make users keep excited about Dynamics 365 and using it for as a purpose to compete.

This results in the success of D365 implementation among users.

To serve the purpose, D365 has an add-on called as Gamification wherein β€˜game commissioners’ can setup games for D365 users to play and compete against each other. Let’s look at enabling this service for D365.

Pre-Requisites

  1. You’ll need to be on at least Dynamics 2016 CRM Update 1.
  2. D365 Customer Engagement License to anyone who will use this service.

Install Add-On

  1. If you are a Global Admin or D365 CE Administrator, In your D365 Admin Center, under the Org you want to enable Gamification, you can find the add-in and simply click Install.
    addIn
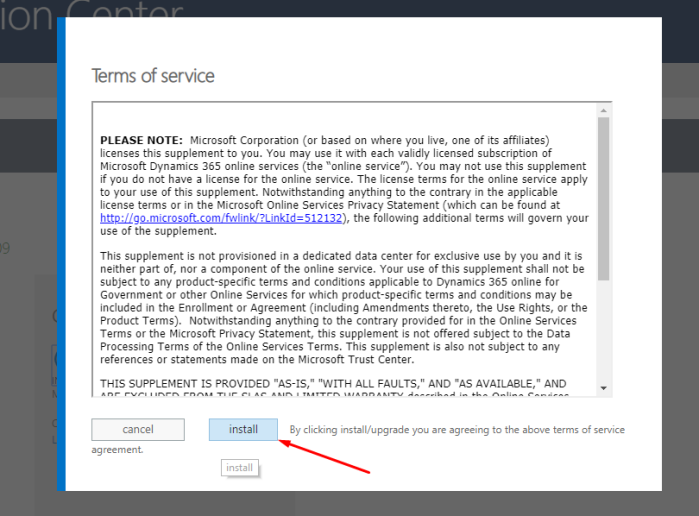
  2. You’ll need to Agree to the terms of service to proceed.
    agreeToS
  3. It takes about 15-20 mins for the setup of the solution and can happen in the background. Once successfully installed, a new Area in the SiteMap will appear called as Gamification.
    siteMap

Activation

Next step after enabling it.

  1. Click on Start Activation to begin the process.
    clickActivate
  2. It will ask the for the credentials of the User who will authenticate to Activate the Gamification. They must be a System Admin with a D365 CE license.
    signIn
  3. Provide consent by Agreeing to permissions asked.
    agreeConsent
  4. Once completed in the background, an Security Key will be generated. Simply copy it and paste it in the Box given below.
    securityKeyGenerated
  5. That’s it. Gamification is now enabled for the Organization.
    enabled

Security Roles

There are three aspects to Security Roles

  1. Commissioner is the one who will enable the Add-in i.e. a Global Administrator or D365 CE Service Administrator.
  2. Game Manager is an actual Security Role given to a person who should create and run the games for the users.
  3. Users are the ones who have a D365 CE license who will access Gamification service.

Hope this was helpful to set you up!

β€˜Based on entity’ folder structure in D365 SharePoint Online Integration

When you configure SharePoint Online integration for your D365 entities, while setting up, you see an option to either proceed to enable feature based on entity or not.

featuredImage

And you’re not sure what it means. Let’s quickly see that it stands for.

I assume you know that you’ll need to go to Settings > Document Management > Document Management Settings to enable SharePoint integration for selected entities.

DocManagement

Now, let’s look at the difference between them.

Folder Structure based on Entity

When you select based on Entity, you get 2 options – Account and Contact. There’s no more options.

basedOnEntity

Now, when the above is setup and when you put documents under an Opportunity, see below how the documents will be stored in SharePoint.

  1. The Opportunity Printers has a parent Account called as β€˜Adventure Works’.
    addToOppAnd you add Document to this Opportunity.
    addDocToOpp
  2. When I add documents under Opportunity Printers, on the SharePoint site, it will be like –
    folderStructureAsEntity

Folder Structure Not Based on Entity

Note: I’m doing this in another instance for demo purpose.

notAsEntity

  1. When you don’t select and proceed as is, and you go to the Opportunity Printers and add you Documents to the record as below.
    addDocToOpp2
  2. You can see unlike the one based on Entity, these Documents have Opportunity at the root level and not the Account which is that Opportunities’ parent.
    folderStructureNotAsEntity

Hope that was straight forward!

D365 Quick Tip: Rather Uninstall Plugin Profiler from the D365 Solutions

Often, I get annoyed when I finish debugging the plugin and want to uninstall the Plugin Profiler from the Plugin Registration Tool so that users can quickly go ahead and test out the fix, it takes longer in the tool for the Profiler to be uninstall.

uninstallFromTool

And if at times, there are bandwidth issues, the uninstall just times out giving you this error.

error

Solutions in D365

Same thing is available in your organization’s Solution as well.

Select it and Delete it. It happens in less time.
uninstallFromSolutions
confirm

As a test, I simply closed the browser window and solution was deleted later when I logged back in. Since it happens on the server.

Hope this quick tip saves a few minutes. 😊

Bringing back Maintain Bookings Availability View from D365 PSA 1.2.x into 2.4.x

Disclaimer: This is an experimental implementation and is not recommended out-of-the-box. My assumption is Microsoft would not provide support for anything that gets goes wrong while implementing this, with the original MS scripts or anything that intervenes with out-of-the-box functionality. Kindly implement at your own risk, do not change the existing out-of-the-box files and back up entities/files before any customization.

Maintain Bookings Schedule Board view in PSA 2.4.x?

Recently, I upgraded PSA from v1.2.x to v2.4.x. And I missed the classic Availability view of the Maintain Bookings of the older version. 2.4.x has the new Schedule Board approach.

Schedule Board based Maintain Bookings view as below
scheduleBoardView

Instead of the old Availability View from the v1.2.x version which looked like this –
availabilityView

Also, even other projects bookings were seen which wasn’t desired and editing the hours was added effort. Se let’s see what we can do her –

Pre-Requisites

  1. Knowledge of Ribbon Workbench in the XRMToolBox.
  2. Make sure you have any D365 environment having PSA in version 1.2.x. You’ll need the older ProjectTeamActions.js file from that version of D365 PSA 1.2.x.
    originalFile

Customization

  1. I prepared a new JS Web Resource (named it MyCustomProjectTeamActions) in the target PSA 2.4.x environment and added the code from the PSA 1.2.x’s PSA file ProjectTeamActions.js file referred in the Pre-Requisites section above
    customWebResource
  2. In the XRMToolBox, connect to the 1.2.x’s Specify Pattern button on the Team Member Sub-grid view, you can use that as a reference.
    longViewSpecifyPattern
    closeViewSpecifyPattern
  3. In your updated PSA 2.4.x’s Org, assuming you have copied the ProjectTeamActions.js from the older org to your custom Web Resource file in Step 1 above, you can prepare a new custom button next to the existing one and use your custom file instead on your button. I just called it β€˜New Maintain Bookings’
    customMaintainBookingButton
    customWRInButton
  4. And Publish your changes. Then go to the Project’s Project Team Member view and see your new button work.

Seeing it Work

  1. Now your new button appears besides the current version’s Maintain Bookings.
    teamMemberView
  2. And that will bring up the Availability View for the Maintain Bookings on how it was in PSA 1.2.x
    availabilityView

Hope this helps you out too!

D365 Quick Tip: Est. Revenue calculations on Opportunity

Here’s a quick tip! Either let the system calculate the revenue of the Opportunity based on the Product Line Items or you can enter yourself or add your own custom logic to it.

So, there is a field on the Opportunity entity of type TwoOptions – β€˜isRevenueSystemCalculated’

And, as self-explanatory as its name, it will let you either set your own Revenue calculations or pull it from the Opportunity Line Details

field

You can either put this field on the form to switch while working or use custom logic (or use Default Value) to be set and keep it hidden from the user as per you requirements.

For the purpose of this blog, I’ve kept it on the form.

System Calculated

When you select System Calculated, the Est. Revenue field is locked and the Revenue is calculated from the Product Line Items.
systemCalculated

User Provided

When you select User Provided, the Est. Revenue field is unlocked and the Est. Revenue is open to enter data into it.
userProvided

Pretty straight-forward! 😊