Pass Entity parameter from Power Automate Flow to an Action

Let’s say that you want to run a Power Automate Flow on a set of Dataverse records and those records will be referenced in your C# Plugins.

And the next steps is you’ll create an Action for this and register it in the Plugin Registration Tool.

In case you are new to plugins in CRM, you can refer this series – Plugins Development in Dynamics 365 CRM for Beginners | [Blog Series]

Bound Action in CRM

Let’s suppose you are aware on how to create Actions in Dynamics 365 CRM. This is an old concept since many years and I’m also assuming you know how to profile a plugin (which is registered as an Action in CRM) –

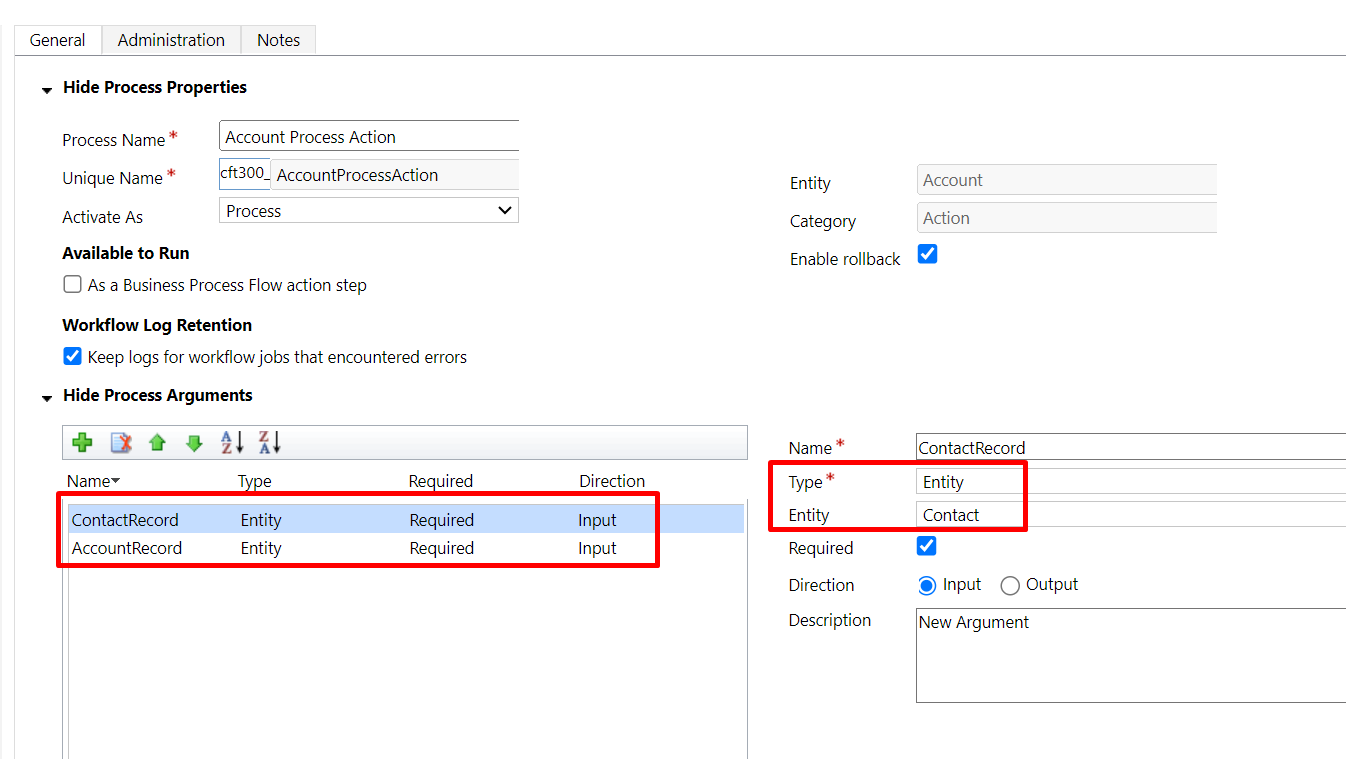
  1. When you open an Action, let’s suppose you are passing Account as well as a Contact Entity to the Action itself.
    Notice that the Action is registered as a Bound Action on the Account entity already.

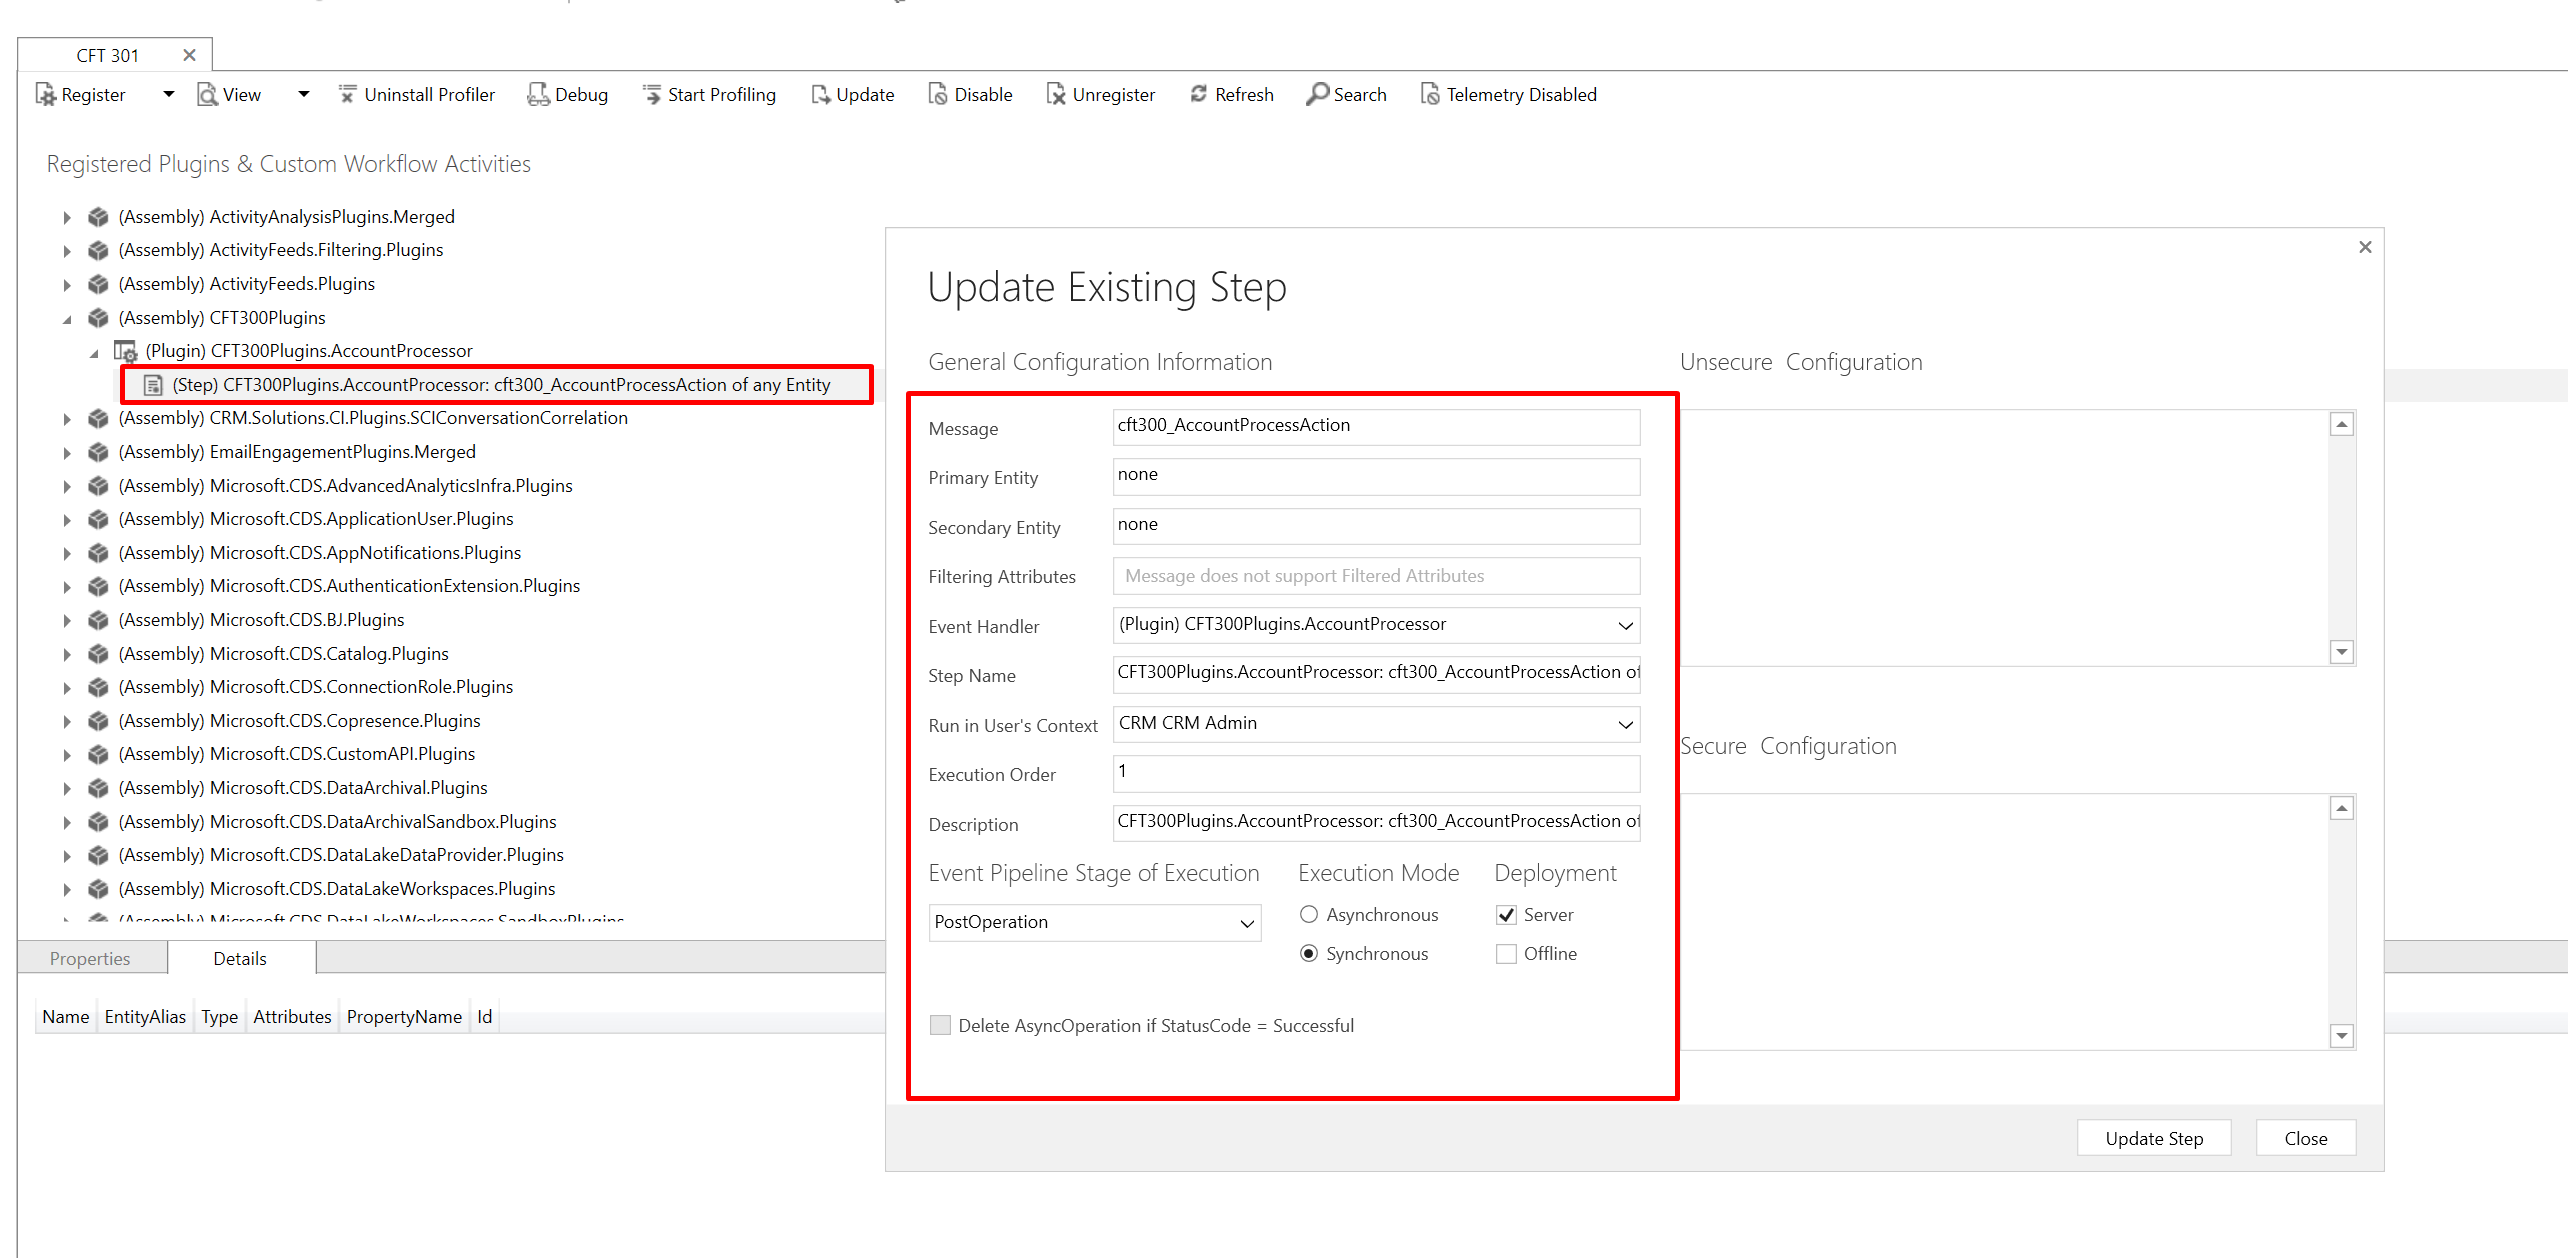
  2. Also, assuming that you have Activated this Action and then registered this Action as a Step on the Plugin in the Plugin Registration Tool.

    Now, let’s see how we can pass the parameters to the plugin itself from the Flow

Power Automate Flow – Bound Action

You must’ve used the Dataverse connector a lot, so here’s how you can call the Bound Action and pass the Entity parameters to the Action itself –

  1. You’ll need to use a Perform a bound action action in Power Automate which is offered by Dataverse connector.

  2. Then, select the Table which you have registered the Action on in CRM and you’ll then see the Action’s backend name appear for selected, then pass the primary key of the record.
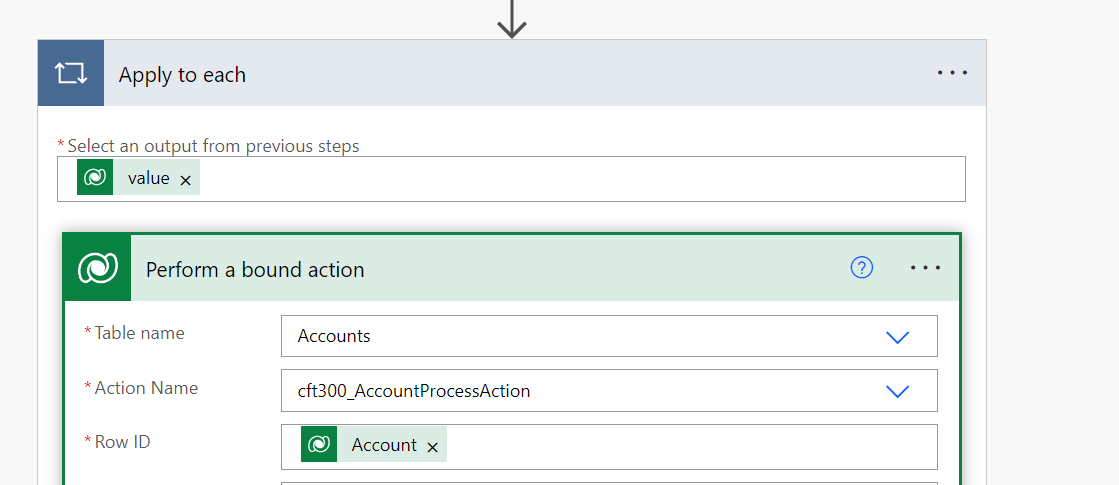
  3. Now, since there are 2 Entity parameters to be passed for the Action, here’s you’ll see all the fields from those Entity itself!
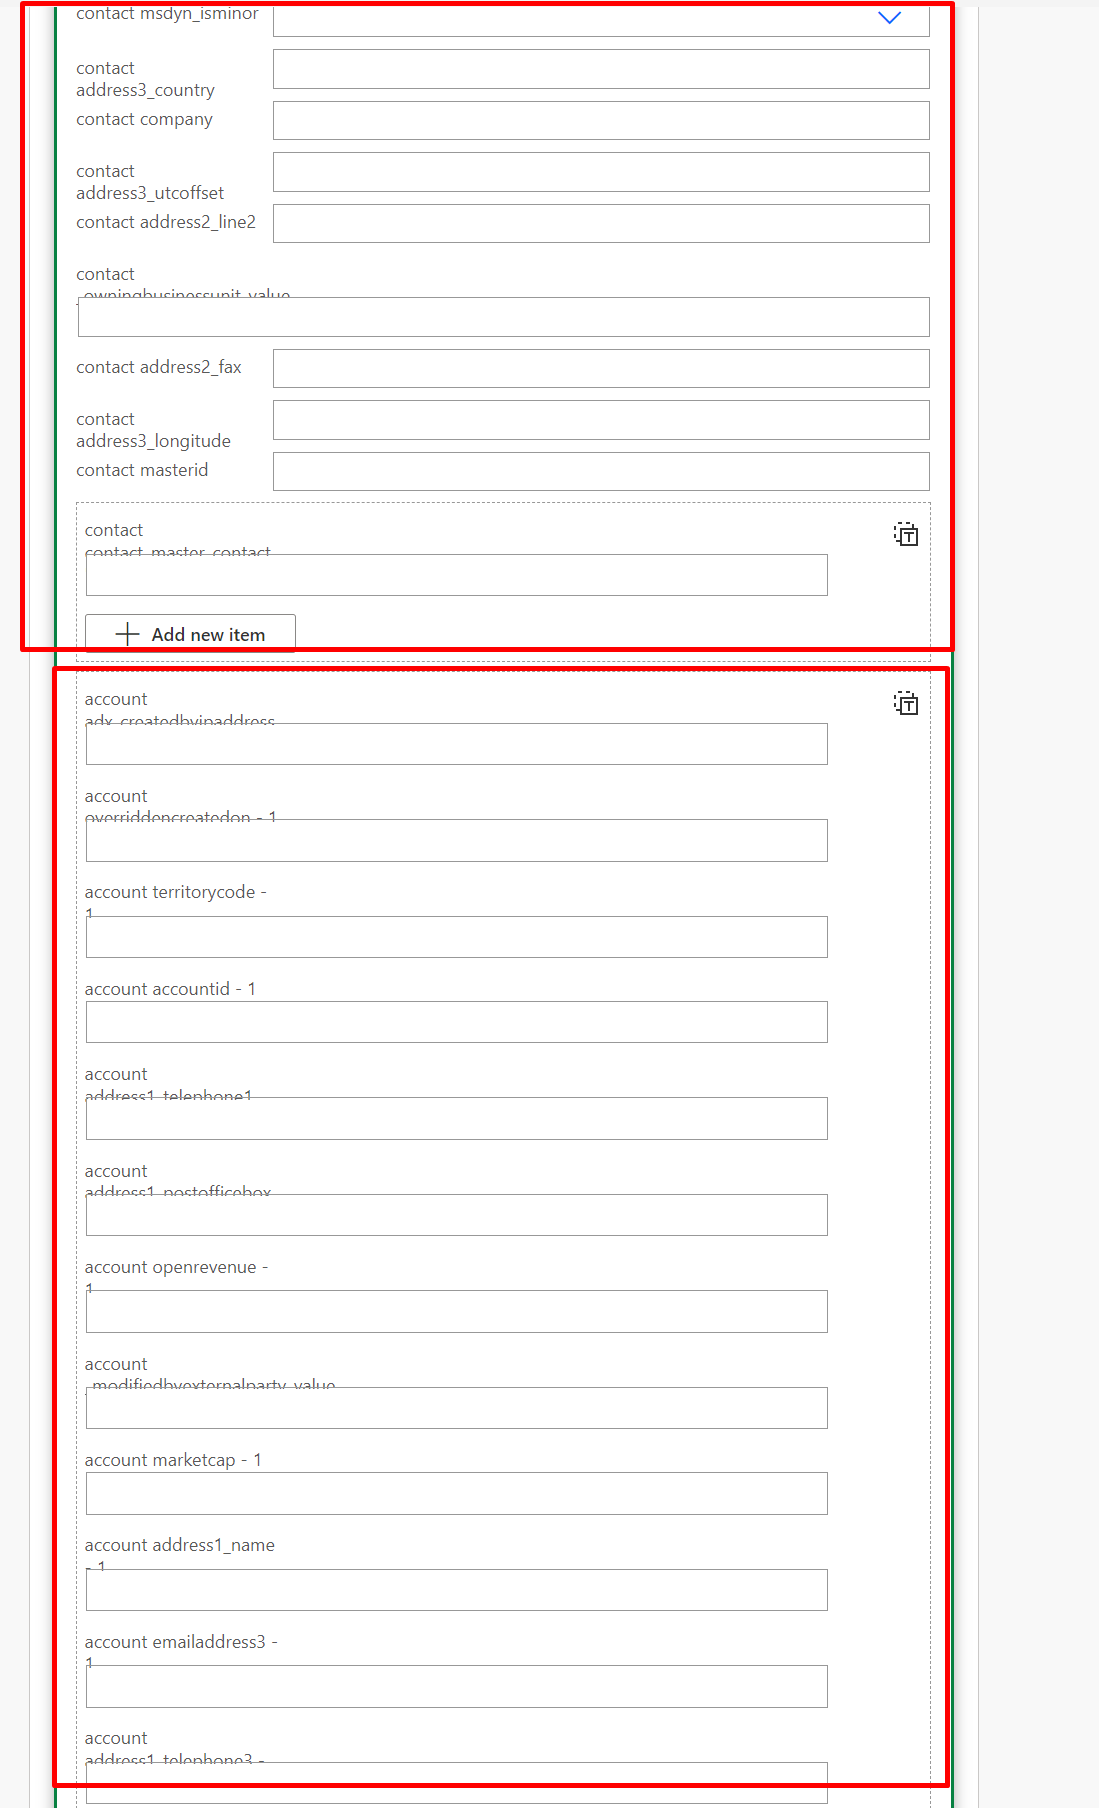
  4. For each of these Entity parameters, you have to look for the Primary Key field of those tables and then pass the GUIDs of the Entity records you presumably have.

  5. But wait! There’s a limitation here. You can only have 1024 parameters saved for the step selected. Hence, only 1 lookup will suffice.
    You’ll get the below error when trying to set both the Lookups that I’m passing to the action above.
    The error says “The dynamic schema response from API ‘commondataserviceforapps‘ operation ‘GetMetadataForBoundActionInput‘ is too large, only schemas with at most 1024 properties are supported.

  6. Hence, I’ll go back and remove 1 Entity parameters just for this example to work!

  7. And then, I’ll simply profile the Plugin Action to see what is passed in the InputParameters.
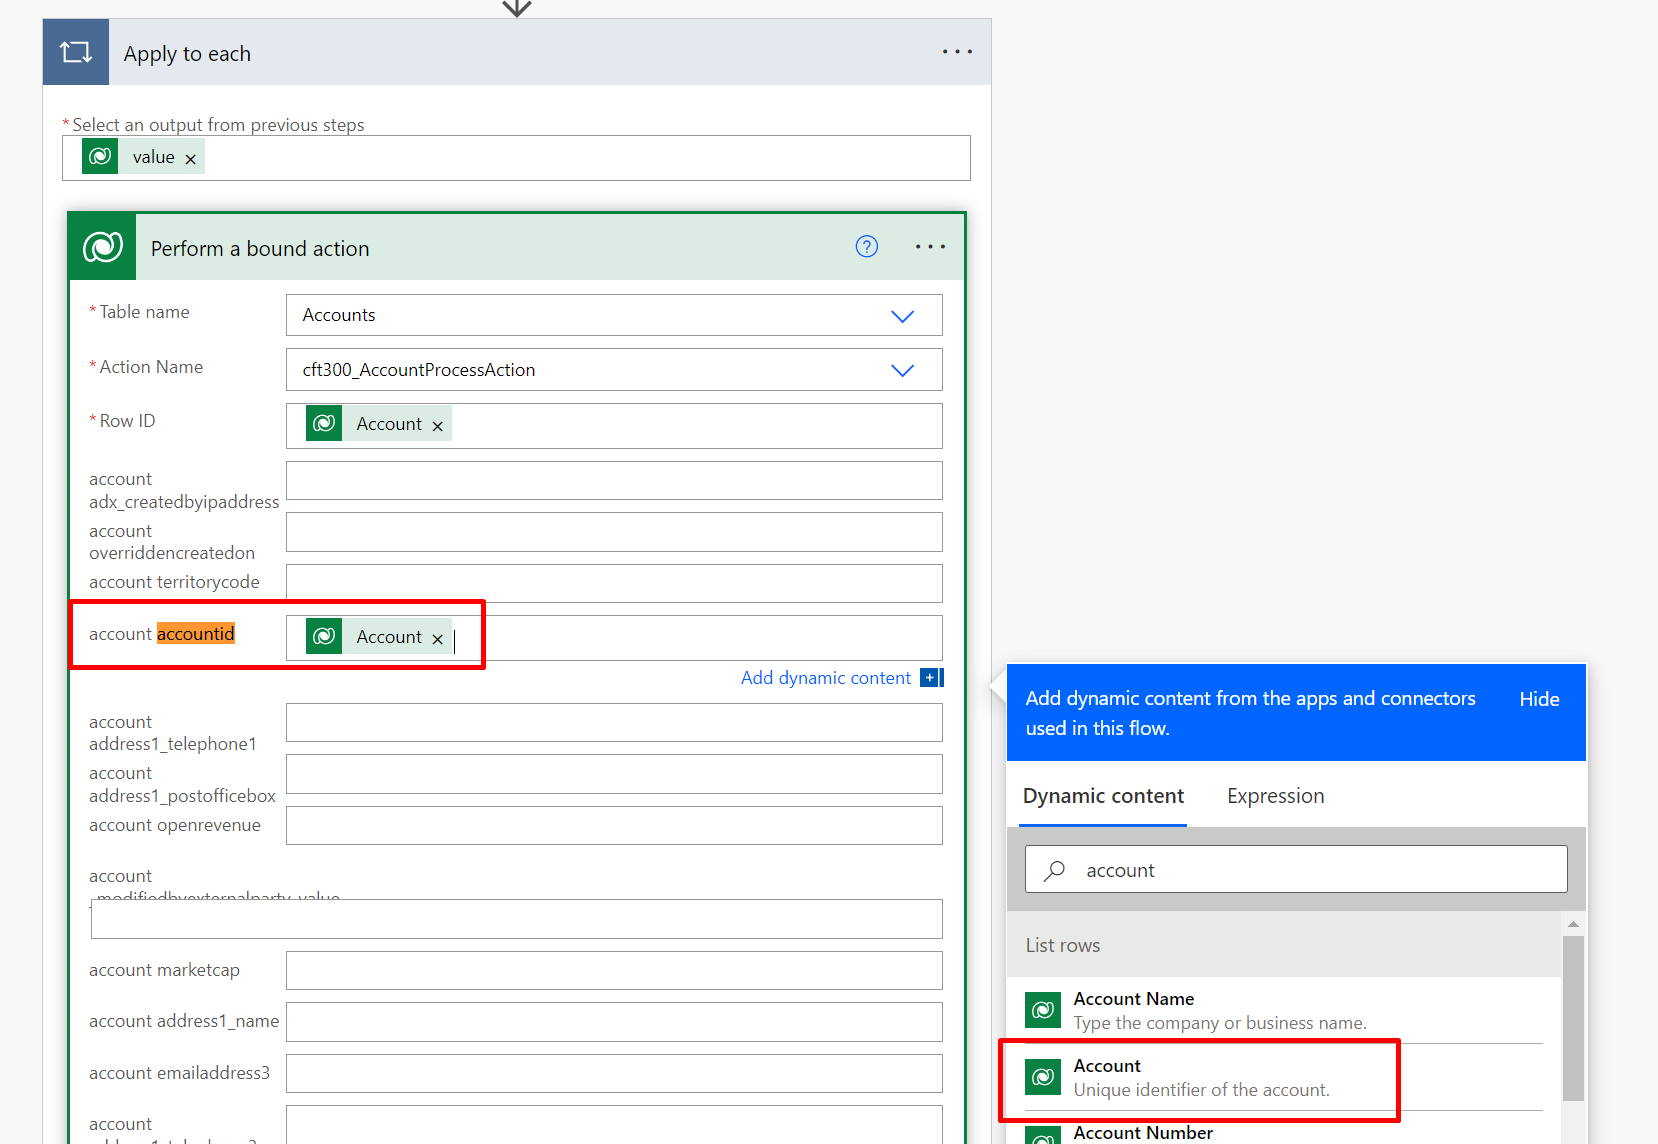
Plugin Context

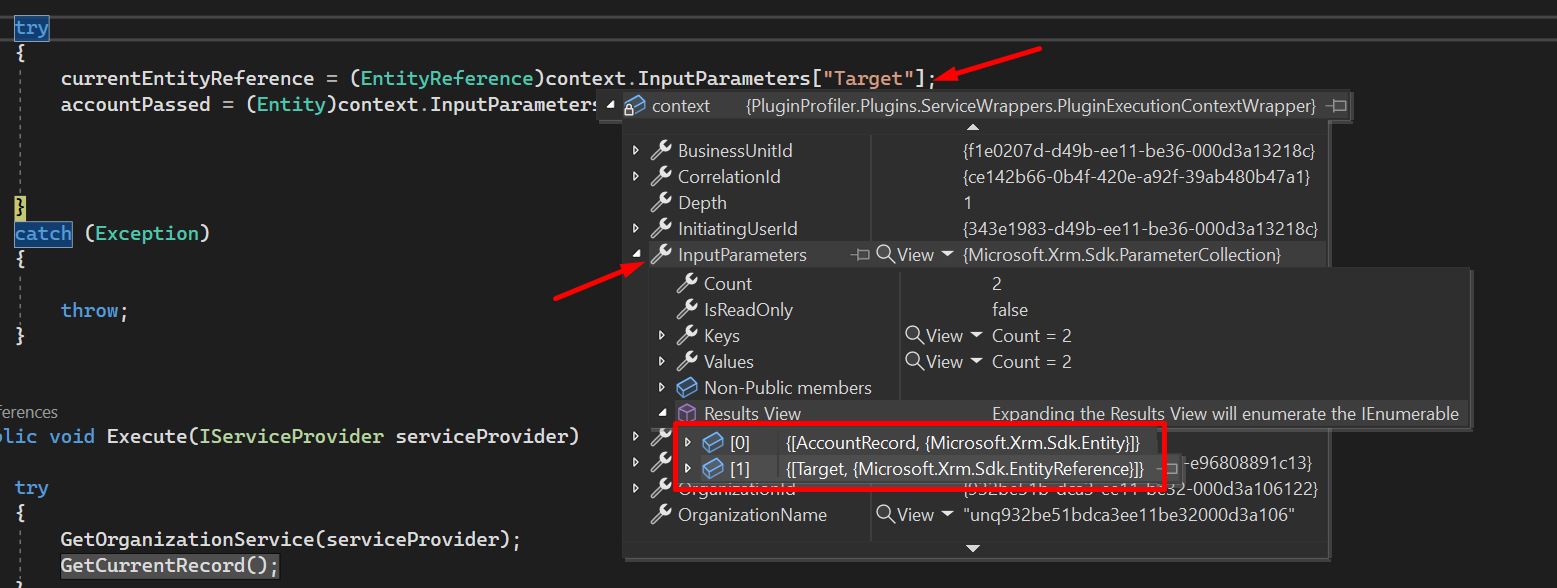
Now, given that you might have already Profiled the plugin and attached it to the Plugin Registration Tool process, let’s examine the context’s Input Parameters –

  1. the InputParameters in the plugin’s execution context will contain the following parameters, which we’ll see in later section of this blog post.
    Target [EntityReference, in a CRUD operation registered plugin step – Target is an Entity in the plugin context]
    AccountRecord [Entity]
Considerations

Here are some considerations if you want to make design decisions for your implementation –

  1. Cannot have 2 or more Entities as parameters as the Perform a bound action step itself has limitations of 1024 properties at the Power Automate level.
  2. Pass some other Entity than the Action you have registered on since you’ll get the registered Entity as EntityReference itself in the “Target” parameter.

Hope this was useful!

Thank you!

Read OptionSet Labels in Dynamics 365 CRM Plugins | Entity object

Usually, you’d look at the OptionSet in the customiation and decide to write plugin logic based on the code you have noted down.

But, at times, you might want to know what the OptionSet Labels are for these Options, in that case, here’s how you retrieve the labels as well.

In case you are looking to retrieve OptionSet Labels in Power Automate Flow on the Dataverse connector, you can check this post – Read OptionSet Labels from CDS/Dataverse Triggers or Action Steps in a Flow | Power Automate


Scenario

Below is the OptionSet Value and you want to retrieve the Label part when you retrieve or work with RetrieveMultiple or object of the Entity class in Dynamics 365 CRM plugin execution context


OR

And here’s the Data that I’ll be retrieving in my plugin of which I need the label “Silver” instead of the OptionSet value of 1 as seen above.

OptionSet Value

Amongst some methods, I prefer using the below to retrieve the OptionSet Value i.e. the code itself

  1. Lets say I’m looping through a list of records retrieved using RetrieveMultiple in my plugin.
    I use entity.GetAttributeValue<OptionSetValue>("field_name").Value; to retrieve the value of the OptionSet option and store it in an Int32 / int variable.


  2. But, this doesn’t give you the Name of the label itself. For that, you’ll need to use a different method. Let’s see below

OptionSet labels using Formatted Values

Below is how you can retrieve Label of the OptionSet value from the Object of the Entity class in Dynamics 365 CRM plugin execution context –

  1. Similar to the above step, I’m retrieving the name of the Label of the same OptionSet value I’m working on from the same example above.
    I use entity.FormattedValues["field_name"]; to retrieve the Label of the OptionSet option and store it in a String / string variable.

Here’s where all the other Formatted Values are stored in the RetrieveMultiple’s Object

And that’s how you retrieve the OptionSet Labels in your Dynamics 365 CRM plugin.

Hope this helps!

Here are some Power Automate posts you want to check out –

  1. Select the item based on a key value using Filter Array in Power Automate
  2. Select values from an array using Select action in a Power Automate Flow
  3. Blocking Attachment Extensions in Dynamics 365 CRM
  4. Upgrade Dataverse for Teams Environment to Dataverse Environment
  5. Showing Sandbox or Non Production Apps in Power App mobile app
  6. Create a Power Apps Per User Plan Trial | Dataverse environment
  7. Install On-Premise Gateway from Power Automate or Power Apps | Power Platform
  8. Co-presence in Power Automate | Multiple users working on a Flow
  9. Search Rows (preview) Action in Dataverse connector in a Flow | Power Automate
  10. Suppress Workflow Header Information while sending back HTTP Response in a Flow | Power Automate
  11. Call a Flow from Canvas Power App and get back response | Power Platform\
  12. FetchXML Aggregation in a Flow using CDS (Current Environment) connector | Power Automate
  13. Parsing Outputs of a List Rows action using Parse JSON in a Flow | Common Data Service (CE) connector
  14. Asynchronous HTTP Response from a Flow | Power Automate
  15. Validate JSON Schema for HTTP Request trigger in a Flow and send Response | Power Automate
  16. Converting JSON to XML and XML to JSON in a Flow | Power Automate

Thank you!

Plugin Registration Tool buttons not functioning | Dynamics 365 CRM [Quick Tip]

At times, if you are setting up a new system or new to development of Dynamics 365 CRM plugins, you often end up borrowing Plugin Registration Tool from some one.

In this scenario, you are getting a zip file from someone or some other computer and expecting the Plugin Registration Tool to work for you as it works for them.

Ideally, download Plugin Registration Tool from source. You can follow this post – Download Plugin Registration Tool for Dynamics 365 CRM using PowerShell

Plugin Registration Tool Issue

Issue is when you try to, say, Update the plugin assembly – You’ll see that the button is being pressed but nothing happens.

And the Update window doesn’t show up.

Fix

The issue is that when you bring files from other computer, Windows blocks suspected dlls when you Unzip the files.

So, you’ll need to Unblock all the dlls in the Plugins Registration Tool folder as shown below.
You can do so by going into Properties of each of the dll files in the Plugin Registration Tool folders and look for a button which says Unblock

Likewise, you’ll need to Unblock each of the dll files which will enable features within the Plugin Registration Tool.

As you can see, the message besides the Unblock checkbox reads – “This file came from another computer and might be blocked to help protect this computer.”

And once you Unblock all the files, you then need to restart the Plugin Registration Tool in case it was already open.

Side Note: In case you are new to Plugins in Dynamics 365 CRM and looking for tutorials, you can check out my Blog Series on Plugin Development – Plugins Development in Dynamics 365 CRM for Beginners | [Blog Series]

Hope this was helpful! Here are some more Dynamics 365 posts which you might be interested in –

  1. Dynamics 365 Storage Utilization | Dataverse Storage | Power Platform Admin Center
  2. Use Hierarchy in Roll Up Fields in Dynamics 365 CRM
  3. Filter records in a View owned by a Team you are a member of | Dynamics 365 CRM
  4. Get GUID of the current View in Dynamics 365 CRM JS from ribbon button | Ribbon Workbench
  5. Dynamics 365 App For Outlook missing on SiteMap in CRM? Use shortcut link [Quick Tip]
  6. Import lookup referencing records together in Dynamics 365 CRM | [Linking related entity data during Excel Import]
  7. Mailbox Alerts Hide/Show behavior in Dynamics 365 CRM
  8. Excel Importing Notes (Annotation) entity in Dynamics 365 CRM
  9. Enable/Disable the need to Approve Email for Mailboxes in Dynamics 365 CRM CE
  10. Call Azure Function from Dynamics 365 CRM using Webhooks
  11. Show Ribbon button only on record selection in Dynamics CRM
  12. Accessing multiple occurrences of a field in Business Process Flow using JS in D365 CRM

Thank you!!

Retrieve fixed number of records in FetchXML in Dynamics 365 CRM | [Quick Tip]

FetchXML is one of the common approaches used for retrieving records from CRM either using Plugins or JavaScript

At times, you want to retrieve only a fixed number of records based on the requirement or even if you want to just debug the plugin and don’t want all the records to be retrieved in your tests. So, here’s what you do!
Also, if you are new to Dynamics 365 CRM plugins, you might want to check this Plugin Development series I posted – Plugins Development in Dynamics 365 CRM for Beginners | [Blog Series]

FetchXML

  1. The FetchXML below is usually the only you are going to end up using since you are retrieving all the Contacts.

    This will retrieve all the records for you.

  2. Now, let’s add a “top” attribute in the <fetch> tag to retrieve only x number of records which you mention.

And that was it, same is applicable even if you are using XRMToolBox to test your FetchXML query using FetchXML tester.

Hope this was helpful! Here are some more Dynamics 365 posts which you might be interested in –

  1. Dynamics 365 Storage Utilization | Dataverse Storage | Power Platform Admin Center
  2. Use Hierarchy in Roll Up Fields in Dynamics 365 CRM
  3. Filter records in a View owned by a Team you are a member of | Dynamics 365 CRM
  4. Get GUID of the current View in Dynamics 365 CRM JS from ribbon button | Ribbon Workbench
  5. Dynamics 365 App For Outlook missing on SiteMap in CRM? Use shortcut link [Quick Tip]
  6. Import lookup referencing records together in Dynamics 365 CRM | [Linking related entity data during Excel Import]
  7. Mailbox Alerts Hide/Show behavior in Dynamics 365 CRM
  8. Excel Importing Notes (Annotation) entity in Dynamics 365 CRM
  9. Enable/Disable the need to Approve Email for Mailboxes in Dynamics 365 CRM CE
  10. Call Azure Function from Dynamics 365 CRM using Webhooks
  11. Show Ribbon button only on record selection in Dynamics CRM
  12. Accessing multiple occurrences of a field in Business Process Flow using JS in D365 CRM

Thank you!!

Plugins Development in Dynamics 365 CRM for Beginners | [Blog Series]

If you are looking to start Plugins development in Dynamics 365 CRM Online instance but are a bit digressed in the process, I’ve created this short Crash Course to help you get started with your first plugin on Day 1!

Here are the list of the posts –

  1. Setting up Visual Studio Projecthttps://d365demystified.com/2021/12/31/plugins-development-in-dynamics-365-crm-part-1-setting-up-visual-studio-project/
  2. Registering your pluginhttps://d365demystified.com/2021/12/31/plugins-development-in-dynamics-365-crm-part-2-registering-your-plugin/
  3. Adding Logichttps://d365demystified.com/2021/12/31/plugins-development-in-dynamics-365-crm-part-3-adding-logic/
  4. Debugging the pluginhttps://d365demystified.com/2021/12/31/plugins-development-in-dynamics-365-crm-part-4-debugging-the-plugin/

Further, I’ll enrich this series with posts on best practices and links to useful Tools and code samples by fabulous and brilliant community members! 😊

I hope this is a good enough starting point to you all.

Hope this was helpful! Here are some more Dynamics 365 posts which you might be interested in –

  1. Dynamics 365 Storage Utilization | Dataverse Storage | Power Platform Admin Center
  2. Use Hierarchy in Roll Up Fields in Dynamics 365 CRM
  3. Filter records in a View owned by a Team you are a member of | Dynamics 365 CRM
  4. Get GUID of the current View in Dynamics 365 CRM JS from ribbon button | Ribbon Workbench
  5. Dynamics 365 App For Outlook missing on SiteMap in CRM? Use shortcut link [Quick Tip]
  6. Import lookup referencing records together in Dynamics 365 CRM | [Linking related entity data during Excel Import]
  7. Mailbox Alerts Hide/Show behavior in Dynamics 365 CRM
  8. Excel Importing Notes (Annotation) entity in Dynamics 365 CRM
  9. Enable/Disable the need to Approve Email for Mailboxes in Dynamics 365 CRM CE
  10. Call Azure Function from Dynamics 365 CRM using Webhooks
  11. Show Ribbon button only on record selection in Dynamics CRM
  12. Accessing multiple occurrences of a field in Business Process Flow using JS in D365 CRM

Thank you!!

Plugins Development in Dynamics 365 CRM | Part 4 – Debugging the plugin

Given that you are coming here from the Part 3: Plugins Development in Dynamics 365 CRM | Part 3 – Adding Logic

Let’s see how we can debug the plugin in case of Exceptions / issues!

Profiling

Now, you’ll need to start Debugging in the Plugin Registration tool

  1. In the Plugin Registration Tool, if a Profiler solution was never installed, you will find this button that says Install Profiler.

  2. It’ll begin installing the Profiler and it takes a few minutes until this is completed.


    Once done, you’ll see this message.

  3. One this is done, you’ll see Uninstall Profiler button all the while.
  4. Now, you need to select the Plugin step and then click on Start Profiling.

  5. Once started, the Plugin step will look like this. The step will have “(Profiled)” mentioned.


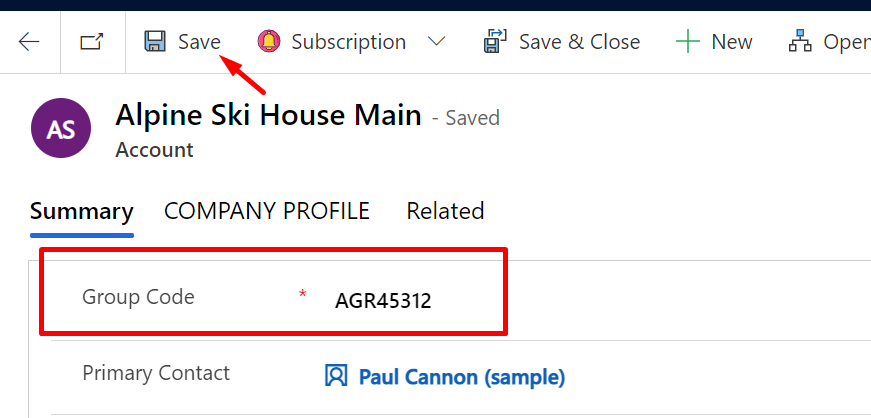
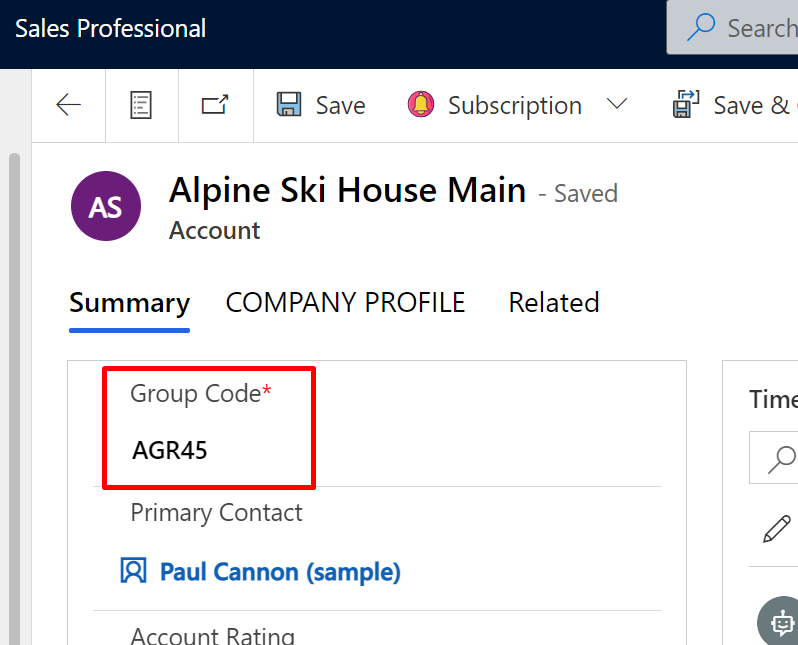
  6. Now that you have started profiling the plugin step. You’ll need to “perform the operation” in Dynamics 365 CRM. In this case, updating the Group Code field and clicking on Save.

  7. This will not throw the Exception since the method we chose above was Persist to Entity. And the system will just save the record [But of course, the plugin code was not executed since it throws an error]
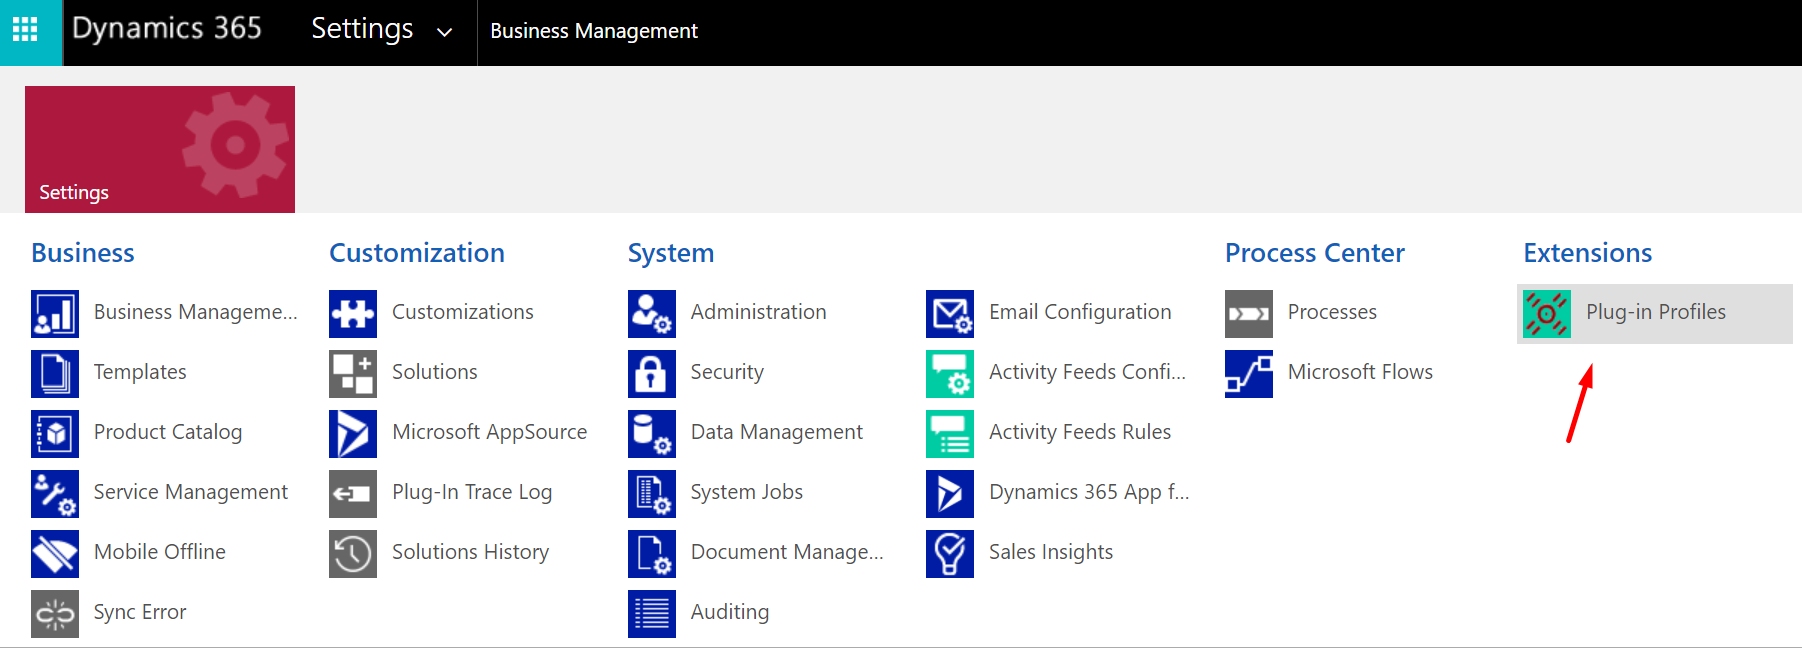
  8. Next, you can navigate to Plug-in Profiles in Settings

  9. Make sure the Plug-in and custom workflow activity tracking is turned to All in System Settings.


    Else, you’ll see this error on navigating to the Plug-in Profiles section in Settings.


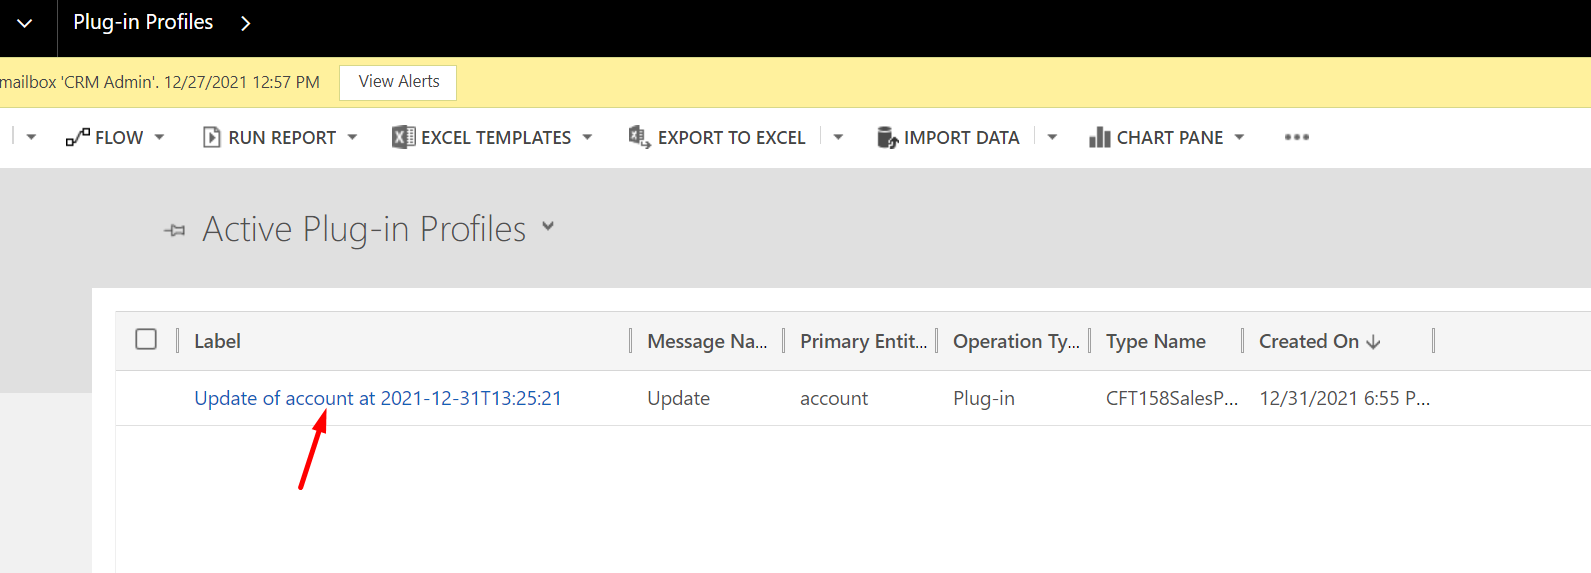
  10. Next, you’ll find the record which was captured when we tried to replicate the scenario to capture the issue.

  11. Now, when you open this record, you’ll need to expand the Serialized Profile section and copy all the content into a Notepad file.

  12. For example, I’m naming my file as error.txt. Remember where you stored this file.


    Now, let’s Debug the plugin!

Debugging

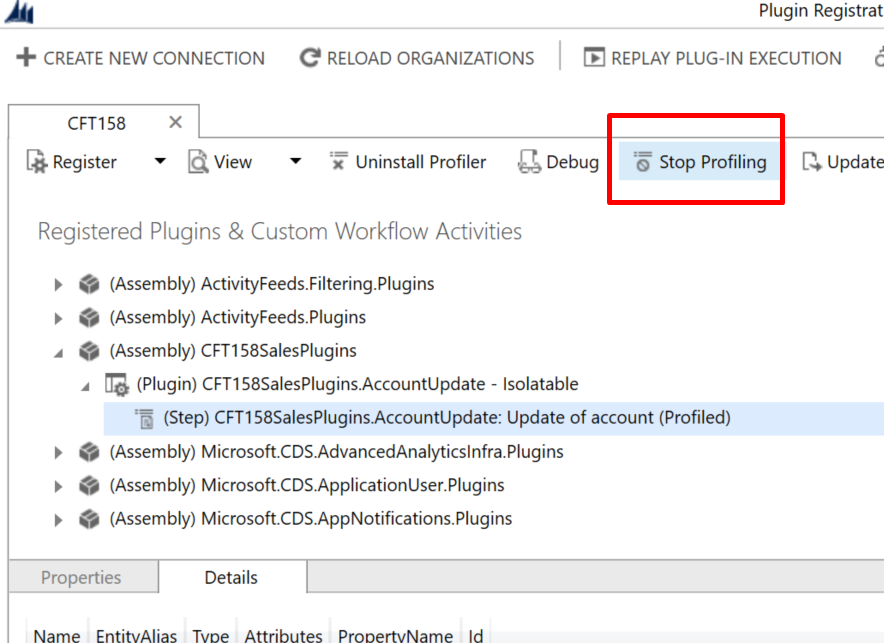
Now, in order to start debugging the plugin, you’ll need to first, stop the Profiling which we started to capture the logs –

  1. Click on Stop Profiling.

  2. Once stopped, click on the Step, then on Debug to open the Dialog box as shown below.


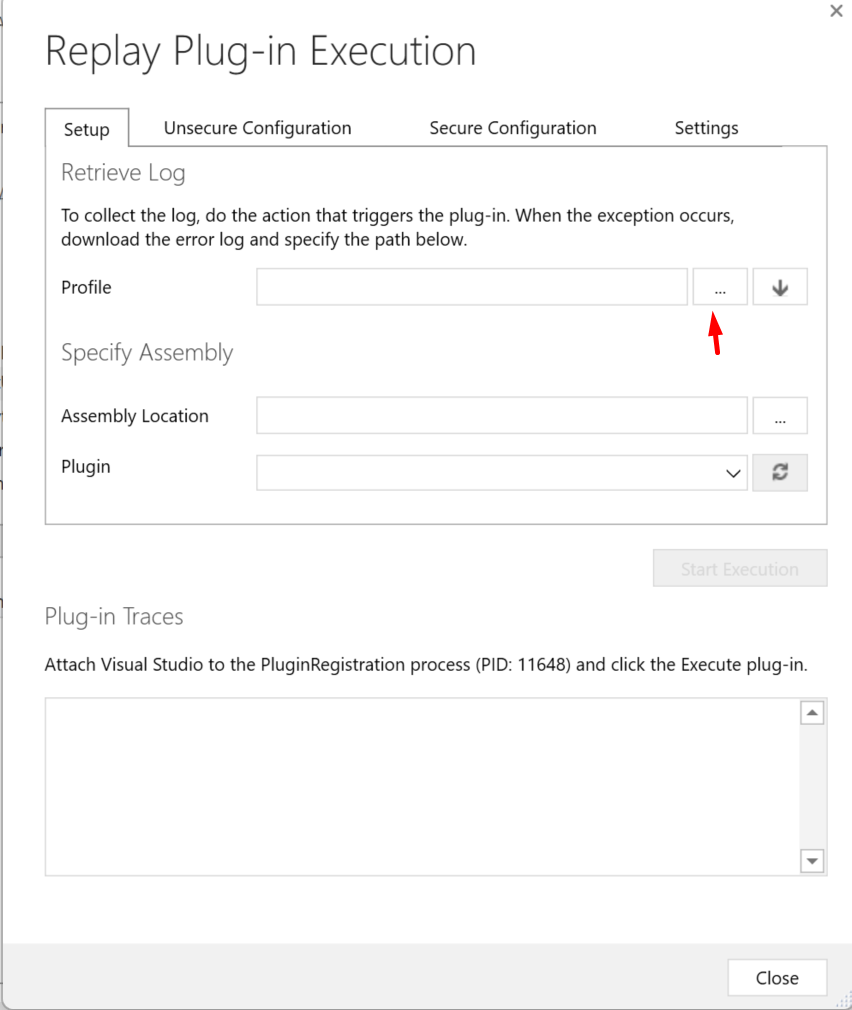
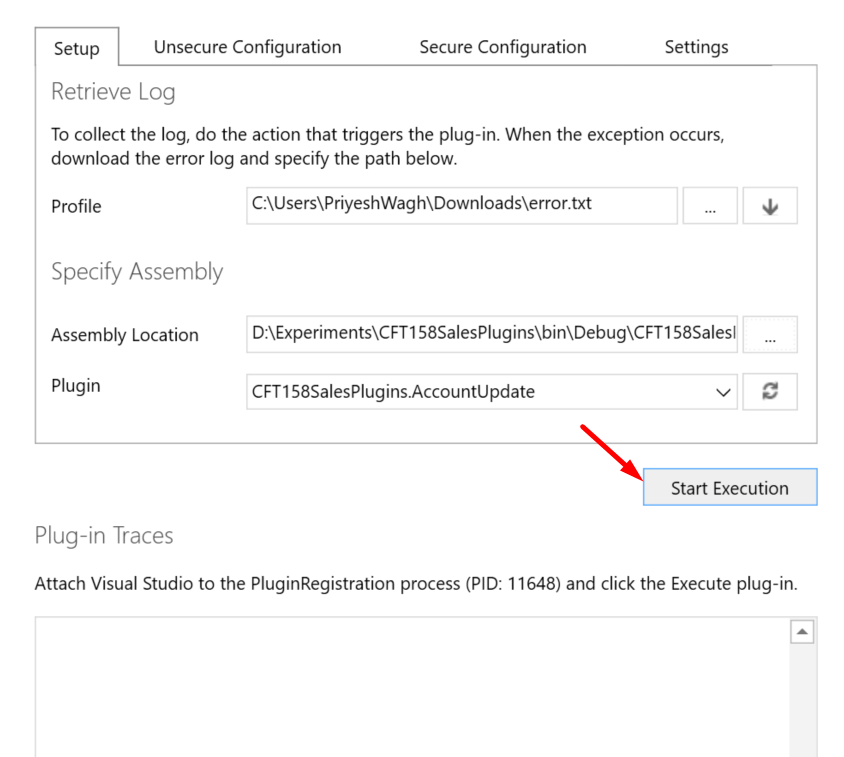
    It’ll open this dialog. Click on the three dots for Profile field.


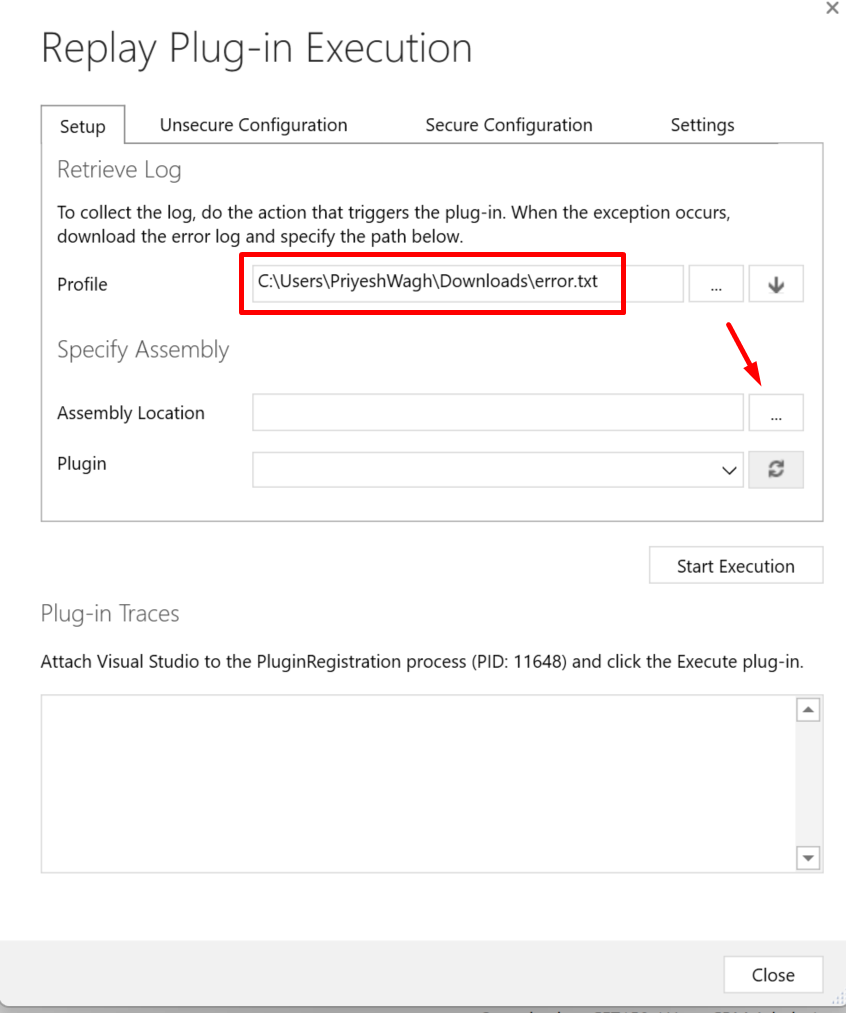
  3. Select the text file which was saved. It’ll appear if the text file was correctly rendered.
    Then, click on the three dots in Assembly Location. This will accept the .dll file of the plugin

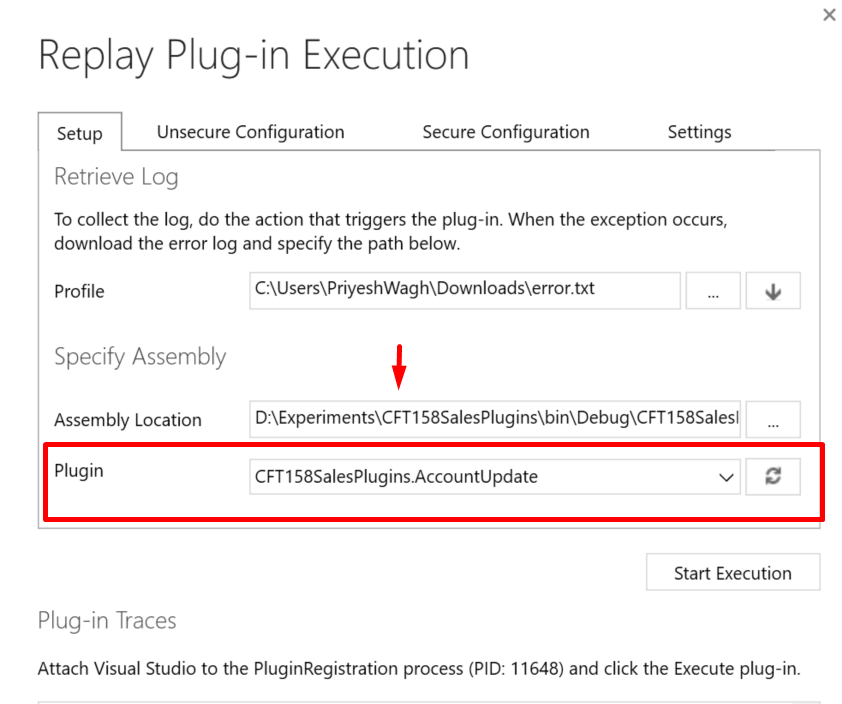
  4. Once you select the DLL, it’ll detect the Plugin and it’ll be show as below.

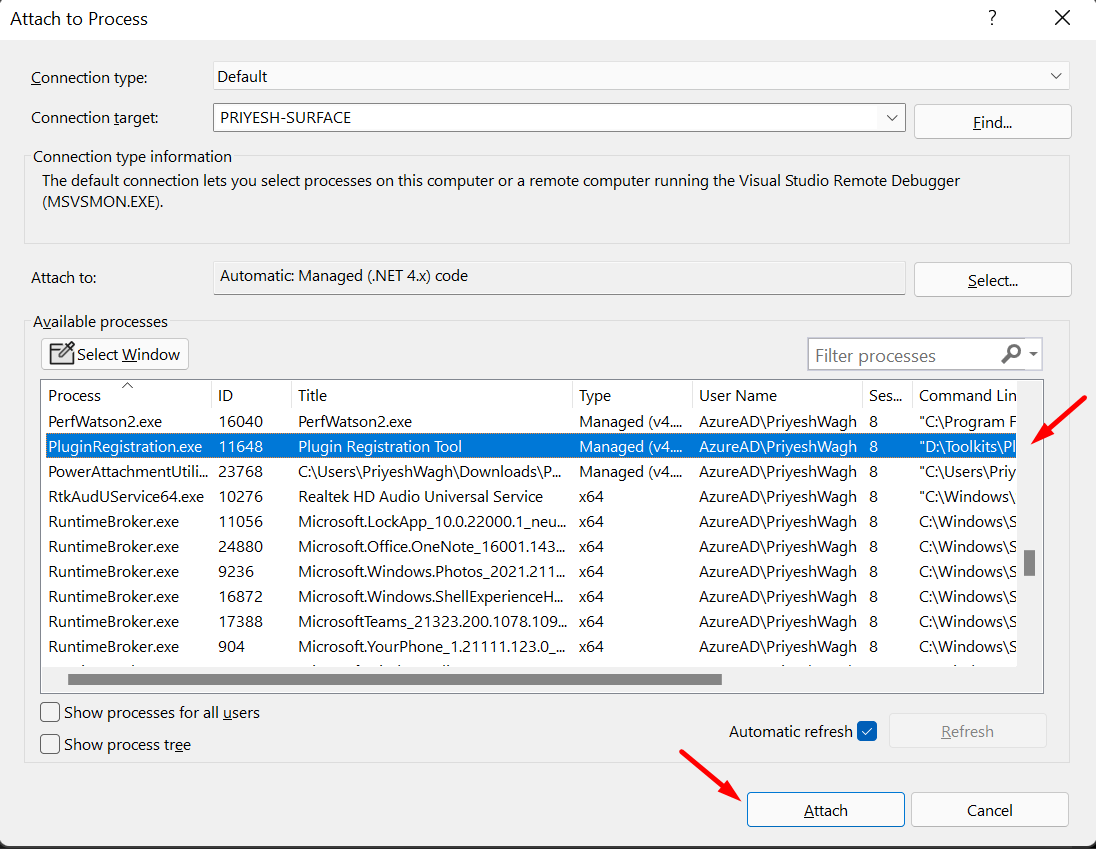
  5. Don’t click on Start Execution yet!! Go to Visual Studio and open Attach to Process.
    Shortcut for that is Alt + D [pause for a bit], then press [P].
    Find Plugin Registration Tool and then click on Attach.

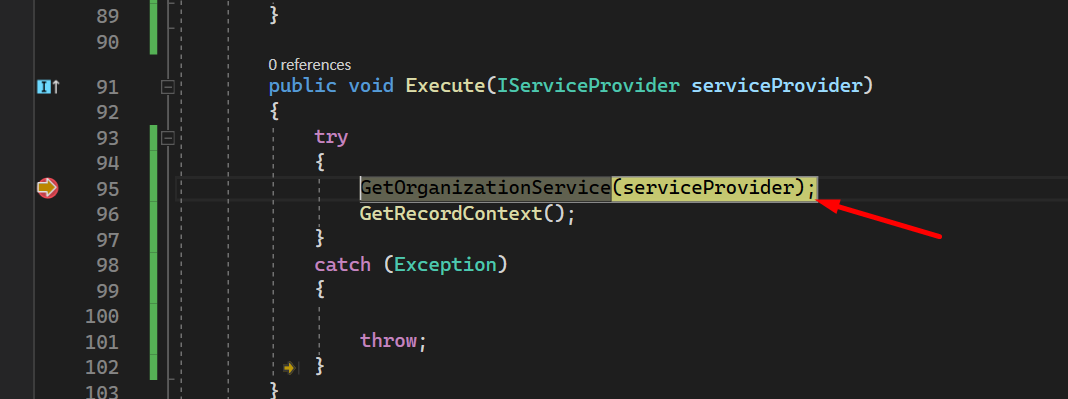
  6. Once you click on Attach, the VS will be in Debug mode with the Plugin Registration Tool and you can now set the breakpoint at appropriate location in order to capture the debug. Ideally, this should be early on in the plugin to identify the issue step by step.

  7. Now, you can go back to the Plugin Registration Tool and click on Start Execution.

  8. Once it starts, the breakpoint will be hit and you can then take it forward like any C# program debugging using F10, F11, F5 etc.

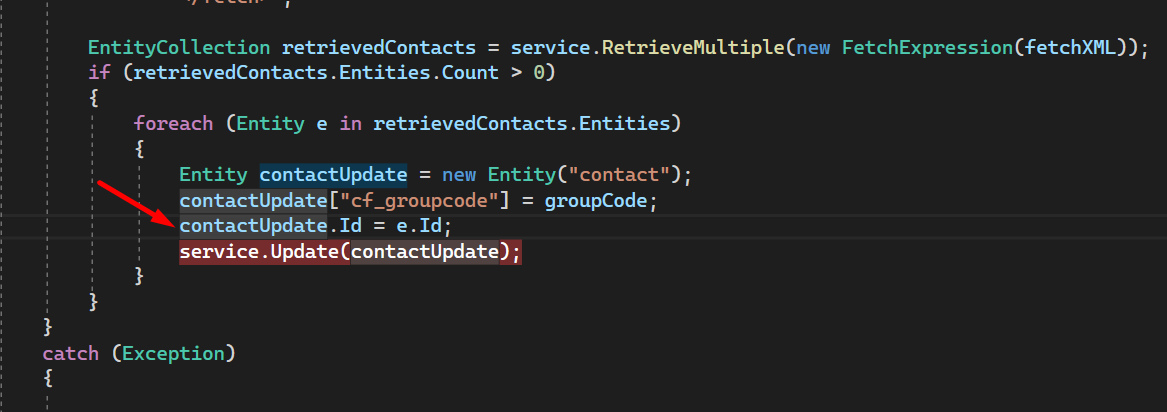
  9. Let’s assume the exception was hit correctly where we anticipated it to be hit.
    You’ll catch the exception and fix the code.
    [I had purposely commented in earlier posts for this scenario]

  10. Now, I fix the code. Rebuild and Re-deploy the plugin

  11. And as a result, when I perform the operation again, the plugin works and the child records are updated.
    So, I’ll make a change on the Account record.


    And if I check the Contact, the same will have been updated there as well. This indicates that our intended functionality was successfully implemented.


Hope this series was helpful in getting you an understand of how you can write plugins as a newbie. This is just scratching the surface and one of the early ways to write plugins.
I’ll further extend this series in the future to add best practices and some tools in the marketplace to help you write plugins faster and better!

Hope this was helpful! Here are some more Dynamics 365 posts which you might be interested in –

  1. Dynamics 365 Storage Utilization | Dataverse Storage | Power Platform Admin Center
  2. Use Hierarchy in Roll Up Fields in Dynamics 365 CRM
  3. Filter records in a View owned by a Team you are a member of | Dynamics 365 CRM
  4. Get GUID of the current View in Dynamics 365 CRM JS from ribbon button | Ribbon Workbench
  5. Dynamics 365 App For Outlook missing on SiteMap in CRM? Use shortcut link [Quick Tip]
  6. Import lookup referencing records together in Dynamics 365 CRM | [Linking related entity data during Excel Import]
  7. Mailbox Alerts Hide/Show behavior in Dynamics 365 CRM
  8. Excel Importing Notes (Annotation) entity in Dynamics 365 CRM
  9. Enable/Disable the need to Approve Email for Mailboxes in Dynamics 365 CRM CE
  10. Call Azure Function from Dynamics 365 CRM using Webhooks
  11. Show Ribbon button only on record selection in Dynamics CRM
  12. Accessing multiple occurrences of a field in Business Process Flow using JS in D365 CRM

Thank you!!

Plugins Development in Dynamics 365 CRM | Part 3 – Adding Logic

Given that you are coming here from the Part 2: Plugins Development in Dynamics 365 CRM | Part 2 – Registering your plugin

Let’s add logic to catch the Group Code field value and retrieve all the Contacts under the Account to update their Group Code fields!

Context of the Plugin

Since this plugin is registered on one of the common messages like Update, let’s capture the context of the Update record we are working on –

  1. I’ll write a new method to just capture the context. If you are an expert in C#, you could smartly implement this than I have done. 😊
    Here, once the service, context and trace are set, you can have a new method to capture the context.
    In GetRecordContext() method, context.InputParameters[“Target”] will give you what is captured in the current Update context of the specific record you are running this plugin on.
    Typecase it into Entity so that you can retrieve required values from Entity currentEntity .

    Here, I’ve null-checked if the value is a part of the context update (in case the plugin unknowingly set to run on update of all fields), then I’m capturing the field value in a String variable to pass further.
    Once I capture the field value, I’ll pass it to GetAllChilRecords() method
  2. Next, in GetAllChildRecords(groupCode) method, I’m passing the updated string value further so that it can be updated to all retrieved child records.
    Here, I’m using FetchXML query to retrieve the Contacts which have the Company Name field i.e. the Account lookup set to the current record (current Account record on which we are updating the Group Code field)
    Quick Post on FetchXML attributes: Get all attributes in FetchXML in Plugins | Dynamics 365 CRM [Quick Tip]

    Now, there’s a purposeful mistake in the commented code above which we’ll see in the Debugging plugin part of this blog series.

  3. Finally, I’ll Rebuild this code, Update and run the plugin.

Updating the Plugin

Now, let’s say you have updated the code and now you want to re-deploy the plugin code.

  1. Once you have Rebuild. I use Ctrl + Shift + B.

  2. Next, you need to go to the Plugin Registration Tool, select the Plugin Assembly itself and click on Update.

  3. On this screen, even though you see your plugin already selected, click on the three dots to reselect the Assembly and select the .dll file as you originally did while registering it the first time.

  4. And then reselect the assembly and the plugin both and then click on Update Selected Plugins.


  5. Upon correctly updating, the below message is seen and you are done.

  6. Now, let’s run the code and see the “expected” Exception it will throw since we had commented a line on purpose in step #2 in Context of the Plugin section above. 😊

Exceptions

Now, when there are exceptions, you’ll typically see a error pop-up in Dynamics 365 as shown below

And since we can’t tell what it means, we’ll need to debug the plugin to find out the issue.

Let’s move to our Part 4 of the series to see how we can Debug a Plugin: Plugins Development in Dynamics 365 CRM | Part 4 – Debugging the plugin

Hope this was helpful! Here are some more Dynamics 365 posts which you might be interested in –

  1. Dynamics 365 Storage Utilization | Dataverse Storage | Power Platform Admin Center
  2. Use Hierarchy in Roll Up Fields in Dynamics 365 CRM
  3. Filter records in a View owned by a Team you are a member of | Dynamics 365 CRM
  4. Get GUID of the current View in Dynamics 365 CRM JS from ribbon button | Ribbon Workbench
  5. Dynamics 365 App For Outlook missing on SiteMap in CRM? Use shortcut link [Quick Tip]
  6. Import lookup referencing records together in Dynamics 365 CRM | [Linking related entity data during Excel Import]
  7. Mailbox Alerts Hide/Show behavior in Dynamics 365 CRM
  8. Excel Importing Notes (Annotation) entity in Dynamics 365 CRM
  9. Enable/Disable the need to Approve Email for Mailboxes in Dynamics 365 CRM CE
  10. Call Azure Function from Dynamics 365 CRM using Webhooks
  11. Show Ribbon button only on record selection in Dynamics CRM
  12. Accessing multiple occurrences of a field in Business Process Flow using JS in D365 CRM

Thank you!!

Plugins Development in Dynamics 365 CRM | Part 2 – Registering your plugin

Given that you are coming here from the Part 1: https://d365demystified.com/2021/12/31/plugins-development-in-dynamics-365-crm-part-1-setting-up-visual-studio-project/

Let’s register our plugin to the Dynamics 365 CRM organization using the Plugin Registration Tool!

Log into Plugin Registration Tool

Based on where you have downloaded the Plugin Registration Tool, navigate to the folder and follow the below –

  1. Open the Plugin Registration Tool from the directory.

  2. Now, given that this is Dynamics 365 CRM Online (Customer Engagement / Dataverse) environment, you’ll make sure Office 365 is selected and then you’ll need to enter Admin Credentials.

  3. Once successfully authenticated, you’ll be asked to choose which organization this is in. Given that development should ideally be done on a Dev/Sandbox environment, you’ll select the appropriate environment here.

  4. Once logged in, you’ll see the the assemblies registered with the CRM environment. These are the out-of-the-box assemblies which are not supposed to be manipulated.

Register your Assembly

Let’s register the Plugin Assembly –

  1. Click on the Register New Assembly button and click on New Assembly

  2. You can now click on the three dots in order to navigate to the .DLL file which was generated when you Build the project.

  3. You’ll then need to navigate to the bin folder (Either Debug or Release)

  4. Once you select the .dll file, you’ll see the plugins which are exposed in the dll i.e. the Plugins of .CS of ‘public’ visibility.
    Once this looks good, click on the Register Selected Plugins

  5. Upon successful registration, you’ll see the below message.

  6. And your Assembly will now be registered successfully using the Plugin Registration Tool.


  7. In case this Project was not signed with .snk file, you’d see the below message.
    Assemblies containing Plugins must be strongly signed. Sign the Assembly using a KeyFile


    Now, the assembly has been registered. Next, we’ll add a step (you can call it a trigger for the plugin to start executing)

Register Step for Plugin

Now, let’s register a step for the Plugin –

  1. Now, given that the Assembly was successfully Registered, the next step is to Register a Plugin Step.
    Expand the Assembly, then expand the Plugin itself to which you want to add a Step.

  2. As per the scenarios from Blog 1, the plugin is supposed to be triggered on change of the Account’s field Group Code.
    So, when you click on Register New Step, you’ll get to configure the Step
    Here, Message means the “operation” on occurrence of which the Plugin should be triggered. In this example, we want to trigger the plugin on an Update operation.
    Primary Entity denotes which entity is this targeted at. Account in this example.
    Then, the Filtering Attributes is available if the Message is set to Update since Filtering Attribute let’s you select which all fields should be listened to in order to run/trigger the plugin.


  3. Clicking on the three dots, you’ll get to choose the fields. In this example, we’ll select the Group Code field.

  4. Once you click OK after choosing what all fields the plugin should fire on, you should select “under whose security context should the plugin be running”
    Run in User’s Context is that field to choose the user.
    In my practice, I choose either Calling User or a System Administrator

  5. Finally, I’ll choose “when in the context of the operation” should the plugin be triggered.
    Since, I want the plugin to run “after” the “Update” operation is performed, I’ll select PostOperation.
    And Execution Mode has options – Asynchronous / Synchronous defines if the plugin will run in the background or with the operation itself.

  6. Once I choose these preferences, I’ll click on Register New Step and the Step will be registered on the Plugin.

  7. At this point, you’ve successfully registered the plugin assembly and a step on the plugin to be triggered on the update of the Account field – ‘Group Code’.

But we haven’t written any logic in place, right? So Part 3 we’ll write a short logic to add meaning to this tutorial

Link to Blog 3: https://d365demystified.com/2021/12/31/plugins-development-in-dynamics-365-crm-part-3-adding-logic/

Hope this was helpful! Here are some more Dynamics 365 posts which you might be interested in –

  1. Dynamics 365 Storage Utilization | Dataverse Storage | Power Platform Admin Center
  2. Use Hierarchy in Roll Up Fields in Dynamics 365 CRM
  3. Filter records in a View owned by a Team you are a member of | Dynamics 365 CRM
  4. Get GUID of the current View in Dynamics 365 CRM JS from ribbon button | Ribbon Workbench
  5. Dynamics 365 App For Outlook missing on SiteMap in CRM? Use shortcut link [Quick Tip]
  6. Import lookup referencing records together in Dynamics 365 CRM | [Linking related entity data during Excel Import]
  7. Mailbox Alerts Hide/Show behavior in Dynamics 365 CRM
  8. Excel Importing Notes (Annotation) entity in Dynamics 365 CRM
  9. Enable/Disable the need to Approve Email for Mailboxes in Dynamics 365 CRM CE
  10. Call Azure Function from Dynamics 365 CRM using Webhooks
  11. Show Ribbon button only on record selection in Dynamics CRM
  12. Accessing multiple occurrences of a field in Business Process Flow using JS in D365 CRM

Thank you!!

Plugins Development in Dynamics 365 CRM | Part 1 – Setting up Visual Studio Project

If you are a newbie to Dynamics 365 CRM and need to connect dots in getting your first plugin up and running, this post is for you! I’ve tried to summarized this in the shortest possible way. 😊 Hope this gets you going quickly!

Since you’re here, it’s presumed that you are told to learn or implement a Dynamics 365 CRM plugin with some business logic in mind based on the requirements. So, here’s how you get started in your learning journey!

Pre-Requisites

Here’s what you need to be have installed in order to proceed to writing a plugin –

  1. Plugin Registration Tool – Required for your to connect to the Dynamics 365 environment and deploy your plugin on.
    How to get Plugin Registration Tool: Download Plugin Registration Tool for Dynamics 365 CRM using PowerShell
  2. Microsoft Visual Studio – You’ll need to write your plugin in a Visual Studio IDE as it’s the preferred way to code your plugin and also to Version Control / Source Control.

Scenario

Now, before you decide why you have to write a plugin, it is presumed that you have some high-level understanding as to why you are writing this plugin.

To keep it short, here are some points –

  1. Understand Plugin Execution Pipeline (Basically, it means when is the plugin supposed to run when you perform a certain operation) – https://carldesouza.com/dynamics-365-plugin-execution-pipeline/

Example Business Scenario

Here’s a quick example we’ll consider which we will implement using a plugin –

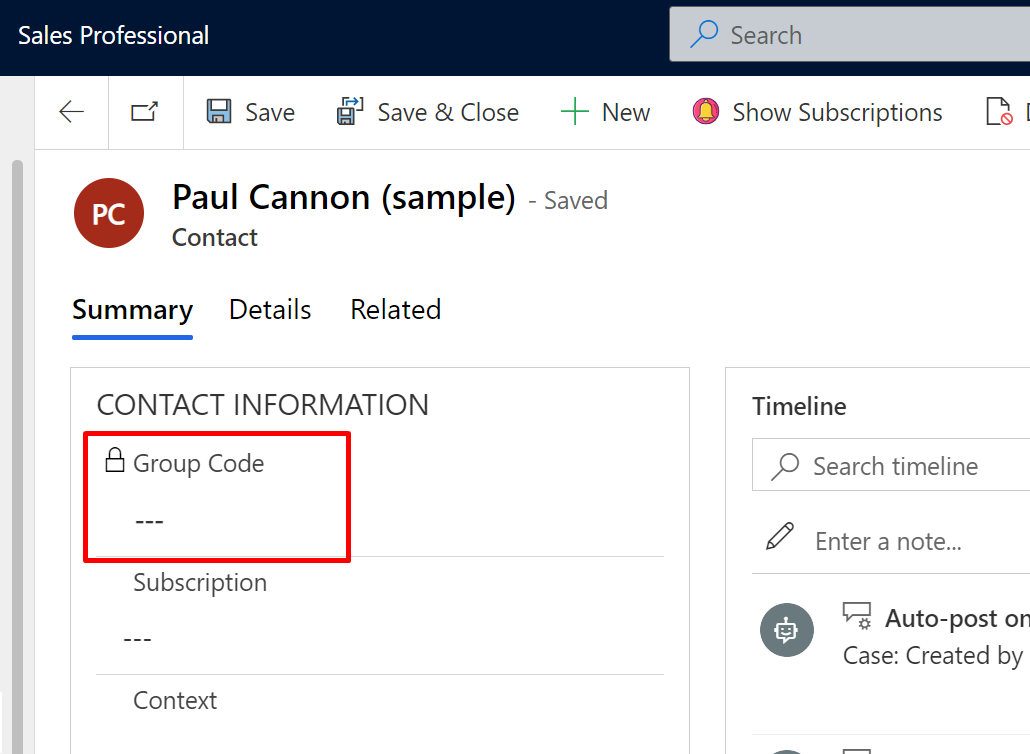
  1. An account has a custom field called as Group Code.

  2. So whatever is updated in this field should be updated on all the Child Contact records under the Account.


    Now, let’s write a quick plugin to implement this.

Writing a Plugin – Visual Studio

Given that you want to start writing a plugin, you must also have understood some concepts –

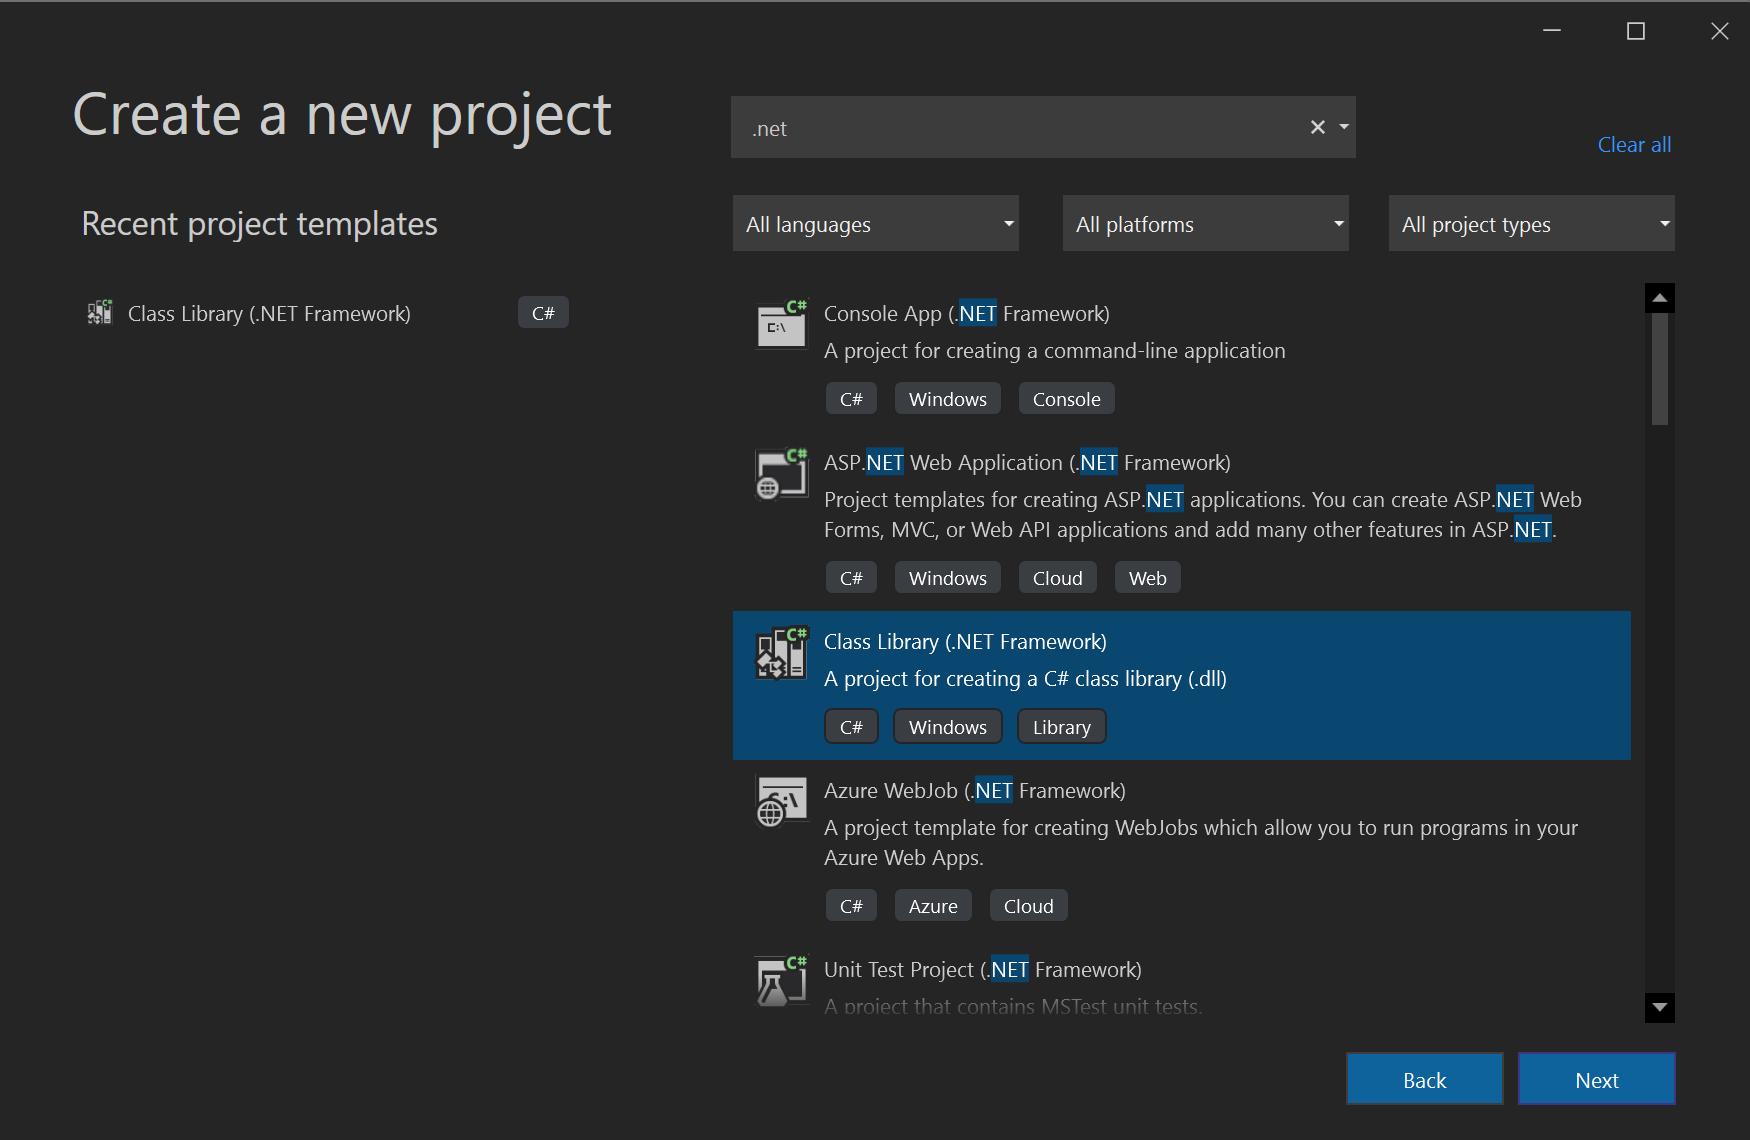
  1. You’ll need to create a new .NET Framework Project in order to get started. I use Visual Studio 2022 (This was newly released at the time of writing this post)
    So the type of Project required is a Class Library of .NET Framework

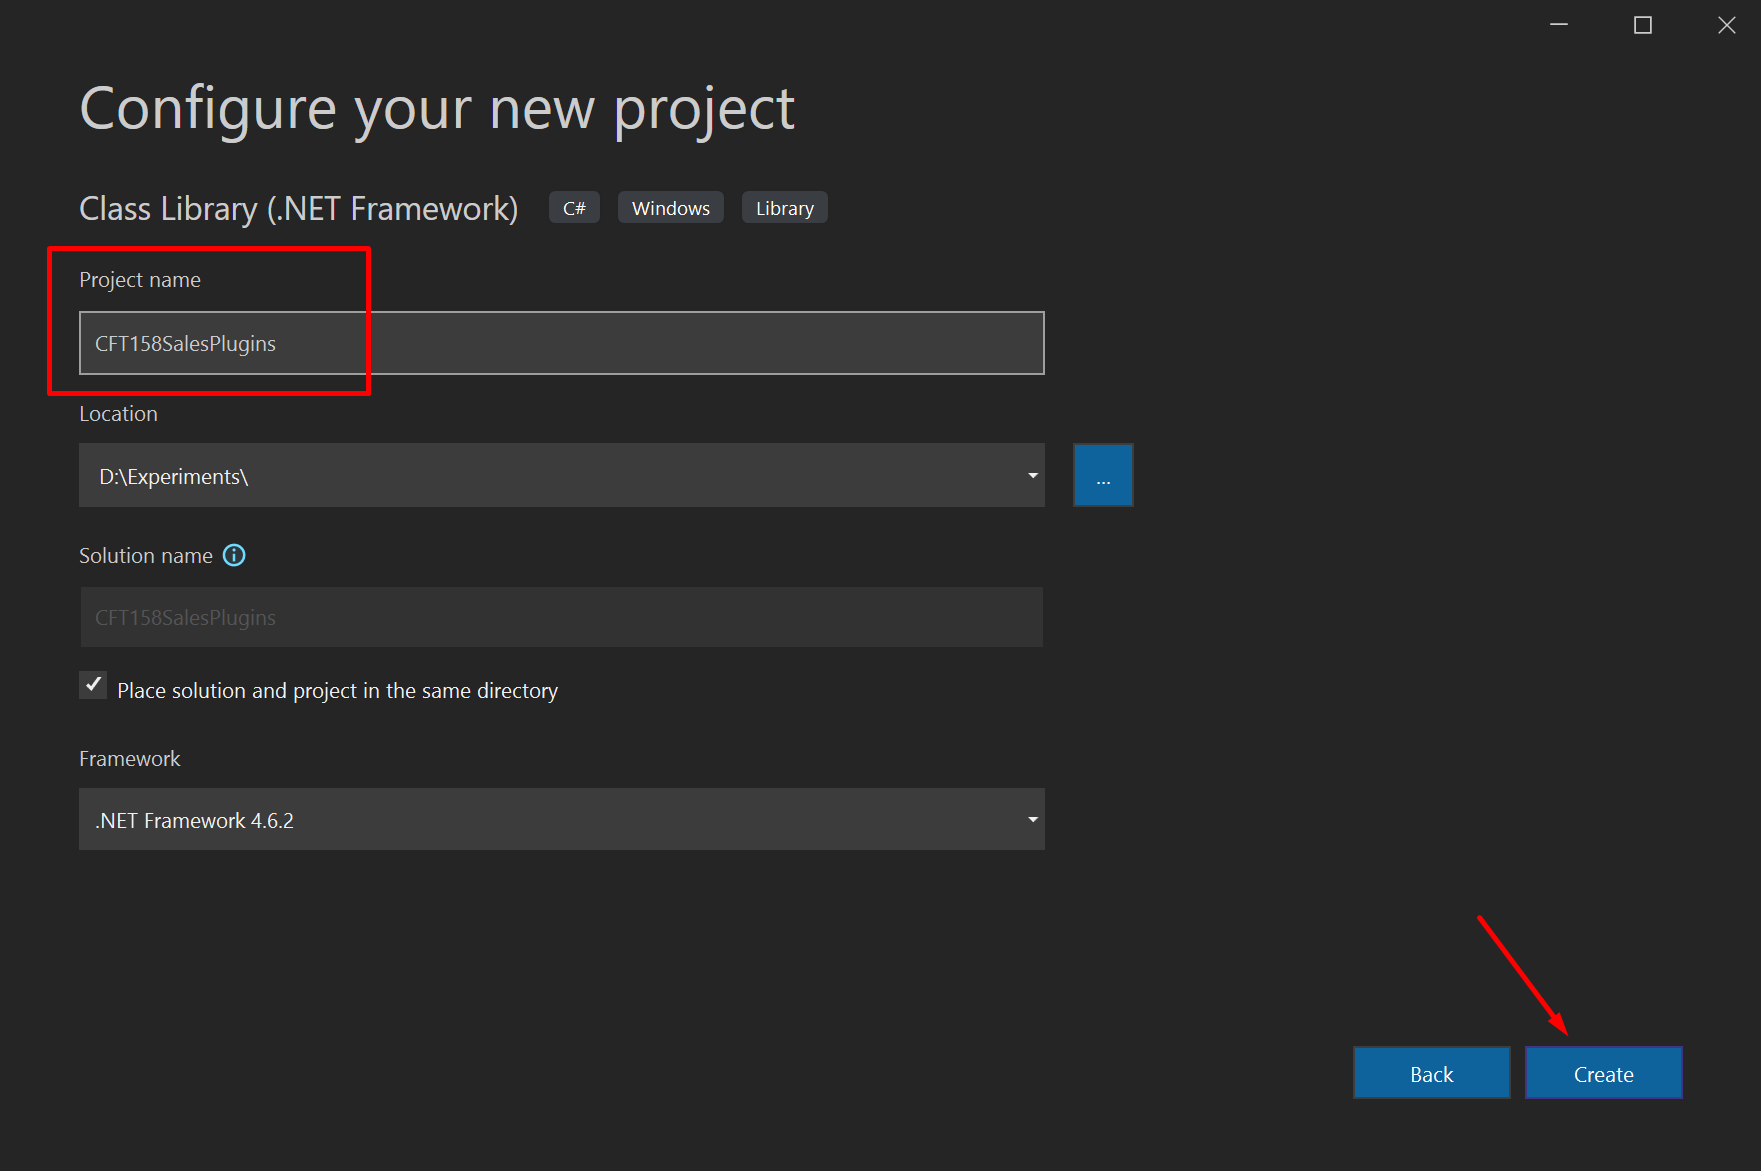
  2. Once you click Next, provide a relevant name to the Project. As a D365 Consultant working on multiple projects, you should be able to identify the library/assembly by the name as to which Org and what Module it belongs to.
    In my case, I’m calling it CFT158SalesPlugins which is sufficient to give an idea of what org and what module this assembly is for.

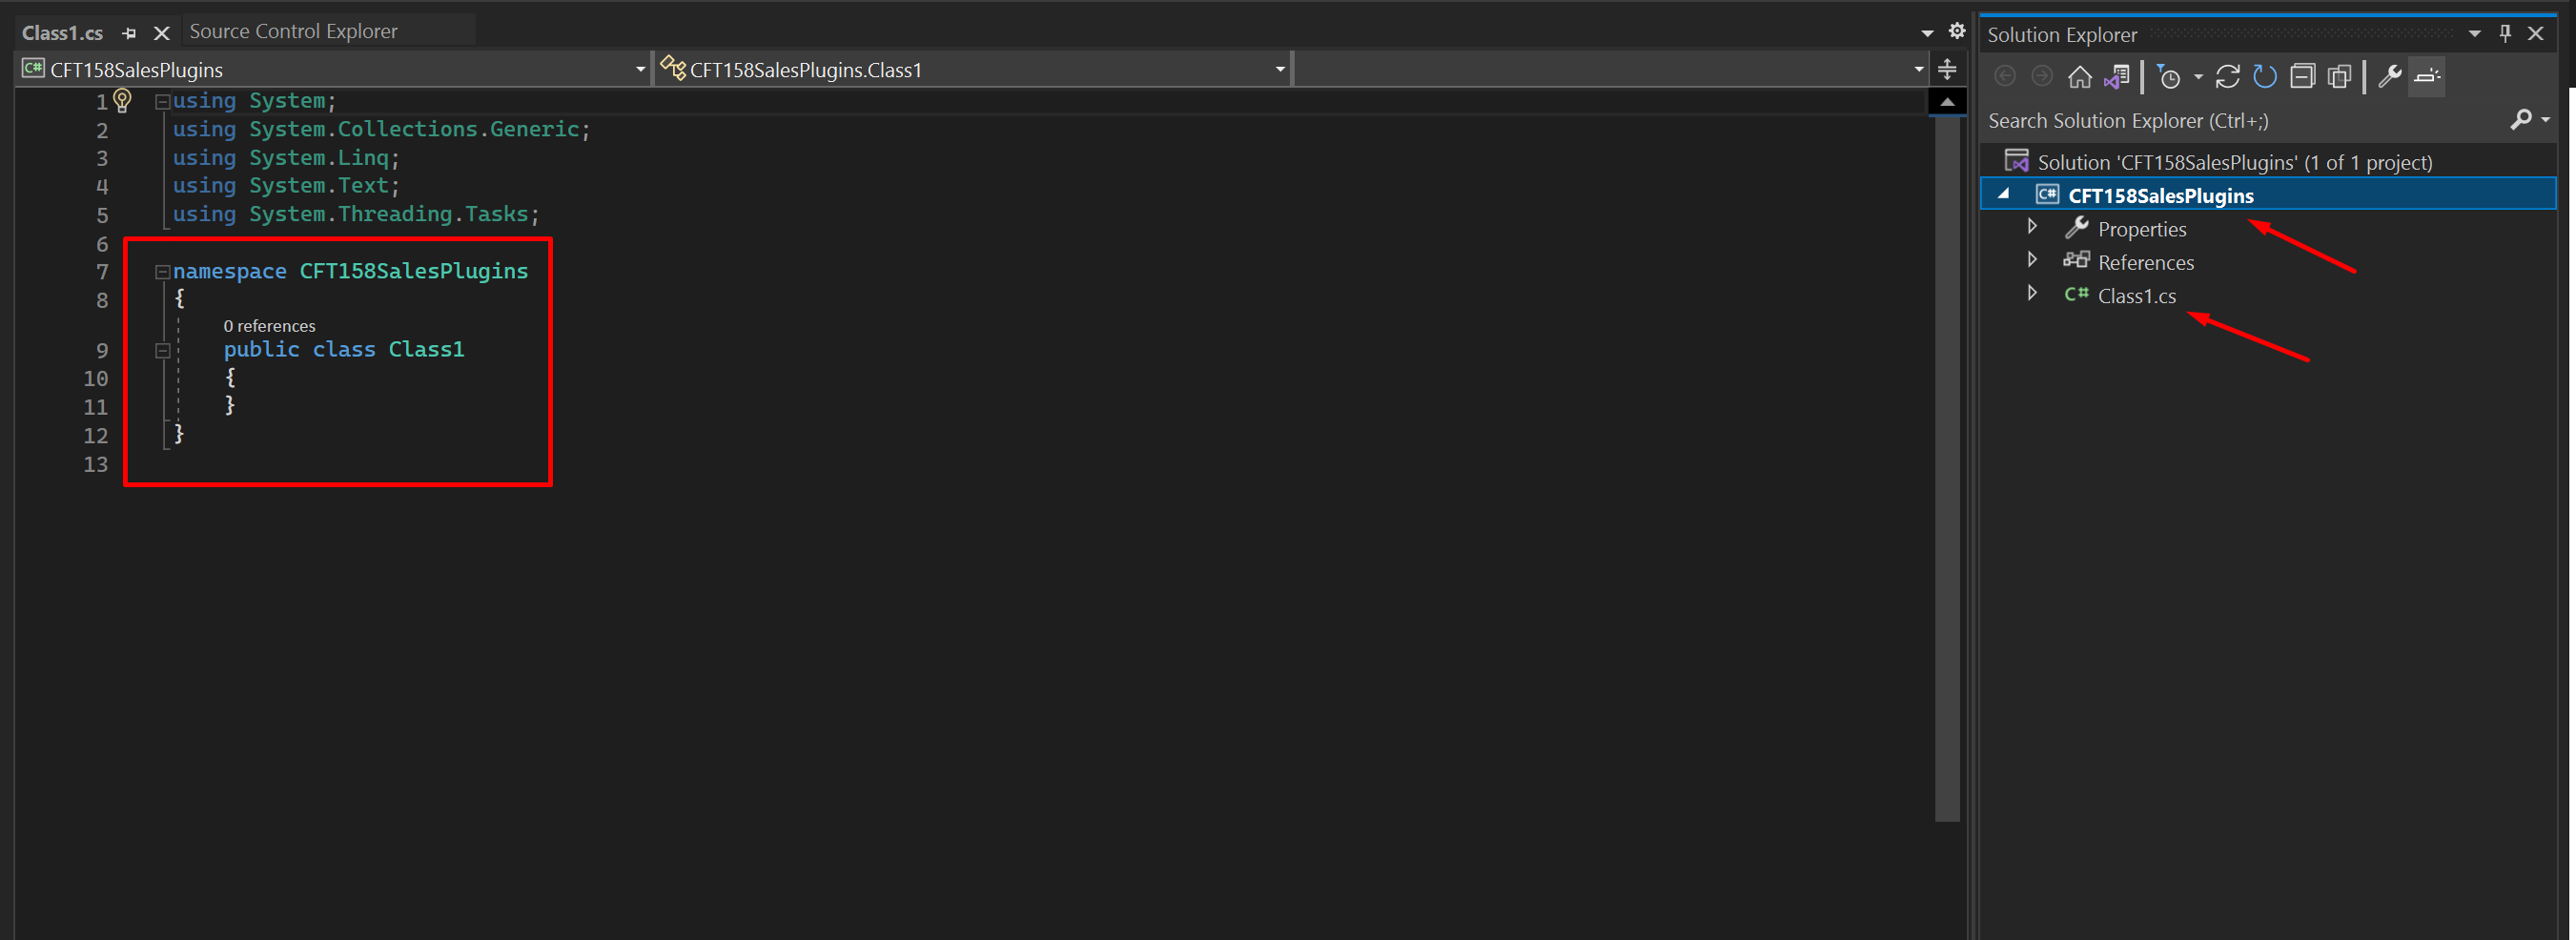
  3. Once I click on Create, an Empty Project with the standard Class1 will be created which will be ready for you to start writing.

  4. Next, since Dynamics 365 CRM plugins extend IPlugin interface provided by Microsoft Dynamics, you’ll need to fetch references for the same.


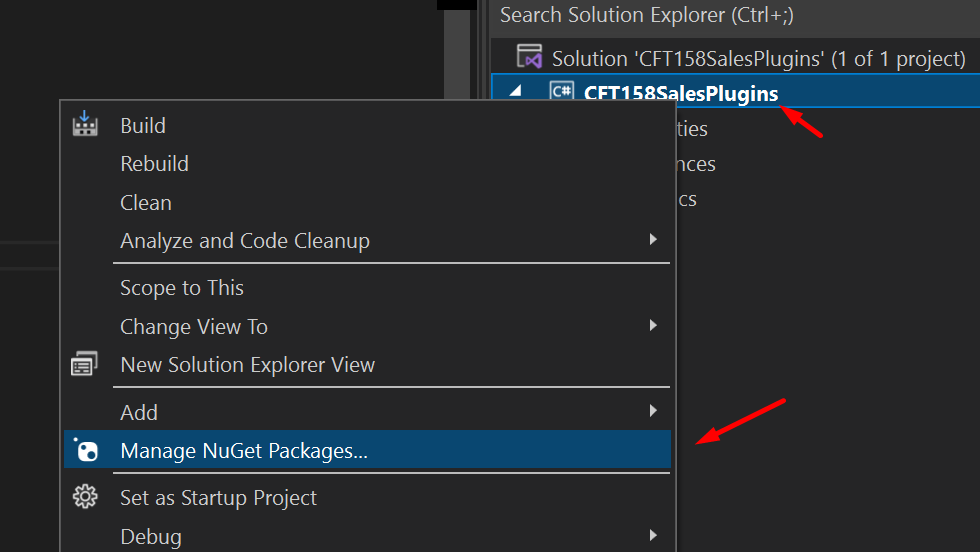
    Now, right-click on the Project itself and click on Manage NuGet Packages…

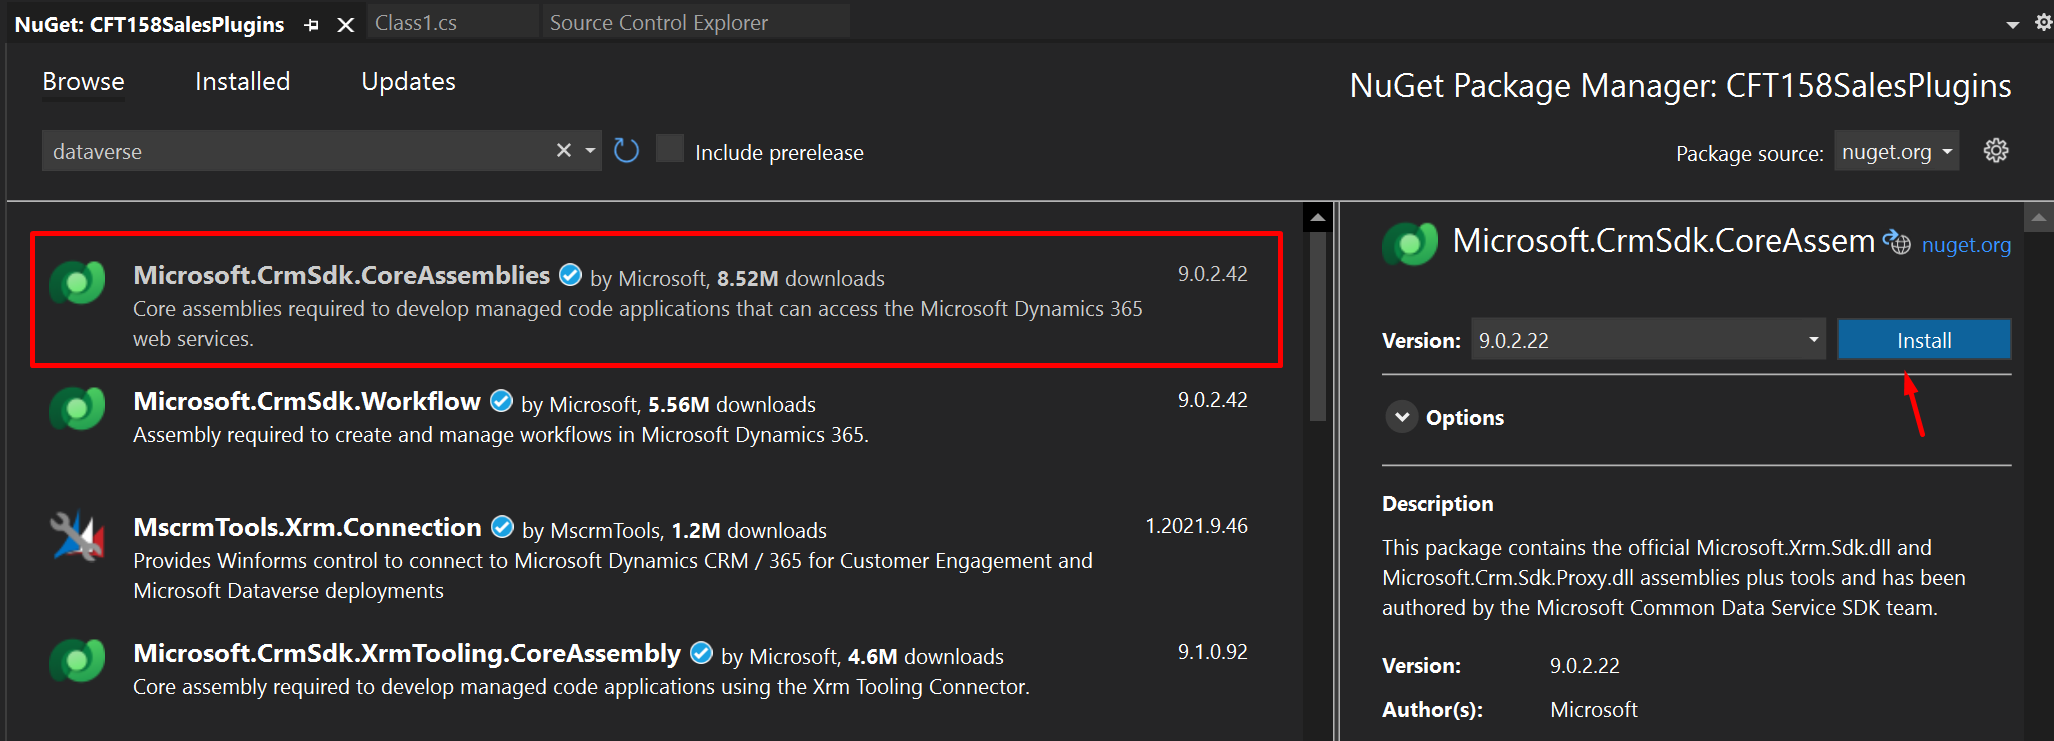
  5. Then, go to Browse and then search for Dataverse…

  6. You’ll find Microsoft.CrmSdk.CoreAssemblies which you can download. I usually choose a little older version than the current one.

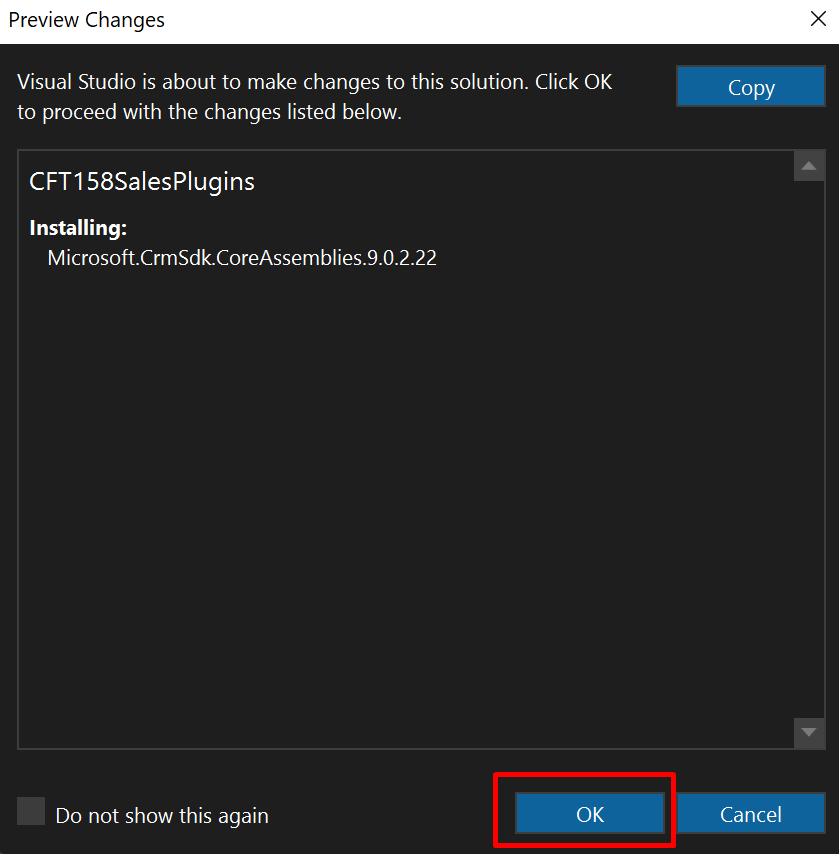
  7. Make sure you have selected the correct one. Then, click OK.


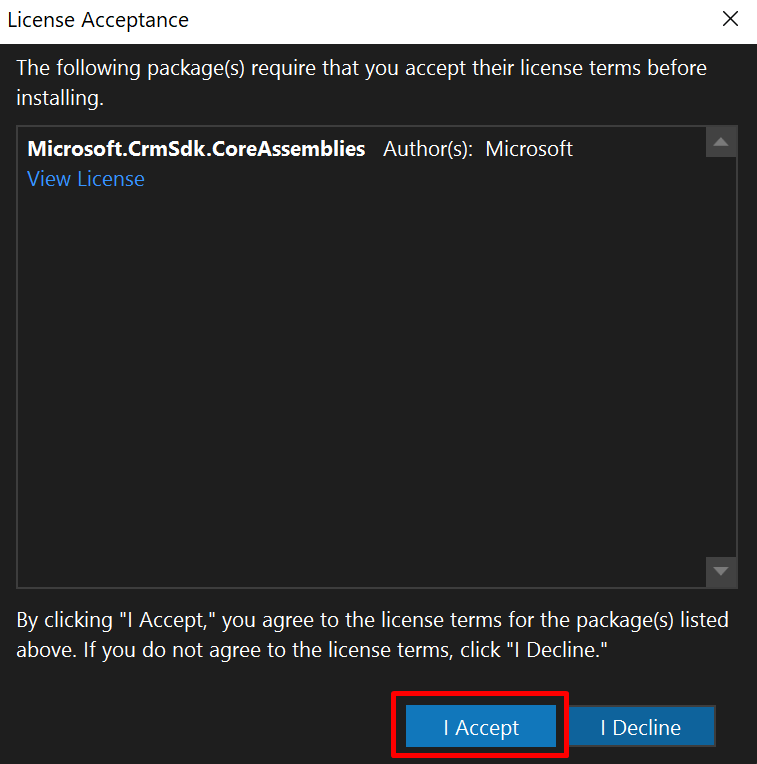
    Next, you get a chance to also look at the licensing terms before you Accept. Once you are OK, you can click on I Accept.

  8. If you have the Output window open in your Visual Studio, you’ll be able to see the progress. It only takes a few seconds for the references to be imported.

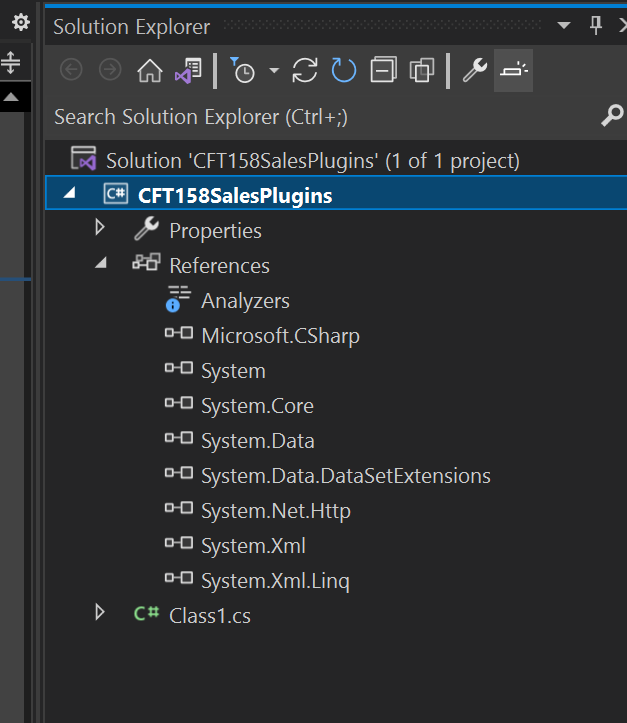
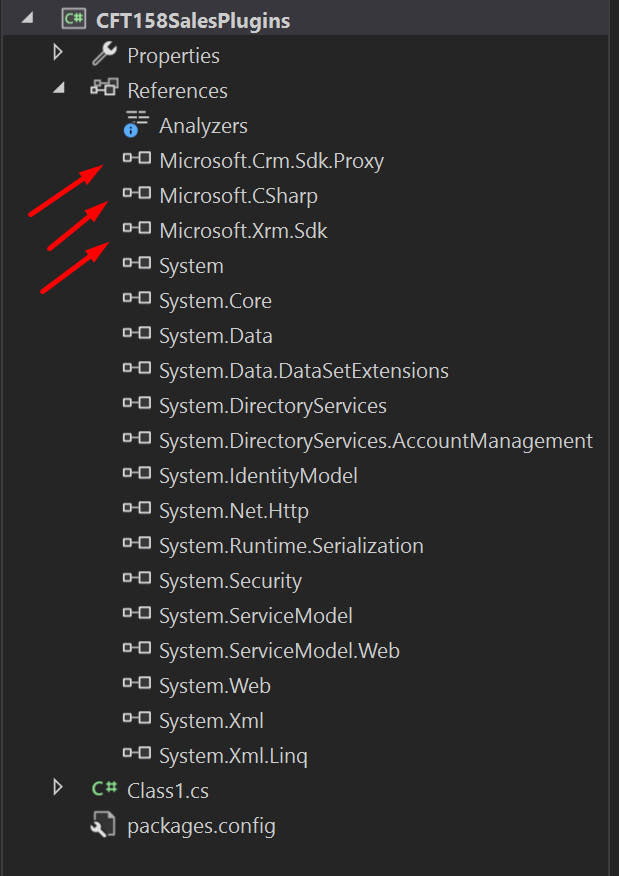
  9. Once done, you can see that the references required have now been added to the project.

  10. I’ll rename my Class1.cs to something that gives an idea of what the Plugin would do.
    So, for example, I’m setting it to AccountUpdate.
    Detailed post on Renaming or Deleting a Plugin in Dynamics 365 CRM
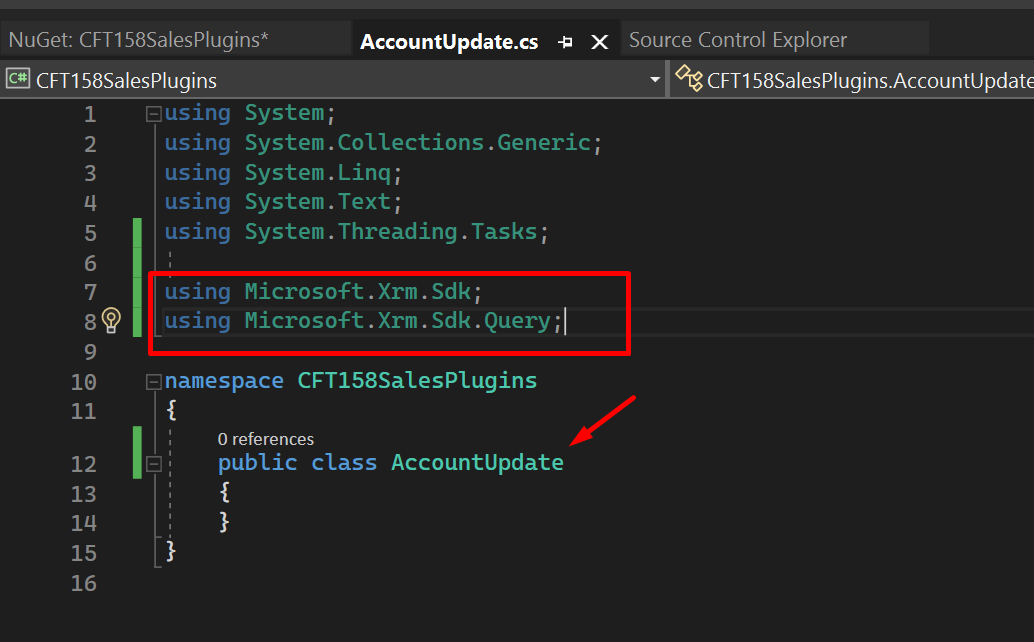
    Now, that my class is renamed, I’ll also add the references to the Class File so that I can use the IPlugin interface. In most common Plugin scenarios, you’ll need Microsoft.Xrm.Sdk amongst other references too.
    My personal practice is to include as shown below –


Setting Initial Methods

Now, let’s set a template of which we can start to code the plugin. Before we do that, some common Methods need to be added first.

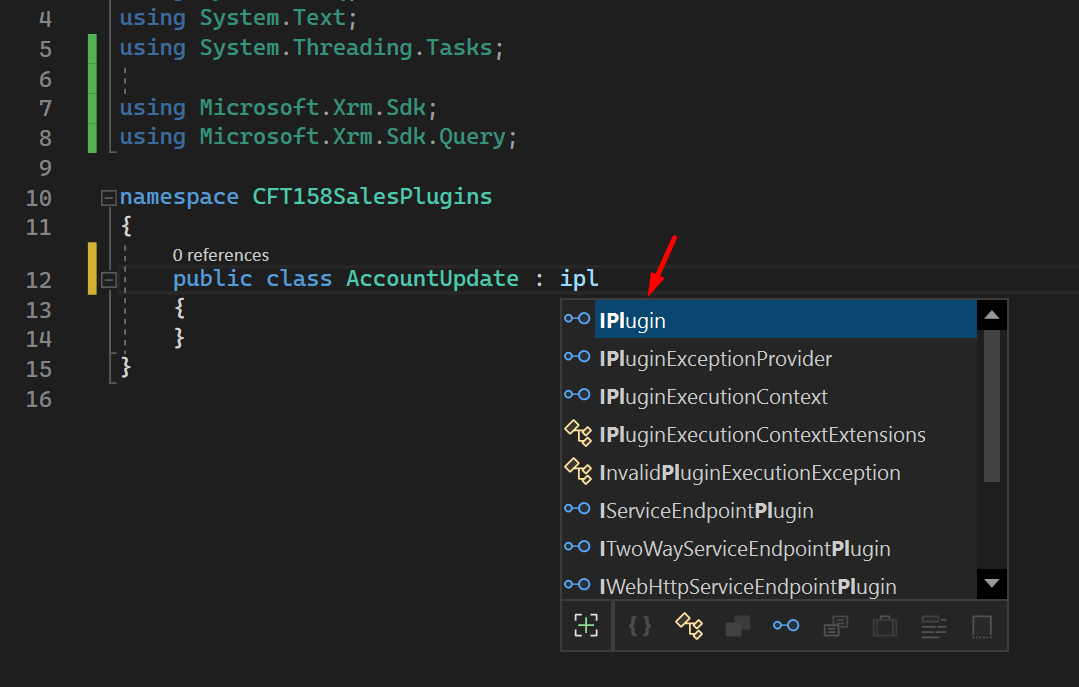
  1. I’ll now extend the IPlugin interface to the class.

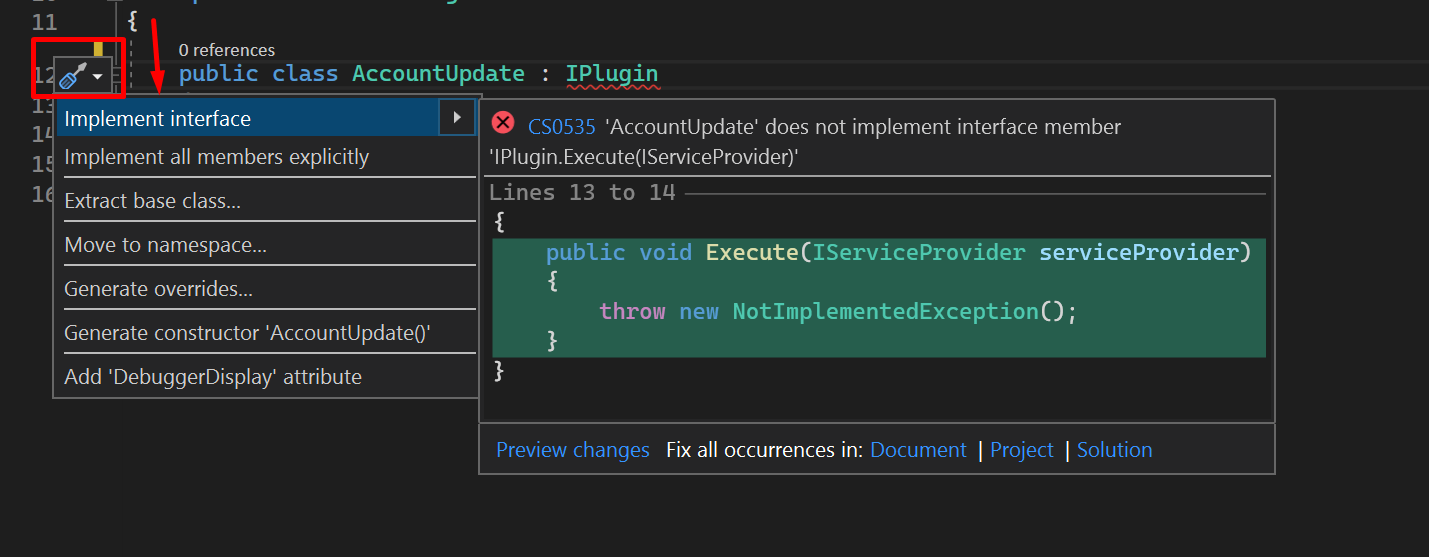
  2. As you choose the IPlugin, in Visual Studio, you’ll be prompted for some actions which will auto-complete the interface process. Look for the icon on the left hand side and expand the menu to find Implement Interface


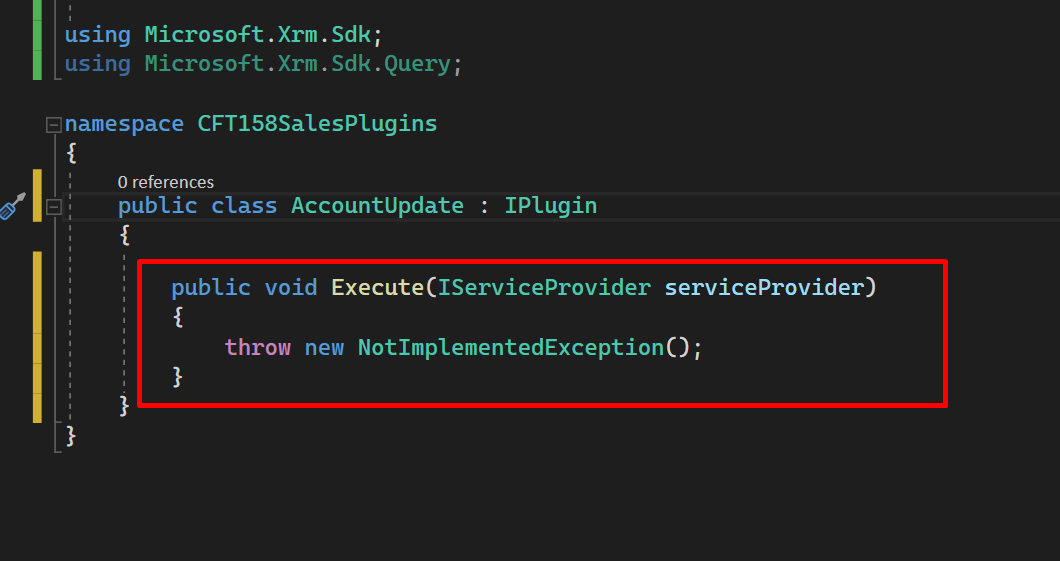
    Once done, the Execute method will be populated as below. Execute method is the first method from where the plugin execution starts.
    Also, make sure the class is public so that we can register is successfully in the Plugin Registration Tool.

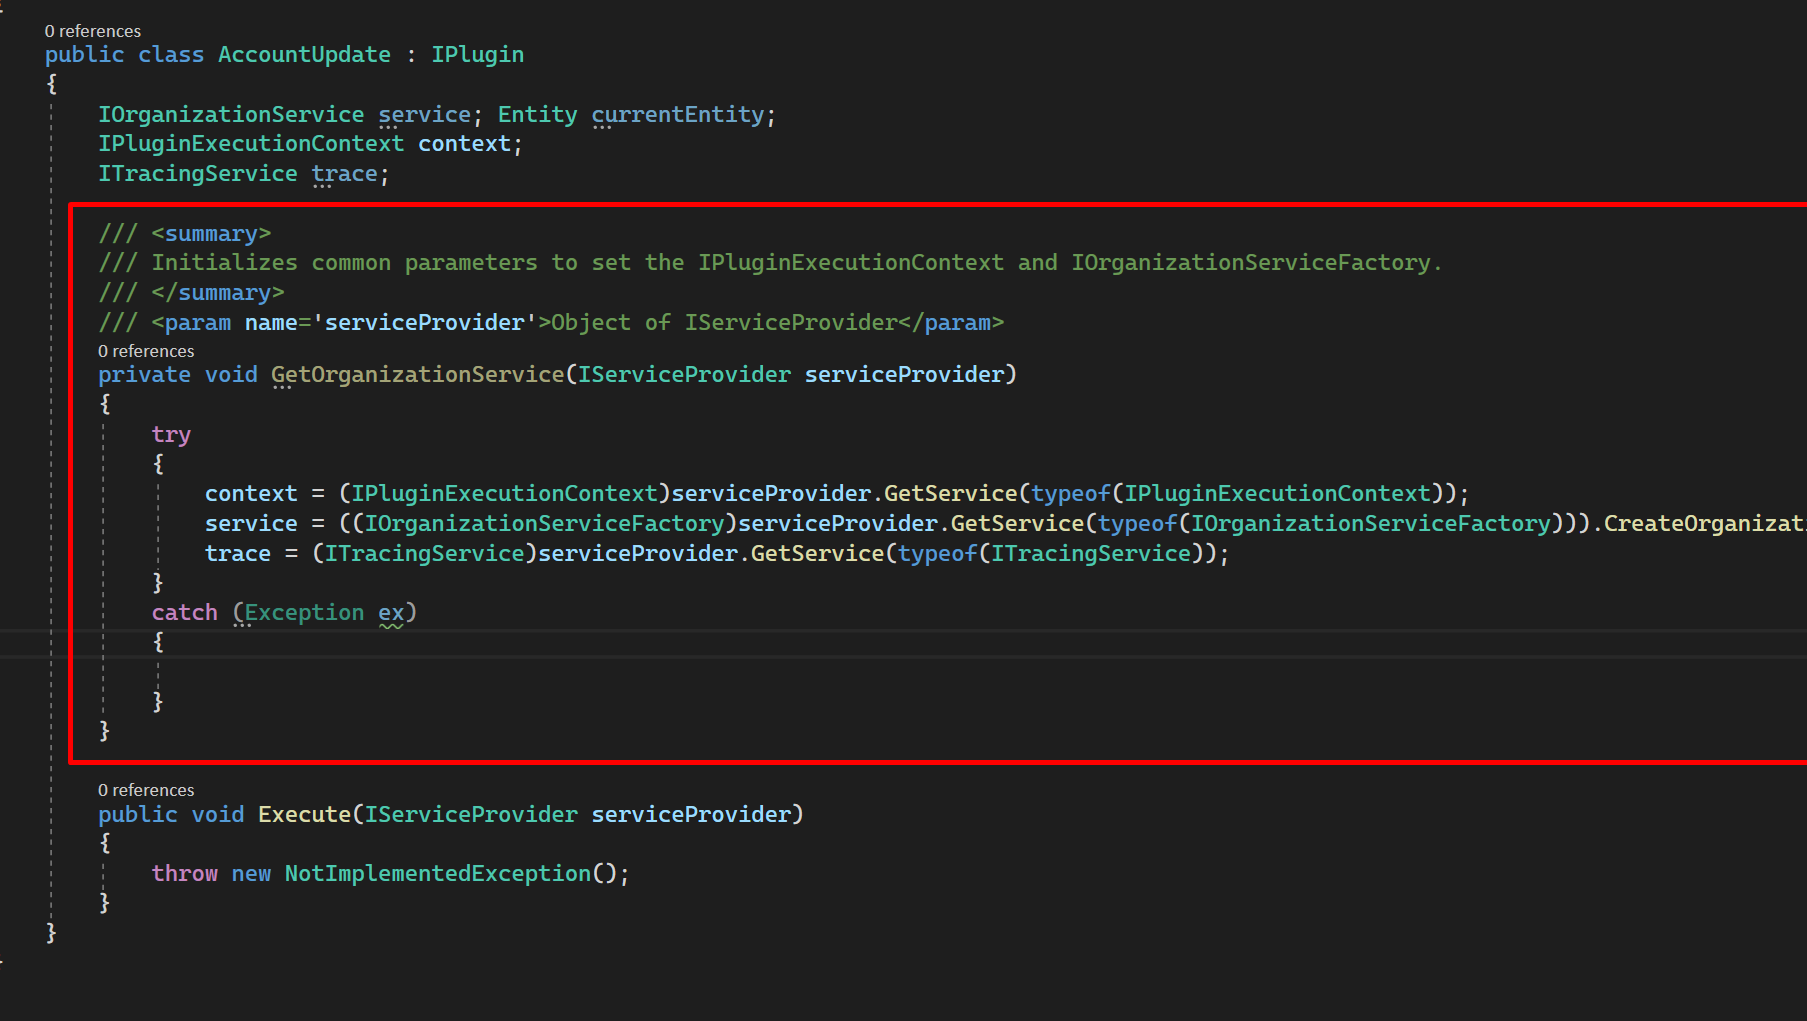
  3. Now, below are some helper methods which are required for the plugin to be registered on the environment.
    You can copy from here:

    context = (IPluginExecutionContext)serviceProvider.GetService(typeof(IPluginExecutionContext));
    service = ((IOrganizationServiceFactory)serviceProvider.GetService(typeof(IOrganizationServiceFactory))).CreateOrganizationService(context.UserId);
    trace = (ITracingService)serviceProvider.GetService(typeof(ITracingService));


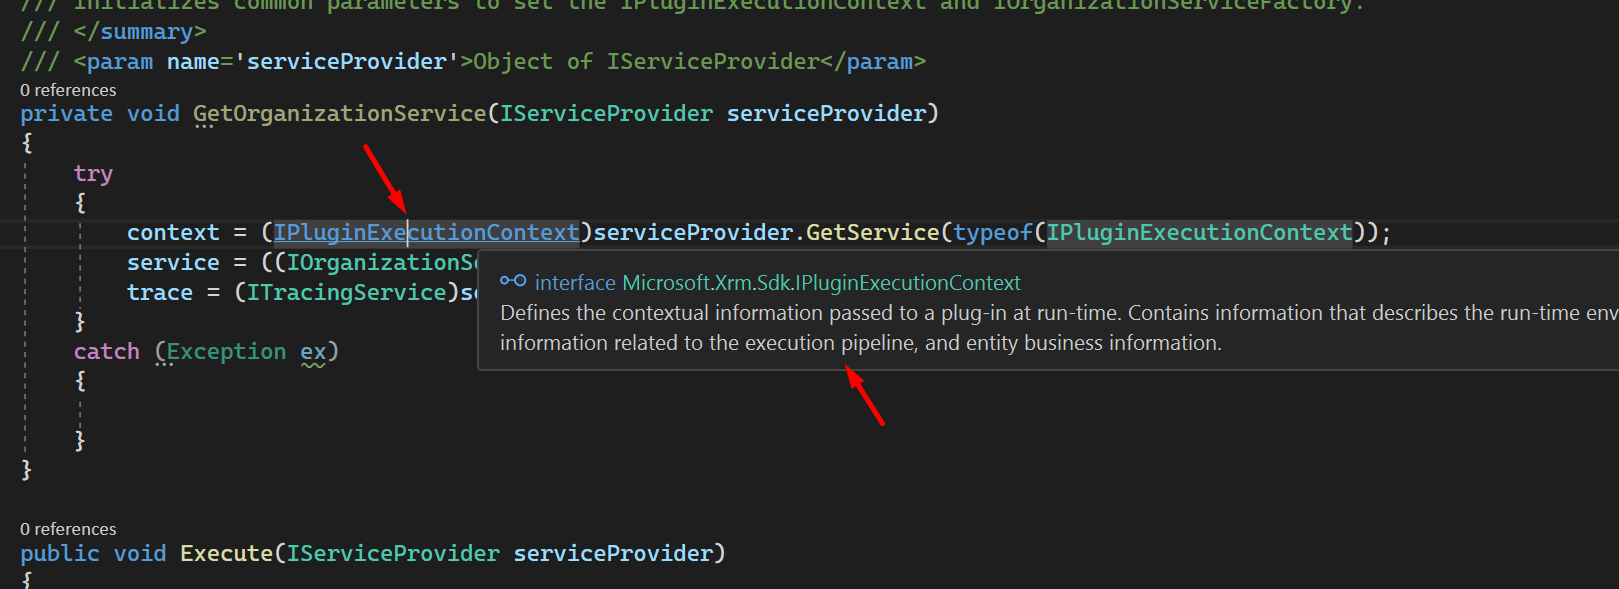
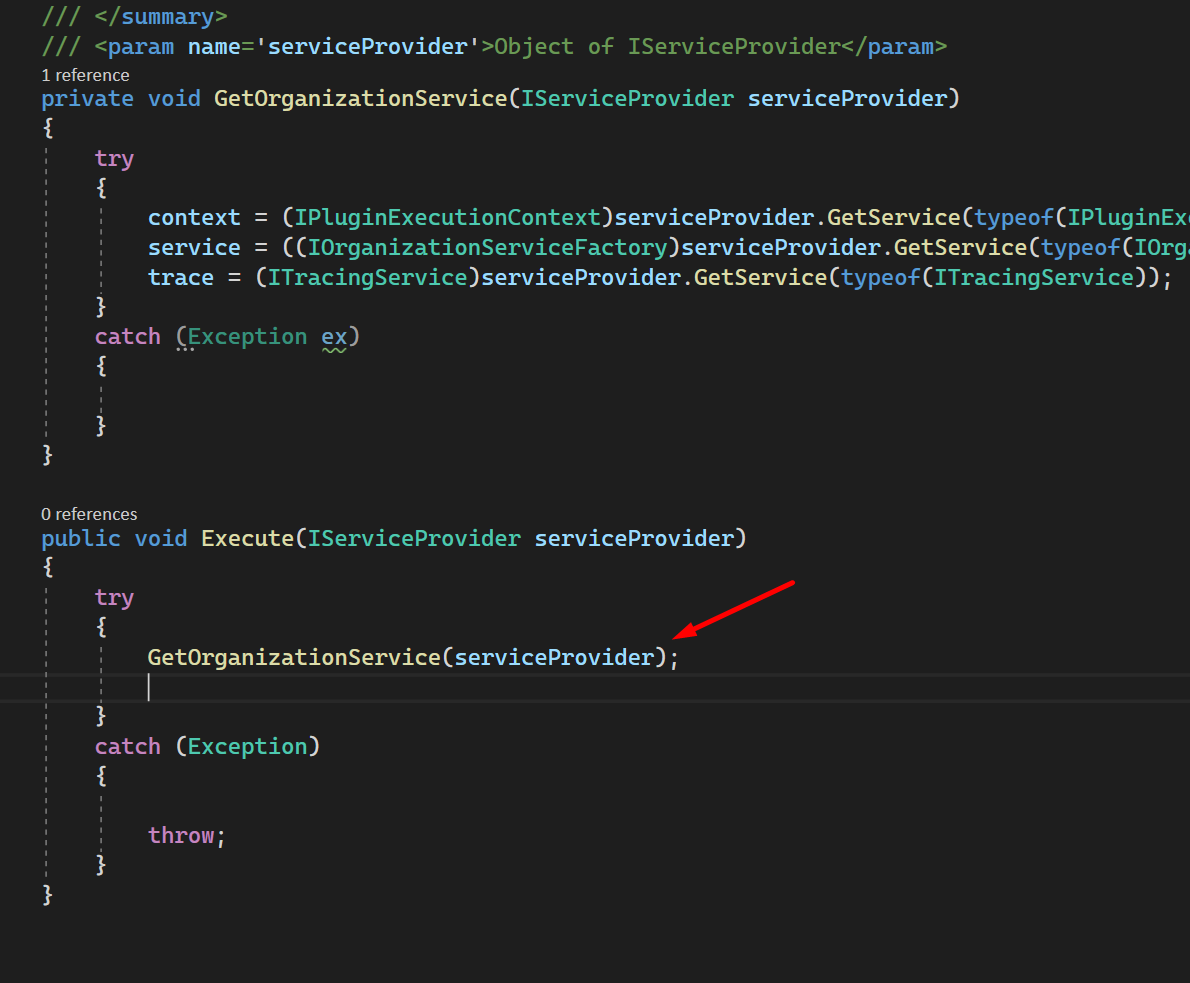
  4. In order to understand what these methods are, you can simply hover over these and read the definition. If you don’t understand these right away, it’s not a problem. But, it’s recommended that you thoroughly understand the purpose behind each of these.

  5. Then, this should be the first method to call in order to establish connection with the Dynamics 365 CRM organization you are hosting this plugin on.

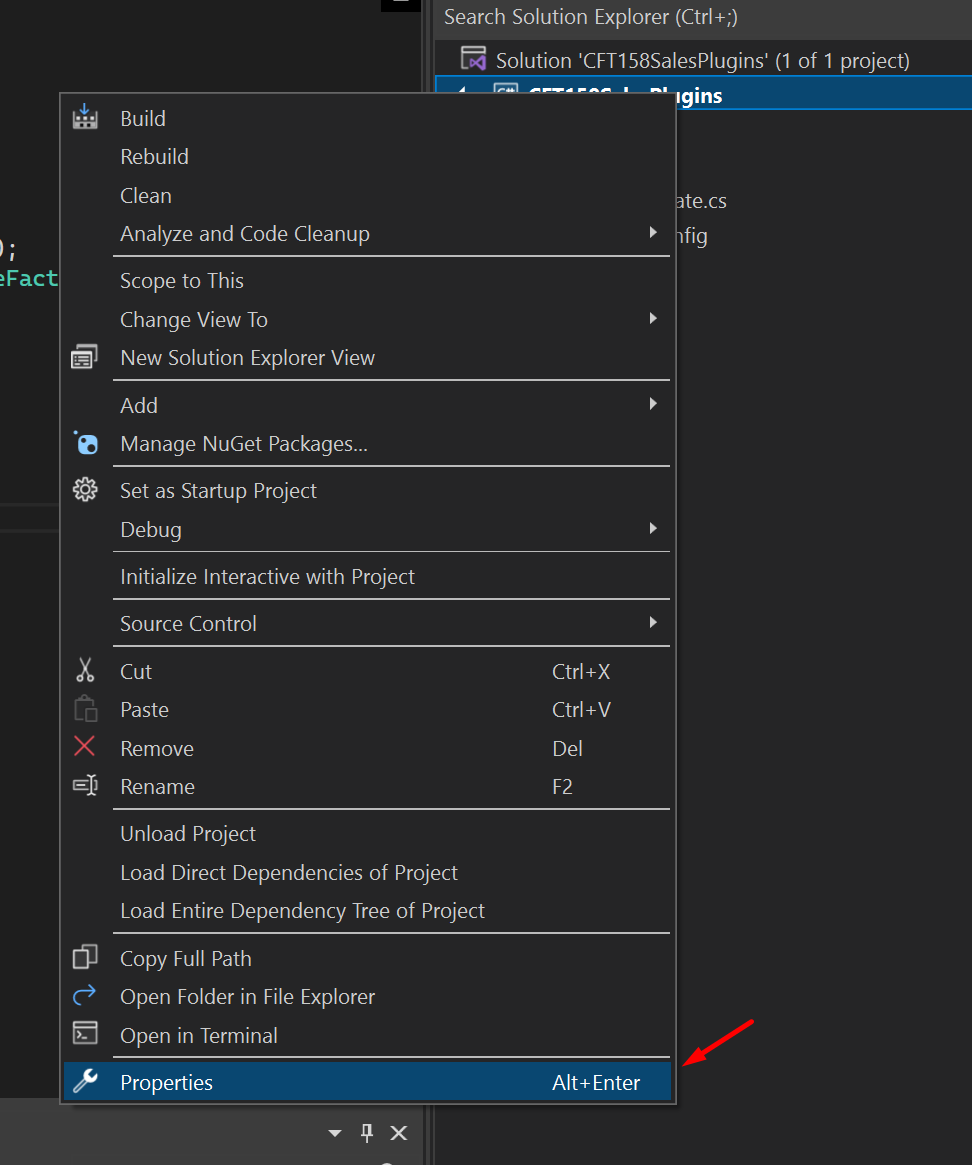
  6. Next, you’ll need to Sign the Assembly before it could be registered on the environment using Plugin Registration Tool.
    Right-click on the Project and then choose Properties.

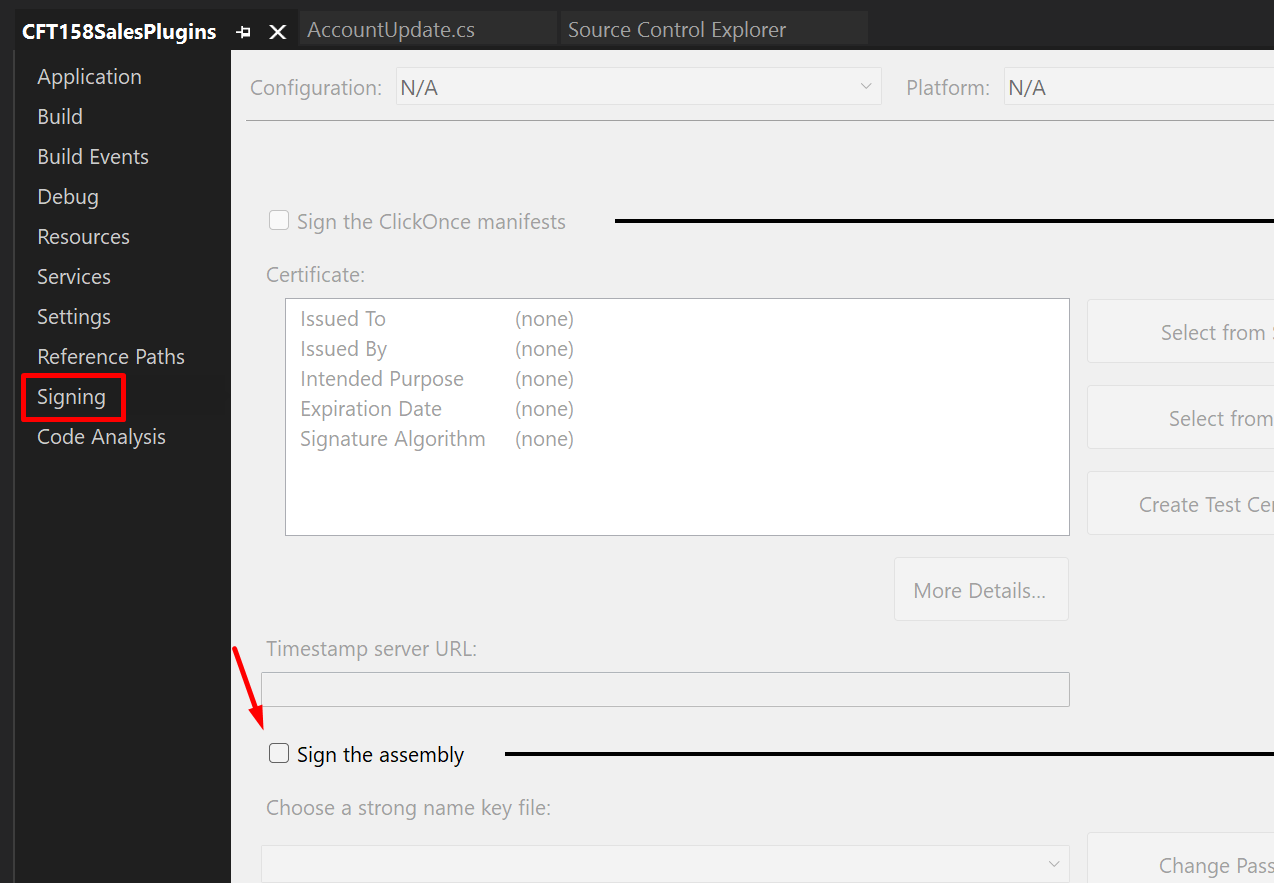
  7. Once in Properties, look for the Signing section on the left-hand side on the menu.
    Notice that the Sign the assembly is not yet enabled.

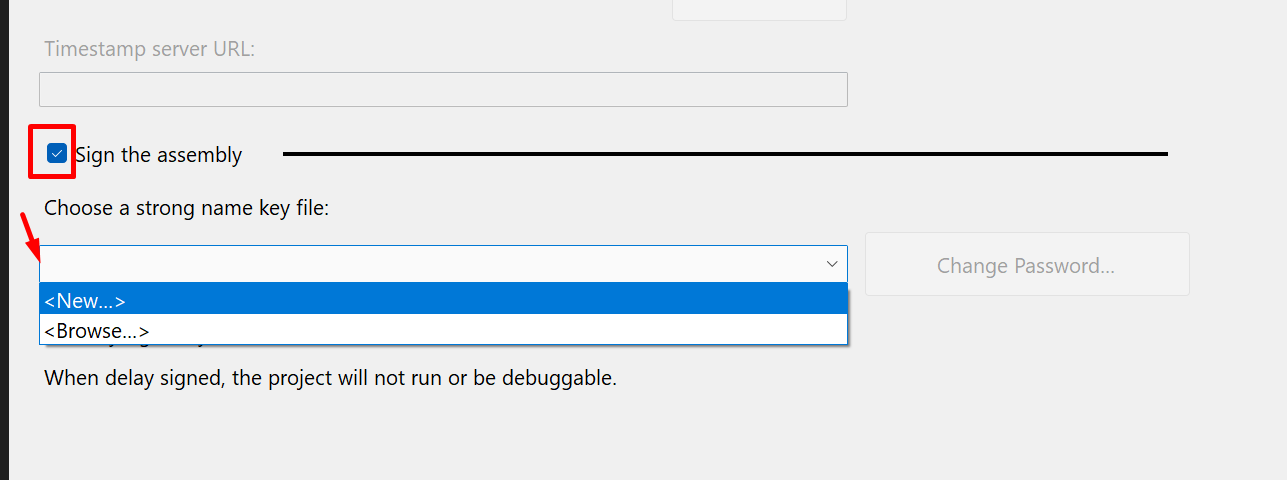
  8. Once you tick it, it’ll expose the area below and you’ll be able to create a new strong key name file.

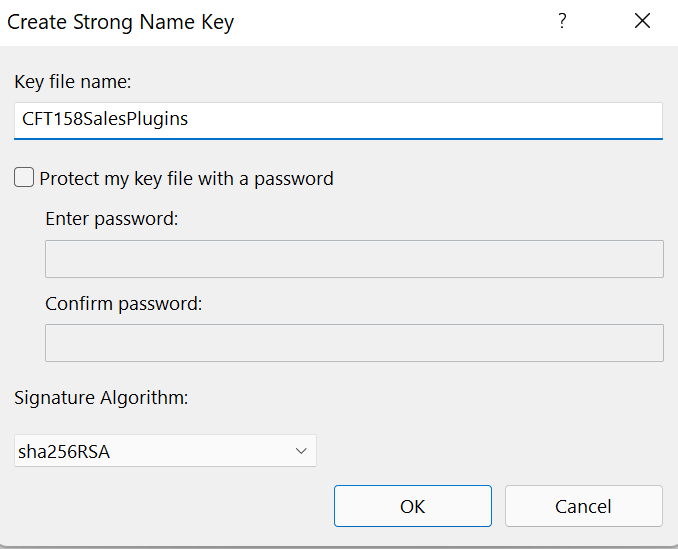
  9. When I click on new, I created a strong name key file –
    Note: I’ve not password protected the Strong Name Key I’m creating but it’s up to you to maintain it if needed.

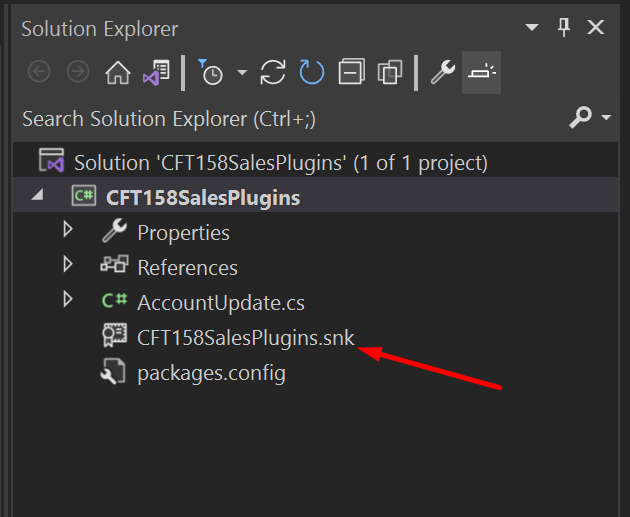
  10. Once I click OK, the .snk file will appear here.

  11. Finally, build the Project at this stage and we’ll move towards Registering this Plugin.

    Now, at this point, we have established the code which is ready to be hosted on the Dynamics 365 CRM organization itself. Post this point, you’ll now code the logic which is supposed to be done by the plugin.

But first, let’s move to part 2 where you’ll first host this assembly in the Dynamics 365 CRM environment!

Registering Plugin in Dynamics 365 CRM environment

Here’s the Part 2 of the Blog: https://d365demystified.com/2021/12/31/plugins-development-in-dynamics-365-crm-part-2-registering-your-plugin/

Hope this was helpful! Here are some more Dynamics 365 posts which you might be interested in –

  1. Dynamics 365 Storage Utilization | Dataverse Storage | Power Platform Admin Center
  2. Use Hierarchy in Roll Up Fields in Dynamics 365 CRM
  3. Filter records in a View owned by a Team you are a member of | Dynamics 365 CRM
  4. Get GUID of the current View in Dynamics 365 CRM JS from ribbon button | Ribbon Workbench
  5. Dynamics 365 App For Outlook missing on SiteMap in CRM? Use shortcut link [Quick Tip]
  6. Import lookup referencing records together in Dynamics 365 CRM | [Linking related entity data during Excel Import]
  7. Mailbox Alerts Hide/Show behavior in Dynamics 365 CRM
  8. Excel Importing Notes (Annotation) entity in Dynamics 365 CRM
  9. Enable/Disable the need to Approve Email for Mailboxes in Dynamics 365 CRM CE
  10. Call Azure Function from Dynamics 365 CRM using Webhooks
  11. Show Ribbon button only on record selection in Dynamics CRM
  12. Accessing multiple occurrences of a field in Business Process Flow using JS in D365 CRM

Thank you!!

Get all attributes in FetchXML in Plugins | Dynamics 365 CRM [Quick Tip]

In Plugin development, when you use FetchXML while using RetrieveMultiple to retrieve data.

In some scenarios since you want to retrieve a large number of columns, so mentioning each column is cumbersome on not worth to save the extra processing. In that case, it’s better to retrieve everything.

Here’s a quick tip on how you can quickly retrieve everything in 1 tag in the FetchXML!


Creating FetchXML using Advanced Find

As a standard practice, just to revise – this is how you create FetchXML from Advanced Find.

  1. While working on Advanced Find, you click on Download Fetch XML

  2. This gives you an XML output of the FetchXML query which you can use in your plugins.

All Attributes

Here’s what you change in order to get all attributes –

  1. You remove all the marked columns as shown below

  2. And replace the <attribute> tags with <all-attributes />. Make sure no other <attribute name /> tags are included in combination with this <all-attributes /> tag.

Hope this was helpful! Here are some more Dynamics 365 posts which you might be interested in –

  1. Dynamics 365 Storage Utilization | Dataverse Storage | Power Platform Admin Center
  2. Use Hierarchy in Roll Up Fields in Dynamics 365 CRM
  3. Filter records in a View owned by a Team you are a member of | Dynamics 365 CRM
  4. Get GUID of the current View in Dynamics 365 CRM JS from ribbon button | Ribbon Workbench
  5. Dynamics 365 App For Outlook missing on SiteMap in CRM? Use shortcut link [Quick Tip]
  6. Import lookup referencing records together in Dynamics 365 CRM | [Linking related entity data during Excel Import]
  7. Mailbox Alerts Hide/Show behavior in Dynamics 365 CRM
  8. Excel Importing Notes (Annotation) entity in Dynamics 365 CRM
  9. Enable/Disable the need to Approve Email for Mailboxes in Dynamics 365 CRM CE
  10. Call Azure Function from Dynamics 365 CRM using Webhooks
  11. Show Ribbon button only on record selection in Dynamics CRM
  12. Accessing multiple occurrences of a field in Business Process Flow using JS in D365 CRM

Thank you!!