Read Excel File from SharePoint Online and create Records in Dataverse | Power Automate Flow

One of the most common scenarios is to be able to pick an Excel spreadsheet from a SharePoint Document location and create records in Dataverse.

There are several ways to do this. But, one of the most common scenarios could be to use Power Automate Flow and use Excel Online and SharePoint Online connectors to perform this operation!

Scenario

Here’s the scenario which you can expand on and fit the same according to your Use Case –

  1. There’s a file in a SharePoint Document location called as AccountImport.

  2. This file has some Account information that needs to be inserted in Dataverse
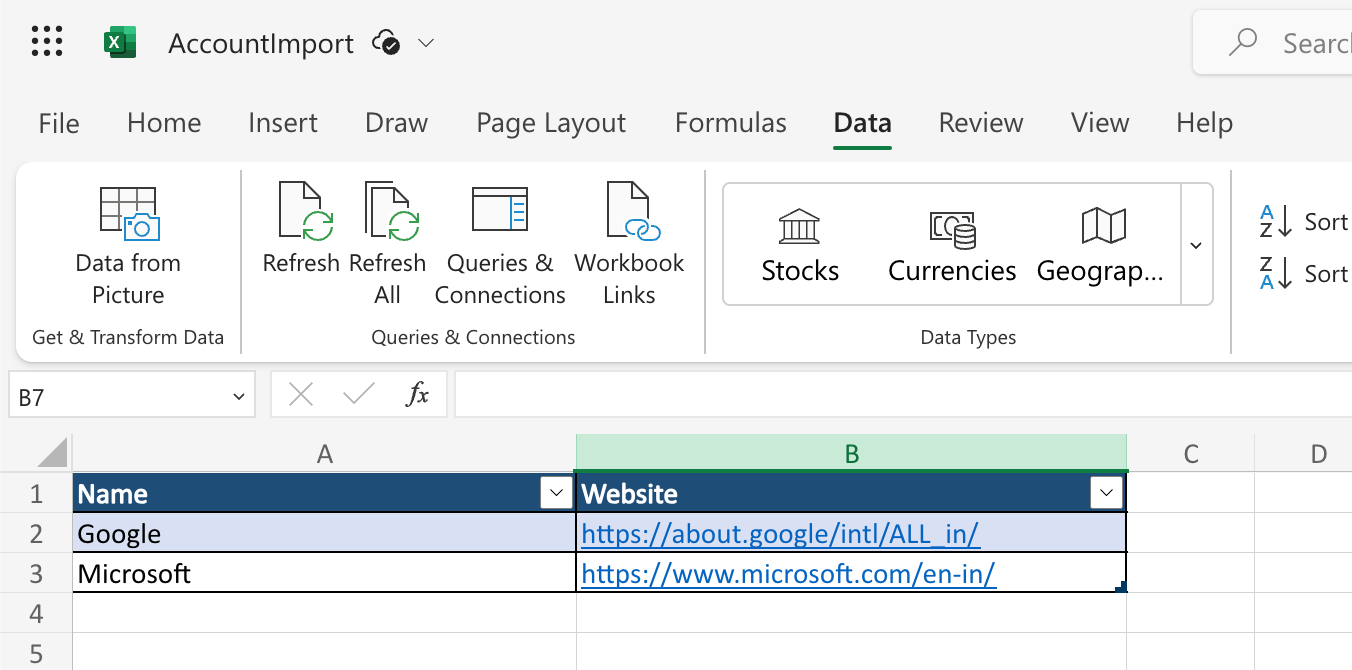
    Here’s the Excel content which has a Table in it.

  3. And this data needs to be Inserted in Dataverse [You can either Automate this Flow, Make it On Demand — based on whatever is suitable for you]
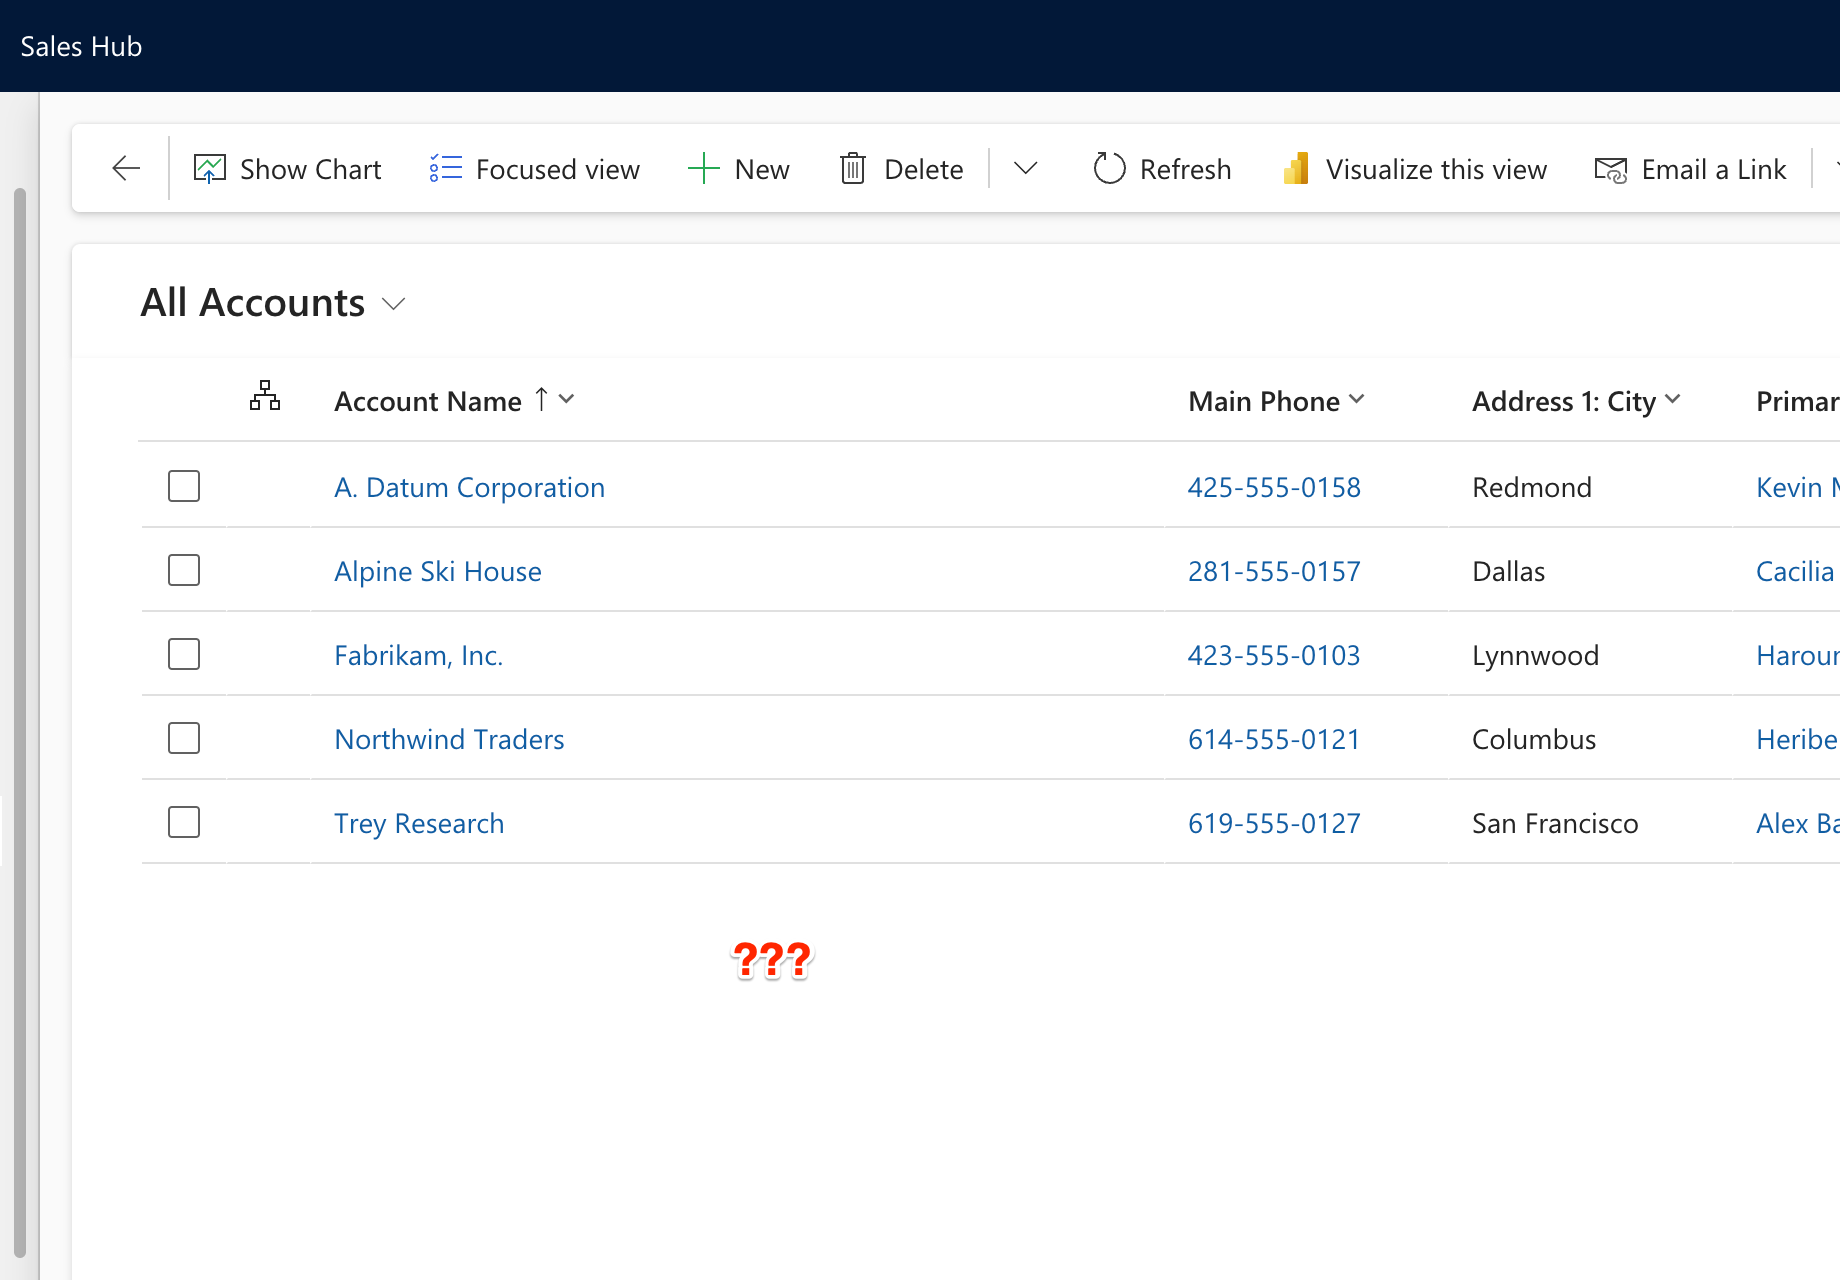

    Let’s create an On-Demand Flow in order to pick this File and then insert into Dataverse.

Power Automate Flow

Here’s the Power Automate Flow which we’ll create. For the same of this example and to keep it simple, we’ll create an On-Demand Flow –

  1. Create an On-Demand Flow in Power Automate [You could even choose to run the Flow when a SharePoint file is created or changed or even to Run the Flow once every day — depending on what best suits your case]
    Then, look for the action called as List rows present in a table from Excel Online connector

  2. In this Action, you can select what SharePoint Site is to be selected where you have the File in the Document Location.
    Also, then select the Document Library where the Documents reside. That’s the ideal place where you would want to place your Documents.
    Finally, select the File itself by navigating from the Folder icon on the File property as shown below.
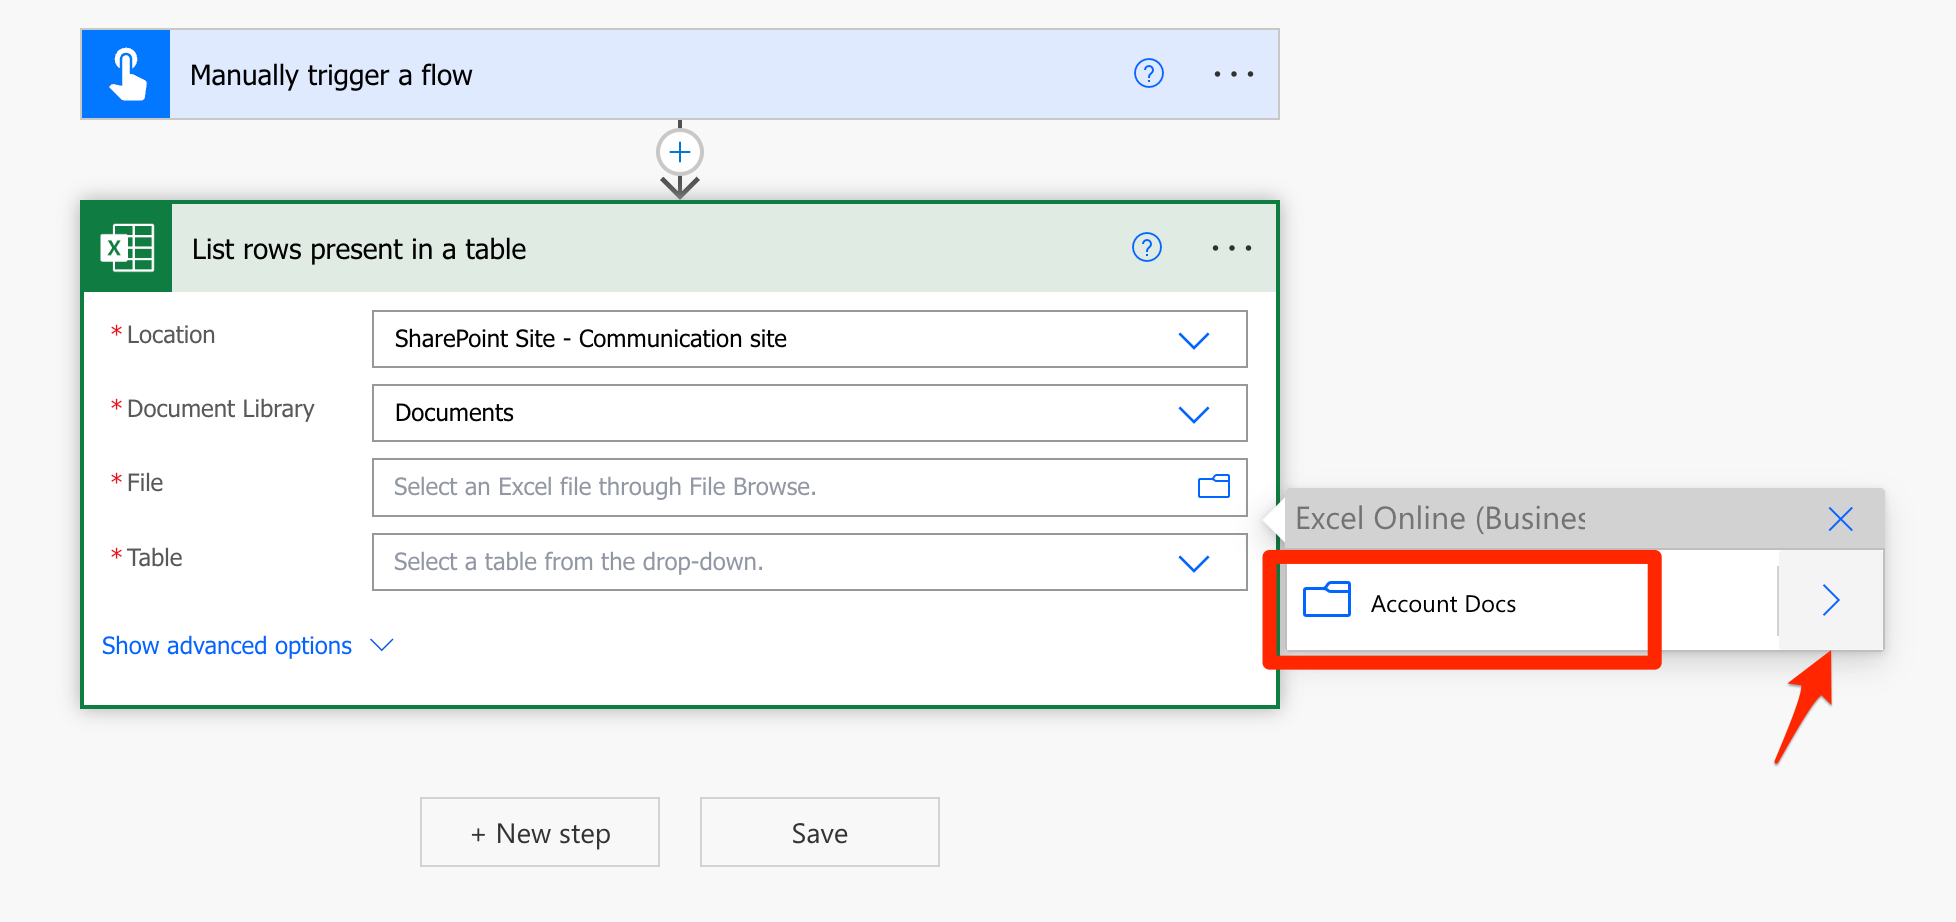

    And then select the File once you find it.

  3. Once you have selected the File, the Table itself will be available to pick up from the Table property. Make sure to convert the Excel data into a Table.

  4. Now, once all the Properties are set on the List rows present in a table action, select a For Each loop in the Flow.
    And in the Inputs, give value (List of Items) from the List rows present in a table action which we just completed above.
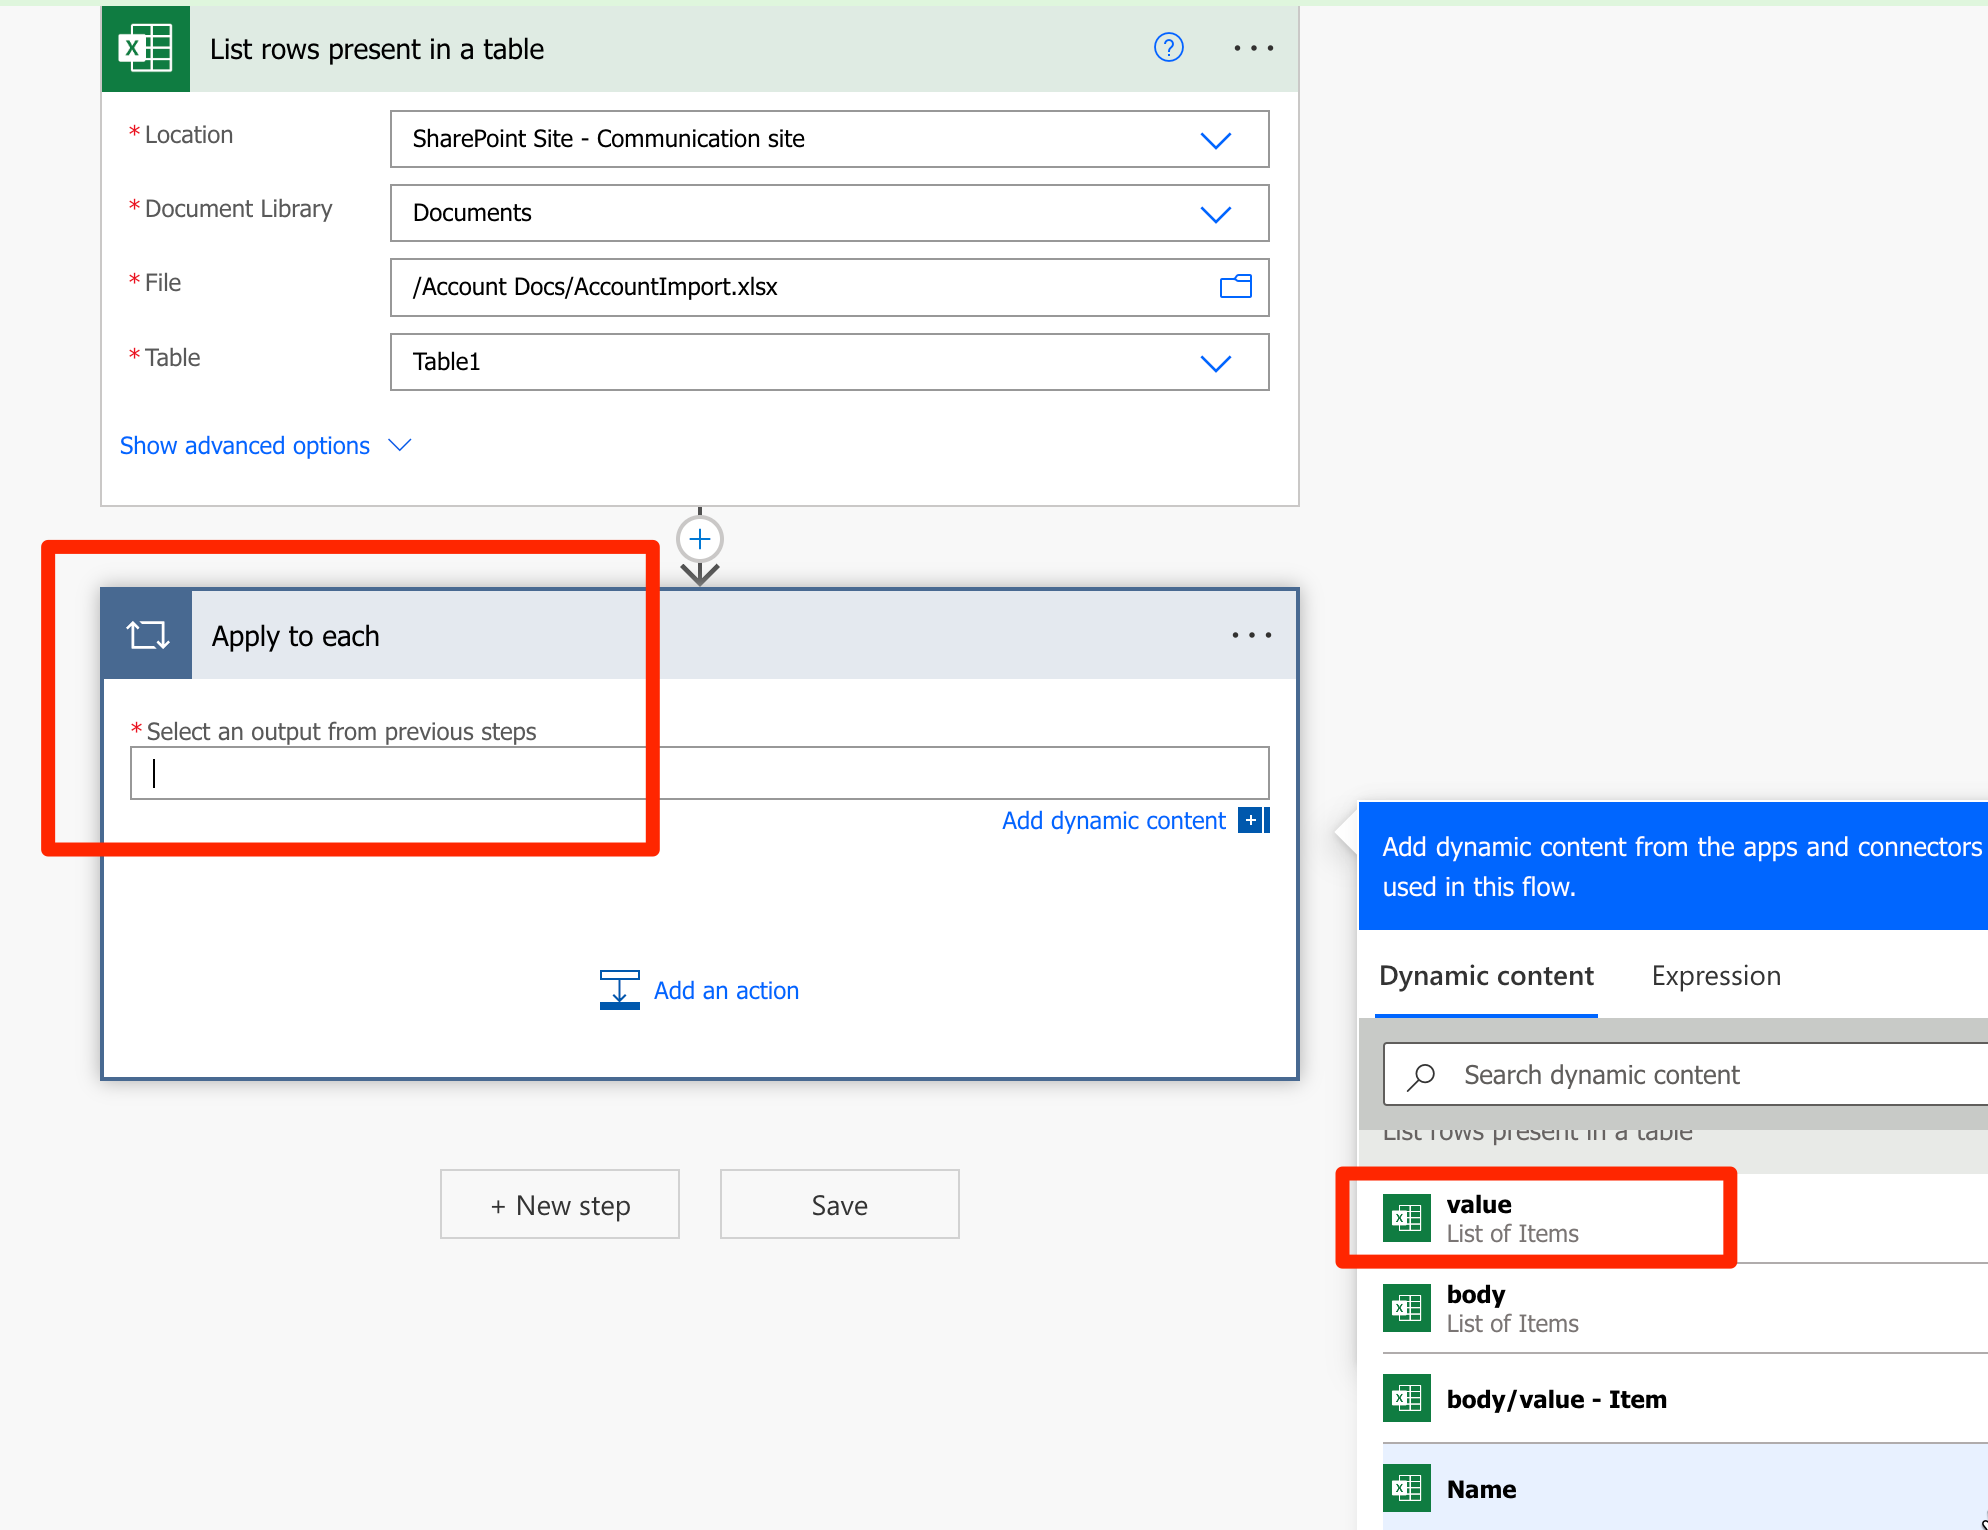
  5. Once this is set, select Add a new row action from the Dataverse connector in order to create the records sequentially in Dataverse.

  6. Here, map the Columns to the fields in Dataverse. Firstly, select the Table in Dataverse you want to insert these records into.
    Then, select the fields from the Excel which the Excel connector itself separated out for you.
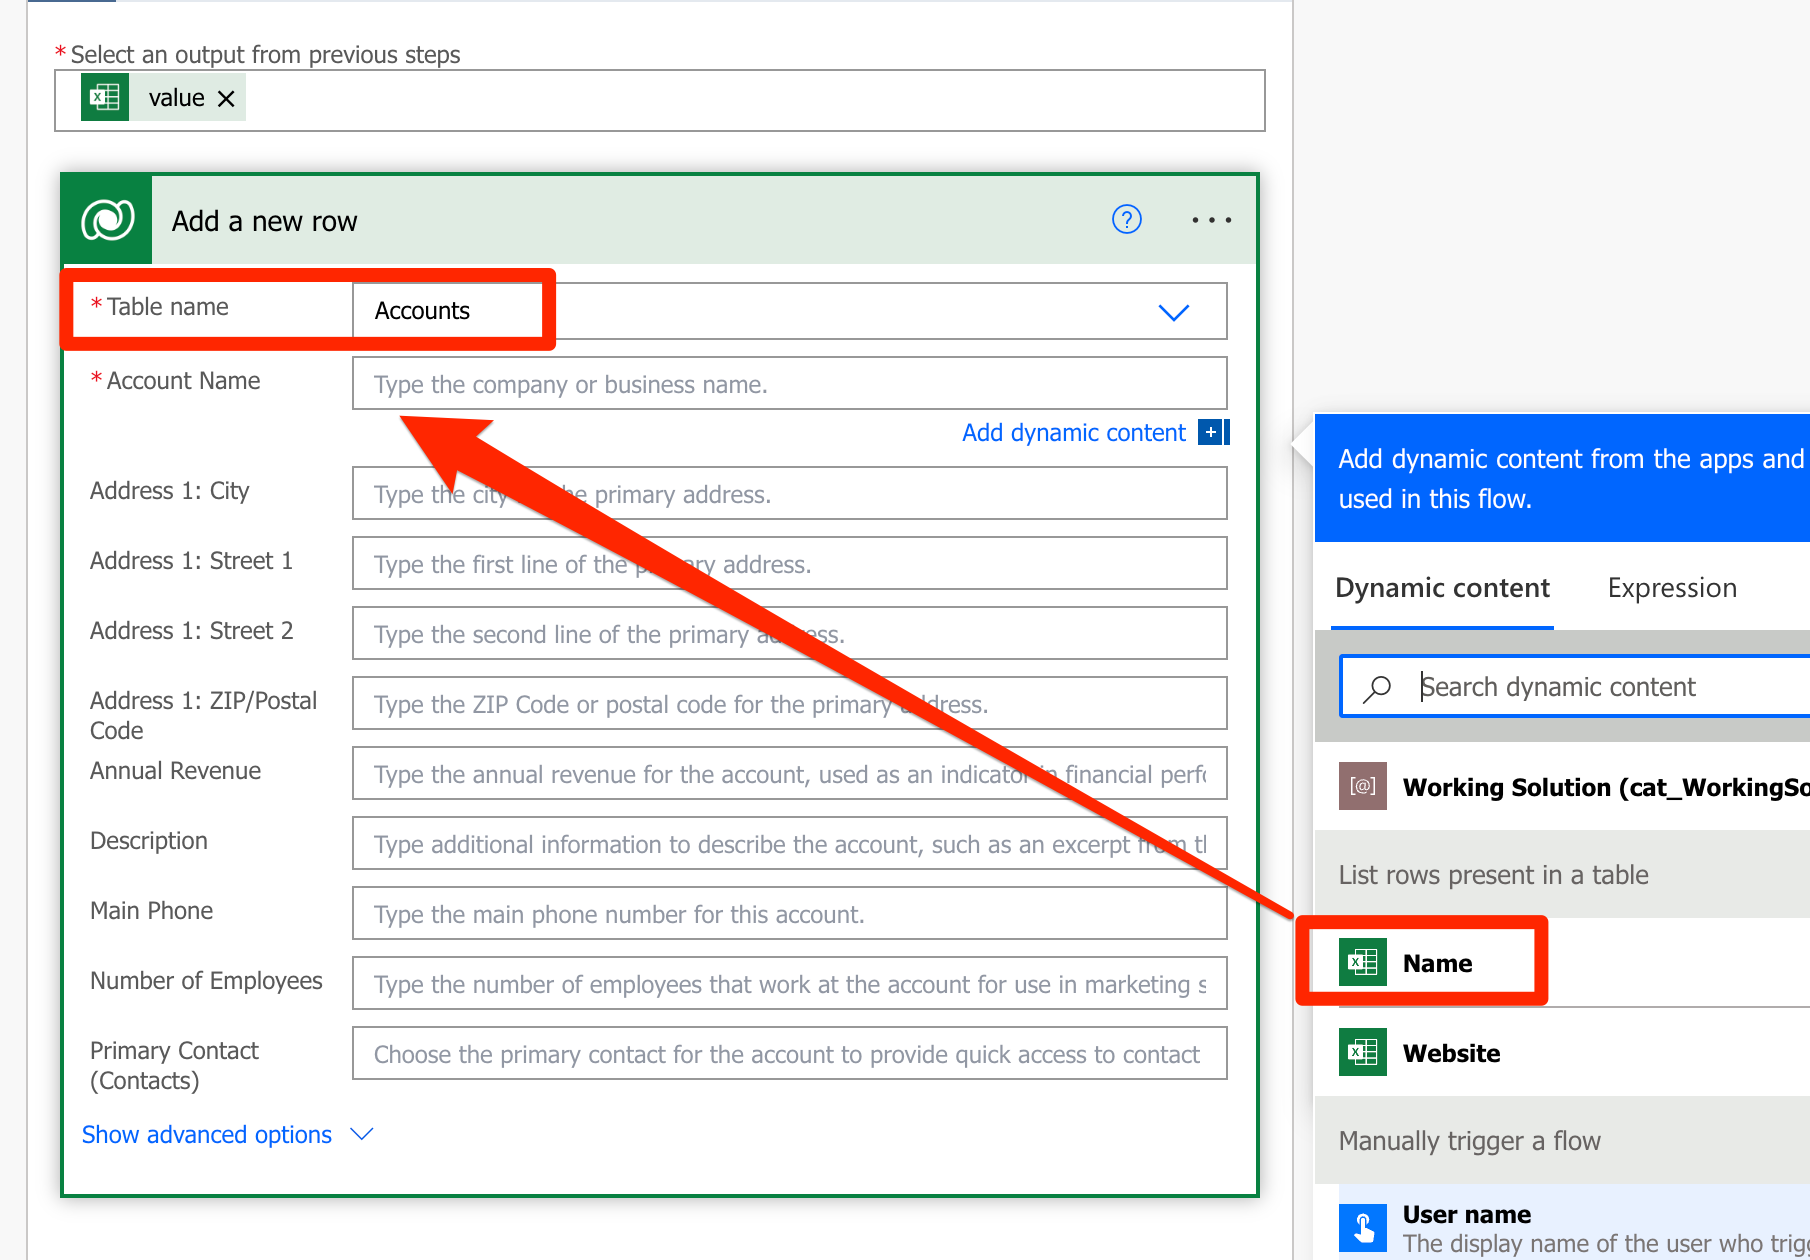
  7. Once you complete all the Fields from the Excel to the Dataverse connector.
    Save and Test the connector itself.
    This will create the records in Dataverse (Dynamics CRM)


    And it’ll Run in a few moments and succeed if everything goes right.


Dataverse Records

Now, let’s see the Flow in action –

  1. Because this is an on-demand Flow, you can Run it whenever you want. And when it Runs successfully, records in the Dataverse will be created as shown below
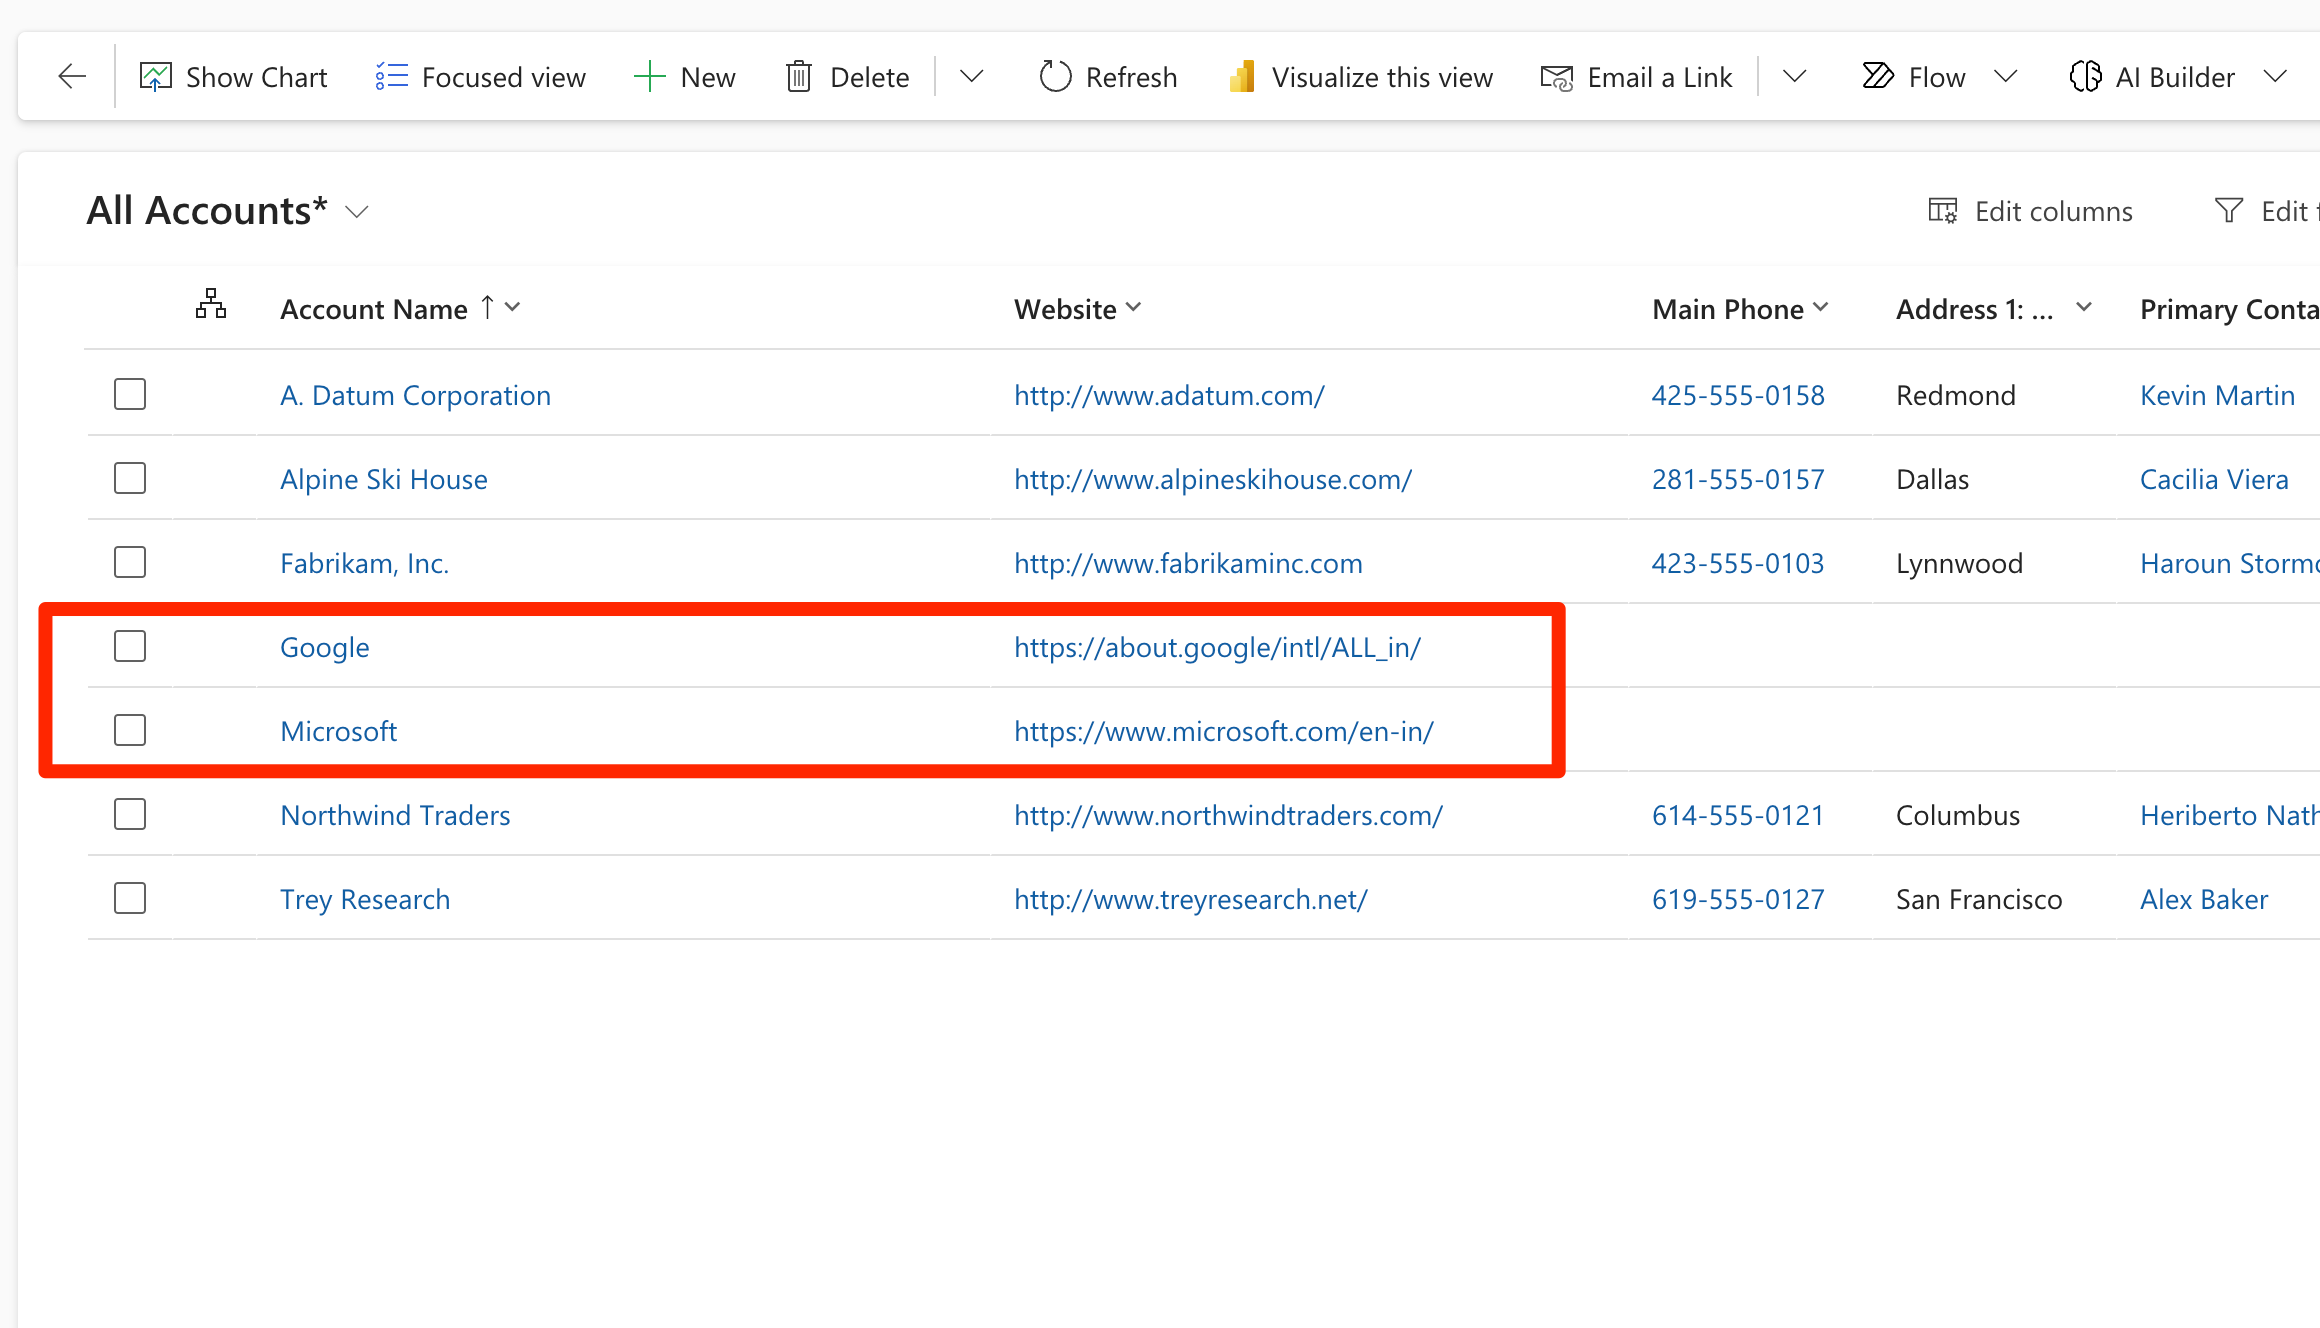

Hope this helps!

Here are some Power Automate posts you want to check out –

  1. Select the item based on a key value using Filter Array in Power Automate
  2. Select values from an array using Select action in a Power Automate Flow
  3. Blocking Attachment Extensions in Dynamics 365 CRM
  4. Upgrade Dataverse for Teams Environment to Dataverse Environment
  5. Showing Sandbox or Non Production Apps in Power App mobile app
  6. Create a Power Apps Per User Plan Trial | Dataverse environment
  7. Install On-Premise Gateway from Power Automate or Power Apps | Power Platform
  8. Co-presence in Power Automate | Multiple users working on a Flow
  9. Search Rows (preview) Action in Dataverse connector in a Flow | Power Automate
  10. Suppress Workflow Header Information while sending back HTTP Response in a Flow | Power Automate
  11. Call a Flow from Canvas Power App and get back response | Power Platform
  12. FetchXML Aggregation in a Flow using CDS (Current Environment) connector | Power Automate
  13. Parsing Outputs of a List Rows action using Parse JSON in a Flow | Common Data Service (CE) connector
  14. Asynchronous HTTP Response from a Flow | Power Automate
  15. Validate JSON Schema for HTTP Request trigger in a Flow and send Response | Power Automate
  16. Converting JSON to XML and XML to JSON in a Flow | Power Automate

Thank you!

See Trigger Outputs using Edit Columns in Flow Runs | Power Automate [Quick Tip]

If you are noticed a new addition to the Cloud Flows is where you see the Edit Columns in the Flow page.

Edit Columns in Flow

When you open a Flow, you see the below –

  1. These are your usual results of Flow Runs.

  2. And then you open each Flow Run to see what data is passed in the attributes of the steps.

  3. Now, here’s where Edit Columns are a useful new addition if you are using Flows around Sep 2022 time frame.

  4. And then you get to select the attributes from the Flow itself. In this instance, I’m select name and accountid fields from the Flow.
    Once your desired columns are selected, you can click Save.


  5. Those columns and their respective values will show up. This will save your effort to go into each Flow to look at what the values are.

  6. And from All Runs page, you can even export these to Excel if you need to.

Hope this was useful!

Here are some Power Automate posts you want to check out –

  1. Blocking Attachment Extensions in Dynamics 365 CRM
  2. Upgrade Dataverse for Teams Environment to Dataverse Environment
  3. Showing Sandbox or Non Production Apps in Power App mobile app
  4. Create a Power Apps Per User Plan Trial | Dataverse environment
  5. Install On-Premise Gateway from Power Automate or Power Apps | Power Platform
  6. Co-presence in Power Automate | Multiple users working on a Flow
  7. Search Rows (preview) Action in Dataverse connector in a Flow | Power Automate
  8. Suppress Workflow Header Information while sending back HTTP Response in a Flow | Power Automate
  9. Call a Flow from Canvas Power App and get back response | Power Platform\
  10. FetchXML Aggregation in a Flow using CDS (Current Environment) connector | Power Automate
  11. Parsing Outputs of a List Rows action using Parse JSON in a Flow | Common Data Service (CE) connector
  12. Asynchronous HTTP Response from a Flow | Power Automate
  13. Validate JSON Schema for HTTP Request trigger in a Flow and send Response | Power Automate
  14. Converting JSON to XML and XML to JSON in a Flow | Power Automate

Thank you!

Run As context in CDS (Current Environment) Flow Trigger | Power Automate

In a CDS (Current Environment), you have to option to Run the Flow under a context of a certain user. And there are a few options from which you can select from – Process Owner, Record Owner & Triggering User

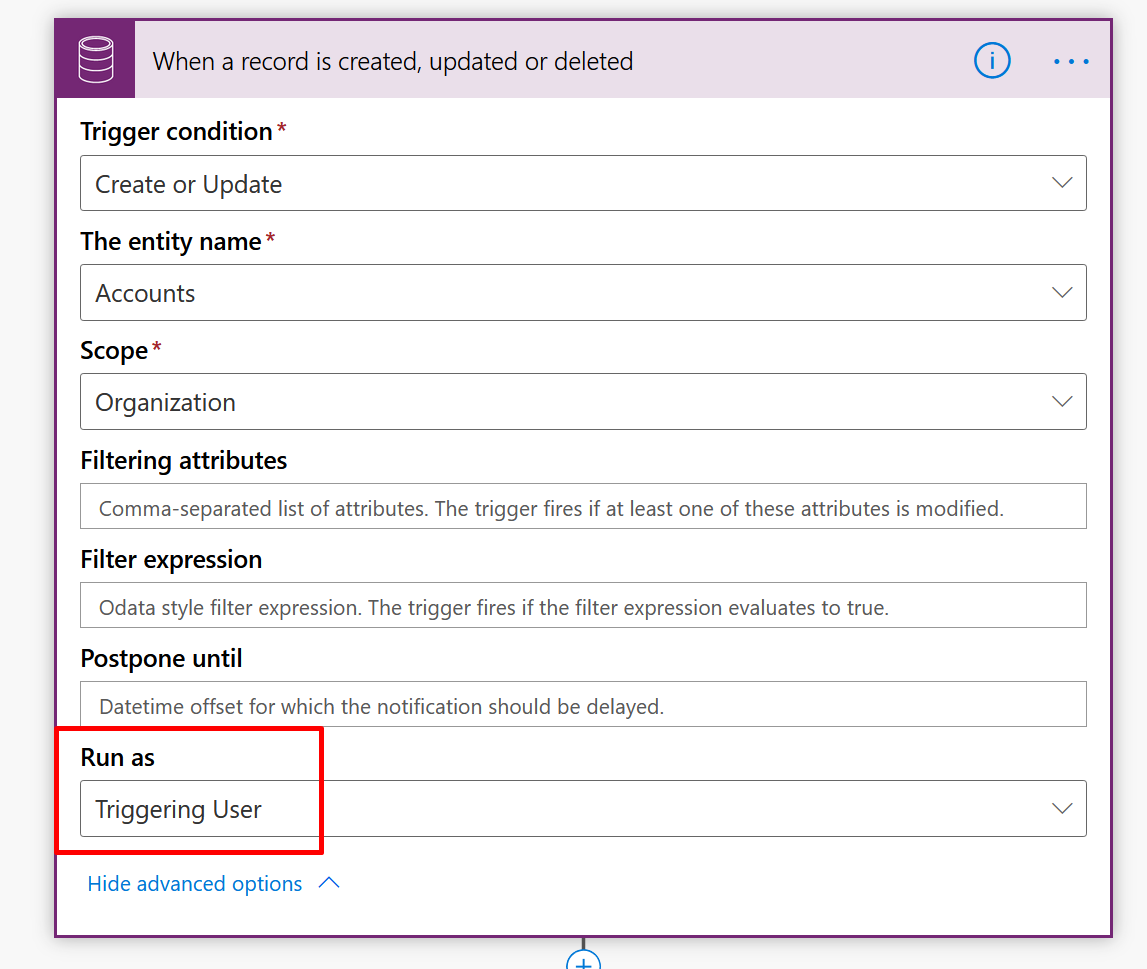
Here’s my Flow in which the trigger is the CDS (Current Environment) connector. Show advanced options and you’ll see that there’s a field call as Run As


Which has the following 3 Options as I mentioned above –

Let’s look at each one of these.

Scenario

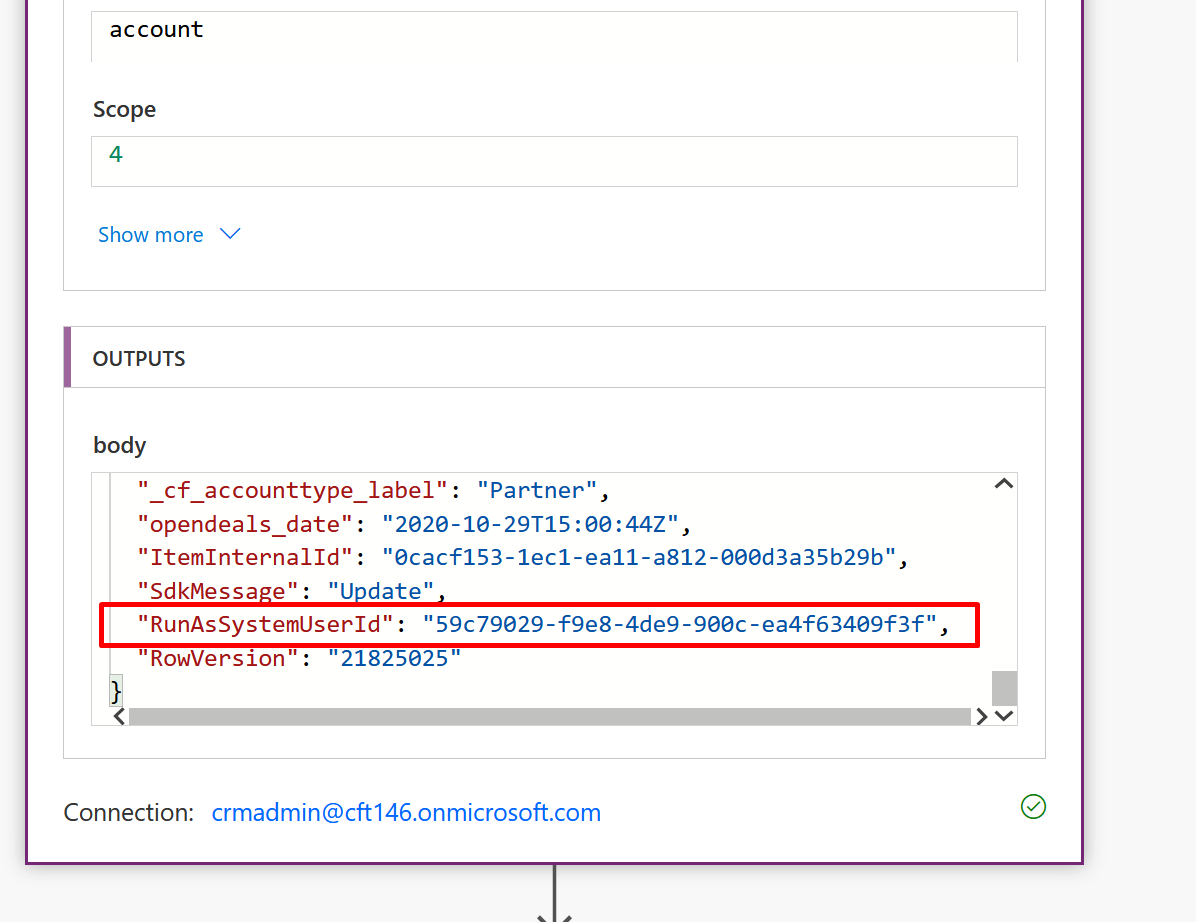
To demonstrate Run As, my Flow is triggering on the Update of the Account record, an attribute in the CDS (Current Environment) connector called as RunAsSystemUserId provides the GUID of the System User used in the connector’s Run As field.

You can use triggerOutputs() function to get this GUID from the Trigger Outputs and use it to fetch the System User record. To see how triggerOutputs/triggerBody() works, check this post – Using triggerBody() / triggerOutput() to read CDS trigger metadata attributes in a Flow | Power Automate

Process Owner

As suggested, Flow Owner meaning the one who Owns the Flow

  1. If I select as Process Owner, no matter who triggers the Flow or who is the Owner of the record, the Run As user will be the one who Owns the Flow.


    The record could belong to one owner and the other owner might modify it as shown below –


    But the Flow will Run As the Owner of the Flow as suggested.


    Multiple Owners?
    In my test, I believe the one who created the Flow becomes the first Owner and hence, is what it appears in Run As

Record Owner

  1. Easily, the record Owner in Dynamics 365 is the Owner of the record, so no matter who triggered the Flow or who the Flow owner is, the Record Owner will be the Run As user.

  2. In this example, Priyesh Wagh is modifying the record Owner by Kuldeep Gupta, the Flow Run As will show as Kuldeep Gupta

Triggering User [Also Default]

  1. If the Run As is set to Triggering User, whoever caused the Flow to Run is the Run As context user.


    Let’s say Kuldeep Gupta is a user is modifying a record Owned by SYSTEM, the Run As user is Kuldeep Gupta.


  2. Now, if there’s no Run As selected or even if there are multiple Owners to the same Flow, the one who causes the Flow to run, is the context user of the Flow.


    Let’s say Priyesh Wagh modified this record owned by SYSTEM, the Flow will Run As Priyesh Wagh


Hope this helps!!

Here are some more Power Automate related posts you might want to look at –

  1. Task Completion reminder using Flow Bot in Microsoft Teams | Power Automate
  2. Call HTTP Request from a Canvas Power App using Flow and get back Response | Power Automate
  3. Send a Power App Push Notification using Flow to open a record in Canvas App | Power Automate
  4. Accept HTTP Requests in a Flow and send Response back | Power Automate
  5. Terminate a Flow with Failed/Cancelled status | Power Automate
  6. ChildFlowUnsupportedForInvokerConnections error while using Child Flows [SOLVED] | Power Automate
  7. BPF Flow Step as a Trigger in CDS (Current Environment) connector | Power Automate
  8. Pause a Flow using Delay and Delay Until | Power Automate
  9. Generate Dynamics 365 record link in a Flow using CDS connector | Power Automate
  10. Setting Retry Policy for an HTTP request in a Flow | Power Automate
  11. Text Functions in a Flow | Power Automate
  12. Using Parse JSON to read individual List Records in Flow|Power Automate

Thank you!!

Number Formatting in a Flow | Power Automate

Quite obviously this is one of the most common asks in Flow to format a number. Here are some ways to do so using Format number Action in Flow (Power Automate).

This is available in Format number action in a Flow in Power Automate. This is available in Number Functions connector.
numActions

Commas and Decimals

  1. For a standard simple number, you can simply denote by # and commas or other symbols where needed. Here, I won’t select any locale.
    standardNumberBody
  2. And it would render into this –
    standardNumber

Phone Number

  1. US phone is an example where it is denoted by brackets and dashes in between. I’ll select English (United States) (en-US) in the locale among others. So, my format would be.
    isPhoneBody
  2. And the resultant phone number will be set as below
    usPhone

Currency Input

For currency, this is what I did –

  1. Added ₹ followed by ##,###,###. I’ll select English (India) (en-IN) in the Locale field.
    indCurrencyBody
  2. So even though my number value i.e. (50000) is in thousands and not hundred-thousands as I covered in my format, it’ll consider the correct format used and my output will be – indCurrency

Here’s where you can look at other ways to format numbers –
1. Standard numeric format strings
2. Custom numeric format strings

If you’re looking for some more posts on Flow / Power Automate, I’ve written some in the past. Check these –

  1. Create a To-Do List Item of Important Outlook Emails using Power Automate
  2. Get N:N records in a Canvas Power App using Common Data Service connector | Power Platform
  3. Call a Dynamics 365 Action from Flow [Bound and Unbound Actions] | Power Automate
  4. Switch-Case in a Flow | Power Automate
  5. Setting Retry Policy for an HTTP request in a Flow | Power Automate
  6. Make HTTP request from Flow in Power Automate
  7. Using Parse JSON to read individual List Records in Flow|Power Automate
  8. Secure Input/Output in Power Automate Run History
  9. Button Flow in Power Automate to replicate a Quick Create Form in D365 CE
  10. Enable Flow button on D365 Ribbon

Hope this helps!

Switch-Case in a Flow | Power Automate

Some of the common operations / decision making one wants to perform in terms of programming is definitely switch-case!

Here’s how you can do it in power automate

Scenario

To keep things simple, I will simply reflect the name of the OptionSet value in a variable in Flow –

    1. Here’s my OptionSet called Account Type with values Customer [1], Vendor [2] & Partner [3]
      optionSet


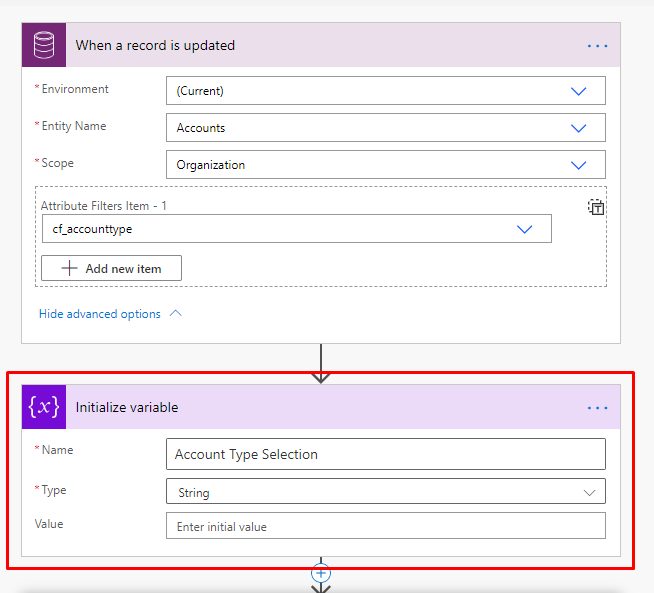
    1. My Flow will be called on update of Account record’s Account Type field change
      updateOfAccountType


    1. I’m simply using a variable to store the value of the selection made on the field.
      initVariable


Using Switch

Now, let’s get to the important part –

    1. If you search for Switch under Control, you’ll see as below
      switchControl


    1. This will first ask you what the Switch should be on, in this case, it’s the Account Type value to be selected from the dynamics values
      accountTypeChosen


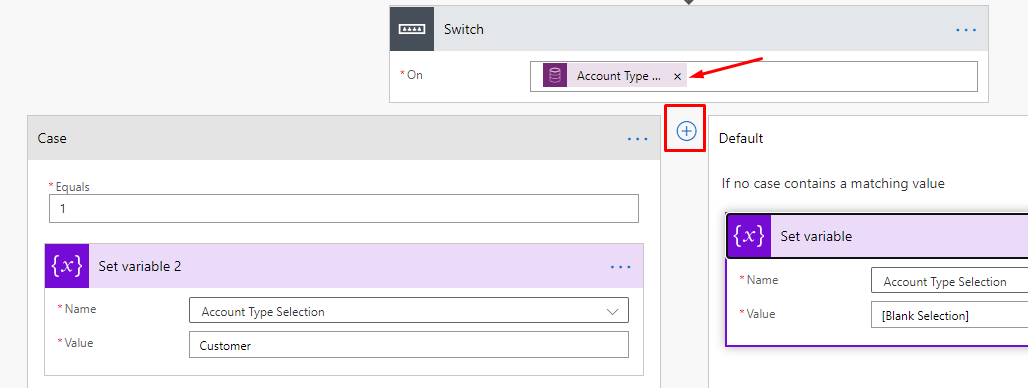
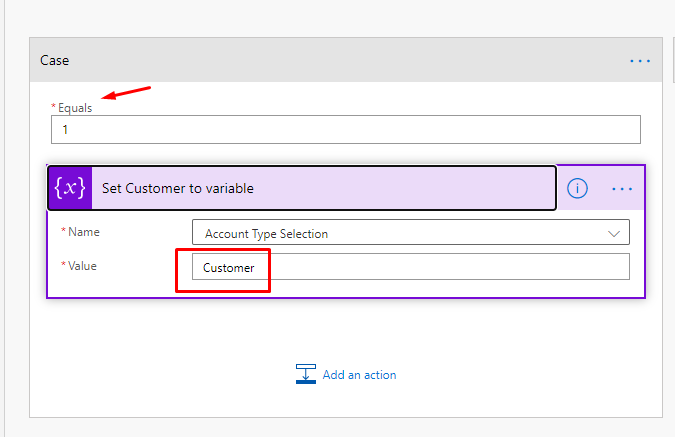
    1. Now, I can start entering the Cases one by one as shown below and setting the variable I created above. For value in Equals 1, I’ll set variable as Customer
      firstCase&Default
      case1DetClicking on the + [Plus] sign in between Case and Default will let you add more cases.
      addCase


    1. Finally, once all the cases are entered, the Flow will start looking something like this from a hawk-eye-view with the Default case appearing in the end.
      hawkEye


Working

Let’s look at how Switch-Case would work –

    1. I updated the Account Type field with Vendor
      d365Updated


    1. Switch on the Account Type Value (selected from Dynamic Values) will reflect the value of 2
      2Selected


    1. And Case 2 will execute simply reflecting what is stored in the variable. Rest of the cases will not run
      result


Pretty Easy! Hope this helps!

Setting Retry Policy for an HTTP request in a Flow | Power Automate

Often times, There could be an issue where your HTTP request isn’t hitting well. So, to overcome this, you might want your Flow to Retry after a certain duration and for some number of times.

You want to setup a Retry policy for the same. Here’s how you do it!

Setting Retry Policy

Follow this to setup a Retry Policy of your Flow

  1. Locate your HTTP step and navigate to Settings
    openSettings

  2. Once you’re in Settings pane, scroll below and look for Retry Policy.
    retryPolicyLocation

  3. Default type is set by default, if you expand it, you can select what should be the Retry Type. In  this example, I’ve set to Fixed Interval for simplicity
    Default is set to 4 retries at an exponential interval. (Exponential increment type is a little confusing to explain, you can check this post as users discuss how exponential time increments work – )fixedInterval
  4. In Fixed Interval type, I’ve set number of retry count to be 3 and duration between each retry should be 30 seconds (represented in ISO-8601 format)
    sampleRetrySet
  5. With that, the policy is set. And the HTTP request step will try for 3 times at the interval of 30 seconds each.


If you want to test using some HTTP request, you can sample HTTP requests from here – https://httpstat.us/

How it works

Look for Failed Runs to see the result –

  1. Open a Failed Run where you know HTTP request could have failed
    openFailedRun
  2. Now, look for your HTTP request where you set the policy on. Expand the same.
    openHTTPCallThatFailed
  3. Upon expanding, you can see that there were 3 retries and it failed due to a timeout i.e. 408
    failedRetries
  4. You can also check on the right hand side of the page which says that the total duration of all these retries were 1 min 30 seconds
    totalFixedTime

If you observe the Flow Runs, you can find the the Flow did consistently try to run at an interval for the number of times specified.

In case you’re looking for more Flow/Power Automate related posts, check below –

  1. Make HTTP request from Flow in Power Automate
  2. Using Parse JSON to read individual List Records in Flow|Power Automate
  3. Selecting (Current) in Environment in Power Automate CDS connector and why it matters
  4. Retrieve only active Dynamics 365 CE licensed Users in CDS connector in Power Automate
  5. Secure Input/Output in Power Automate Run History
  6. Approval Process using Power Automate
  7. Create a To-Do List Item of Important Outlook Emails using Power Automate
  8. RSS notifications to your phone using Power Automate
  9. Enable Flow button on D365 Ribbon
  10. Button Flow in Power Automate to replicate a Quick Create Form in D365 CE

Hope this helps!!

Using Parse JSON to read individual List Records in Flow|Power Automate

This is a scenario I came across when I was using Common Data Service connector [not Common Data Service (Current Environment)] connector to read Opportunities tied to an Account.

Example

In this scenario, I wanted to retrieve the Opportunities tied to an Account. So, my filter query was _parentaccountid_value(‘ACCOUNT_IDENTIFIER’)

Here’s my Flow starts. I want to read Opportunities that are tied to my Account in context –

baseQuery

Flow Inside a solution vs. Outside a Solution

Inside a Solution

Now, when I had this Flow inside a solution, the result didn’t have a body and instead just gave me Status Reason value as below –

missingData

Outside a Solution

Whereas, outside the Solution, I was able to get the array of Objects i.e. Opportunity data in the Body in the Output itself.
outsideSolutionResult

So, what can we do about the Flow which is used inside a Solution and you want to actually see what was the output? You may or may not require to see the records (depending on your implementation)

But let’s say you want to see what was returned, let’s just parse these results as is using Parse JSON to see what we got.

Use Parse JSON from Data Operation

Another way to read what you’re retrieving is using Parse JSON Data Operation.

  1. Search Parse JSON and you’ll see the result in Data Operation type of Actions as shown below –useParseJSON
  2. Now, you have to apply this to Current item from the retrieved List records in Apply to each operation. In case you don’t have the schema or not sure what to put it in. Simply use {} in Schema field. This will just pass through as is.
    applyParseJSON

Checking Result

Now, let’s test using the above and see if we can get the results

  1. Now, you can actually see the Inputs and Output of Parse JSON which is basically the same. This is useful if you want to visually see what’s going on through your Flow.
    visibleResult

But, if you don’t want to see what’s being passed through when in Production? You can Secure Input/Output in Power Automate Run History

Hope this helps you!!

Create a To-Do List Item of Important Outlook Emails using Power Automate

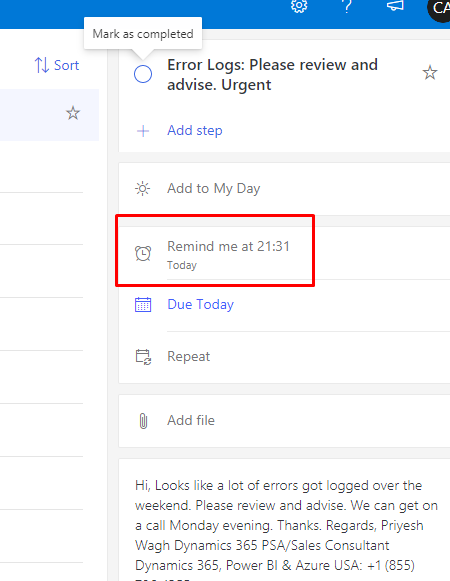
Since Power Automate is so powerful that you can creatively use it to improve your productivity at work. Here’s an example of how you can utilize a scenario where you need a quick checklist to make sure you respond all important emails for the day.

Power Automate

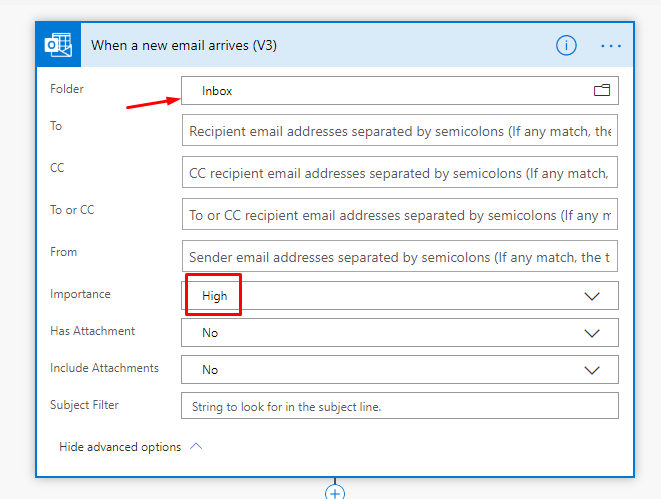
  1. You’ll need to create an Automated Power Automate and select the trigger as Office 365 Outlook. Select ‘When a new email arrived (V3)’ from the same and make sure you only select the High Importance marked emails
    selectOnlyHighImp
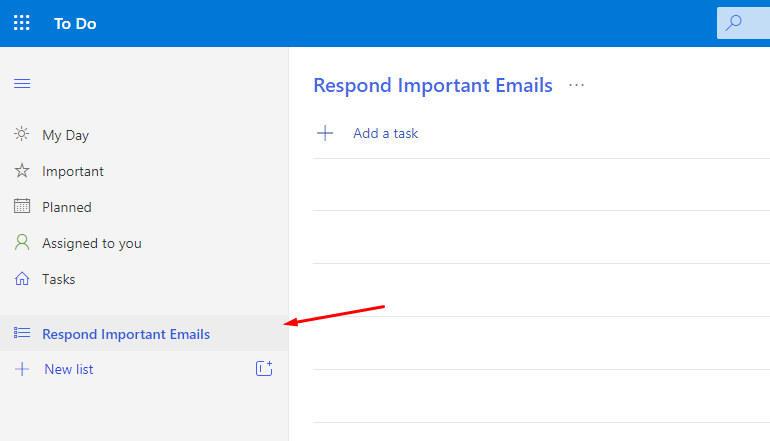
  2. Next step, create a To-Do Item. Select the List you have created. In my case, I created a separate list called ‘Respond Important Emails’
    toDoList
    And the step to configure the To-Do List item should be like this –
    addToDoStep
    In the above picture, I’ve made sure I select the correct List I want to create a To-Do in.

    And to give myself some time, I’ve added a reminder time of 2 hours from the time this Flow/Power Automate will run i.e. when the email will come in –
    add2Hours

How it works

Now, when an Important email will arrive in my Inbox as below –
actualEmail

Power Automate will create a To-Do in my created List
newItemAdded

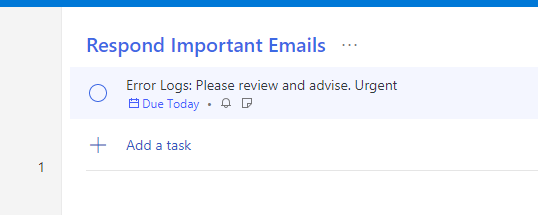
And it will look like this –
reminderIn2Hours
Also, the reminder is set to remind me 2 hours post the time the To-Do item was created. Just in case I’m into something else, I’d set myself a reminder.

Hope this helps! And you can use your creativity to improve your productivity!

Selecting (Current) in Environment in Power Automate CDS connector and why it matters

If you’re new to Power Automate, you must be wondering why am I given an option to select either (Current) or the actual name of the environment. Why can’t I just select the actual name?
selectEnv

Well, here’s why –

Importing into Other environments

So, when you import your Flow / Power Automate into other environment using a solution, be it from Sandbox to Production or to entirely different org in different tenant, here’s the behavior

(Current) selection

currentSelected

And if you Export this Flow and import into other Organizations, you can simply restore the connections to that organization by simply selecting the connection
authenticateCurrent

And it will be loaded with the current environment(s) as it was on the source environment
currentLoaded

Environment selection

Whereas now, if you have exported the Flow with Environments selected as the particular environment and not (Current) like below –
envSelect

When you import this into other environment, and when you try to authenticate, it will not go through and you’ll see something like this –
corruptedEnv

And if you wonder what the Org name is displayed in the picture above, it’s the Org Unique Name of the source environment
uniqueNameOfOldOrg

And that’s why, it’s critical to select (Current) environment when you develop flows and you know you want to have these imported to other environments.
Here’s Microsoft’s Current Environment connector’s official Docs – https://docs.microsoft.com/en-us/connectors/commondataserviceforapps?WT.mc_id=DX-MVP-5003911

Hope this helps!

Create your own Insight Cards with Power Automate in Sales Insights

Sales Insight’s cards are not just restricted by what is provided by Sales Insights for your Org, you can make your own using Power Automate too. Here’s how –

Requirements

These features aren’t free under Free Features of Sales Insights. Sales Insights license is for $50/user/month. More info on licensing here – Sales Insights Licensing

For free features, only pre-defined Insight Cards show up. You don’t get to create your Cards. To try this feature, you can create a 30-day Sales Insight trial.

Scenario

Let’s say you have a custom field on the Account called as Renewal Date which holds a Date of renewal for an account. And you want to create an Insights card to show up whenever this date is within 5 days –
fieldOnForm

Create a new Insights Card using Power Automate

Let’s say you have Sales Insights already setup in your Org and you have moderate knowledge of Power Automate (formerly known as Flows)

  1. Navigate to Sales Insights settings in Sales Hub > Global Settings > under Assistant Studio, look for Home and you’ll see a button to Create a new Insight card.
    navigateToCards.png
  2. Since our requirement is a pretty common one and Power Automate has a template for it already, you can select one or even start from scratch.
    template
  3. Make sure all the permissions are correct and you’re set to modify a Power Automate Template (or create from scratch)
    permissions.png
  4. Let’s say you are making this run on a daily business during your non-business hours.

Little Tweak to store a Reminder Date in D365

I wanted to have a custom reference of the Reminder Date in my own way in D365 instead of making the Power Automate query more complex.
I’ve created a Calculated Date field for RenewalReminder to store date of 5 days before the Renewal Date and this will be maintained for all records.
renewalDateField
So that the field stores 5 days prior to the Renewal Date
fieldValue.png
(I’ve hidden it away in actual implementation later on)

In the past, I’ve implemented a similar scenario to store current date used for views in D365, reference Blog: Store ‘Today’s Date’ in a field to use in workflow conditions in D365 CE

Design Power Automate

Since we’ve chosen a template to get a reference from, feel free to remove/modify whatever you need to –

  1. Now, I want to Flow to be triggered every day at UTC midnight
    flowPart1
    Details: Every midnight, fetch me Accounts where I RenewalDate has passed so that selective Accounts will be queried, and then I want to create cards for those accounts in the next step.
    And I’m only comparing the RenewalReminder field value to the current date since it will run everyday
    dateConfig.png
  2. In the final step, for Each account, I’ll create a Card with the Account’s details which the user needs to see.
    createCard.png
    I’ve set some properties which are quite self-explanatory. I’ve made the Open button on the card to open the record itself.
    And I’ve also made the card to show up only until the Renewal Date. (Maybe setup a separate process for Accounts past renewal date)

    And that’s that! Your Power Automate is ready to create Insight Cards which remind you of an upcoming renewal

Seeing it Run

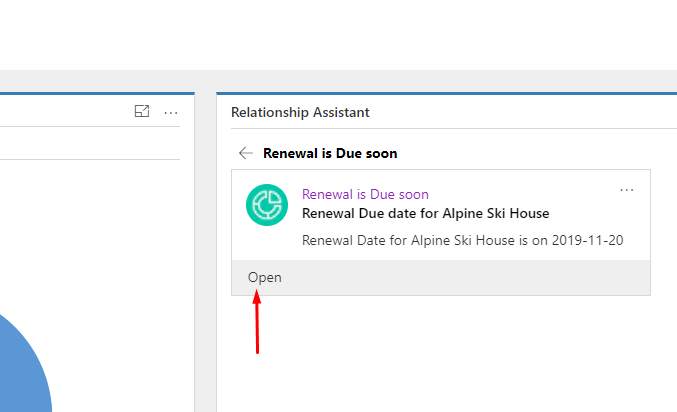
Now, every day when the Power Automate runs, it will create Insight cards for you and they’ll appear as you’ve configured them. In this case, For Alpine Ski House account, the Renewal Date is 20th Nov, so the card has started showing up since 5 days before the Renewal Date (Date stored in RenewalReminder for referencing, you can choose your own way to do so in Flows)
cardShowUp

Even in your Dashboards, since you’re the owner of the record and it’s set to show only to the owner, you’ll see it and clicking on the Open button will open the Account record itself
clickOpen.png

Hope this helps!!