Custom Help Pages and Guided Tasks for Unified Interface in Dynamics 365

Formerly, Learning Path – A complete new overhaul for guided help is Custom Help Panes in Dynamics 365


Enable Custom Help Panes

Access your System Settings for enabling this feature in your organization –

  1. Go to Settings > Administration > System Settings. Then switch “Enable Custom Help Panes and Guided Tasks” to Yes if already set to No.


Creating Custom Help Panes

Let’s see how you can configure these Custom Help Panes in your Dynamics 365 CE environment for different environments –

  1. For example, for Contact entity, if you navigate to the Question Mark option on your top navigation bar, a Custom Pane will show up. If the above System Settings is not turned on, it’ll navigate to Microsoft Docs instead.

  2. It’ll expand the Pane as follows. You can then click on the three vertical dots as shown and click on Edit –

  3. Once you Edit, you’ll open the Custom Help Pane editor on which you can start configuring the Help Pane.
    You can Start Editing the Pane. You can start by entering the Title and then move down to add different Help items to the Pane.

  4. Now, I’ve added Title of the Page to Contact Help. You’ll see Save button at the button where you can Save the progress. Now, I’ll go to Insert and add a Section.
    The first item is Insert a Section.


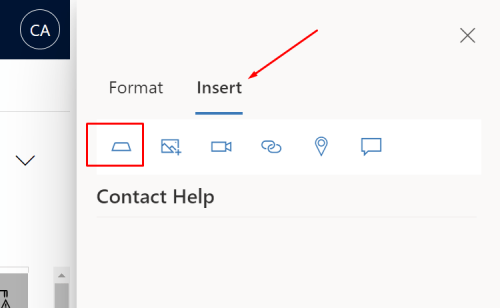
  5. Open clicking Insert Section, I can add a title to it. Now, I’ll label this section as General.
    And it will appear as below.


    Now, you can click inside the General section and can add rest of the items there.

  6. Next, I’ll insert a Link into the General section.


    And I’ll complete the below Info for the Link.


    It’ll appear as below –

  7. Next, I’ll Edit the Pane again. And select Coachmark.


    And add Coachmark details as follows –


    Now, you can drag to where the Coachmark should be highlighted when clicked.

    Now, when you click on the generated Link, the coachmark will prompt.


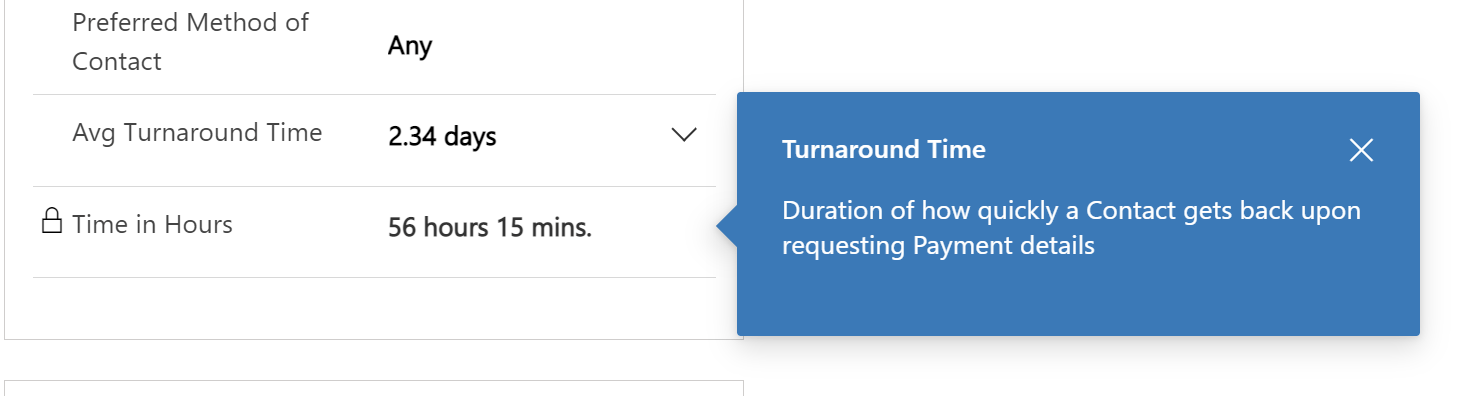
  8. Next, let’s insert a Balloon.


    Enter details on the Balloon like the Link title, actual Title as it should appear on the Balloon and the Details it should read out. Finally, drag the Balloon to the element.


    And here it drag it to a relevant field.


    And finally, when the link is clicked in the Pane, the Balloon will appear as below.


  9. Next, Let’s insert a Video.


    And enter the URL of the video and set preferences accordingly.


    Once Inserted, it’ll look like below.


  10. Now, the final Items which we will insert here is an Image.


    And it’ll ask me for a Image URL which is accessible over the Internet.


    And it’ll appear as below –


    I’ve also added a YouTube video explaining the above steps in case anything from the above was not already clear –

Help Page record

In Dynamics 365, the Help Page record looks as follows if you do an Advanced Find –


You can even move this between environments within solutions itself. You can test this out in the new make.powerapps.com Solutions and Add an Existing Help Page as shown below –

Hope this was helpful!

Here are more Dynamics 365 CE/CRM posts you might want to check out –

  1. Sign up for a Dynamics 365 Project Operations (Lite Deployment) environment and provision a new instance | Power Platform
  2. Make Managed fields Required in Dynamics 365 – Managed Properties Error [Workaround] | D365 CE Quick Tip
  3. Sign up for a Dynamics 365 Project Operations (Lite Deployment) environment and provision a new instance | Power PlatformFilter records in a View owned by a Team you are a member of | Dynamics 365 CRM
  4. Duration field in Dynamics 365 converts Hours value to Days in Dynamics 365 | [Flow Workaround to convert in Hours and Mins]
  5. Show custom ribbon button based on Security Role of the logged in User in Dynamics 365 | Ribbon Workbench in XrmToolbox
  6. Connecting XrmToolBox to an MFA enabled Dynamics 365 environment | Azure AD
  7. Form Access Checker in new Power Apps Form Designer | Model-Driven Apps in Dynamics 365
  8. Use Rich-Text Control for Multiple Lines of Text in Dynamics 365 CE | Quick Tip
  9. Ribbon button visibility based on a field value in Dynamics 365 | Ribbon Workbench
  10. Find deprecated JS code used in your Dynamics 365 environment | Dynamics 365 v9 JS Validator tool | XrmToolBox
  11. Make On-Demand Flow to show up in Dynamics 365 | Power Automate
  12. Track and Set Regarding are disabled for Appointments in Dynamics 365 App For Outlook message | Demystified

Thank you!!

Advertisement

Custom View Filter JS code not working in Dynamics 365 CE. Why? [Quick Tip]

One of the major pet-peeve is not understanding why the code isn’t working. And you for sure know you’ve written the correct code. But, thing just don’t work.

One such tricky situation is that of applying custom filter to fields using JavaScript in Dynamics 365 Customer Engagement apps.

Scenario

Let’s say you have a custom filter to be applied to a field and you’ve written your JS code on Load to apply the filter and everything (you know what you need to do!)

Example:
defaultCode

But the above is just not working. Why???
contactNotWorking

Reason

The reason is pretty simple! Because, the Lookup field is still using the one set on the field itself. Check that –

onFieldFilteringOn


The above should be turned off to make your code work since the field’s default OOB filtering takes precedence.
turnedOff

And now, your code should work (Provided everything in it correct)

working


Hope this quick tip helps!

Store ‘Today’s Date’ in a field to use in workflow conditions in D365 CE

Most of us need this in our workflow conditions to check against – to have today’s date handy and then use them in If conditions in workflows. But, the filter in If conditions in workflows don’t let you dynamically select On or after ‘Today’.

And when you want to compare to today’s date on selection of On or After, you are forced to enter a date and not dynamically select Today.

onOrAfterBlank

To overcome this, here’s what you can do to simply store Today’s Date in all records.

Calculated Date and Time field

So workaround this, you can simply create a new Date and Time type of Calculated field to store the current date and use it in your workflow conditions or wherever you need it.
createCalculatedField

Make sure the type of the field is Calculated and then, Edit the criteria.

Select Now() function to set the value of the field.
Now
And the final criteria condition will simply look like the below
finalCriteria

Once you save and publish all your changes, you’ll see that the field is automatically populated with today’s date.
allDatesPopulated.png

Using in Workflow Conditions

Now, you can use the same in the workflow conditions as shown below –

addedCriteria

and you should be able to use this in your workflow conditions which could look like this

addedOnCondition

Hope this quick workaround comes handy!


Booking Resources more than their capacity in D365 PSA v3

While booking resources, you often don’t pay attention to how much capacity the resource has.

Or rather, you are aware, but you want to book the resource anyway (only to change later on, which I don’t recommend.)

In that case, if you are trying to overbook a resource out of their capacity, you are treated with this message below –

errorMessage

Why this occurs?

This is because of the Work Hours defined for the Resource. Rather, what Work Hour Template is assigned to that resource. Now, let’s say, you are trying to book someone for 8 hours on top of their already booked 2 hours
overloading.png

If you switch to the Hours view, you’ll see the availability marked by white cells. Grey meaning, unavailable.
available

Remember, this is even said in the error message when you tried to click Book.
errorMessage

Alternative

Of course you can do this, but you should have a very strong reason to overbook resources. 🙂

Switch to Evenly Distribute Hours to allow the resource to be booked on top of the existing one.
evenlyDistribute.png

And this should be fine, but it will appear in red indicating that the resource is overbooked. Say, 10 hours (on top of already booked 2 hours) – exceeding the 9 hours total limit.
hardOver
redMarking

Suggested

You should rather Propose Book the resource, this way, the booking will exist and won’t bloat the schedule board. And then, you can decide later to do something with it.

Front Load – Proposed

Now with combination of Front-Load and Proposed, you should be able to Book for only the remaining capacity

frontLoadPropose.png
only7.png

Evenly Distributed – Proposed

With Evenly Distributed Proposed, you should be able to exceed the capacity and even Propose for the full time you want.
evenlyDisProposed.png
Full10Hours.png


Hope this quick tip helps! 🙂

Happy 365ing!


Summarizing D365 App For Outlook Setup in 3 steps with Exchange Online mailbox

Remember, there are a lot of considerations for security and synchronization. The above setup is recommended for all first time Outlook and Dynamics users. While all this, I would like to summarize the steps for all you first time users!

Here’s a crash course guide to setting up D365 App For Outlook for new on-boarders.

Part 1 – Outlook License

  1. So, you can have any of these licenses which has Outlook service included. Be it Enterprise E3, E5 etc. Basically, you need an Exchange Online mailbox. Also make sure the license is assigned to the user and Mailbox is created as below.
    license
    licenseAssign.png

Part 2 – Enable Server Side Synchronization

Once Mailbox is setup for the User. Now, let’s go the D365 For enabling Server Side Synchronization on the user’s mailbox. Remember, you must be a Global Administrator to Approve the Mailboxes.

  1. Go to Settings >Email Configuration > Mailboxes. Open Mailbox you want to enable SSS for.
    selectMaibox
  2. Then, click on Approve.
    approveMailbox
    confirmApprove
  3. Then, click Test & Enable Mailbox from the ribbon.
    test&Enable
  4. This is important, if you have multiple instances like Production, Sandboxes etc. Choose if you want to only enable it for the current organization and not else where, select the checkbox.
    enableForCurrentOrg
  5. The Mailbox in D365 will complete testing in a few minutes and you should see the status of the same  as Success if everything went well.
    allSuccess

Part 3- Enable D365 App For Outlook

Now, once Server Side Synchronization is enabled, you’ll need to go to Dynamics 365 App For Outlook in Settings.
D365FOSitemap

If you don’t see the above in your SiteMap, refer this post for the details and the shortcut- https://d365demystified.com/2017/11/14/missing-dynamics-365-app-for-outlook-from-settings-in-dynamics-365-v8-2/

Now, in my case, I had selected to enable this feature for anyone who has already been enabled with Server Side Sync to also be enabled for D365 App For Outlook.

Hence, when I opened the App, I could already see my being added to the App!!

alreadyAdded

Else, you’ll need to add other users explicitly by selecting them and clicking on Add App To Outlook button on the view shown above.

READY!

You’ll see the Dynamics icon that denotes the D365 App For Outlook, you can click on it and the D365 App For Outlook is ready to be used for that selected item.
iconReady

and the app will show up in the pane next to it.

readyApp

For detailed information on Support Matrix of the D365 App For Outlook, refer this – https://docs.microsoft.com/en-us/dynamics365/customer-engagement/outlook-app/deploy-dynamics-365-app-for-outlook

Here is also a YouTube video summarizing the same: 

Hope this summarizes the setup well!

Quickly get the right .NET Framework version to work with CoreAssemblies 9.0.2.x

Plugin development is a hassle if you don’t start of with getting the correct assemblies in place before you start writing your plugin code.

Best way is to get all of that from the NuGet Manager in VS. Preferably, we all pick the latest version from the NuGet Manager and pick Microsoft.CmSdk.CoreAssemblies. With 9.0.2.x version for v9 D365 environments, you might need to be careful with the .NET Framework version too. So, here’s a quick post about that.

Let’s say you pick Microsoft.CmSdk.CoreAssemblies

coreAssemblies

While installing, you get the below error
error

This is because your VS Project might not be on or might not have the correct .NET framework installed. If you go to Project properties, you can check that.

What version do you need?

Nuget.org will tell you about the version of .NET Framework required for that assembly.
correctVersion

Getting .NET 4.6.2

You can download among the different versions of Developer Packs available across your VS versions from the link below –

Link: https://dotnet.microsoft.com/download/visual-studio-sdks?utm_source=getdotnetsdk&utm_medium=referral

Once you have the correct version, 4.6.2 in this case, you can simply select that Developer Pack and download.

Alternatively, you can also click on Install other frameworks… to get to the link (note that 4.6.2 is not yet installed for me)
installOtherFrameworks

Once you see the downloaded Setup in your browser as shown below, simply run it –
downloadedPack

It sets up like a typical Windows application. Once done, you can check your project properties and select the .NET Framework version you installed.
4.6.2NowInstalled

Re-install Assembly

And when you now try to re-install the assembly, it should be successful and you’ll get all the references you need in your plugin.
successfullyInstalled

Hope this will help! 🙂

“Enable Mobile Offline” for D365 for Phones app in D365 v9.x

Finally! After much await and as April 2019 kicks in, the Mobile Offline capability for D365 Apps is finally setting in. But remember, this is in preview as of April 2019 and is not recommended for Production use.

Here’s you can enable Mobile Offline for any Dynamics 365 App

  1. You can see that you can now turn on Enable Mobile Offline for a certain app.
    beforeEnable
  2. Once you select it to tick, you’ll need to select a Mobile Offline Profile. Out-of-the-box, I have selected Sales Sample.
    selectedProfile
  3. These profiles are available for creation and edit in your Default Solution if you go and see
    profileInSolution
  4. And, they specify what properties should the offline mode have. Also, make sure the Users who should have this capability should be added to Users grid as shown below in the Offline Profiles.
    insideProfile
  5. Once done, save and Publish your Unified Interface app in the App Designer. Make sure the Profile is Published too!

Running Mobile Offline

When you open the Mobile App for that user, there’ll be a notification pop-up saying that changes on the org were made and you’ll need to update the same.

And when the update is complete, you’ll see the entities which are enabled for offline like the ones marked below (by a wifi signal icon)


So, let’s assume you are offline, you won’t be able to view records that are not enabled for Offline and will see the below error instead.


And the entities like Accounts, which is enabled for Offline, you’ll see the record as below

To summarize, that was the Offline for Mobile which is in preview as of April 2019. Hope this helps!

Import Time Entries in PSA from your Bookings in D365 PSA v3

Often, one of the real-life scenarios is making time entries by either remembering what you did the whole week or looking at the Schedule Board and based on what you were booked, making each Time Entry in PSA manually.

Tiresome and inefficient, right? Not any more, a cool feature let’s you just create Time Entries in PSA v3 by a single click.

Now, let’s say your Bookings look like the below. I’m booked on 2 projects across the week.

scheduleBoard

And now let’s see how we import these.

Import Time Entries

  1. Let’s see you want to make time entries now based on you Bookings in D365. On the Time Entries scree, drop down to the arrow besides Import.
    dropDown
  2. Select Resource Bookings. (Obviously, like this method – you can import from Resource Assignments and Outlook Sync too! But we will keep that for some other day)
    importFromBookings
  3. Then, you can select what all Time Entries should actually make it to the records. So you can select the ones you need and leave the rest.
    summaryOfImport
  4. Once you click on Import, it’s done! Time Entries are created.
    imported

Works like a breeze!

Making common developer/customizer tasks simpler by using “Level up for Dynamics CRM/365”

I know how it’s like to be a developer/customizer for D365 and having to fumble between windows to reach ‘name’ of fields, look behind the scenes trying to get a schema name, etc.

But all of that is simplified with this Chrome extension called as Level up for Dynamics CRM/365 offered by Natraj Yegnaraman

Link: Level up for Dynamics CRM/365

Using the Chrome Extension

Add the extension to Chrome as below –
addToChrome

Once you see Level up icon on Chrome like below, you can use it so do common tasks and much ease –

extensionAdded

And when you click it while in D365, you’ll get tools that you could use to work your way in Dynamics 365

controlCenter

One of my favorite among these, as a customizer/developer is – “Logical names”. I shows the logical names of the fields/Tabs and saves me time from going in to Solutions or opening the Form Editor
logicalNames

Loved this and the way it works!


D365 Quick Tip: Hide Dashboards in D365

This being an obvious approach to how Dashboards are by default seen by all. And how you can disable/hide for users. Even for D365 System Administrators!

Unlike usual forms, view or other records,

ribbon.png

And Deleting the Dashboard isn’t an option.

Enable Security Roles way

So a simple trick is to remove entire access from Enable Security Roles

enableSecurityRoles

Make sure Display only to these selected security roles
selected

And then just untick if you want to provide no access to anyone

removed

Hope this works!