Call a Flow from Canvas Power App and get back response | Power Platform

One of the most commonly searched topic is being able to Run a Flow from a Canvas App. And this has been demonstrated by many users over a period of time.

This is my attempt to summarize the same. Hopefully, this will clear out in a simpler way!!

Scenario

In this scenario, I will call a Flow using a Button and send the number in the TextBox, the Flow will do some calculation and I will get back the result which I’ll use to store and utilize. Simple!
Create a Flow

Let’s see how you can add a Flow to Canvas Power App –

Before we begin, remember, only the Flows which are outside a solution will be recognized inside a Canvas App.

  1. Here is my Cloud Flow. Since the Trigger of the Flow is a Canvas Power App, I’ll search for PowerApp in the Connectors and select the PowerApps connector.
    It has 1 trigger which is called as PowerApps.


  2. Once I select, I start the Flow with the trigger and then I’ll go on to declare 2 variables to do a simple operation.


  3. Now, I want to request Number 1 in the Canvas PowerApp which will be passed to the Flow.
    So, in the Dynamic content, you’ll notice Ask in PowerApps

  4. As I select this, a variable will be auto-created with will be the name of the variable “Number 1” (spaces will be removed), followed by _Value. Hence, resulting in Number1_Value.


  5. Next, I’ll create another variable to just multiply these 2 numbers together and produce a result. So, here’s my third variable. (Just for the sake of this example 😊)


  6. Now, to send back a Response to the calling Canvas PowerApp, I’ll again search for PowerApps connector in which and then look for the Action which is called as Respond in Power App

  7. Once I select that, I can then pass on my variable which is a result of my calculation.


  8. And I’ll send the result back to the calling PowerApp.

Accepting Parameters in Flow from Canvas App

Let’s look at the other part of the implementation where I will have a button pass value to the Flow and get back results.

  1. In my Canvas App, I have this structure where I have a Textbox called ‘ValueToSend‘, a button called ‘ProcessButton‘ and a DataTable called ‘ResultTable‘ to show the result.

  2. Now, in order to add a Flow on the trigger of the Process Selected button, I’ll select the button first and then make sure OnSelect is highlighted and then follow the step below.
  3. Now, let me add the Flow to the App first. I’ll navigate to Action and click on Flow.

  4. Upon selecting Power Automate, I’ll be shown all the Power Automate Flows detected by the App. Remember, only ones NOT in Solutions will be detected and available for selection.

  5. Upon clicking it, it will be added to the Power App and appear in the Data above and the Flow will be ready in the Formula Bar for you to complete calling it.


  6. Now, as you click on the Formula Bar to start writing the Flow, you’ll be asked the first parameter which we added as Ask In PowerApps in our Flow above.

  7. So, I’ll enter the TextBox which I had created i.e. ValueToSend, for example. And then close the Flow and then enter a dot to select the Outputs for Flow has to offer.
    As you see, I can now select the Output Parameters which we had selected.

  8. Once I select that, the Flow will send the value that I pass and collect back the calculatedValue from the Flow.


  9. Now, this is not stored anywhere, so it’s recommended you store it in a Variable/Collection for your use later.
    In my case, I’ll add it all to a Collection to populate the DataTable later on. Hence, I’ll add the entire thing to the Collect() method


  10. Next, since I want to display thee result in the label, I’ll assign the Label’s Text property to the variable I created above and collected Flow result in.


    Now, let’s Run this example.

Running

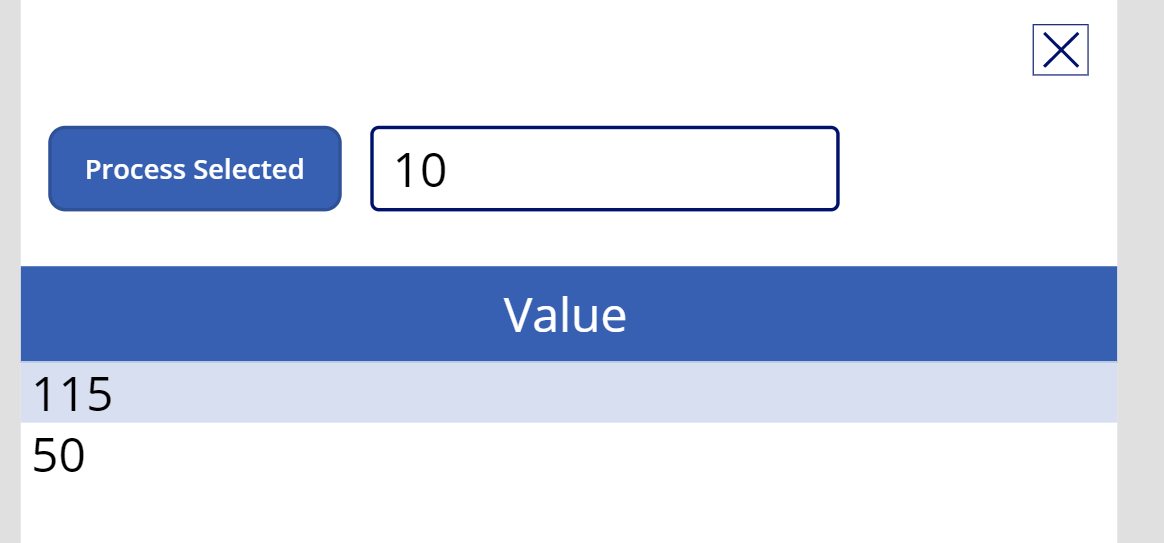
Now, when I call the Flow by pressing the button once I enter some value, the result will be calculated and the Collection will store the answers sent back by the Flow and it’ll keep adding to the collection on each request.

Likewise, your scenario could be anything per your implementation.

  1. First call to Flow


  2. Second call to Flow

Hope this was useful!!

Here are some more Canvas Power App posts you might want to check out –

  1. Retrieve Hashtags from Text in a Canvas Power App | Power Platform
  2. Rich Text Control for Canvas and Model-Driven App | Quick Tip
  3. Setting Correct Default Mode for Forms in a Canvas App | [Quick Tip]
  4. Rating Control to represent data from Dataverse in a Canvas Power App | Power Platform
  5. Clear a field value & Reset Form in a Canvas Power App [Quick Tip]
  6. Get Dynamics 365 field metadata in a Canvas App using DataSourceInfo function | Common Data Service
  7. Debug Published Canvas Power App with other users using Monitor | Power Platform
  8. Download a File from a Canvas Power App using a button | Power Platform
  9. Implement real-time search in Gallery of CDS records in a Canvas Power App | Power Platform
  10. Log Canvas Power App telemetry data in Azure Application Insights | Power Apps
  11. Call HTTP Request from a Canvas Power App using Flow and get back Response | Power Automate
  12. Launch URL on a Data Table Text column selection in a Canvas PowerApp | SharePoint Lists

Thank you!

Make Managed fields Required in Dynamics 365 – Managed Properties Error [Workaround] | D365 CE Quick Tip

On some instances, there are Managed fields in Dynamics 365 CRM (or CE if you want to call it) where we can’t change the required level of the field from Fields i.e. on the database level. And you get the below error –

Here’s an alternative way to do it.

Scenario

Let’s consider this scenario.

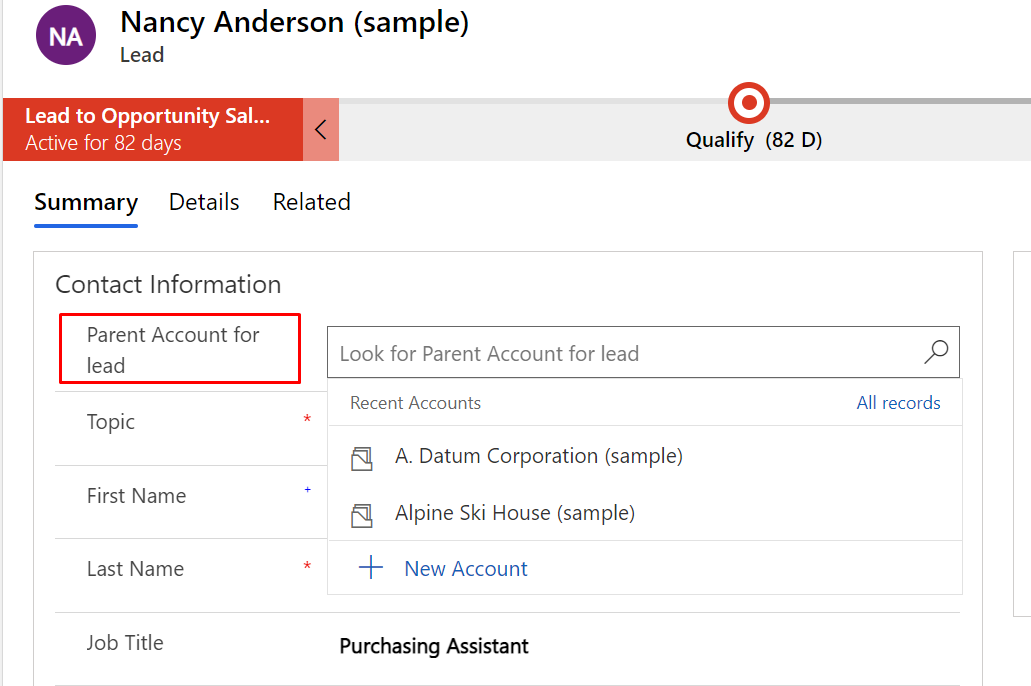
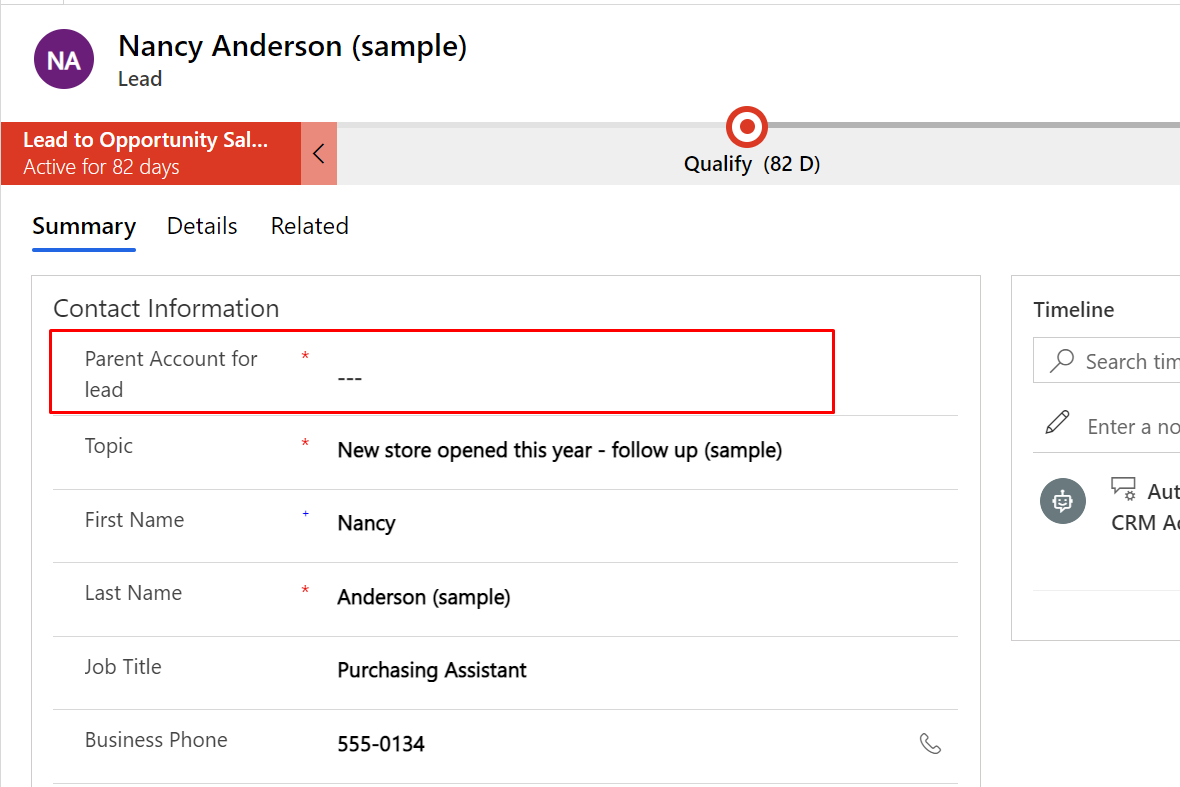
  1. Although Microsoft suggests you don’t change the behavior of Managed fields since they are designed with a purpose. However, let’s consider this scenario where you want to make the Parent Account for Lead as required on the form.
    When you try to change the Requirement Level as follows


  2. And while saving this change, you get this error.


    So how do we do it? Let’s see.

Workaround – Business Rule

Now, to overcome this particular scenario you can implement a simple Business Rule to make it required as follows –

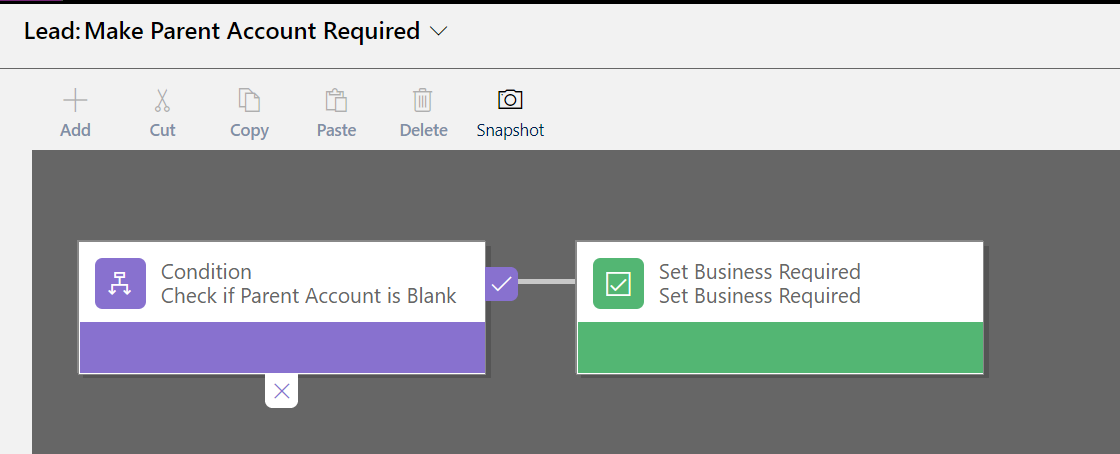
  1. If the field can’t be made Required on a database level, you can make it required on the form using Business Rule. Here’s how you create your Business Rule.
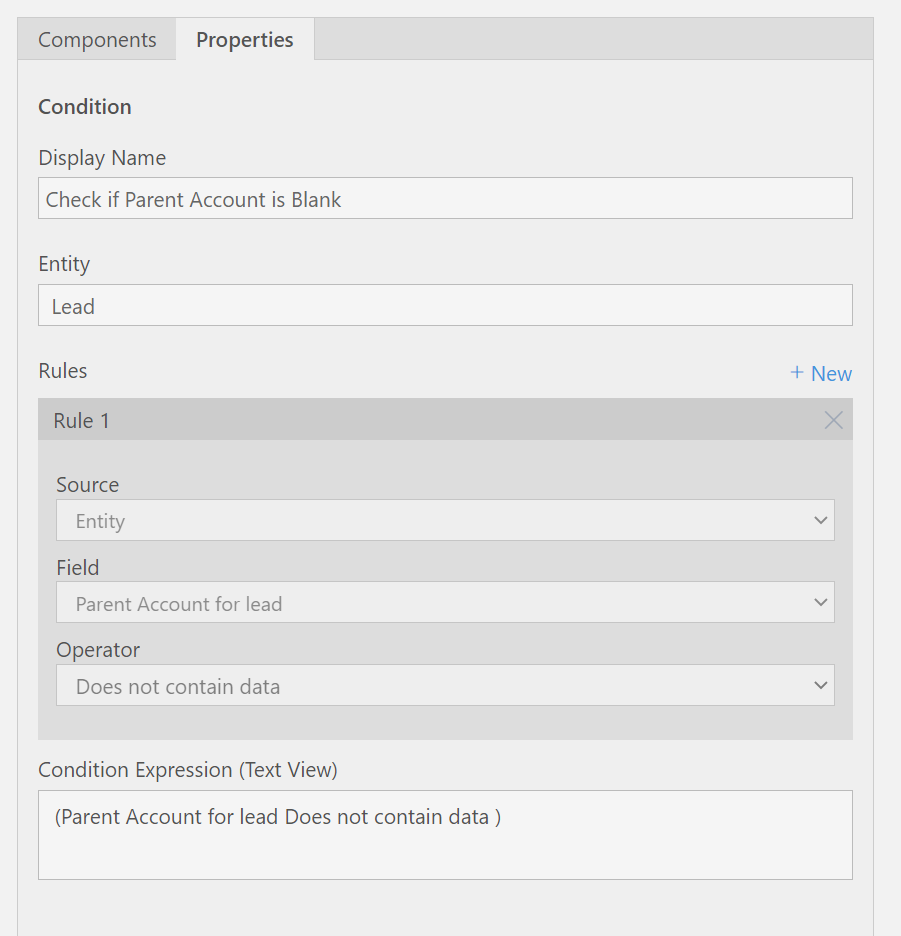
    As the Business Rule starts with the condition, here’s the check you need to add in case the field value is not entered.


    The condition I used is as below – Check if Parent Account for lead Does Not Contain Data

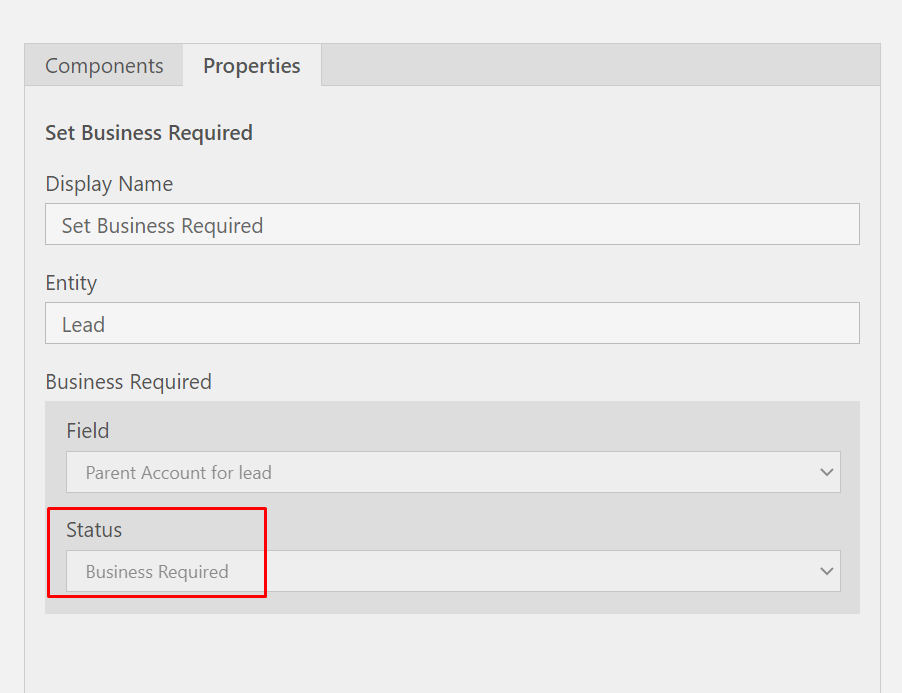
  2. If this is True, then go ahead and add a Step for True condition. Add Set Business Requirement Level

  3. And in this, you need to set the Business Required Status to Business Required as show below.

  4. And the result is the Business Rule which looks like in #1 above. Now, save your changes, Publish the Rule, Activate and check.
  5. The result will be that the field is not required once it doesn’t have data forcing the user to enter data for the same.

Hope this was helpful! Here are some more D365 posts which you might be interested in –

  1. Filter records in a View owned by a Team you are a member of | Dynamics 365 CRM
  2. Get GUID of the current View in Dynamics 365 CRM JS from ribbon button | Ribbon Workbench
  3. Dynamics 365 App For Outlook missing on SiteMap in CRM? Use shortcut link [Quick Tip]
  4. Import lookup referencing records together in Dynamics 365 CRM | [Linking related entity data during Excel Import]
  5. Mailbox Alerts Hide/Show behavior in Dynamics 365 CRM
  6. Excel Importing Notes (Annotation) entity in Dynamics 365 CRM
  7. Enable/Disable the need to Approve Email for Mailboxes in Dynamics 365 CRM CE
  8. Call Azure Function from Dynamics 365 CRM using Webhooks
  9. Show Ribbon button only on record selection in Dynamics CRM
  10. Accessing multiple occurrences of a field in Business Process Flow using JS in D365 CRM

Thank you!!

Enable Custom Code Components (PCF Controls) to be imported in a Canvas Power App | Quick Tip

In case you want to enable PCF Controls to be allowed to be embedded in a Canvas Power App, here’s what you do.

Default Behavior

By default, if you see as below i.e. you are not able to Import Code Components (PCF Components) into your Power App and see the below –

  1. In order to Import a Code Components in a Canvas App, you navigate to Insert tab and then expand Custom and click on Import Components.


  2. But, only Components published from other Canvas Apps are available to import.


    So here’s how you can first enable the ability to import Custom Code Components in Canvas Power Apps.


Power Platform Admin Settings

It is possible that this setting is turned off by default. Here’s what you need to do to turn it back on –

  1. Navigate to Environments’ section in Power Platform Admin Center (https://admin.powerplatform.microsoft.com/environments). Make sure you are into the environment where you are building this App in.
    Alternatively, you can also select the environment and click on Settings from the top ribbon.


  2. Once in the environment, click on Settings. (As I mentioned above, you can also access this from the Environments section itself without entering the Environment altogether)


  3. Once in Settings, expand Settings tab and go in Features.


  4. Once you open Features, you’ll find the Power App Component Framework settings on the right which might be turned off.


  5. Now, turn this ON and Save changes.


  6. Also, as an additional check also make sure the App too has enabled Components to be included in the App. This is available in the Advanced Settings of the Canvas App itself.


    Assuming you have turned that ON. Now, you can go in your Canvas Power App and Import Code Components.


Import Code Components in Canvas Power Apps

Now, let’s say you have already turned on Power Apps component framework settings for canvas apps as shown above.

  1. In you Canvas App, click on Import Components as shown below.


  2. And now, you should be able to also see a section called as Code where custom code components will appear.


  3. Let’s say you have imported this component, it will be available to use in the + menu in the Canvas App Studio.

Hope this was useful. Here are some more Power Apps / Power Platform posts you might want to check out –

  1. Rich Text Control for Canvas and Model-Driven App | Quick Tip
  2. Setting Correct Default Mode for Forms in a Canvas App | [Quick Tip]
  3. Rating Control to represent data from Dataverse in a Canvas Power App | Power Platform
  4. Clear a field value & Reset Form in a Canvas Power App [Quick Tip]
  5. Implement real-time search in Gallery of CDS records in a Canvas Power App | Power Platform
  6. Implement character length validation in a Canvas Power App | Power Platform
  7. Implementing Exit app, Logout and Confirm Exit features in a Canvas Power App
  8. Debug Published Canvas Power App with other users using Monitor | Power Platform
  9. AddColumns() function to dynamically add columns to a Data table in Canvas Power App | SharePoint List
  10. Log Canvas Power App telemetry data in Azure Application Insights | Power Apps

Thank you!

Retrieve Hashtags from Text in a Canvas Power App | Power Platform

Let’s say you want to make a collection of Hashtags used in a certain Text Input control. Here’s how you do it using the HashTags() function in Power Apps.

Let me demonstrate it quickly below!

Using HashTags() function

Now, let’s consider the below scenario where you want to collect the Hastags from a Text Input and later on use business logic on that.

  1. As an example, let me take a Description multi-line text field on the Canvas App and I’ll also take a DataTable to show the collected Hashtags in the same.
    I’ve renamed the Text Input to “Description”

  2. Now, to scan for hashtags and collect them, I’m writing the below formula on the OnChange operation of thee Text Input so that once I finish writing and move the focus away from Text Input, the Formula can scan for Hashtags and populate the collection.


  3. Now, here’s the formula I’ve used to scan the Text (String) for Hashtags present.


    Microsoft Docs Link for HashTags() formula –
    https://docs.microsoft.com/en-us/powerapps/maker/canvas-apps/functions/function-hashtags?WT.mc_id=DX-MVP-5003911

    Why ClearCollect instead of Collect? – Because only using Collect will scan the field and add all the hashtags again causing redundancy.

    Why I used Collection? – I could also use this collection elsewhere instead of directly assigning the above formula to the Items of the Data Table. Hence, the preference to use ClearCollect.

  4. Now, from the Data Table perspective, I’m simply populating the Data Table with the Collection [hashtagCollection] as the Data Source and make sure you also add the Result column as well, else, the Data Table will be blank even if the Collection is being populated.

Working

Let’s see how the table will be populated as we Run the App.

  1. Now, I’ve written as Hello #PowerPlatform and moved the focus out of the Text Input, the Data Table (via Collections) is populated with the results.


  2. Again, if I add another Hashtag i.e. #PowerApps, it’ll add to the collection (Basically, erase everything and scan all over again behind the scenes)

To demonstrate this example, I’ve created a YouTube video for the same, kindly check it out!

Hope this was useful. Here are some more Power Apps / Power Platform posts you might want to check out –

  1. Rich Text Control for Canvas and Model-Driven App | Quick Tip
  2. Setting Correct Default Mode for Forms in a Canvas App | [Quick Tip]
  3. Rating Control to represent data from Dataverse in a Canvas Power App | Power Platform
  4. Clear a field value & Reset Form in a Canvas Power App [Quick Tip]
  5. Implement real-time search in Gallery of CDS records in a Canvas Power App | Power Platform
  6. Implement character length validation in a Canvas Power App | Power Platform
  7. Implementing Exit app, Logout and Confirm Exit features in a Canvas Power App
  8. Debug Published Canvas Power App with other users using Monitor | Power Platform
  9. AddColumns() function to dynamically add columns to a Data table in Canvas Power App | SharePoint List
  10. Log Canvas Power App telemetry data in Azure Application Insights | Power Apps

Thank you!!

Sign up for a Dynamics 365 Project Operations (Lite Deployment) environment and provision a new instance | Power Platform

Unlike other Dynamics 365 Trial instances sign up process which is from https://trials.dynamics.com/, Project Operations are requested and provisioned in a different way as of early 2021.

Let me walk you through how you can provision a Dynamics 365 Project Operations Trial (Lite Deployment) on a brand new instance/tenant.

Selecting a Deployment Type

Here are Microsoft Docs links to help you understand the different Deployment types – https://docs.microsoft.com/en-us/dynamics365/project-operations/environment/determine-deployment-type?WT.mc_id=DX-MVP-5003911

To summarize –

Project Operations Lite Deployment is the CE only deployment meaning it does not connect to Finance & Operations for the full-fledged stocked/non-stocked scenarios talked about in the above MS Docs.

Dynamics 365 Project Operations https://dynamics.microsoft.com/en-us/project-operations/overview/?WT.mc_id=DX-MVP-5003911

Provisioning

It takes about 2-3 days for the Email to appear in your Mailbox.

  1. Below is how it looks like.

  2. There are 3 links in the Email. You’ll need to provision for the below 2 links –
    1. Office 365 Project Operations – Preview [Required]
    2. Dynamics 365 Project Operations (CRM) – Trial [Required]
    3. Dynamics 365 Finance and Operations Trial

Process

I’ve created a YouTube video to summarize Sign Up and Provisioning of the Project Operations Lite deployment

Hope this was helpful!

Here are some more Dynamics 365 Administrator related posts you might want to check –

  1. Turn Teams On / Off at Org Level, provisioning users | M365 Admin Center Tip
  2. Convert environments between Production and Sandbox | Power Platform Admin Center [Quick Tip]
  3. Create new Sandbox and copy Production over to it in PowerPlatform Admin Center
  4. D365 Admin Center: Instance Picker Link / Power Platform Admin Center | Dynamics 365 Environments
  5. Remove ‘This Email has been blocked due to potentially harmful content.’ message in Dynamics 365 Emails | OrgDbSettings utility
  6. Wave 1 2021 Early Access is now available | Opt-in

Thank you!