Calendar View for Work Order Bookings in Field Service | Wave 2 2020 Update [Early opt-in]

So here’s a nice improvement to see your Bookable Resource Bookings in a Calendar View as a part of the 2020 Wave 2 Update for Field Service!

Disclaimer: his is a preview feature and is planned, it’s no guarantee that this feature will make it to the final release of Wave 2 Updates.

Pre Requisites

  1. Make sure Wave 2 2020 Updates are available to your either via Early Opt-in or having directly applied to Org if you’re reading this from the future 😊

    Here’s the Microsoft Docs official link for the same – https://docs.microsoft.com/en-us/dynamics365-release-plan/2020wave2/service/dynamics365-field-service/calendar-view-booking-work-orders?WT.mc_id=DX-MVP-5003911

Switch to Calendar View

Here’s how you can leverage the Calendar View control for the Bookings.

  1. When you are in your Bookable Resource Bookings view, you might not have this view by default. So, you look to switch the view.
    look for Show As option on the ribbon button

  2. Now, you can see that a BookingCalendarControl is available for you to select.

  3. Once your switch, you’ll see the Calendar Control on the view with the Bookings arranged in a Calendar like control
    The default Month view looks like below

  4. You can even switch to look at 2 other views, Week and Day views.


  5. The Day view looks like below

  6. And the week View looks like the below

  7. Selecting the Booking will simply open the record in Dynamics as usual.
  8. And this is how you see it on the phone.

Config Options

To first address the most important question, it’s isn’t enabled by Default.

  1. But, you can make it defaulted on the Web application of Dynamics by changing it at the Entity level as shown below.

  2. These are the Properties that can be configured.

    Hope this was helpful!!

Here are some more Dynamics 365 / PSA posts you might find useful –

  1. Change Booking Status colors on Schedule Board for Field Service/PSA [Quick Tip]
  2. How to add Rating Values to Rating Models in D365 Field Service and PSA
  3. A manager is required for non-project time entries, absence, and vacation error in D365 PSA v3
  4. Modify Project tab’s view in Schedule Board in PSA v3 | Quick Tip
  5. Restrict User Access to a D365 instance using Security Groups

Thank you!!

Debug Published Canvas Power App with other users using Monitor | Power Platform

At times, users report that they can’t seem to know what’s wrong with their published App and the behavior is said to be unexpected. At times, no direct error is thrown to them but they don’t seem to understand what’s wrong.

Here’s what we can look at and invite them to join a Remote debugging session.

Open Monitor

In your Canvas Power App, you can find Monitor (which is in Preview as I write this post), this will open a new Monitor interface.

  1. Click on the Menu as shown

  2. Alternatively, also from the list of Apps available to you by permission.


  3. Now, when you open it, you’ll be in the Debug interface. In the interface, look for this open to Play Published App

  4. It’ll open the actual App in Play mode in the new tab.
    On the new Tab, you’ll see this message to ask you if you want to Join the session.

  5. Once you click on Join, the App will open with the message on top saying that you’ve joined the debug session.

  6. Let’s say I do a simple data entry operation by select one of the records and trying to modify it.


  7. As you then perform Actions in your App, your operations will be captured in the Monitor for you to review and debug what’s wrong.

  8. Also, if there are any specific errors that occurred, they are highlighted with Red row. You can simply click it and the details will appear on the right.

  9. Error can be investigated as below

  10. You can then investigate and see what was sent and how the payload was etc. and work towards further debugging/investigating it.

Invite Others to Debug session

Also, if you want others to simply look at what’s being captured. You can invite other users to your debugging session by clicking on Invite button

Enter their Email address and they’ll show up in the list. Copy the Link from their row and pass it on to them to join the session. They will be in read only mode and can see what’s captured and look at error details.

They can only watch and not Play the App themselves or invite others. See below

Hope this helps!!

Here are some more Canvas Power App based posts you might want to check –

  1. Implement character length validation in a Canvas Power App | Power Platform
  2. Download a File from a Canvas Power App using a button | Power Platform
  3. AddColumns() function to dynamically add columns to a Data table in Canvas Power App | SharePoint List
  4. Implement real-time search in Gallery of CDS records in a Canvas Power App | Power Platform
  5. Log Canvas Power App telemetry data in Azure Application Insights | Power Apps
  6. Call HTTP Request from a Canvas Power App using Flow and get back Response | Power Automate
  7. Send a Power App Push Notification using Flow to open a record in Canvas App | Power Automate
  8. Launch URL on a Data Table Text column selection in a Canvas PowerApp | SharePoint Lists
  9. Aggregate functions in a Canvas Power App | Using on SharePoint Lists
  10. Dependent OptionSets in a Canvas Power App for 1:N related CDS entities | Power Platform

Thank you!!

Pass Execution Context to JS Script function as a parameter from a Ribbon button in Dynamics 365 | Ribbon Workbench

One of the most common searches around customizing ribbon buttons is to send the Execution Context / Form Context as a parameter to the JavaScript function your Ribbon button is set to call.

Pass Form Context to the JS in Ribbon

Let’s see how you can pass form context as a parameter to the JS method on from your Ribbon button

  1. Let’s say you have a ribbon on the Opportunity that does something based on budget, so I’ve called it Budget.

  2. In the Ribbon Workbench, the button is calling the command which has a JS Function tied to it. Add a CRM Parameter to the JavaScript Action

  3. Once you select CRM Parameter, you’ll need to pass on the Primary Control as shown below

  4. Then, it’ll look like this on your JS Function

Accessing Form Context

Let’s say you have opened the Dev Tools on your browser by pressing F12, then click the button (assuming you either have set a breakpoint inside the function or using debugger; to stop at a point inside the function that button calls). And then you click the button


Once you debug, you’ll see this when you hit the debugger when you function is called.
The debugger will be hit

And if you check in the Console, you’ll see the complete context passed to the function

Hope this helps!

Here are some Ribbon Workbench related posts you might want to check –

  1. Pass selected rows’ GUIDs to ribbon button in D365 | Ribbon Workbench
  2. Debug Ribbon button customization using Command Checker in Dynamics 365 CE Unified Interface
  3. Show Ribbon button only on record selection in Dynamics CRM
  4. Hide Custom Ribbon Button [Easy Way] – Ribbon Workbench
  5. Enable Flow button on D365 Ribbon
  6. [SOLVED] Navigating URL from Ribbon’s custom button in Dynamics for Phones app
  7. Fix Ribbon icons on the Unified Interface in D365 CE
  8. D365 Ribbon Button shortcut to open a Document in SharePoint Online

Thank you!

Download a File from a Canvas Power App using a button | Power Platform

Let’s say you give a simple button to download a standard PDF file to the user. It could be a pre-defined file which already exists somewhere and your App readily has the URL to the file. You only need to provision a button to the user to download and they can simply click it and download the file to the device.

Let’s see how!

Scenario

Let’s say salespeople in your organization have access to Accounts and each Account has an exclusive Document to that Account, say, some type of Agreement/Whitepaper.

For simplicity, I’m storing the URL of the Document in a field. However, you can have a different (and better) ways to represent this. Finally, all you need is a URL to the file to be downloaded.

Download button

Here’s how I’m implementing it. To keep it simple, I’m only reading from the field on my Accounts, called as Agreement Doc URL.

Consideration: To keep this post simple, I didn’t go into the SharePoint Access settings, etc. Make sure the file is hosted over the internet and doesn’t have to go through a lot of settings to be accessible.

  1. Here’s my Gallery that shows all the Accounts.

  2. When I make a selected to any of the records, it’ll open the Form and pre-populate the form with the selected record. However, your application could be anything.
  3. I’ll place a button on click of which, I’ll write the Function to download a file.

  4. And the function used it Download()

    In my example, I’m choosing to download the file which is supposedly coming from my AccountView (which is a Gallery). Selected method is pointing to the row from my CDS Data Source which I selected in the Gallery and navigated to the Formevery of my Account records have their own respective URLs and Agreement Doc URL is the name of the field in which the URL to the document resides.

    Here’s Microsoft Document on this function – https://docs.microsoft.com/en-us/powerapps/maker/canvas-apps/functions/function-download/?WT.mc_id=DX-MVP-5003911

Working

Hope this helps! Here are some more Canvas Power Apps related posted you might want to check out –

  1. Call HTTP Request from a Canvas Power App using Flow and get back Response | Power Automate
  2. Send a Power App Push Notification using Flow to open a record in Canvas App | Power Automate
  3. Accept HTTP Requests in a Flow and send Response back | Power Automate
  4. Terminate a Flow with Failed/Cancelled status | Power Automate
  5. Adaptive Cards for Teams to collect data from users using Power Automate | SharePoint Lists
  6. ChildFlowUnsupportedForInvokerConnections error while using Child Flows [SOLVED] | Power Automate
  7. BPF Flow Step as a Trigger in CDS (Current Environment) connector | Power Automate
  8. Pause a Flow using Delay and Delay Until | Power Automate
  9. Generate Dynamics 365 record link in a Flow using CDS connector | Power Automate
  10. Text Functions in a Flow | Power Automate
  11. Loop through array of objects in a Flow & Create records in CDS | Power Automate
  12. Get Count of records retrieved in CDS connector in a Flow | Power Automate

Thanks.

AddColumns() function to dynamically add columns to a Data table in Canvas Power App | SharePoint List

At times, you want to do a quick calculation but the Data Source doesn’t have that column present.

Example, you’re populating some data from a SharePoint List which is a Scoreboard. But it doesn’t tell the difference between the current Score and Top Score.

So, to find how many points does the Score trails by the Top Score. To do that, we’ll dynamically add a Column to our Data Table in a Canvas Power App by using AddColumn() function.

SharePoint List & Canvas App

First part is the list itself which you already saw above, I have the below Canvas App –

  1. The only thing I have in this Canvas App is a Data table which I named as ScoreBoard

    Which will look like this

  2. I’m setting the Data Source of this Data Table to be DynamicList and not the actual SharePoint List. Because, in order to create a dynamic column, I should be using Collections in this demo and I can’t use the SharePoint List as Data Source directly.

  3. And to write my function, I’ll also add a Button so that on click of which, I can populate my internal Data Source in this case which is Collection called as DynamicList to be populated with data. You can use any other way as suitable.

AddColumns() function

  1. Since I want to generate my dynamic column, I’ll first use ClearCollect() method to add the SharePoint List with the dynamic column to my Collection which I’ll call as DynamicList.
    All this OnSelect of the Button which I added.

  2. The formula goes as below
    ClearCollect(<NameOfCollection>, AddColumns(<ActualDataSource>,”ColumnName”,<Expression>))

    In the above formula,
    ClearCollect(DynamicList) is being created to create a Collection called DynamicList and Clear if there’s any pre-existing data in it before populating fresh data.
    AddColumns(Scoreboard,”Trial By”, ‘Top Score’ – Score) – Scoreboard is the actual SharePoint List I’m using which doesn’t have the column, Trial By is the dynamic column I’m creating. And my expression is Subtract Score from Top Score so that I get the difference.

  3. Make sure you select the columns. Perhaps once you run in in your browser, and try to click the button, the column will be available for your selection in the below Edit Fields section. [I had to do a little back and forth, perhaps you might have a smarter way 😊]


    Here’s Microsoft Docs on the function – https://docs.microsoft.com/en-us/powerapps/maker/canvas-apps/functions/function-table-shaping ?WT.mc_id=DX-MVP-5003911

Run

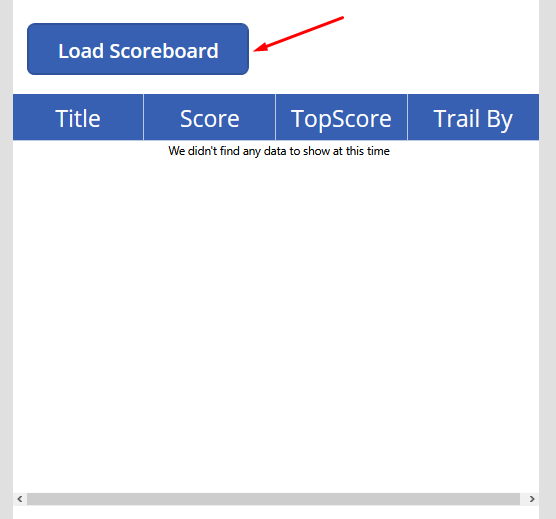
Now, when I run the app, and click on Load Scoreboard button, I see the below data populated with by dynamic column Trail By.


Hope this was useful.

Here are some more Power Automate / Flow posts you might want to check

  1. Call HTTP Request from a Canvas Power App using Flow and get back Response | Power Automate
  2. Send a Power App Push Notification using Flow to open a record in Canvas App | Power Automate
  3. Accept HTTP Requests in a Flow and send Response back | Power Automate
  4. Terminate a Flow with Failed/Cancelled status | Power Automate
  5. Adaptive Cards for Teams to collect data from users using Power Automate | SharePoint Lists
  6. ChildFlowUnsupportedForInvokerConnections error while using Child Flows [SOLVED] | Power Automate
  7. BPF Flow Step as a Trigger in CDS (Current Environment) connector | Power Automate
  8. Pause a Flow using Delay and Delay Until | Power Automate
  9. Generate Dynamics 365 record link in a Flow using CDS connector | Power Automate
  10. Text Functions in a Flow | Power Automate
  11. Loop through array of objects in a Flow & Create records in CDS | Power Automate
  12. Get Count of records retrieved in CDS connector in a Flow | Power Automate

Thank you!

Implement real-time search in Gallery of CDS records in a Canvas Power App | Power Platform

One of the most common asks is to be able to search CDS records in a Gallery control in real-time using a Text-box.

Search Box & Gallery connected to CDS

Let’s design a simple gallery that is populated with CDS records from Account entity.

  1. Take a Text Input control (Textbox) and make it look like a Search Box.

    In order to have the Search watermark, write the text to appear as water-mark, enter it in Hint text property of the Text input


  2. Take a Gallery control and select Data Source as Accounts from CDS.


    The way the above shown Gallery control is populated is by selecting a CDS Data Source which is as below –

Filter records

Finally, there’s a 1-line formula that will do the trick for you

  1. In the Items property of the CDS Gallery, I have to filter the records based on the Text of the Text Input on my form.


    Marked by green arrow Filter() function is the one which handles filtering of the data set based on the parameters demanded by the method. Here’s Microsoft Docs on the same – https://docs.microsoft.com/en-us/powerapps/maker/canvas-apps/functions/function-filter-lookup

    Underlined by red Accounts is the CDS data source which I want to filter on.

    StartsWith() is a method which is used to compare the start of the string in question. In this case, the text I enter in the SearchField textbox.

    1. ‘Account Name’ is the field in the Accounts dataset to be considered on which the search parameter is dependent.
    2. Underlined by purple SearchField.Text in which SearchField is the textbox which is used to query the Name of the Account and .Text is Text value of the string which will be considered.

    So at all times, whenever there’s a change in the Textbox value, the Items of the Gallery control are supposed to be updated with the filtered records.

Working

Now, when you use the App, here’s what it will behave like. As you type, the records will filter with a certain delay (depending on how large your dataset is)

Hope this was useful!!

Here are some more Canvas Power Apps posts you might want to check –

  1. https://d365demystified.com/2020/08/31/log-canvas-power-app-telemetry-data-in-azure-application-insights-power-apps/
  2. https://d365demystified.com/2020/08/25/call-http-request-from-a-canvas-power-app-using-flow-and-get-back-response-power-automate/
  3. https://d365demystified.com/2020/08/16/send-a-power-app-push-notification-using-flow-to-open-a-record-in-canvas-app-power-automate/
  4. https://d365demystified.com/2020/08/07/recover-deleted-d365-powerapp-environment-using-powershell/
  5. https://d365demystified.com/2020/08/07/recover-deleted-d365-powerapp-environment-using-powershell/

Thanks!

Using triggerBody() / triggerOutput() to read CDS trigger metadata attributes in a Flow | Power Automate

Now, for all the newbies working with Common Data Service (Current Environment) connector face a little constraint in order to read certain fields which are NOT in the list of the Dynamic Content of the CDS connector itself.

Scenario

Let’s say you want to read this field from the Body / Outputs of the CDS trigger in a Flow in Power Automate

Attributes (or rather supporting metadata) won’t be accessible directly since it’s not from the context of the CDS connector itself like you see for other fields as below –

Flow

In this example, here’s how our Flow will look like.

We’ll declare 2 variables after the CDS connector with Create or Update trigger on Accounts entity and how we can work with the results.

Reading from triggerBody()

When to use triggerBody() ? – When you want to fetch attributes from the body of the trigger.

Here’s how you can use triggerBody() function to read ‘RunAsSystemUserId’ from the outputs of CDS connector.

  1. Let’s say you have a variable declared to store your results. Let’s call it Trigger Body. Click on the fx sign to enter the formula

  2. Now, in the formula, enter triggerBody()?[‘RunAsSystemUserId’]. triggerBody() is a method to you’ll find it in auto-complete

  3. And the variable will look like this

Result of triggerBody() will be as below

Reading from triggerOutputs()

When to use triggerOutputs() ? – Whenever you need to access anything from within the body as well as some info from the header as well as shown in the 2nd screenshot in step #2 below.

Here’s how you can use triggerOutputs() funtion to read ‘RunAsSystemUserId’ from the outputs of CDS connector

  1. Let’s say you have a variable declared to store your results. Let’s call it Trigger Output. Click on the fx sign to enter the formula


  2. Now, in the formula, enter triggerOutputs()?[‘body/RunAsSystemUserId’]. triggerOutputs() is a method to you’ll find it in auto-complete.


    The reason this we write “body/RunAsSystemUserId” is because in the JSON structure of the complete Outputs of the CDS Connector, you’ll see that RunAsSystemUserId attribute lies inside body in the JSON.
    Whereas in terms of triggerBody() above, we are reading attributes from the “body” itself.

Result of triggerOutputs() will be as below

Hope this was useful!

Here are some more Power Automate / Flow posts you might want to check –

  1. Call HTTP Request from a Canvas Power App using Flow and get back Response | Power Automate
  2. Send a Power App Push Notification using Flow to open a record in Canvas App | Power Automate
  3. Accept HTTP Requests in a Flow and send Response back | Power Automate
  4. Terminate a Flow with Failed/Cancelled status | Power Automate
  5. Adaptive Cards for Teams to collect data from users using Power Automate | SharePoint Lists
  6. ChildFlowUnsupportedForInvokerConnections error while using Child Flows [SOLVED] | Power Automate
  7. BPF Flow Step as a Trigger in CDS (Current Environment) connector | Power Automate
  8. Pause a Flow using Delay and Delay Until | Power Automate
  9. Generate Dynamics 365 record link in a Flow using CDS connector | Power Automate
  10. Text Functions in a Flow | Power Automate
  11. Loop through array of objects in a Flow & Create records in CDS | Power Automate
  12. Get Count of records retrieved in CDS connector in a Flow | Power Automate

Thank you!

Convert environments between Production and Sandbox | Power Platform Admin Center [Quick Tip]

In most scenarios, you might need to either –

  1. Convert from Production to Sandbox or
  2. Convert from Sandbox to Production

Converting from Production to Sandbox

  1. Navigate to Power Platform Admin Center’s environments section – https://admin.powerplatform.microsoft.com/environments
    Select the environment you want to convert (you can even navigate inside this environment)

  2. You’ll be asked for confirmation. It states that any services will be unavailable during this conversion.

  3. Process initiated. It takes a few minutes.

  4. In Progress.

  5. Since there’s no refresh button to show you it’s completed, you’ll have to check back in a few minutes in the same link as above – https://admin.powerplatform.microsoft.com/environments
    You’ll find that the conversion must’ve been completed by now.


    Similarly, the opposite holds true while converting from Sandbox to Production! Hope this quick tip helps!

Here are some more Admin/PowerPlatform posts you might want to check out –

  1. Create new Sandbox and copy Production over to it in PowerPlatform Admin Center
  2. New ‘Capacity’ analytics on PowerPlatform Admin Center
  3. Create new CDS Environment and Database quickly from PowerApps Admin Center
  4. CDS For Apps Analytics instead of Organization Insights. Power Platform Admin Center

Thank you!