Create Application Users for Dynamics 365 environment | Power Platform Admin Center

Here’s how you now set up Application Users in Dynamics 365 CRM from the Power Platform Admin Center instead from the Classic UI and let’s see how the process is eased.

Classic UI

Previously, you used to see Application Users view in the Dynamics 365 CRM under Settings > Security > Users.


But it’s not longer available. Instead, you now go to the Power Platform Admin Center.

Register App in Power Platform Admin Center [PPAC]

Now, once you are in the Power Platform Admin Center, you can go to the Environment section –

  1. First, let’s say this is your App in your Azure’s Active Directory in the App Registrations. And now you want to create an Application User in Dynamics CRM for this App.

  2. Now, you can go to the PPAC (https://admin.powerplatform.microsoft.com/) and in Environments, look for your D365 CRM/Dataverse environment.

  3. In Settings, you’ll see Users, expand the same and you’ll see Application Users which is now it’s own separate option.

  4. Now, you’ll see the Registered Apps I have already and you can add from the “+ New App User” button above.

  5. Now, select the + Add an app button

  6. And you’ll see the complete list of all the Apps that are in your Azure’s Active Directory. Select the one your just created and click Add.

  7. And then finally click Create once you Add the App you want to create Application User for.

  8. And now, you’ll see the App added as an Application User for your environment.

  9. Now, you also need to provide Security Roles based on the requirement. Select the App User, and click on Edit security roles once available.

  10. In my case, I’m giving 3 Roles which I need to give and click Save.

  11. Now, I’ll also see how many Roles have been given to the App User.

Hope this was helpful! Here are some more Dynamics 365 posts which you might be interested in –

  1. Setup Postman to connect to Dynamics 365 CRM using OAuth 2.0 | Azure App Registration
  2. Dynamics 365 Storage Utilization | Dataverse Storage | Power Platform Admin Center
  3. Use Hierarchy in Roll Up Fields in Dynamics 365 CRM
  4. Filter records in a View owned by a Team you are a member of | Dynamics 365 CRM
  5. Get GUID of the current View in Dynamics 365 CRM JS from ribbon button | Ribbon Workbench
  6. Dynamics 365 App For Outlook missing on SiteMap in CRM? Use shortcut link [Quick Tip]
  7. Import lookup referencing records together in Dynamics 365 CRM | [Linking related entity data during Excel Import]
  8. Mailbox Alerts Hide/Show behavior in Dynamics 365 CRM
  9. Excel Importing Notes (Annotation) entity in Dynamics 365 CRM
  10. Enable/Disable the need to Approve Email for Mailboxes in Dynamics 365 CRM CE
  11. Call Azure Function from Dynamics 365 CRM using Webhooks
  12. Show Ribbon button only on record selection in Dynamics CRM
  13. Accessing multiple occurrences of a field in Business Process Flow using JS in D365 CRM

Thank you!!

Call Azure Function from Dynamics 365 CRM using Webhooks

This is a vast topic to cover in a blog. But I wanted to write from a bird-eye’s view of how this will pan out in an implementation where you perform a certain operation in Dynamics 365 CRM and an Azure Function is called to perform further operations.

This post is written keeping in mind fair knowledge of Azure Functions, Storage accounts and subscriptions in mind.

I’ll try to keep the article short, so stay with me! 🙂

Create a Function App in Azure

  1. Let’s say you have created a Function App in Azure already and want to connect to Dynamics 365 CRM. Click on the big + New Function button in the screenshot below
    resourceOverview_LI
  2. Now, since I want to keep Visual Studio as my driver for coding and deployment, I’ll create a new Project in Visual Studio of type Azure Functions and click Next
    newProj
  3. On the next page, I’ll give a relevant name and hit Create.
    createProjectButton
  4. Since we will be using Webhooks to connect to the Azure Function, the trigger chosen here is Http Trigger.Make sure you select Framework because Microsoft.Xrm.Sdk assemblies don’t work on .NET Code, but on .NETFramework only.And then you should take care of what your Storage Account and Authorization should be – Finally click Create once done.
    frameWorkSelected
  5. The Project will open with 1 .cs file, so make sure you name your plugin initially –
    accountPluginGetsInApp
  6. It’ll take a while to create the Project. Once created, go to the Portal on Azure and click on the Get Publish Profile
    getPublishProf_LI
    It will be downloaded on the computer. Keep it so that you can import it on the Project in Visual Studio to use for Direct Publish.
    downloadedProfile
  7. Now, right click and chose Publish to make your first push as is so that the Account Function gets pushed to Azure App.
    firstPublish
  8. Then, click on Import and import the Publish Profile settings downloaded in step #5 above –
    selectImport
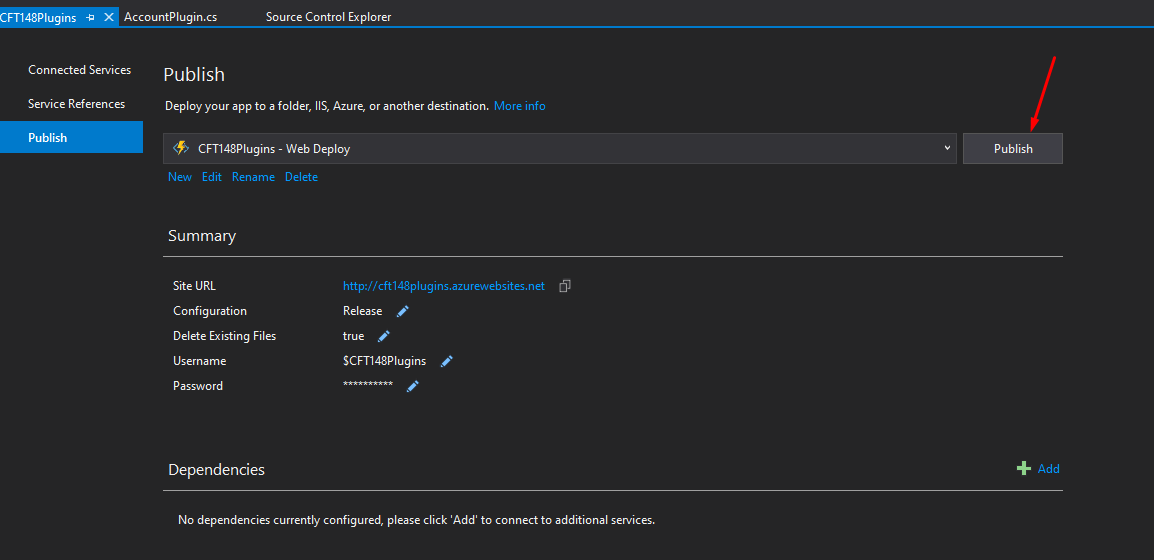
  9. Once imported, you’ll be taken here – simply Publish once.
    quickPublish
  10. Once Publish is successful, check in the Azure App in Portal, the Function should appear.
    accountPluginGetsInApp


Modifying code to read Webhook Call from Dynamics 365

  1. To keep it simple, I’m simply reading the context and then, you can flourish your App further to make it work as required.
    captureContextSo, I’m only reading the request into a String and logging it so that we can see it in the logs in the Azure Function app.
  2. You can use RemoteExecutionContext class to actually get all the contextual information into the Function app and then use it further. See below –
    remotecontext
  3. Once ready with your code, Publish it.

Now, let’s Register the Webhook and call the app.

If you’re also looking for remote debugging, this is a great article-Remote Debugging Azure Functions V2 “The breakpoint will not currently be hit. No symbols have been loaded for this document”

Register a Webhook in Plugin Registration Tool

Coming to Dynamics 365 CRM side of things, you can register a Webhook that will trigger on Account Name update to fire off the AccountPlugin Function App created above –

  1. In Plugin Registration Tool, register a new Webhook
    registerWebHook
  2. Enter Webhook Details. Select Authentication type as WebhookKey
    enterWebhookDetails
  3. Now, to get the key, go to the Function App in portal, and look </> Get function URL link.
    getKeyandURL
  4. Copy the same and paste in Notepad, separate the code part from the main URL
    selectCopy
    separateCodePart
  5. Paste the URL part in Endpoint URL and key in the Value field. Click Save.
    registerWebHookWIthDetails
  6. Now, add a Step to the Webhook. For this example, I’ve chosen update of Account‘s Account Name field
    addStepregisterStepInWebhook
    And Register it.

Execution

  1. The purpose was to simply ready Dynamics 365 Account record upon modification of the Account Name
    recordChange
    And save the record.
  2. In a minute or so, the Log will be generated (only the logs take a little longer to generate)
    triggered
    And thus, we are able to send data / or rather, call Azure Function and process Dynamics 365 CRM data using Webhooks.

Some other Azure related post you might like to look at – Use Azure App Passwords for MFA enabled D365 authentication from Console App

Hope this was helpful! Tried my best to keep it basic and short as possible. I’m sure you all will explore way beyond and develop awesome implementations!