Dynamics 365 Solutions History – Keep track of your deployments

As you might have observed, newer updates to D365 are bringing out vital features which were much needed in Dynamics 365 are finally rolling out.

One such feature is Solution History!

As you can see in your SiteMap, you’ll see Solutions History has been added
sitemap

It gives you a summary what solutions were imported, exported or deleted.

summary

Where does this come from?

If you look at the Default Solution, this is coming from Virtual Entity Data Provider
dataprovider

Availability

My observation is that this is available for organizations from 9.1.0.1471 onward.
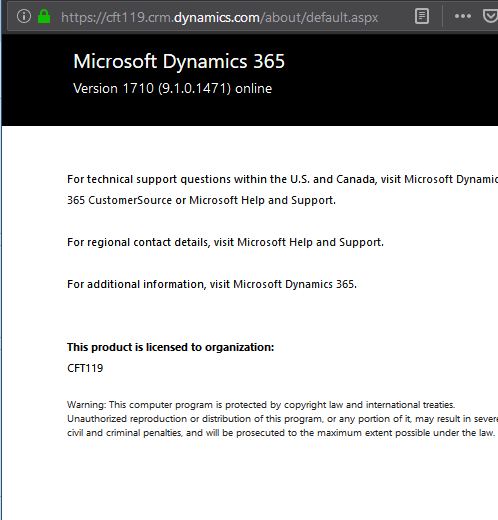
version

If you want to learn more about my Cloning and patching Solution, check my blog here – Using ‘Clone a Patch’ & ‘Clone Solution’ in D365 Solutions

Hope this helps.

D365 Quick Tip: Shortcut to Settings from the Unified Interface

If you’re spending time looking and wondering that you always need to go to the app switcher to go the Settings from the Unified Interface, you need to do the following –

Once you are in the Unified Interface, click on the Gear icon next to the help icon on top-right corner as shown below and click Advanced Settings

advancedsettings


Right on the next tab, Settings with the classic UI is shown –
fullsettings

And there’s nothing else on that SiteMap.


And that’s it! 🙂


D365 Quick Tip: Why BPF wouldn’t appear in D365 Unified Interface?

Got stuck trying to figure out why the Business Process Flow you created/modified couldn’t be seen in the Unified Interface?

Like I have this BPF called ‘Onboarding Process’

actualprocess

But when I look at the form on the Sales Hub, it won’t show up
blankrec


And when I Switch Process and try to apply, it won’t apply either
applying

Where could we check to make sure it appears –

  1. Whether it was Activated.
  2. Whether it was corrected ordered in the Order Process Flow
  3. Logged in user had correct privileges to access it.
  4. Even trying to switch to the process won’t make it appear!

and so on.

But there’s one thing that needs attention when

App Designer is the answer

The reason is the App Designer for the Unified Interface app you are in.

  1. In this case, the Sales Hub app.
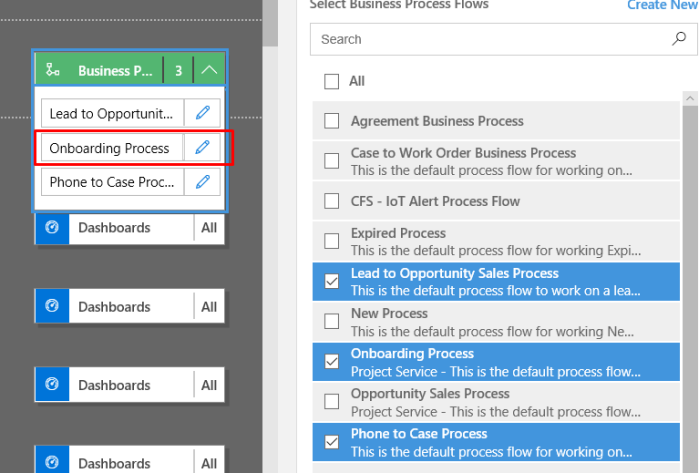
    Open the Sales Hub app and look for Business Process Flows section and expand it.
    missingprocess
  2. On the right hand pane, find your BPF and add it in the App Designer
    foundprocess
  3. Once you added, it should appear in the included BPFs. Save and Publish once confirmed
    added

BPF is now applied

Now, your BPF is finally added and you can work on it.
appeared

Hope this helped! 🙂

Failed to Generate Excel error when trying to Export Data from Advanced Find

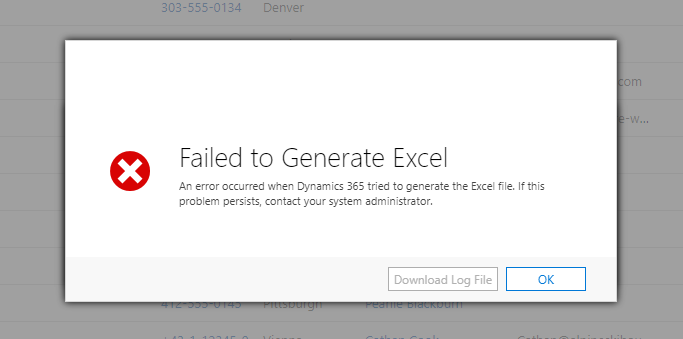
Here is the most common issues seen while trying to Export data to Excel from an Advanced Find view. And you end up seeing this error which says ‘Failed to Generate Excel’ –

error

Getting the Error

  1. So this is what you typically do – When you run an Advanced Find and click on Export when you see the results
    exportofaccounts
  2. Or, when you are in an entity’s view and you want to Export to Excel right from the ribbon button like this –
    exportfromview
  3. But, as soon as the File is being generated and you feel you’re there –
    generating
  4. You see this –
    error


Culprit

The reason for this is – Redundant Display Names of the fields used in the View you are exporting
duplicatedisplaynames

How to catch this

The easiest way to catch this is trying to Export the view to Excel Online, this will give you the exact error
exacterror
The Downloaded Log File won’t help much in identifying the column that is duplicate though, you’ll need to go through the Columns manually to check


Hope this helps! 🙂


Linear Slider Custom Control in D365 v9.x UCI

Using Custom Controls is the new cool in Dynamics 365. Specifically, if visual cue of approximation or ‘to what extent’ is priority over the textual/numeric data, using Custom Control is the best way forward.

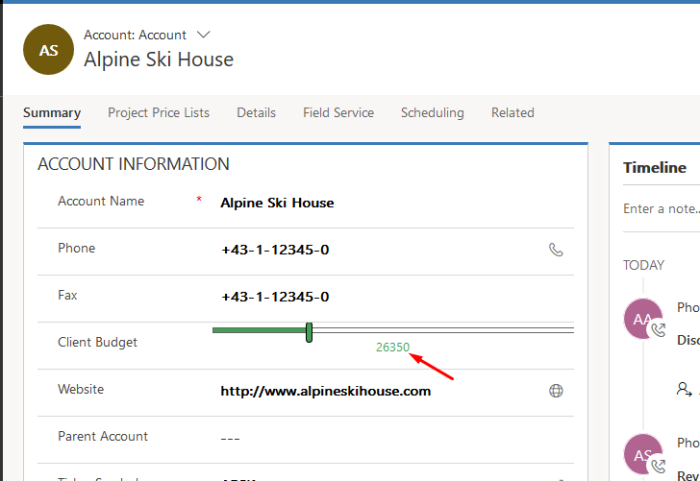
Something like this –

featured

Use Case

In my use case, I want to know the client budget so that I keep Quotes for them around the range they can afford.

Now, number will give me an idea. But a visual cue of the same will let me know the spending capacity of the client in the bigger picture.

So, I’ll use Linear Slider custom control on the Client Budget currency field to show a slider as well as the currency value.

Enabling Linear Slider on Currency Field

  1. So here, Client Budget (new_clientbudget) is my Currency type of field in D365.
  2. On the Form Editor, I’ll go to Properties of the field and go to Controls. Click on Add Control…
    addcontrol

  3. Select Linear Slider among others and click Add.
    addslider
  4. Then, I’ll set the properties of the control. Make sure you enable them for Web, Phone and Tablet as per your preferences.
    sliderproperties
  5. I’ve set the min and max range for the control, also that step which should reflect while moving the slider.
  6. Finally, click OK and publish changes.


Linear Slider

featured

You can even input custom number in the box and the slider will set to it.

manualnumber


Hope this was useful! 🙂

Thanks for reading.

D365 Quick Tip: Choose how currency field is displayed

In D365 CE Apps, you have 2 options to display the currency fields, by symbol or by the currency code.

Symbolic representation

symbolic

Currency Code representation

coded

Setting

With a simple setting, you can apply this change organization wide. Navigate to Settings > Administration > System Settings and under General tab, look for Set the currency display option.
setting

Pretty simple! 🙂

Run Dynamics 365 Diagnostics to check network latency

If you’ve heard complains about D365 running poorly throughout on a particular day, not necessary the issue could be with D365. It could be network latency.

And one of the first thoughts would be “To try on a different browser” without much investigation on it.

In fact, it could be bandwidth or latency issue. You’ll need Dynamics 365 Diagnostics here.

Check Latency

  1. You need to login to your browser session with your D365 credentials
  2. Enter this URL in a new tab https://<ORGNAME>.crm.dynamics.com/tools/diagnostics/diag.aspx
  3. It will show you a Dynamics D365 Diagnostics page like thisdiagnosticspage
  4. When you click on Run, it takes a few seconds to perform the test before showing you the results
    results

Hope this helps!


D365 For Outlook 2016: There is a Problem communication with the Microsoft Dynamics CRM server for D365 v9

One of the recent and most frequent issues faced while upgrade is that of the existing Dynamics 365 For Outlook 2016 setup which doesn’t connect to D365 v9.

Right after the environment upgrades to v9, D365 For Outlook’s older version doesn’t connect.

But that’s not the end of the story, obviously, there’s is an upgrade. So let’s see how to go about this process and why this happens.

Error

When you’re trying to re-enter credentials or connect to D365 v9 from the existing D365 For Outlook version, you see this error
error

Reason

The reason is that D365 version 9 required TLS 1.2. Detailed explanation of which you can find here – https://support.microsoft.com/en-in/help/4054414/dynamics-365-for-outlook-update-for-version-9-0?LCID=1033

Version Upgrade

You can either choose to upgrade to D365 For Outlook v8.2.2.137 which you can download from here – https://www.microsoft.com/en-us/download/confirmation.aspx?id=56327

Or, if you don’t have any pre-installed version, you can also directly setup D365 For Outlook – https://www.microsoft.com/en-us/download/details.aspx?id=56972

Make sure you have upgraded your D365 to v9 first. I’ve posted a related blog regarding this in the past and you can refer it here – https://d365demystified.com/2018/11/13/d365-quick-tip-higher-version-of-d365-for-outlook-wont-work-older-d365-online/


Hope this helps! 🙂

Delete Async Plugin Logs if plugin succeeds, save D365 storage space

Let’s see how we can efficiently manage D365 storage without bloating the storage with data that you might not need.

In my opinion, we don’t really need to know that the background process was successful or not, we typically care for what failed.

So, from an Asynchronous plugin standpoint, the logs in D365 is registered in the System Jobs and they create a ton of System Events if you are Importing data in D365 and your Async process is on the create of such records.

sysjobs

Check your Async plugin step

  1. Now, you can preserve this storage space by choosing to Delete the Async plugin logs.
  2. In the screenshot below, you can see an option to ‘Delete AsyncOperation is StatusCode = Successful
    deletelog

In this case, the System Jobs for the will not be created, thus, saving you valuable storage space if your plugin is run frequently.

Hope this helps.

Enable entity for Party List selection in Appointment

Out-of-the-box, you have fixed set of entities enabled for Party List fields in Appointment entity. Of which, you can select to be either in Required or Optional fields on Appointments.

But, what if you want to enable a custom entity for the same? You can do that was well.

Enable Entity for Sending Email

  1. In your custom entity, you can turn on Sending Email option on the entity level and the entity will be enabled for Party List.sendingemails
  2. And Publish your customization.
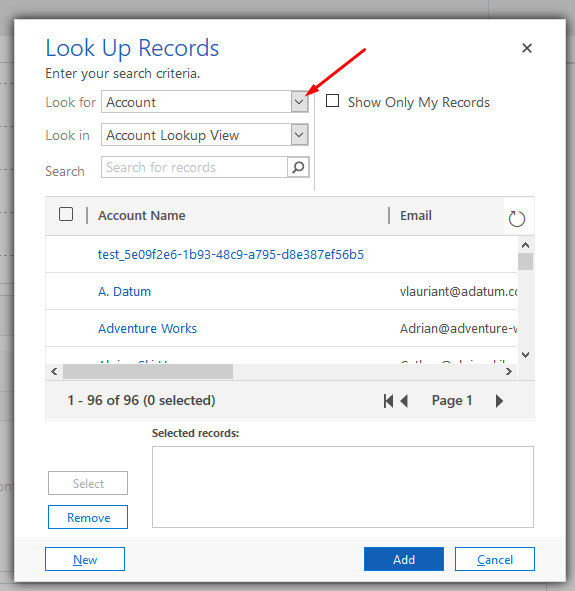
    Now, when you select the Required/Optional field in Appointment, Look for More Records
    lookForMoreRecords.png
  3. Select the Look For option to expose available entities
    expandlookfor
  4. And look for the custom entity you created i.e. Office Representatives my this case.
    selectentity
  5. And select the record you want
    jamieg
  6. And the custom entity record will be added to the Party List field
    addedtolist

The reason your see them enabled is because Email Address (emailaddress) field has been created for the entity i.e. the entity is now Email enabled.

Hope this helps!