Recommendation in Business Rules in Dynamics 365

Here’s a super-useful feature to describe a field in case the user is not sure if they should manipulate the field in any way or not.

In Dynamics 365 Business Rules, here’s how you can add Recommendations based on the condition selected in the Business Rules.

Scenario

Here’s the scenario we will use to demonstrate Recommendation –

  1. If my custom field called as “Context” on the Contact entity says – Customer, then, recommend the User to enter a US phone number in Business Phone field.
  2. Also, if the user choses to Apply the Recommendation, the Preferred Method of Contact will also be set to Phone.

Add Recommendation

Here’s how you can add a Recommendation post you condition in a Business Rule.

  1. In Business Rules, let’s say you will first set the condition.
    Here, I’m setting the value to check is Context = Customer


  2. If the Context field is set to Customer, then, show a recommendation. Here’s how you add a Recommendation


  3. Once you add a recommendation, you can set as to what it should point the recommendation to – In my case, I’m pointing to a Business Phone field.
    Now, the field I chose is Business Phone
    The Recommendation Title is the one that will be shown in bold when Recommendation bulb is clicked.
    The Recommendation Details will describe the Recommendation itself.
    Post this, expand the Details to add the Action to take under the Recommendation


  4. Once you apply the Recommendation Properties, it is also mandatory to add an Action – Else, the Business Rule won’t be enabled.
    In action, I want to set the value Email in the field Preferred Method of Contact.


    And the properties on the right hand side are –
    Preferred Method of Contact field to set to Phone


  5. Once all the changes are applied, you can simply Activate the Business Rule and test the same.

Working

Here’s an example –

  1. On Contact, notice the Business Phone field appears like a normal field.
    Notice the Context field says Marketing Only for now, I’ll update this in the next step.


  2. Now, I’ll select Customer

  3. When I do this, a Bulb appears next to Business Phone, click on it.


    When I click on it – The area will show the recommendation with the Title and the Recommendation I entered in the Business Rule step
    [Notice that the Preferred Method of Contact still says ‘Any’]. This will be changed when I click Apply.


  4. And when I click Apply, the Preferred Method of Contact will be set to Phone.


    Hope this was useful!

Here are some more posts on Dynamics 365 which you might want to check –

  1. Retrieve Metadata of Global OptionSets from Dynamics 365 in Power Automate | HTTP with Azure AD action
  2. Single record and multiple record auditing in Dynamics 365 to Audit record access | M365 Compliance
  3. Enable Plug-in Profiler in Settings area in SiteMap in Dynamics 365 | [Quick Tip]
  4. Disable Recent Records from Dynamics 365 Lookup Control | Model-Driven Apps [Quick Tip]
  5. Language format for Whole Number field in Dynamics 365 CE
  6. Custom Help Pages and Guided Tasks for Unified Interface in Dynamics 365
  7. Make Managed fields Required in Dynamics 365 – Managed Properties Error [Workaround] | D365 CE Quick Tip
  8. Sign up for a Dynamics 365 Project Operations (Lite Deployment) environment and provision a new instance | Power Platform
  9. Form Access Checker in new Power Apps Form Designer | Model-Driven Apps in Dynamics 365
  10. New App Designer for Model-Driven Apps | Power Platform

Thank you!

Find deprecated JS code used in your Dynamics 365 environment | Dynamics 365 v9 JS Validator tool | XrmToolBox

In this point in time where all developers are busy upgrading their Dynamics 365 JavaScript libraries to use the latest supported code.

Here’s an extremely handy tool by Michel Gueli (https://twitter.com/MichelGueli) called as ‘XrmToolBox.Dynamics365V9JavascriptValidator’

Dynamics 365 v9 JavaScript Validator in XrmToolBox

If you use XrmToolBox already, make sure you look for the below tool

  1. In Tool Library, search for Dynamics 365 JavaScript Validator and you’ll find this tool already.

  2. Once you find it, it’s pretty easy to use it.
    You’ll find it in the list of your tools as below


    Then, it’ll just Retrieve all the Resources first. This will take a minute or two depending on your environment.

  3. Once done, it’s best practice to already add all the code you want to analyze in 1 solution in your Dynamics 365 environment like so

  4. Now, in the tool , open the same solution so that you only focus on the JS files you need to work with.

  5. Once you open it up, you’ll find all you files listed below. Just double click one of them and you’ll find what all needs to be changed.

  6. Once you work your way up in the file by replacing the deprecated code, you can reload the solution again and find that there are no longer any warnings like on my other file below

NuGet Gallery Link: https://www.nuget.org/packages/XrmToolBox.Dynamics365V9JavascriptValidator/

Hope this was useful!!
In case you are looking for more XrmToolBox or Dynamics 365 related posts, please check below –

  1. Set Lookups in Xrm.WebApi D365 v9 correctly. Solving ‘Undeclared Property’ error
  2. Find Created On date of solution components in Solution Layers | Dynamics 365 [Quick Tip]
  3. Pass data to HTML Web Resource using browser’s sessionStorage in Dynamics 365 CE
  4. Pass Execution Context to JS Script function as a parameter from a Ribbon button in Dynamics 365 | Ribbon Workbench
  5. Get GUID of the current View in Dynamics 365 CRM JS from ribbon button | Ribbon Workbench
  6. Import lookup referencing records together in Dynamics 365 CRM | [Linking related entity data during Excel Import]
  7. Mailbox Alerts Hide/Show behavior in Dynamics 365 CRM
  8. Enable/Disable the need to Approve Email for Mailboxes in Dynamics 365 CRM CE
  9. Debug Ribbon button customization using Command Checker in Dynamics 365 CE Unified Interface
  10. Get Dynamics 365 field metadata in a Canvas App using DataSourceInfo function | Common Data Service

Thank you!!

Debug Ribbon button customization using Command Checker in Dynamics 365 CE Unified Interface

Developers, it’s a little irksome to keep struggling with issues around making your ribbon buttons work correctly during the development phase.

At times, you wonder why your button didn’t show up on the form although you had set everything up correctly. Or even for out-of-box button, that didn’t show?

Scenario

In this example, I’ll find out by my Project Service Quote record doesn’t have a Activate Quote button on the ribbon.

noActivationButton
We can use Command Checker to find out why.


Enable Command Checker

Remember, this only works in the Unified Interface and not on the classic UI.

Command Checker is a developer feature to identify how a certain ribbon button has or has not rendered on your form/view. So let’s begin –

Add this command to the end of the Entity form page URL: &flags=FCB.CommandChecker=true&ribbondebug=true

Add make it look like something like below –
https://<ORG_NAME&gt;.crm<REGION>.dynamics.com/main.aspx?appid=7fbb5a25-b903-ea11-a816-000d3a58f769&pagetype=entityrecord&etn=account&id=aaa19cdd-88df-e311-b8e5-6c3be5a8b200&flags=FCB.CommandChecker=true&ribbondebug=true


Command Checker

Form Command Checker

  1. Now, if you navigate to the ellipses on the ribbon, check that Command Checker has now appeared.
    formCommandChecked
  2. A Command Checker Window will appear as below. Navigate to the button you are having issue on.
    baseWindow
  3. Then, click on Command Properties as shown above to see what didn’t pass through. And as shown below, we could see that one of the conditions in Enable Rule didn’t get through and hence, the button didn’t show up on the ribbon.
    commandCheckerWindowIn case you are also looking at how to hide out-of-the-box ribbon buttons, check this – Hide Custom Ribbon Button [Easy Way] – Ribbon Workbench

Global Command Checker

And with that, you must have also observed the Command Checker on the Navigation Ribbon bar as well.
globalCommandChecker
And it opens up as below –
globalCommand


Some other Ribbon Workbench related posts –

  1. Show Ribbon button only on record selection in Dynamics CRM
  2. Enable Flow button on D365 Ribbon
  3. [SOLVED] Navigating URL from Ribbon’s custom button in Dynamics for Phones app
  4. Fix Ribbon icons on the Unified Interface in D365 CE
  5. Create a New Record button for Activity Type entity using Ribbon Workbench: D365
  6. D365 Ribbon Button shortcut to open a Document in SharePoint Online

Hope this helps! Happy 365ing!


Pass data to HTML Web Resource using browser’s sessionStorage in Dynamics 365 CE

If you’re using Xrm.Navigation.openWebResource(webResourceName, windowOptions, data), you probably are already using ‘data’ to the HTML Web Resource you are opening.

Here, I’m using an alternate method. I use JSON to send my data since it is widely preferred and used. Basically, I’ll Stringify my JSON object and add it to session storage, then – retrieve it from sessionStorage and Parse is back to object.


Opening Web Resource

Now, in my example, I’m not passing my data in the ‘data’ parameter provided by Xrm.Navigation.openWebResource(), instead I’m putting it in JSON.

  1. Let’s say, somewhere in my code, I want to send out a JSON to the HTML Web Resource which will open in a new window.
    So, instead of passing ‘data’ to Xrm.Navigation.openWebResource(), I’ll simply do the following –
    First, create a JSON object of what I want to send as data.
    Then, I’ll use sessionStorage.setItem(“<key>”, JSONObject); to add it to the sessionStorage and then open the WebResource using Xrm.Navigation.openWebResource()
    storedInSession

Reading from Session Storage

Reading from sessionStorage is as easy as putting data into it. Just the reverse –

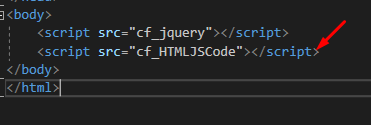
  1. Assuming you are familiar with HTML and JS references, make sure you have correctly referenced the JS file you want to use with your HTML. Provide the name of the Web Resource in which you have your JS code.
    fileReferrenced
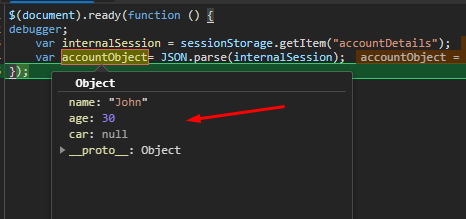
  2. Once the HTML document is loaded (I prefer using JQuery here to put things into document), you can read the same using sessionStorage.getItem(“<Key>”);

    And then, JSON.parse() the object retrieved from sessionStorage.
    retrived

  3. Also, if you look at the Application tab in Dev Tools of your browser, you can check for Session Storage info.
    You’ll find the Item you stored to the session
    inApplication

That way, you can use sessionStorage to keep your data in the browser session if you don’t have any other concerns or reasons not to use sessionStorage.


Hope this helps!!

Set Lookups in Xrm.WebApi D365 v9 correctly. Solving ‘Undeclared Property’ error

Using Xrm.WebApi needs you to be careful with the field names and what to use when. Especially, when you are dealing with Lookups.

One of the most common errors you’ll come across is the one like below – “An undeclared property (fieldname you entered) which only has property annotations in the payload but no property value was found in the payload.

error

This is confusing as to what needs to be put in while setting the lookup.

If you have done the below, entered the name of the field which is all in small caps  –

object[“msdyn_resourcerequirement@odata.bind”] = “/msdyn_resourcerequirements(<Guid>)”;

This will result in the above error!!!


You’ll need to put the Schema name of the lookup field instead and this should solve your problem –

correctName.png

and the code should look like this –

object[“msdyn_ResourceRequirement@odata.bind”] = “/msdyn_resourcerequirements(<Guid>)”;

And this should totally work for you!!

Hope this helps! 🙂

Modified By (Delegate) & Created By (Delegate) in D365

These fields which are everywhere but you don’t really pay attention to really mean something worth.

So if you feel you want to get hold of someone for modifying a record. Maybe also take a look at Modified By (Delegate) just in case so that the actual user might be someone else who wanted to do another thing on that record. 🙂

Impersonation is one of the basic aspects of a plugin step that you need to carefully design to let another user (usually Admins for most implementations) make the plugin run under their context instead of giving more security roles/privileges to every other new user.

Well, same goes for Created By & Created By (Delegate) also!

Modified By

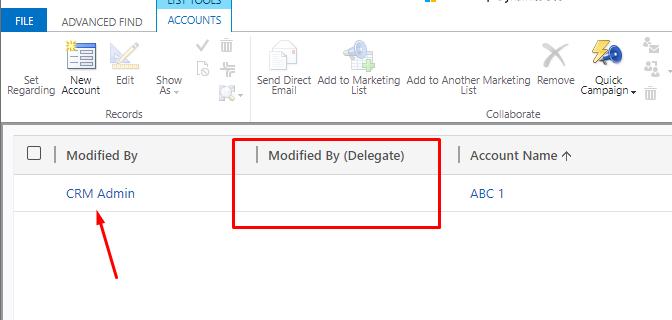
Usually, when you update something on a record, the Modified By is updated as expected. But notice that Modified By (Delegate) is not updated.
noDelegate.png

That’s because you are the rightful owner of the record and there’s no other person involved.

But what is someone else is modifying the record (who don’t have access to that record)?

In that case, Modified On (Delegate) field is populated with the name of that user. In such scenarios, Modified By (Delegate) user is the one who caused changes to the record.

delegatedUser

Why Modified By (Delegate) was populated

The reason this was populated was because the record was updated through a plugin by a user who doesn’t have Write access to the record.

But because the user invoked a plugin which was Impersonating as a User who has rights to the records, the record was successfully updated. And this, the actual user who called the plugin is the one who will be populated in the Modified By (Delegate) field.

impersonatingOtherUser

Hope this quick tip helps!

Business Card Scan in D365 CE Wave 2 Updates

We are close to getting D365 Wave 2 Updates in Oct 2019 and with Early Opt-in to Wave 2 Updates, we are already able to access one of the most desired and requested features of this release – Business Card Scan!

If you are yet to enable Wave 2 Updates for your organization, follow me post on the same here – Early Opt-in for October 2019 Wave 2 Updates. Please do so only on your testing/sandbox environment and not on Production instance yet.

Note that this is only available in US and EU regions as of now and works only in the Unified Interface.

Phone App to scan business cards

Most obvious thing to do is to pull out a phone to scan a card.

  1. Open Dynamics 365 for phones app. And navigate to Quick Create Menu
    qcMenu.png
  2. Then, select Contact
    contactQC
  3. On the Quick Create of Contact form, you’ll see a Business Card control that opens the Camera
    businessCardButton
  4. It will open you Camera and you can simply take a picture of the business card itself like below
    picTaken
  5. It will upload and fill out all the captured information from the card to the Contact form.
    infoCaptured
  6. You can simply Save the record and you’re done. It will be uploaded to CRM.


Uploaded

And here it is, uploaded in CRM already.

enteredInCRM

And if you take a look at the record, the picture that was used is also stored in Dynamics
cardInfo

Custom Control Used

If you look at the form customization of the Contact’s Quick Create form, you can see what control was used. It’s AI Builder Business Card control
controlUsed

Hope this helps!

Qualify Lead in D365 CE: Select which entity records should be created

Wave 2019 Updates brought some really sought-after features. Another one which I would like to bring up is the Lead Qualification experience.

I’ve written this post when I enabled the Early Opt-in of Wave 2 Oct 2019 Updates. To enable Early Opt-in, please refer this post – Early Opt-in for October 2019 Wave 2 Updates

This is set to release for the Oct 2019 Updates.

Default Behavior

So when you Qualify Lead by default – Account, Contact and Opportunity records are created.
fullQualifyLead

Notice that by default, the created Account and Contact are always auto-filled.
all3Records

Lead Qualify Experience in System Settings

By default, D365 will let you create all three – Account, Contact and Opportunity records when you Qualify a Lead.
originalSetting

When you select No, you’ll be asked which all entities should be created when you Qualify a Lead.
selectNo


Lead Qualification for selected entities

No, when you click on Qualify button, you’ll be treated with this Dialog box where you can choose what records should be created.

I’ll select only Opportunity this time
selectWhichOnes


And only Opportunity will be created and notice that the Contact and Account are blank this time.
blankOpp

Hope this is useful!

Thanks.

Related Blog on one of Wave 2 2019 Update: Customize Opportunity Close dialog box in D365 CE v9 Unified Interface – Wave 2 update

I’m also listed on the Top 100 CRM Blogs and Websites on Feedspot. It has a curated list of awesome bloggers.

Workaround to get Plugin Profiler from the Unified Interface in D365 CE

Developers like me, often need to Profile the Plugin so see what logic you are implementing and this is pretty common in the development lifecycle. But, Let’s say you don’t have the classic UI at your disposal and need to download the Profiler from the Unified Interface itself – Here’s a little detour you’ll need to take to get it right.

Alternatively, using Persist To Entity is also preferred. But example – if you have a plugin on Create and on PreOperation, you won’t want to record to be created, you can go with the below –

Ease of the Classic UI

On the classic UI, you would get the Profiled file correctly just by Download Log File button on the interface itself.

classicProfiler

And the file has correct data starting with –
startingWIth

And ending with
endingWith.png

Profiler Message on the Unified Interface

As of now, the message pop-up for the profiled plugin will give you this –
currentUCIMessage.png

And the file has this –

currentUCIFile

And the Plugin Registration Tool doesn’t understand this! You’ll get this parsing error if you try –
parseError
parseErrorMessage

Turn On Exception Logging

Before that, you can check this post on how you can quickly go to the classic UI’s Settings area here – D365 Quick Tip: Shortcut to Settings from the Unified Interface

To be able to capture these details in the Plugin Profile entity, enable Plug-in and custom workflow activity tracing from the System Settings as shown below
turnOnLogging

You can’t add Plug-in Trace Logs to UCI

  1. Smarter way would be to add the Plug-in Trace Log entity to the UCI App itself and not having to go back to the classic UI. Unfortunately, you can’t do that.
    cantAddToUCI.png
    With that, we will have to go back to the Classic UI’s Settings > Plugin-In Profile Area to get out Profiled Log File.

Plug-In Trace Log

  1. Assuming you are back in the classic UI (maybe keep this open in another tab)
    Open the Trace Log record
    openProfileRecord.png
  2. Scroll down to the very bottom to find the Exception Details
    profiledData.png
  3. Now, copy that to the text file and attach it in the Plugin Registration Tool
    correctProfileFile.png
  4. This should work and you won’t get an error
    attached.png

Phew! I know this is lengthy. But we hope this will soon be eased 🙂

Hope this helps you!