Using outputs() function and JSON Parse to read data from missing dynamic value in a Flow | Power Automate

I faced this issue lately and not sure if it’s a bug or something I might be missing. But, I couldn’t find anything in Dynamic Content in a Flow and I was not able to pick fields to use further in a Flow.

Not sure how many of you faced this since most fields you need are available in a Flow’s Dynamic Content part.

Scenario – Adaptive Cards for Teams issue

I had this one scenario in particular where the Adaptive Card I created for Microsoft Teams’ User sends back Response but the Dynamic Content doesn’t appear in the steps after the Card Step.

  1. See below that I’ve declared a Variable just to show that the Dynamic Content that should appear after the Adaptive Card.

  2. And if I press the Dynamic Content as shown above in Step #1, and minimize all the content, I don’t see the Teams’ Dynamic Content variables at all

  3. And the Adaptive Card didn’t return the below Outputs


    That’s when we should use outputs() function to read this data.

outputs() function

Here’s how you can use the Parse JSON action and outputs() method to read the Outputs of the step you want and then Parse JSON so that these can be picked as variables/dynamic values in steps following this –

  1. Take Parse JSON action from Data Operations in a Flow

  2. In that in Inputs, you can use Function on the Content field.

  3. And write outputs function as shown below –

    And the complete the function as below

    Explanation:
    MyCard is the name of the step of my AdaptiveCard I used. If the name of you step has spaces like “My User Adaptive Card”, then the function will look like outputs(‘My_User_Adaptive_Card’)[‘body’]

    body is written because if you see in the Outputs originally in the Scenario section above, all results are sent in body field of Outputs.

  4. Now, since you don’t know the Schema, just put a “{}” so that you can Save the step. (This is required)

  5. Run the Flow once and collect the Outputs from this ‘Parse JSON 2’ step as shown above.
    Copy the Outputs

  6. Now, open the same Parse JSON 2 step which you created. And click on Generate from sample

  7. And paste the schema in the box.

  8. Once done, schema will be generated like this.

  9. Now, this Parsed Outputs can be further used which will have the data from the Step which didn’t yield Dynamic Content
    Example, I’ll create a variable to show Dynamic Content that can pop-up

  10. It’ll show all the fields from the Card in the Parse JSON 2 outputs


    And that solves the problem!!

    Original Microsoft Documentation on the same is: https://docs.microsoft.com/en-us/azure/logic-apps/workflow-definition-language-functions-reference#outputs?WT.mc_id=DX-MVP-5003911

Hope this was helpful.

Here are some more Power Automate / Adaptive Card content you might want to look at –

  1. Adaptive Cards for Outlook Actionable Messages using Power Automate | Power Platform
  2. Make On-Demand Flow to show up in Dynamics 365 | Power Automate
  3. Save Adaptive Cards work using VS Code Extension – Adaptive Cards Studio | Quick Tip
  4. Adaptive Cards for Teams to collect data from users using Power Automate | SharePoint Lists
  5. Task Completion reminder using Flow Bot in Microsoft Teams | Power Automate
  6. Run As context in CDS (Current Environment) Flow Trigger | Power Automate
  7. Using triggerBody() / triggerOutput() to read CDS trigger metadata attributes in a Flow | Power Automate
  8. Run As context in CDS (Current Environment) Flow Trigger | Power Automate
  9. Terminate a Flow with Failed/Cancelled status | Power Automate
  10. Pause a Flow using Delay and Delay Until | Power Automate

Thank you!!

Save Adaptive Cards work using VS Code Extension – Adaptive Cards Studio | Quick Tip

If you’ve started working on Adaptive Cards recently and always struggle with losing Adaptive Card payload from https://adaptivecards.io/designer/, you should use the Adaptive Cards Studio Extension.

So there’s a Visual Studio Code Extension for the same which will help you preserve and preview the Adaptive Card you are working on.

Problem Statement

While working with Adaptive Cards, we often struggle to make sure the browser tab doesn’t gets closed accidently and you lose your progress on the Adaptive Cards you are working on.


And, if you are struggling to maintain the Card Payload in a temporary file, there’s a smarter way available to do so using VS Code’s Extension – “Adaptive Cards Studio”

VS Code Extension – Adaptive Card Studio

Here’s how you can use the Adaptive Card Studio and how it can be useful.

  1. Open Extensions in Visual Studio Code and search for Adaptive Cards Studio

  2. Once installed, it’ll appear on the left hand side as below –

  3. On the right hand side in VS Code, it’ll search for the Workspace for the Adaptive Cards to detect. Make sure the folder in which your Adaptive Cards is saved is added to the Workspace.
    Else, the Extension won’t detect an Adaptive Card.


    In case you have saved the JSON file elsewhere which is not added to your Workspace, you can use this option to add the Folder to your current Workspace. (Depends on your Project structure)

  4. Once the correct Folder is added to Workspace in VS Code, the Adaptive Card you saved will appear


  5. If you expand the card, you’ll find Template and Data which you can get and paste from the Adaptive Cards online Designer and paste the same in here.

  6. Now, if you look at the main Window, you’ll be able to see the Template and Data JSON on the left and the Card on the right

Here’s the link to the GitHub for complete Info on the Adaptive Cards Studio: https://marketplace.visualstudio.com/items?itemName=madewithcardsio.adaptivecardsstudiobeta

And then further, copy the Payload onto your application where this will eventually be deployed.

Hope this was useful!

Here are some more posts that relate to Adaptive Cards usage / Power Platform –

  1. Adaptive Cards for Outlook Actionable Messages using Power Automate | Power Platform
  2. Adaptive Cards for Teams to collect data from users using Power Automate | SharePoint Lists
  3. Task Completion reminder using Flow Bot in Microsoft Teams | Power Automate
  4. Accept HTTP Requests in a Flow and send Response back | Power Automate
  5. Run As context in CDS (Current Environment) Flow Trigger | Power Automate
  6. Using triggerBody() / triggerOutput() to read CDS trigger metadata attributes in a Flow | Power Automate

Thank you!!

Adaptive Cards for Outlook Actionable Messages using Power Automate | Power Platform

Let’s take a look at how you can design Adaptive Cards for Outlook and get response from Outlook users to process using Power Automate.

Scenario

Let’s say I wanted to send an Adaptive Card to an Outlook user on their Email and ask some comment, example – A descriptive feedback and read their response back and send them a confirmation Adaptive Card.

In this post, I’ll simply read the Response in the Flow and send a Confirmation-like Adaptive Card so that you can then further decide to take required action for it based on your use case.

Adaptive Cards Designer – Initial Card Layout

You can logon to https://adaptivecards.io/designer/ i.e. the Adaptive Card designer and start building your card. Below are the high-level steps:

  1. Once you are in the Adaptive Cards Designer, make sure you select the host app as “Outlook Actionable Messages

    You’ll see a sample already created for you which you can start working off of –

  2. Since I want to start from the beginning, I’ll select New Card option as shown below

  3. Now, I’ll start to design my card with the use of some TextBlock, an Input.Text to capture a response. In your case, you can choose the type of input(s) you want. (I’m trying to keep it simple for now 😊)
    These controls works like a drag-and-drop behavior, just drop whatever you need.


    So, I did the following, I added a TextBlock to add the title I want to show on the card and a Multi-line Input.Text to capture a response of the user I’ll send the card to in their Email.

  4. For the Input.Text, I’ve added an id ‘answer‘. We’ll need this when we capture responses back.
    Also, to make the Input.Text control as multi-line, Multi-Line option should be selected as I did below

  5. At this point, our Adaptive Card’s layout is ready. Before we proceed we must first, create a Flow that will capture an HTTP Response and then we’ll come back here.

Flow to Capture Response

Adaptive Cards for Outlook Actionable Messages work off of the HTTP mechanism and that’s why you need a URL where you can capture the responses and send back a confirmation response back.

Let’s call this Flow as “Accept Feedback Response

  1. To do so, first create a Flow that Accepts an HTTP Request. You can refer my other post in order to understand how you can capture HTTP Responses – Accept HTTP Requests in a Flow and send Response back | Power Automate
    Once once you save a Flow that has a trigger of HTTP Response, you’ll get a URL generated, copy it.

  2. Next, I’ll enter the schema by clicking on Use sample payload to generate schema button on the first step above and enter the following schema since I know that’s what is to be expected from the User when they fill in the Text and submit back.

  3. Once you click OK, your schema will look like this.

  4. Collect the result of the above trigger in the Compose so that you can save the Flow with at least 1 Action. (We’ll come back to it later)

  5. Next up, we will also need to setup a response Adaptive Card. This is something that the users will see when they Submit their responses.

  6. It is mandatory to send the response back to the caller i.e. the Outlook in this case. Hence, we’ll send a Response back using Response action in HTTP and send the status code as 200 and header CARD-UPDATE-IN-BODY as true.
    The Body will have the Adaptive Card which we created in step #5 above i.e. the Adaptive Card we have to send as confirmation.

    Here are the details of Refreshing Cards when you send back a response to the client (Outlook user in this case): https://docs.microsoft.com/en-us/outlook/actionable-messages/adaptive-card#refresh-cards?WT.mc_id=DX-MVP-5003911

Complete your Adaptive Card – Add Action

Once your Flow to capture the response is ready, let’s complete the Adaptive Card to add an Action to the same.

  1. Select the card body, you’ll see a button to Add an action

    You’ll need to select Action.Http

  2. Once you select the Action.Http type of Action, look at the Element Properties, you’ll need to enter the URL we got from the Flow we created to capture responses above.

    Here why we chose Action.Http – https://docs.microsoft.com/en-us/outlook/actionable-messages/adaptive-card#outlook-specific-adaptive-card-properties-and-features?WT.mc_id=DX-MVP-5003911
  3. Next, set the title of the Action (it appears as a button). I’ll name it Submit.
    Also, select what kind of Method is to be used for the HTTP Request.

  4. Now, since you’ve selected POST method, you will need to pass the Body. This will be the response which the user will send and which the Flow above will read it as a Response to process the information further.
    Once you select POST, a Body element property will be added where you need to enter the schema and what ID of the element that information belongs to

  5. Remember, the ID for the Input.Text was set as “answer”, we’ll put that here and then it’s Value property. These values should be enclosed in double curly brackets {{ }}.


  6. And also, you’ll need to pass along the Header for Authorization. Read this post by Microsoft – https://docs.microsoft.com/en-us/outlook/actionable-messages/security-requirements#action-authorization-header?WT.mc_id=DX-MVP-5003911
    Add Header as shown below

    Now, as mentioned in the above post, we need to pass the property as Authorization header and leave it blank and Content-Type as application/json

  7. Once all this is done, it’ll look like below in the card payload for the Action.Http part.

  8. Now copy the entire Payload from the Editor and we’ll create a new Flow that will be used to send the Adaptive Card to the user.

Flow to Send the Adaptive Card in Email

I’m creating a Flow here which will be used to send the Adaptive Card. To keep it simple, I’m just triggering it using a button on-demand. Your use-case will vary.

Let’s call this Flow as “Send Feedback Request

  1. Wherever you need to create the Adaptive Card, you’ll need to paste the entire Payload copied from the step above in a Compose step

  2. I’ll add a step to send an Email directly using Send Email and make sure you enable the </> part for the body.


    Make sure the Outputs of the Compose we pasted above in Step #2 are enclosed in
    <script type="application/adaptivecard+json">
    </script>

Working

Let’s look at how this will turn out!!

  1. Let me just Run the Flow as is so that the Adaptive Card is generated and sent to the user I intend to in the Email.
  2. They’ll receive an email like this

  3. And the user will submit the answer in the text box and submit.

  4. Once they submit, the Accept Feedback Response Flow we created will be triggered

  5. And the response is available to be read and processed further in the Compose step we created to collect it with the defined schema.


  6. The Adaptive Card we had created to send back as confirmation (which looks as below) will be sent

  7. Once the user submits, they’ll get the below Adaptive Card as a confirmation that their feedback has been taken.

And that’s how you can make your Adaptive Cards to function with Outlook!! Hope this was helpful.

Here are some superb posts on Adaptive Cards –

  1. Microsoft Message Cards – The Ultimate Guide by Thomas Poszytek – https://poszytek.eu/en/microsoft-en/microsoft-message-cards-the-ultimate-guide/
  2. Multi line Approvals with Adaptive Cards, Outlook and Power Automate by Yash Agarwal – https://www.bythedevs.com/post/multi-line-approvals-with-adaptive-cards-outlook-and-power-automate
  3. Custom Actionable Messages with Microsoft Flow series by Rik-de Koning (3 posts) – https://www.about365.nl/category/blog-series/custom-actionable-messages-with-microsoft-flow/

Here are some more Power Automate / Adaptive Cards posts you might want to look at –

  1. Adaptive Cards for Teams to collect data from users using Power Automate | SharePoint Lists
  2. Task Completion reminder using Flow Bot in Microsoft Teams | Power Automate
  3. Make On-Demand Flow to show up in Dynamics 365 | Power Automate
  4. Run As context in CDS (Current Environment) Flow Trigger | Power Automate
  5. Using triggerBody() / triggerOutput() to read CDS trigger metadata attributes in a Flow | Power Automate
  6. Terminate a Flow with Failed/Cancelled status | Power Automate
  7. Call HTTP Request from a Canvas Power App using Flow and get back Response | Power Automate
  8. Setting Retry Policy for an HTTP request in a Flow | Power Automate
  9. Send a Power App Push Notification using Flow to open a record in Canvas App | Power Automate
  10. ChildFlowUnsupportedForInvokerConnections error while using Child Flows [SOLVED] | Power Automate
  11. BPF Flow Step as a Trigger in CDS (Current Environment) connector | Power Automate
  12. Pause a Flow using Delay and Delay Until | Power Automate

Thank you!! 😊

Find deprecated JS code used in your Dynamics 365 environment | Dynamics 365 v9 JS Validator tool | XrmToolBox

In this point in time where all developers are busy upgrading their Dynamics 365 JavaScript libraries to use the latest supported code.

Here’s an extremely handy tool by Michel Gueli (https://twitter.com/MichelGueli) called as ‘XrmToolBox.Dynamics365V9JavascriptValidator’

Dynamics 365 v9 JavaScript Validator in XrmToolBox

If you use XrmToolBox already, make sure you look for the below tool

  1. In Tool Library, search for Dynamics 365 JavaScript Validator and you’ll find this tool already.

  2. Once you find it, it’s pretty easy to use it.
    You’ll find it in the list of your tools as below


    Then, it’ll just Retrieve all the Resources first. This will take a minute or two depending on your environment.

  3. Once done, it’s best practice to already add all the code you want to analyze in 1 solution in your Dynamics 365 environment like so

  4. Now, in the tool , open the same solution so that you only focus on the JS files you need to work with.

  5. Once you open it up, you’ll find all you files listed below. Just double click one of them and you’ll find what all needs to be changed.

  6. Once you work your way up in the file by replacing the deprecated code, you can reload the solution again and find that there are no longer any warnings like on my other file below

NuGet Gallery Link: https://www.nuget.org/packages/XrmToolBox.Dynamics365V9JavascriptValidator/

Hope this was useful!!
In case you are looking for more XrmToolBox or Dynamics 365 related posts, please check below –

  1. Set Lookups in Xrm.WebApi D365 v9 correctly. Solving ‘Undeclared Property’ error
  2. Find Created On date of solution components in Solution Layers | Dynamics 365 [Quick Tip]
  3. Pass data to HTML Web Resource using browser’s sessionStorage in Dynamics 365 CE
  4. Pass Execution Context to JS Script function as a parameter from a Ribbon button in Dynamics 365 | Ribbon Workbench
  5. Get GUID of the current View in Dynamics 365 CRM JS from ribbon button | Ribbon Workbench
  6. Import lookup referencing records together in Dynamics 365 CRM | [Linking related entity data during Excel Import]
  7. Mailbox Alerts Hide/Show behavior in Dynamics 365 CRM
  8. Enable/Disable the need to Approve Email for Mailboxes in Dynamics 365 CRM CE
  9. Debug Ribbon button customization using Command Checker in Dynamics 365 CE Unified Interface
  10. Get Dynamics 365 field metadata in a Canvas App using DataSourceInfo function | Common Data Service

Thank you!!

Make On-Demand Flow to show up in Dynamics 365 | Power Automate

Here’s a Flow trigger that you can make to appear on-demand in Dynamics 365 views. What makes a Flow appear on a certain entity?

Like this –

Common Data Service connector (Not Current Environment version)

If you’re familiar by now with Common Data Service Connectors, there are 2 of them. 1. Common Data Service, 2. Common Data Service (Current Environment).

  1. Here, you’ll have to use the 1st one i.e. Common Data Service connector. If you type Common Data Service in triggers, both will appear but you have to hover on these and make sure you don’t select the one with Current Environment written on it.

  2. Once you select this, you can select this trigger in order to make it on demand in Dynamics 365.

  3. Now, it appears like any other Flow trigger. Optionally, you can add some inputs in case you want to.
    In my example, I’m taking in a field value called as “Common Comments” and will just update the Description field of the selected Accounts for simplicity of this example.

    Because I want it on Accounts entity views, I’ll select entity Account.


  4. Now, my Flow looks like this. That’s it.


  5. To keep things simple, I’ll just update the record with whatever I put in the Common Comments Input variable in my Flow trigger.

    Now let’s see it work.

On-Demand Flow

Now, in Dynamics 365, I’ll navigate to Accounts entity and select a few records.

  1. Once I select a few records and check the Flows dropdown from the ribbon menu –


  2. If I run this flow, I’ll get option to put my Input parameters as I have declared above.

  3. Since I had selected 2 records, there’ll be two separate instances (Flow Runs) triggered for this Flow

  4. And I can see the values updated in the records. (Checking using Advanced Find)

    That’s it!!

Hope this was useful.

Here are some more Power Automate / Flow posts you might want to look at-

  1. Run As context in CDS (Current Environment) Flow Trigger | Power Automate
  2. Secure Input/Output in Power Automate Run History
  3. Task Completion reminder using Flow Bot in Microsoft Teams | Power Automate
  4. Using triggerBody() / triggerOutput() to read CDS trigger metadata attributes in a Flow | Power Automate
  5. Call HTTP Request from a Canvas Power App using Flow and get back Response | Power Automate
  6. Send a Power App Push Notification using Flow to open a record in Canvas App | Power Automate
  7. Accept HTTP Requests in a Flow and send Response back | Power Automate
  8. Terminate a Flow with Failed/Cancelled status | Power Automate
  9. Pause a Flow using Delay and Delay Until | Power Automate
  10. Generate Dynamics 365 record link in a Flow using CDS connector | Power Automate

Thank you!!

Track and Set Regarding are disabled for Appointments in Dynamics 365 App For Outlook message | Demystified

If you are new to tracking, you probably also want to track the Appointments to Dynamics as well.

Whether this is enabled for you or not is an optional setting and you end up seeing this error message –

Enable Tracking for Appointments, Tasks & Contacts

  1. One of the first places to go and check for Admins when someone reports such an issue is to check if the Appointments, Contacts or Tasks are enabled in Dynamics 365 Outlook or not.

    If you want to navigate to Dynamics 365 App directly and don’t seem to find it in your SiteMap, check this post – Dynamics 365 App For Outlook missing on SiteMap in CRM? Use shortcut link [Quick Tip]
  2. Now that you know the Dynamics 365 App For Outlook is not abled for Appointments, Contacts and Tasks, next, you’ll need to go to Settings > Email Configuration > Mailboxes and switch view to show Active Mailboxes as My Active Mailboxes is usually set to Default.
    Look for the user’s mailbox –
    You’ll find that the Appointments, Contacts and Tasks are not Enabled for Server-Side Synchronization

  3. Enable this and Test & Enable the mailbox

    In case you are also looking to enable Server-Side Sync in general to enable Dynamics 365 App For Outlook, check this post – Summarizing D365 App For Outlook Setup in 3 steps with Exchange Online mailbox

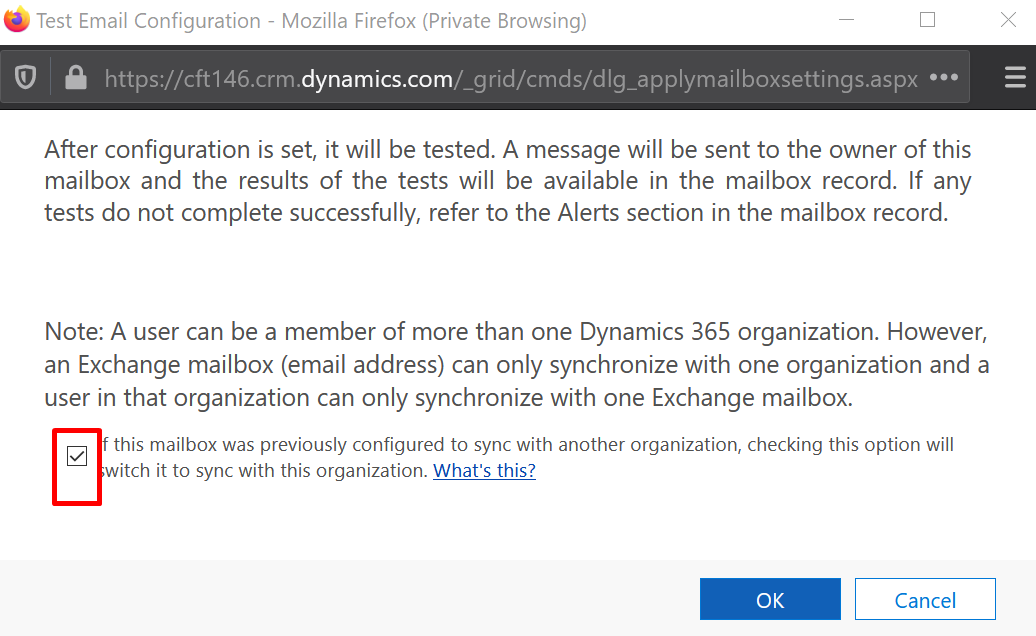
  4. Check this if it should only be enabled for the current Org.

  5. Once the Test is successful, it should now be enabled in Dynamics 365 App For Outlook Settings as well.

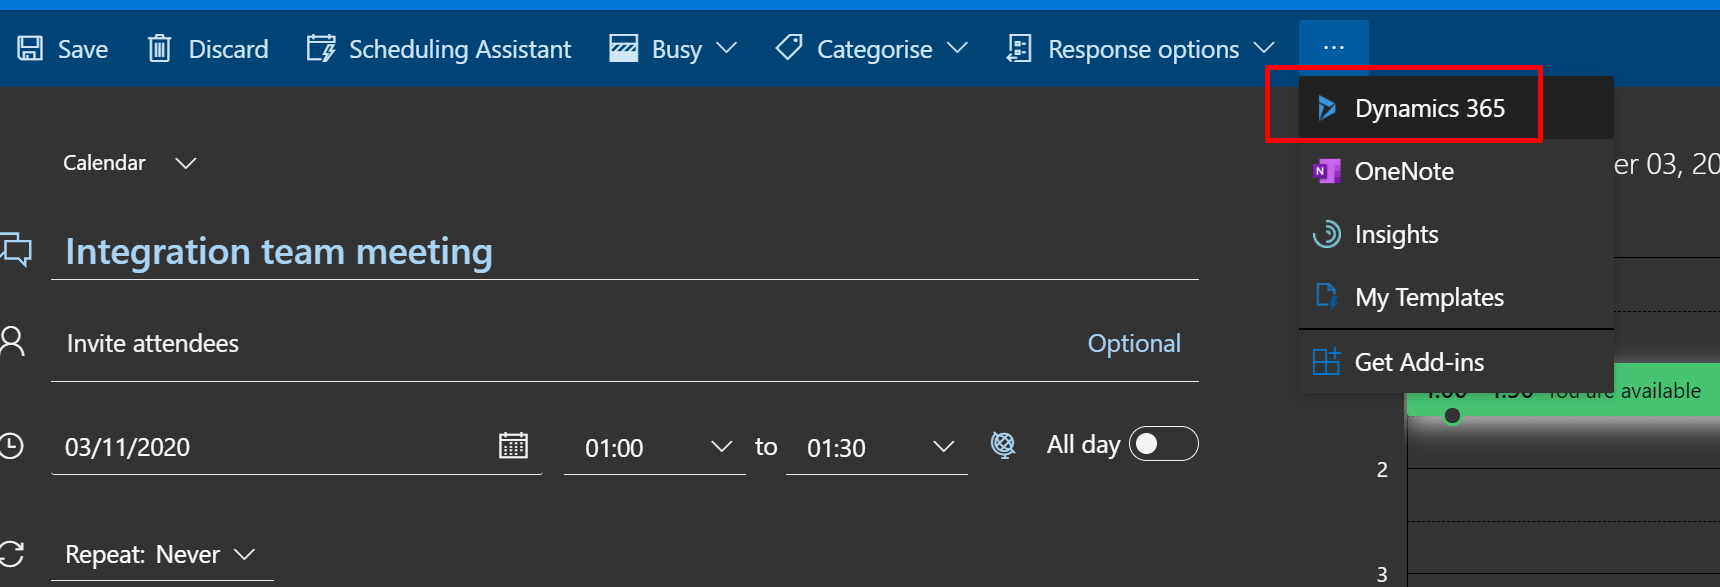
  6. Refresh the browser once if you are using Outlook Web App, you should be able to also track Appointments/Contacts/Tasks to Dynamics 365

  7. Now, the meeting invite should be available to track.

    Please note that even if you click on Track, the meeting will only be tracked once you send it out.


    Hope this helps! Here are some more Dynamics 365 posts you might want to check –
  1. Cancelled Bookings Imported in Time Entries in Dynamics 365 PSA issue | [Quick Tip]
  2. Remove ‘This Email has been blocked due to potentially harmful content.’ message in Dynamics 365 Emails | OrgDbSettings utility
  3. Get GUID of the current View in Dynamics 365 CRM JS from ribbon button | Ribbon Workbench
  4. Get Dynamics 365 field metadata in a Canvas App using DataSourceInfo function | Common Data Service
  5. Dynamics 365 App For Outlook missing on SiteMap in CRM? Use shortcut link [Quick Tip]
  6. Pass Execution Context to JS Script function as a parameter from a Ribbon button in Dynamics 365 | Ribbon Workbench
  7. Find Created On date of solution components in Solution Layers | Dynamics 365 [Quick Tip]
  8. Add multiple Opportunity Products at once in Dynamics 365 Sales | Enhanced Experience [Preview]
  9. Import lookup referencing records together in Dynamics 365 CRM | [Linking related entity data during Excel Import]
  10. Pass data to HTML Web Resource using browser’s sessionStorage in Dynamics 365 CE

Thank you!!