Trigger Conditions not working in a Cloud Flow? Here’s Why | Power Automate Quick Tip

At times, you’re pretty sure that the trigger condition you’ve put in a Cloud Flow is correct but it still doesn’t trigger.

Scenario

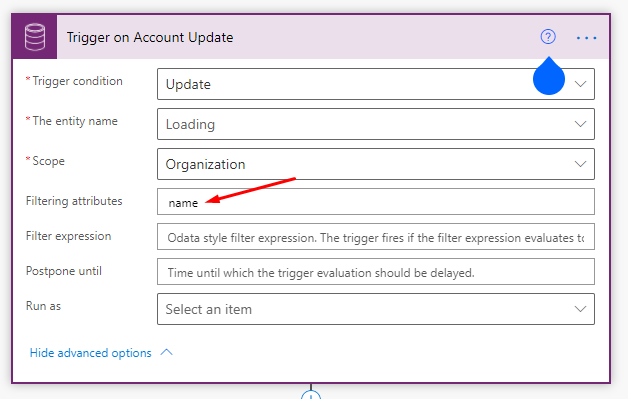
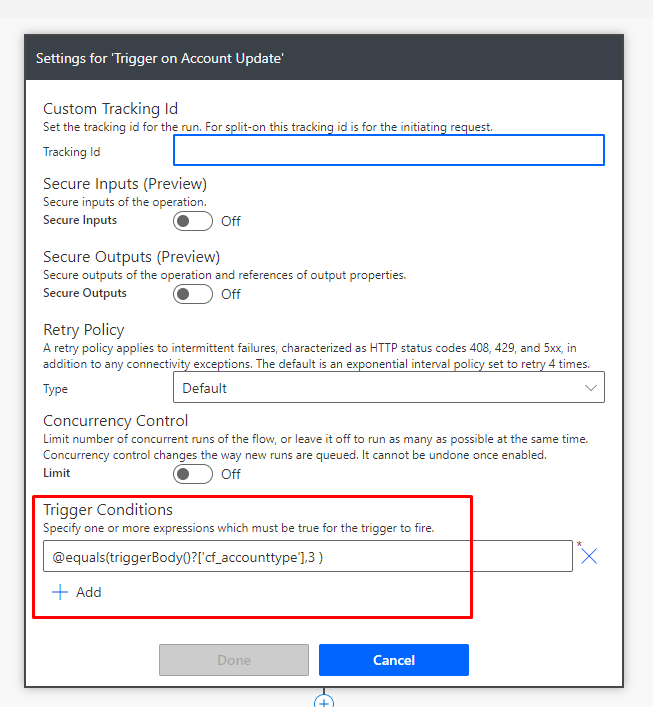
Here’s a scenario which I came across where the Trigger Conditions weren’t triggering. The trigger was Common Data Service (Current Environment) connector and the Trigger Conditions were supposed to check for a specific value to fire.

However, even upon fulfilling the criteria, the Flow was not firing.

Here’s why

Let’s look at what happened here –

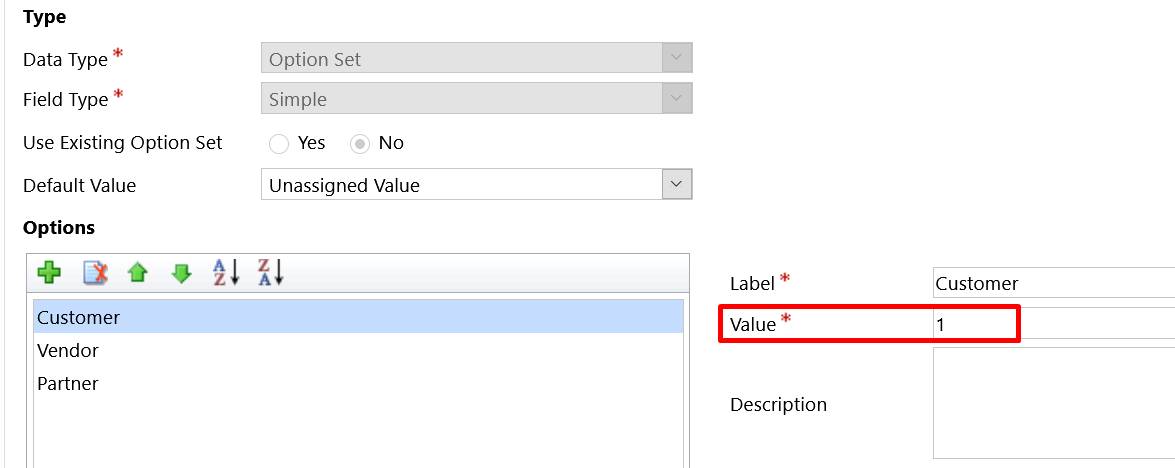
  1. Now, as expected the Flow should have triggered when my field Account Type has Option Set value of 3 i.e. “Partner”(on the label)

  2. The reason was that the Filtering Attribute too was added in the Trigger which clashed.

  3. And this was a clash between the two. Hence, the Condition Trigger was not fired.
  4. On the other hand, if the field which is in the Filtering Attributes was changed, the Flow was triggered.

Takeaway

So here are the takeaways –

  1. Trigger Conditions won’t fire even if the condition is matched because there’s a Filtering Attribute added to an Update trigger on the Common Data Service (Current Environment) connector.
  2. Even if Trigger Condition exists, the Filtering Attributes takes higher precedence and hence, an update on the Filtering Attributes will trigger rather than Trigger Conditions.

Hope this helps!

Here are some more Power Automate / Cloud Flows posts you might want to check –

  1. Read OptionSet Labels from CDS/Dataverse Triggers or Action Steps in a Flow | Power Automate
  2. InvalidWorkflowTriggerName or InvalidWorkflowRunActionName error in saving Cloud Flows | Power Automate Quick Tip
  3. Create a Team, add Members in Microsoft Teams upon Project and Team Members creation in PSA / Project Operations | Power Automate
  4. Using outputs() function and JSON Parse to read data from missing dynamic value in a Flow | Power Automate
  5. Make On-Demand Flow to show up in Dynamics 365 | Power Automate
  6. Run As context in CDS (Current Environment) Flow Trigger | Power Automate
  7. Adaptive Cards for Outlook Actionable Messages using Power Automate | Power Platform
  8. Task Completion reminder using Flow Bot in Microsoft Teams | Power Automate
  9. Using triggerBody() / triggerOutput() to read CDS trigger metadata attributes in a Flow | Power Automate
  10. Terminate a Flow with Failed/Cancelled status | Power Automate

Thank you!!

Parallel Branching in Cloud Flows – Isolate Response dependent Step Actions in parallel branches | Quick Tip

As 2020 comes to a close, here’s a Power Automate / Cloud Flows quick tip that might benefit newbies to Power Automate.

Scenario

Some Flows need you to include Approvals or Adaptive Cards that halt the execution of the Flow until the Response from the target is sent back to the Flow.

If there are some steps to be taken after the Response is received.

Parallel Branching

You can use Parallel Branching

  1. Select Parallel Branching instead of a normal Step.

  2. Now, all the Response dependent Actions should be in one of the Branches – (Denoted by Red Box and arrow). And the other part where the execution is expected to be carried forward should be in the other branch – (Denoted by Green Box and arrow)


  3. The execution will then wait where the parallel branches merge finally. Else, each branch can choose to end independently if there are no inter-dependent actions to be take, like taking Response from the Parallel Branch as well. The Waiting state will look like this –


  4. Now, when the Response is submitted back, the Flow execution will continue from the point of convergence of the two parallelly separated branches.

With this, you can separate dependent activities by using Parallel Branching.

Hope this was useful!

Here are some more Power Automate / Cloud Flows posts that you might like to go through –

  1. Read OptionSet Labels from CDS/Dataverse Triggers or Action Steps in a Flow | Power Automate
  2. InvalidWorkflowTriggerName or InvalidWorkflowRunActionName error in saving Cloud Flows | Power Automate Quick Tip
  3. Create a Team, add Members in Microsoft Teams upon Project and Team Members creation in PSA / Project Operations | Power Automate
  4. Setting Lookup in a Flow CDS Connector: Classic vs. Current Environment connector | Power Automate Quick Tip
  5. Using outputs() function and JSON Parse to read data from missing dynamic value in a Flow | Power Automate
  6. Adaptive Cards for Outlook Actionable Messages using Power Automate | Power Platform
  7. Task Completion reminder using Flow Bot in Microsoft Teams | Power Automate
  8. Make On-Demand Flow to show up in Dynamics 365 | Power Automate
  9. Using triggerBody() / triggerOutput() to read CDS trigger metadata attributes in a Flow | Power Automate
  10. Adaptive Cards for Teams to collect data from users using Power Automate | SharePoint Lists

Thank you!!

Read OptionSet Labels from CDS/Dataverse Triggers or Action Steps in a Flow | Power Automate

Retrieving OptionSet Labels from CDS data in a Cloud Flow / Power Automate / Flow is an extra step than just picking from the Dynamic Values. Check this post!!

Scenario

While working with data that is either a result of a Dataverse Trigger (on Create/Update) or Action like (Get record, list record), the OptionSet fields from CDS/Dataverse return the Values of the OptionSet instead of the Text Labels –

  1. Let’s say this is the OptionSet in Dynamics

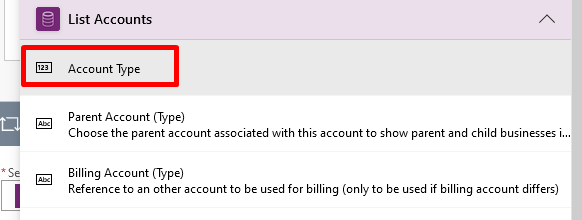
  2. And when you pick the OptionSet field from CDS either from an Action or a Trigger like this
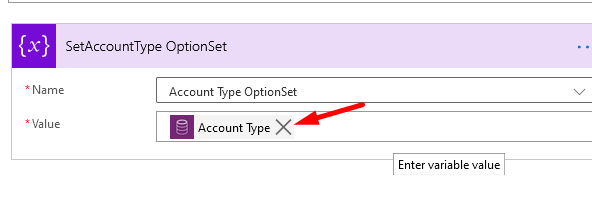
    Let’s say I’m capturing this in a variable to show you


    I’m storing this in a variable for this example to show you

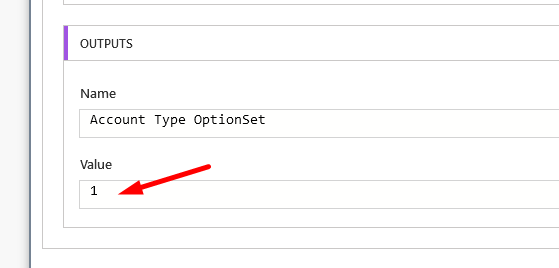
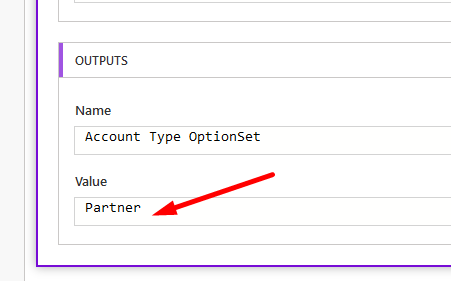
  3. I’ll capture the Value of the OptionSet i.e. the Value part


    Result –

  4. What needs to be displayed is the Label of the OptionSet! Let’s see how we can do this –
    1. Triggers
    2. Actions – List records (Inside Loops)
    3. Actions – Get record (Single record)

triggerOutputs() / triggerBody() to read the OptionSet values from Triggers

Let’s see how to read the OptionSet values from CDS Triggers, Create or Update –

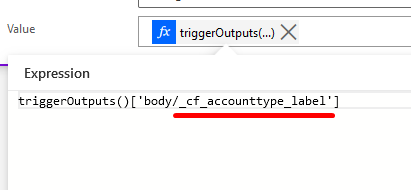
  1. When a Flow is triggered using CDS/Dataverse Triggers (I’m using Common Data Service Environment(Current Environment) trigger), you can read the OptionSet value by using triggerOutputs() / triggerBody() function –
    Here’s a triggerBody() example

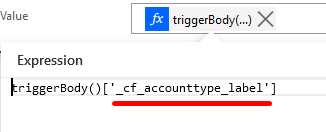
    Now, notice that the name of the field is cf_accounttype. So, the label in Triggers can be retrieved as _cf_accounttype_label and NOT cf_accounttype.

    Same way, you can also use triggerBody() function instead as well to yield the same result


    Here’s a post on triggerBody() / triggerOutputs() for your reference – Using triggerBody() / triggerOutput() to read CDS trigger metadata attributes in a Flow | Power Automate

items() to read the OptionSet values from Action Step – List Records (Multiple Records)

Let’s look at this example where you are retrieving multiple records using List Records and now, you apply a loop on each of those to read individual records.

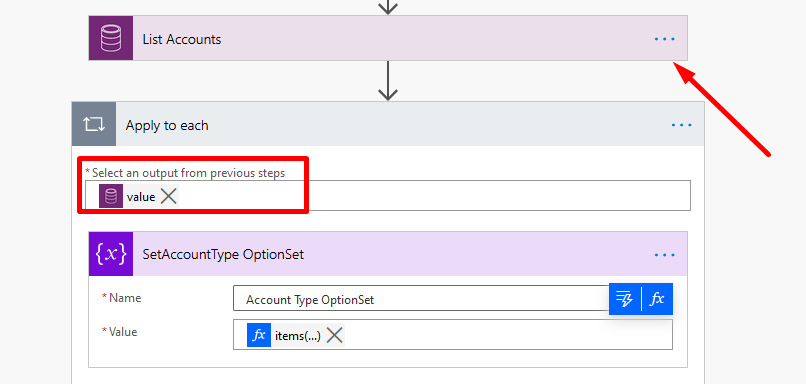
  1. Assuming you are using List Records and you loop through the outputs of each of these records


  2. Now, the value is represented by items() function on the Loop that you are in i.e. Apply to each.
    Hence, the function is
    items('Apply_to_each')?['cf_accounttype@OData.Community.Display.V1.FormattedValue']


    This will show the label of the OptionSet in the results


outputs() to read the OptionSet values from Action Step – Get a record (Single Record)

Similar to items() function, we can use outputs() function to read from the Output’s of the Get a Record Action from Common Data Service (Current Environment)

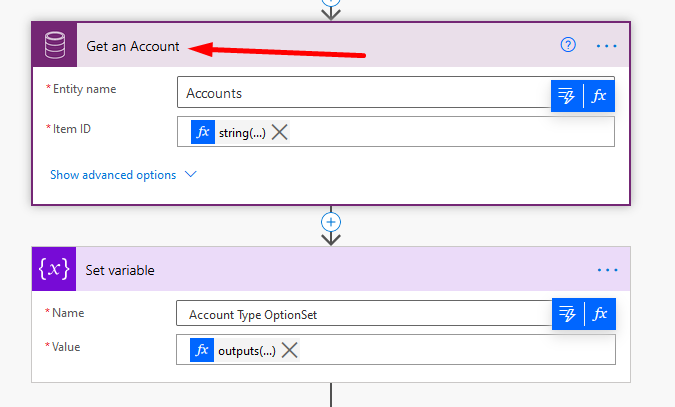
  1. Get an Account is a ‘Get a record’ Action in CDS/Dataverse Current Environment connector. It’ll only fetch a single record.

  2. Now, let’s look at how outputs() function, similar to items() function used in case of Loops is used.
    Formula is –
    outputs('Get_an_Account')?['body/cf_accounttype@OData.Community.Display.V1.FormattedValue']

    In the above scenario, I’m reading under body hierarchy for cf_accounttype@OData.Community.Display.V1.FormattedValue

Using JSON Parse to get the values

Finally, there’s also a method in which you can create a Parsed JSON from the Outputs

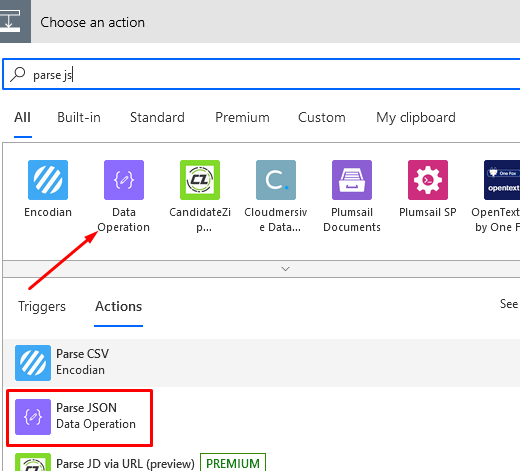
  1. Pick JSON from the Actions, it is under Data Operations connector and is a very popular one.

  2. Now, you’ll need to pass Outputs of the CDS Step to the Inputs of the Parse JSON step. Now, since you don’t already have a schema yet, Just put {} and save (else, you won’t be able to save)

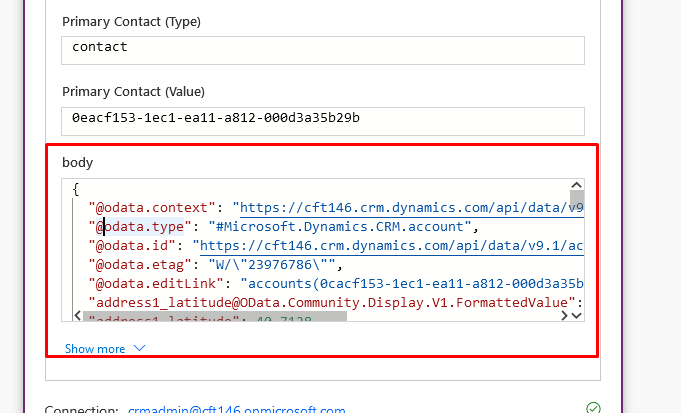
  3. Now, Run the Flow once where the CDS step was successful and copy the Outputs from the Body

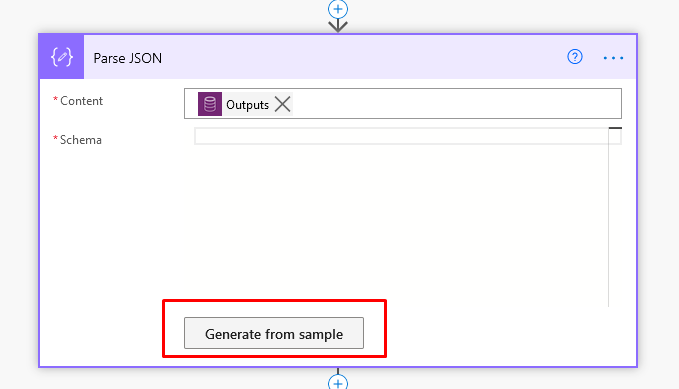
  4. Now, go to the same Parse JSON Step and click on Generate from Sample

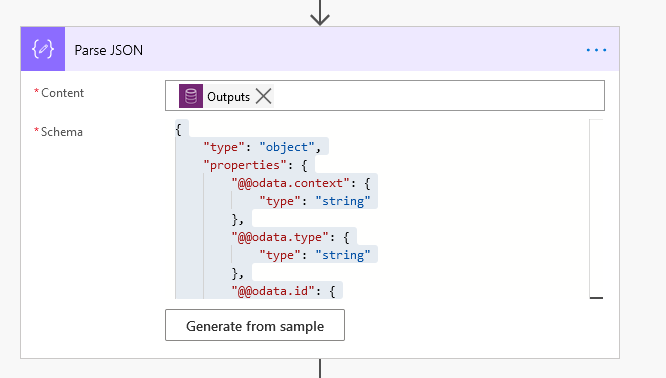
  5. Now, paste the copied Body to generate the schema.

  6. Once you click OK, the schema will be generated.


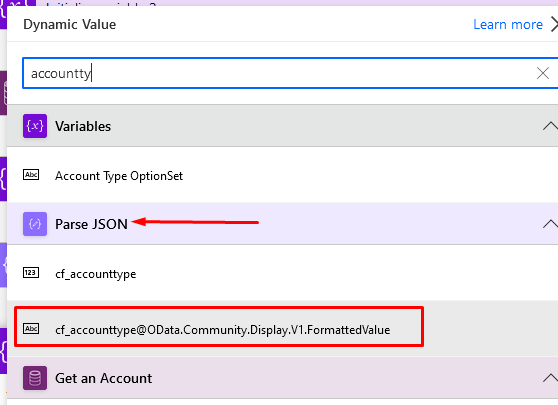
  7. Finally, you can select the Parsed schema and use it as Outputs.


    And it will appear as below –


    Again, this will also show the same results as the above approaches.

Hope this helps!

Here are some Power Automate / Cloud Flow posts you might find helpful –

  1. InvalidWorkflowTriggerName or InvalidWorkflowRunActionName error in saving Cloud Flows | Power Automate Quick Tip
  2. Create a Team, add Members in Microsoft Teams upon Project and Team Members creation in PSA / Project Operations | Power Automate
  3. Setting Lookup in a Flow CDS Connector: Classic vs. Current Environment connector | Power Automate Quick Tip
  4. Adaptive Cards for Outlook Actionable Messages using Power Automate | Power Platform
  5. ChildFlowUnsupportedForInvokerConnections error while using Child Flows [SOLVED] | Power Automate
  6. Run As context in CDS (Current Environment) Flow Trigger | Power Automate
  7. Using outputs() function and JSON Parse to read data from missing dynamic value in a Flow | Power Automate
  8. Setting Retry Policy for an HTTP request in a Flow | Power Automate
  9. Make On-Demand Flow to show up in Dynamics 365 | Power Automate
  10. Task Completion reminder using Flow Bot in Microsoft Teams | Power Automate
  11. BPF Flow Step as a Trigger in CDS (Current Environment) connector | Power Automate
  12. Pause a Flow using Delay and Delay Until | Power Automate

Thank you!!

InvalidWorkflowTriggerName or InvalidWorkflowRunActionName error in saving Cloud Flows | Power Automate Quick Tip

If you are lately started creating Flows, you’ll come across some errors which are not precisely directing to what might be the issue but throw an error that says as below –

For Triggers (InvalidWorkflowTriggerName) –

Run Action (InvalidWorkflowRunActionName) –

Reasoning

The reason you see these errors are because of Invalid Characters which are in your Flow Trigger Step Names or on the Flow Action Step Names.

Invalid Characters in Trigger Names


Invalid Characters in Action Step Name.

Hence, the Step Names shouldn’t contain the below special characters –
< > % & ? / \

Note: Trigger/Step Names can’t end with a Full Stop (.). However, if there’s a Full Stop in between, it’ll work

Hope this was helpful!

Here are some more Power Automate posts you might want to check out –

  1. Create a Team, add Members in Microsoft Teams upon Project and Team Members creation in PSA / Project Operations | Power Automate
  2. ChildFlowUnsupportedForInvokerConnections error while using Child Flows [SOLVED] | Power Automate
  3. Using outputs() function and JSON Parse to read data from missing dynamic value in a Flow | Power Automate
  4. Setting Lookup in a Flow CDS Connector: Classic vs. Current Environment connector | Power Automate Quick Tip
  5. Make On-Demand Flow to show up in Dynamics 365 | Power Automate
  6. Setting Correct Default Mode for Forms in a Canvas App | [Quick Tip]
  7. Pause a Flow using Delay and Delay Until | Power Automate
  8. Call HTTP Request from a Canvas Power App using Flow and get back Response | Power Automate

Thank you!

Setting Correct Default Mode for Forms in a Canvas App | [Quick Tip]

If you are new to creating a Canvas App and you’ve just added a Form and when you try to run and test the same in the browser itself, you don’t see it.

So let’s say you’ve put a form like this

And all you see is this –

So this happens based on the Default Mode and whether the context is passed to the form depending on the type or not.

Default Mode

There are 3 Default Modes for a form and it’s critical which one should be used when –


1. Edit – To be used if you are creating a new record. While using this mode, make sure the Item (from a data source is passed to the Form itself. Else, you’ll see the same error message as above and won’t see a blank form in that case.)
The Item property should be pointed to pick .Selected i.e. typically, <GalleryName>.Selected.


Context of a record i.e. a Row should be passed on to this form for Edit mode i.e. an existing row to be passed on to this Form from the preceding Gallery/Table control (or any data source based on your implementation). For example – The context I send to the form looks like this.
The last parameter i.e. <GalleryName>.Selected is placed on the select button so that once clicked, it’ll send the record context over to the form so that the form is displaying the selected record (which is picked from Item property in the above screenshot)

2. New – New should be used if the Form you’ve inserted isn’t coming as a result of populating a selected record. But you will enter new values and Submit it the first time.
Once New is selected, the form will correctly render for you when you test or run the App once correct Mode is selected (i.e. you don’t intend to pass any context to the Form)

3. View – In this view, fields will not be visible and instead the data will be a result of the selected item from the List/Gallery view it is coming from i.e. a Data Row which will populate this form. This will be a Read-Only view.
Another form example where View is selected, fields won’t show up but this form would need Context to be passed to it just like in the New mode.

Hope this quick tip was useful.

Here are some more Dynamics 365 related posts you might want to check

  1. Find deprecated JS code used in your Dynamics 365 environment | Dynamics 365 v9 JS Validator tool | XrmToolBox
  2. Make On-Demand Flow to show up in Dynamics 365 | Power Automate
  3. Track and Set Regarding are disabled for Appointments in Dynamics 365 App For Outlook message | Demystified
  4. Cancelled Bookings Imported in Time Entries in Dynamics 365 PSA issue | [Quick Tip]
  5. Remove ‘This Email has been blocked due to potentially harmful content.’ message in Dynamics 365 Emails | OrgDbSettings utility
  6. Get GUID of the current View in Dynamics 365 CRM JS from ribbon button | Ribbon Workbench
  7. Get Dynamics 365 field metadata in a Canvas App using DataSourceInfo function | Common Data Service
  8. Dynamics 365 App For Outlook missing on SiteMap in CRM? Use shortcut link [Quick Tip]

Thank you!!

Rating Control to represent data from Dataverse in a Canvas Power App | Power Platform

Although, you can use Text based controls to represent data as is in a Canvas Power App. So why not go an extra mile to make it look more intuitive.

Scenario

Let’s say there are Accounts and you have some kind of Compliance Ratings on them to represent compliant they are based on certain criteria. Could be a Numeric value or Decimal value. But Rating Control represents only in Numeric i.e. Whole Numbers.

So, for this example, I’m using a Rating field which is of type Whole Number in Dynamics 365 on Account entity.

And the complete Dataset looks like this in Dynamics 365 / Dataverse.

Note: I tried with Decimal but it rounded the values hence, sticking to Whole Number.

Rating Control

  1. Let’s say below is the Gallery and you want to show Ratings in the form of stars instead of traditional numeric values.

  2. Now, let’s use Rating Control below the Names of the Accounts to show the Rating values. Select the first Row once you connect to the Common Data Service i.e. CDS / Dataverse Data Source and select the entity you want to populate it with. In this example, we are using Accounts. So my Gallery is populated with Accounts records.
    Select the first record and navigate to Insert tab and look for Input controls as shown below


    Now, look for Rating control.

  3. Once you select Rating, it’ll appear iteratively since it’ll be applied “For Each” of these records in your Gallery control.


  4. I’ve just rearranged them under the name to make them look proper.

  5. Let’s make it Read Only by changing the behavior, so that the Users don’t accidently touch and set a value during Runtime. Although, this won’t affect the actual data but the representation will be incorrect in that case.

  6. Also, the Max will represent the length of your Rating whereas the Default value are kept to 0 in case the field value is not set at Source. (I think 1 would still be misrepresenting)

  7. Now, I’ll connect this Control to the Data Source’s field i.e. Rating field on the Account entity that represents the Rating value.
    On the Default, I’m setting ThisItem.Rating where ThisItem represents the Row of the Account i.e. the Account record itself and Rating is the field in Dynamics 365’s Account entity which we saw in the scenario above.


  8. And that’s it. You can Save and Publish your App and Run it.

Rating values

Now that we’ve added the Rating Control, let’s Run our App and see how it represents the data from your Accounts entity.

And the Ratings represent the below data –

Hope this was useful!

Here are some more Canvas Power Apps posts you might want to check –

  1. Clear a field value & Reset Form in a Canvas Power App [Quick Tip]
  2. Get Dynamics 365 field metadata in a Canvas App using DataSourceInfo function | Common Data Service
  3. Debug Published Canvas Power App with other users using Monitor | Power Platform
  4. Download a File from a Canvas Power App using a button | Power Platform
  5. AddColumns() function to dynamically add columns to a Data table in Canvas Power App | SharePoint List
  6. Implement real-time search in Gallery of CDS records in a Canvas Power App | Power Platform
  7. Implement character length validation in a Canvas Power App | Power Platform
  8. Log Canvas Power App telemetry data in Azure Application Insights | Power Apps
  9. Call HTTP Request from a Canvas Power App using Flow and get back Response | Power Automate
  10. Send a Power App Push Notification using Flow to open a record in Canvas App | Power Automate
  11. Dependent OptionSets in a Canvas Power App for 1:N related CDS entities | Power Platform
  12. Restore older version of a Canvas Power App | Power Platform

Thank you!!

Entity Icon for entities on Unified Interface | Quick Tip

Now, Unified Interface being the only interface we have to work on in Dynamics 365 CRM, Here’s a quick tip on how and where you can set the Entity Icon for the Unified Interface.

Default Icons

One each entity, Custom or otherwise, here’s where you can set the Icon.

  1. Let’s say Commissions is a custom entity which has a default Icon.


  2. This is how it appears in the Unified Interface for any custom entity which doesn’t have any Icon set.


  3. Now, let’s look at how we can set the entity icons.

Set Icons for Entity

  1. Firstly, you need to create a Web Resource of type SVG Icon.

  2. Select the entity you want to set the Icon to in the Unified Interface. Let’s say Commission entity shows the Default Icon. Select the entity and look for Update Icons on the Solution.

  3. When you click on Update Icon, you’ll need to go to the Unified Interface.


  4. Now, in the New Icon field, you’ll have to select the Name of the SVG Icon from Step #1 above, i.e. cf_commission in this case.


  5. Select OK and Publish changes.

  6. And you’ll find the Icon is now updated for the entity entirely wherever it’ll be used on the Unified Interface. Since the Classic UI has been ruled out, we don’t need to update the classic Icons anymore.

Here are some Dynamics 365 related posts which you might need to check out –

  1. Find deprecated JS code used in your Dynamics 365 environment | Dynamics 365 v9 JS Validator tool | XrmToolBox
  2. Make On-Demand Flow to show up in Dynamics 365 | Power Automate
  3. Track and Set Regarding are disabled for Appointments in Dynamics 365 App For Outlook message | Demystified
  4. Cancelled Bookings Imported in Time Entries in Dynamics 365 PSA issue | [Quick Tip]
  5. Remove ‘This Email has been blocked due to potentially harmful content.’ message in Dynamics 365 Emails | OrgDbSettings utility
  6. Get GUID of the current View in Dynamics 365 CRM JS from ribbon button | Ribbon Workbench
  7. Get Dynamics 365 field metadata in a Canvas App using DataSourceInfo function | Common Data Service
  8. Dynamics 365 App For Outlook missing on SiteMap in CRM? Use shortcut link [Quick Tip]
  9. Debug Ribbon button customization using Command Checker in Dynamics 365 CE Unified Interface
  10. Pass Execution Context to JS Script function as a parameter from a Ribbon button in Dynamics 365 | Ribbon Workbench

Thank you!!

Create a Team, add Members in Microsoft Teams upon Project and Team Members creation in PSA / Project Operations | Power Automate

Let’s take a simple use case where you need to have a Microsoft Team created in Teams and have the Project Members added to the Microsoft Teams’ Project Team.

You can simply do this using 2 simple Flows in Power Automate

Scenario & Setup

If you are a PSA Customer, you would want to create a Team in Microsoft Teams based on what Project it is and then add Team Members of the Project as Team Members in the Microsoft Teams’ Team you created.
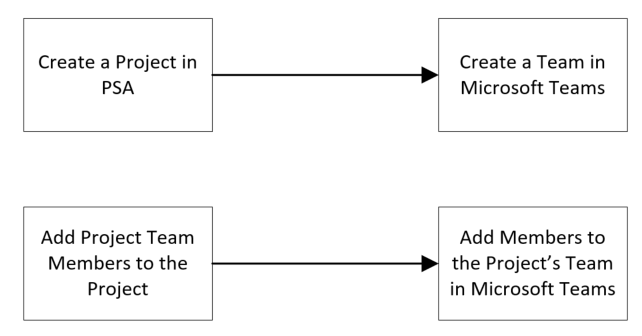
Let’s look at a Simple example of how you can do this. And further, you can enhance the implementation yourselves based on whether a Project becomes Inactive, or someone is to be removed from the Project Team.

I’ll be creating 2 Flows for this purpose –

  1. One that will create a Team in Microsoft Teams upon Project Creation and
  2. Other, will add Member to the Project’s MS Team upon addition of the Team Member in Project in PSA/Project Operations.

Create a Team for the Project

Let’s look at the first scenario where you can create a Team in Microsoft Teams once create a Project in PSA.

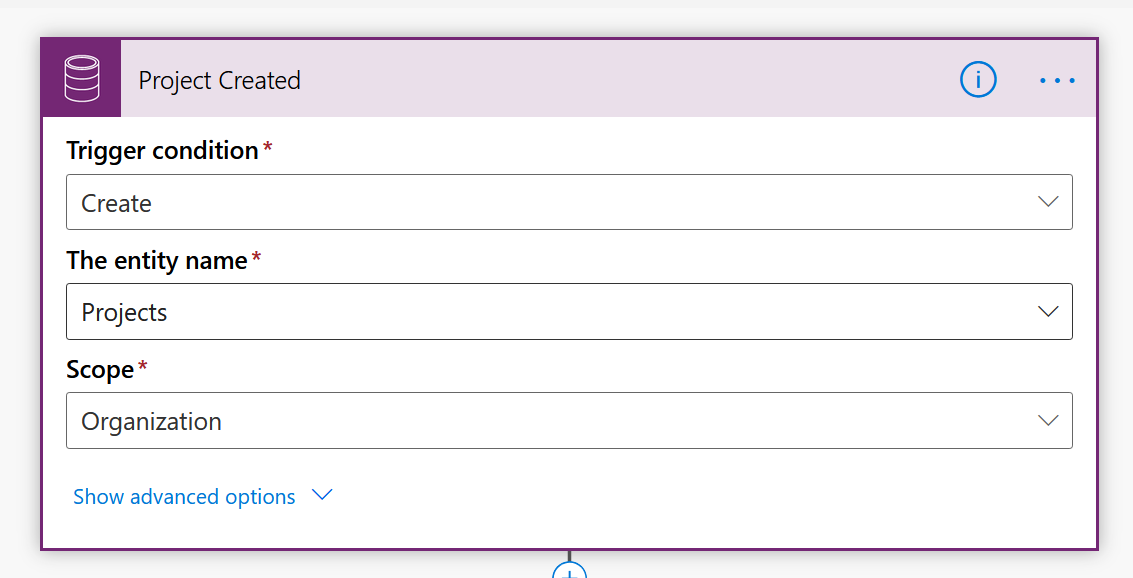
  1. Flow to trigger off of a creation of a Project.
    |
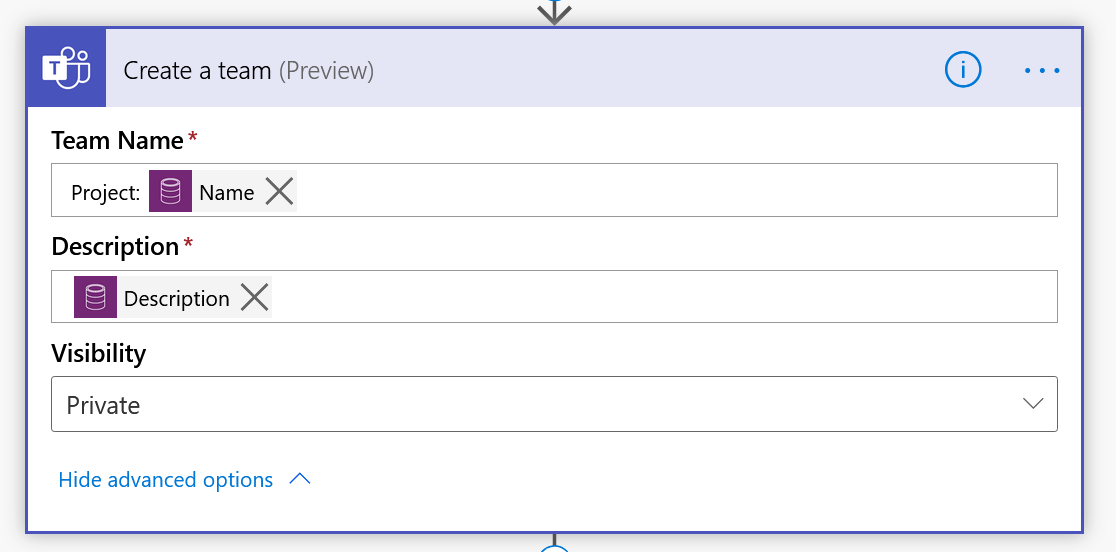
  2. Now, search for create a team in the next step to find a Microsoft Teams connector’s Action to create a Team in Microsoft Teams.


  3. Assign the Name of the Project and Description of the Project for easy understanding. You can make the team Private which is ideal to keep users’ Teams cleaner and also keeps Project discussions isolated if that’s the need.

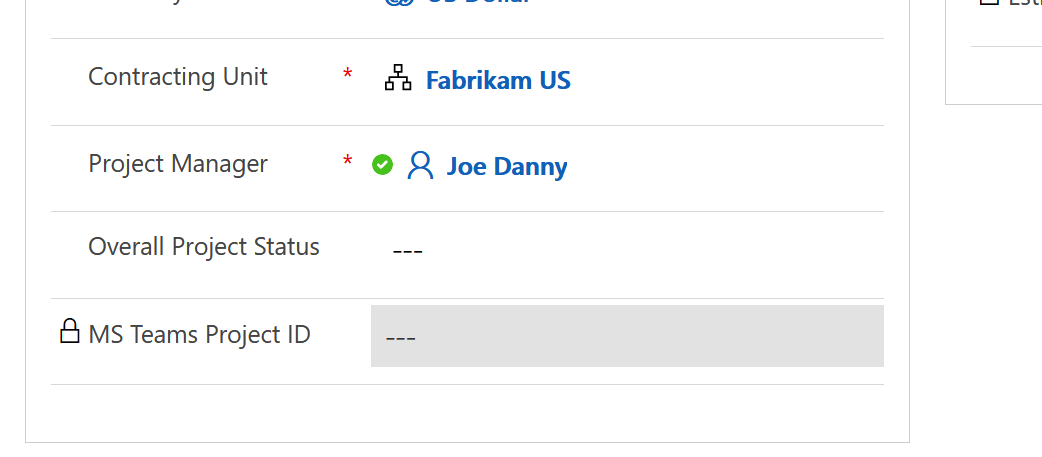
  4. Once a Team is created, I’ve created a field on Project record to hold the MS Teams’ ID for other references.
    Add a step to update the Project back with the created MS Teams’ ID like this

    And in that, I’ll update the Created Team’s ID

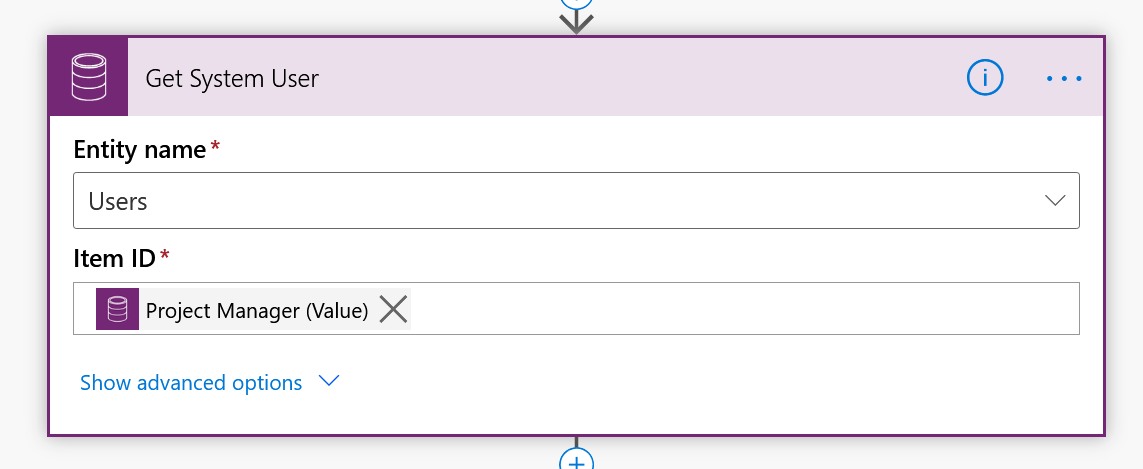
  5. Now, fetch the Project Manager’s User record in CDS (PSA, basically) so that the User’s ID can be used to make the Owner of the Team you are creating.
  6. Next, you need to add Members to the Team. Look for add a member to the team and you’ll find Microsoft Teams’ action which you can use.
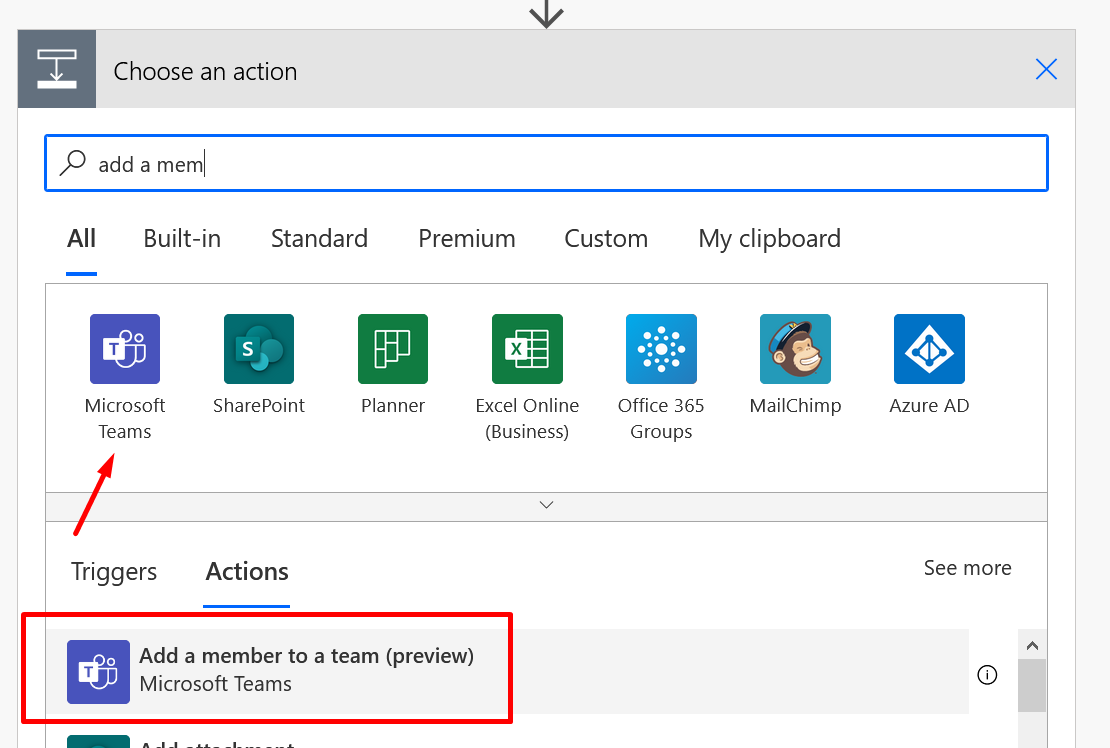
  7. Here’s how the Add a team member looks like.

  8. Now, this is a little tricky. Since you don’t get the Dynamic Values right away in this Action, click on Add a custom item.

  9. In Add a custom item, you can add the Team ID of the MS Team you just created for the Project in step #3 above.
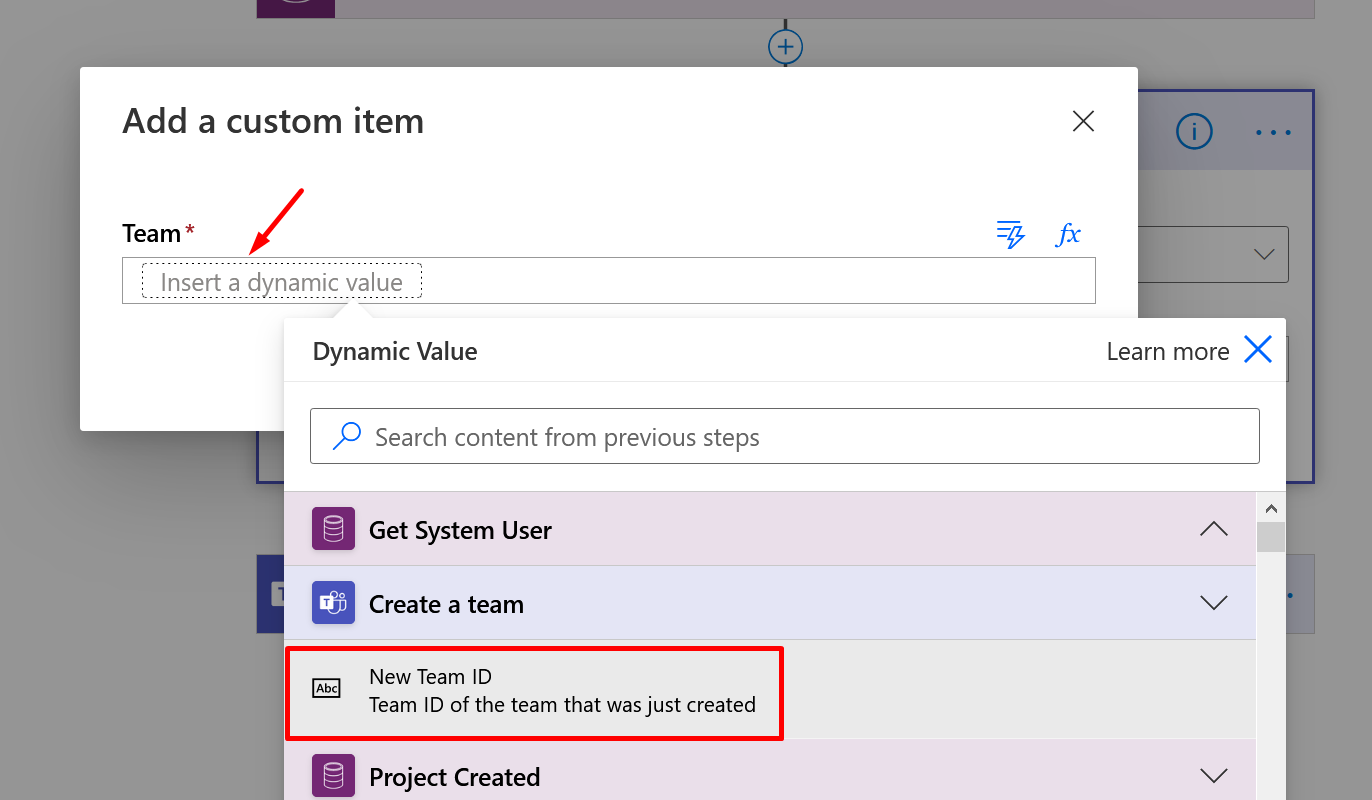
    Once you add it, it’ll look like below
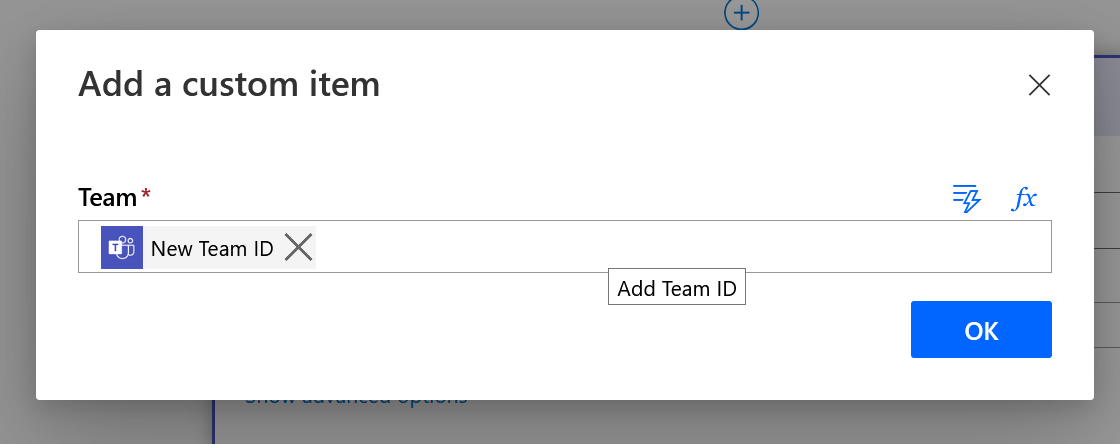
  10. And for the User’s AAD ID step, set the System User’s (fetched in #5)
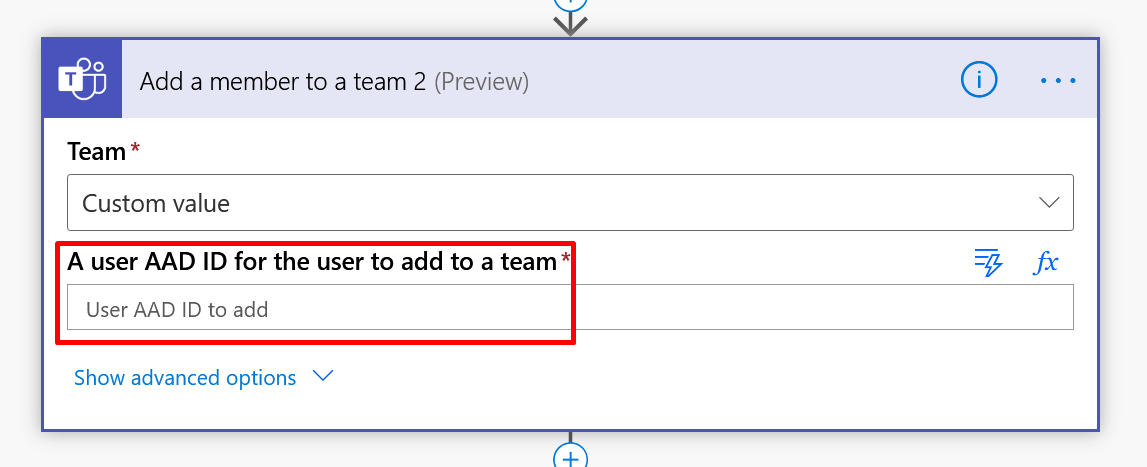
    Add Azure AD Object ID

  11. Now, the last step looks set.

Add Members to the Project Team

Let’s work on the other scenario with other Flow. This will be on trigger of a creation of a project Team Member.

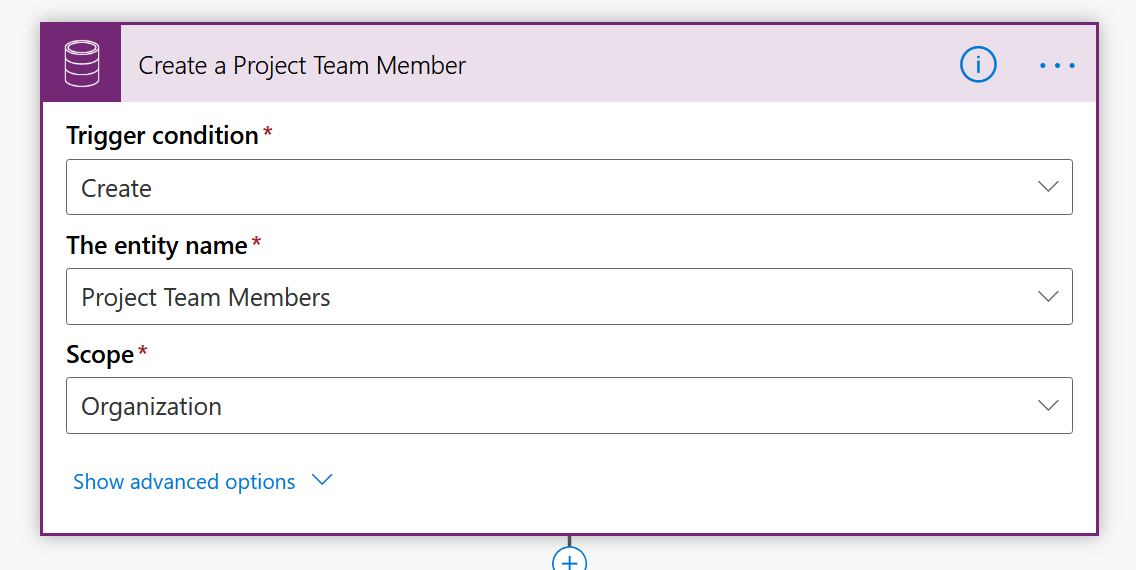
  1. This second will fire off on creation of a Project Team Member. Hence, the trigger on Create of a Project Team Member.
  2. I’ll get the Project record since I need the MS Teams ID which is a custom field we created to store the MS Team’s ID on the Project.

    Again, you can do this easily if you know how to get related records. I’ve done an extra step for simplicity.


  3. Now, the next step is to retrieve the Bookable Resource‘s Record. In turn, we’ll retrieve the System User record associated with the Bookable Resource record on the Project Team so that the System User’s ID can be used.
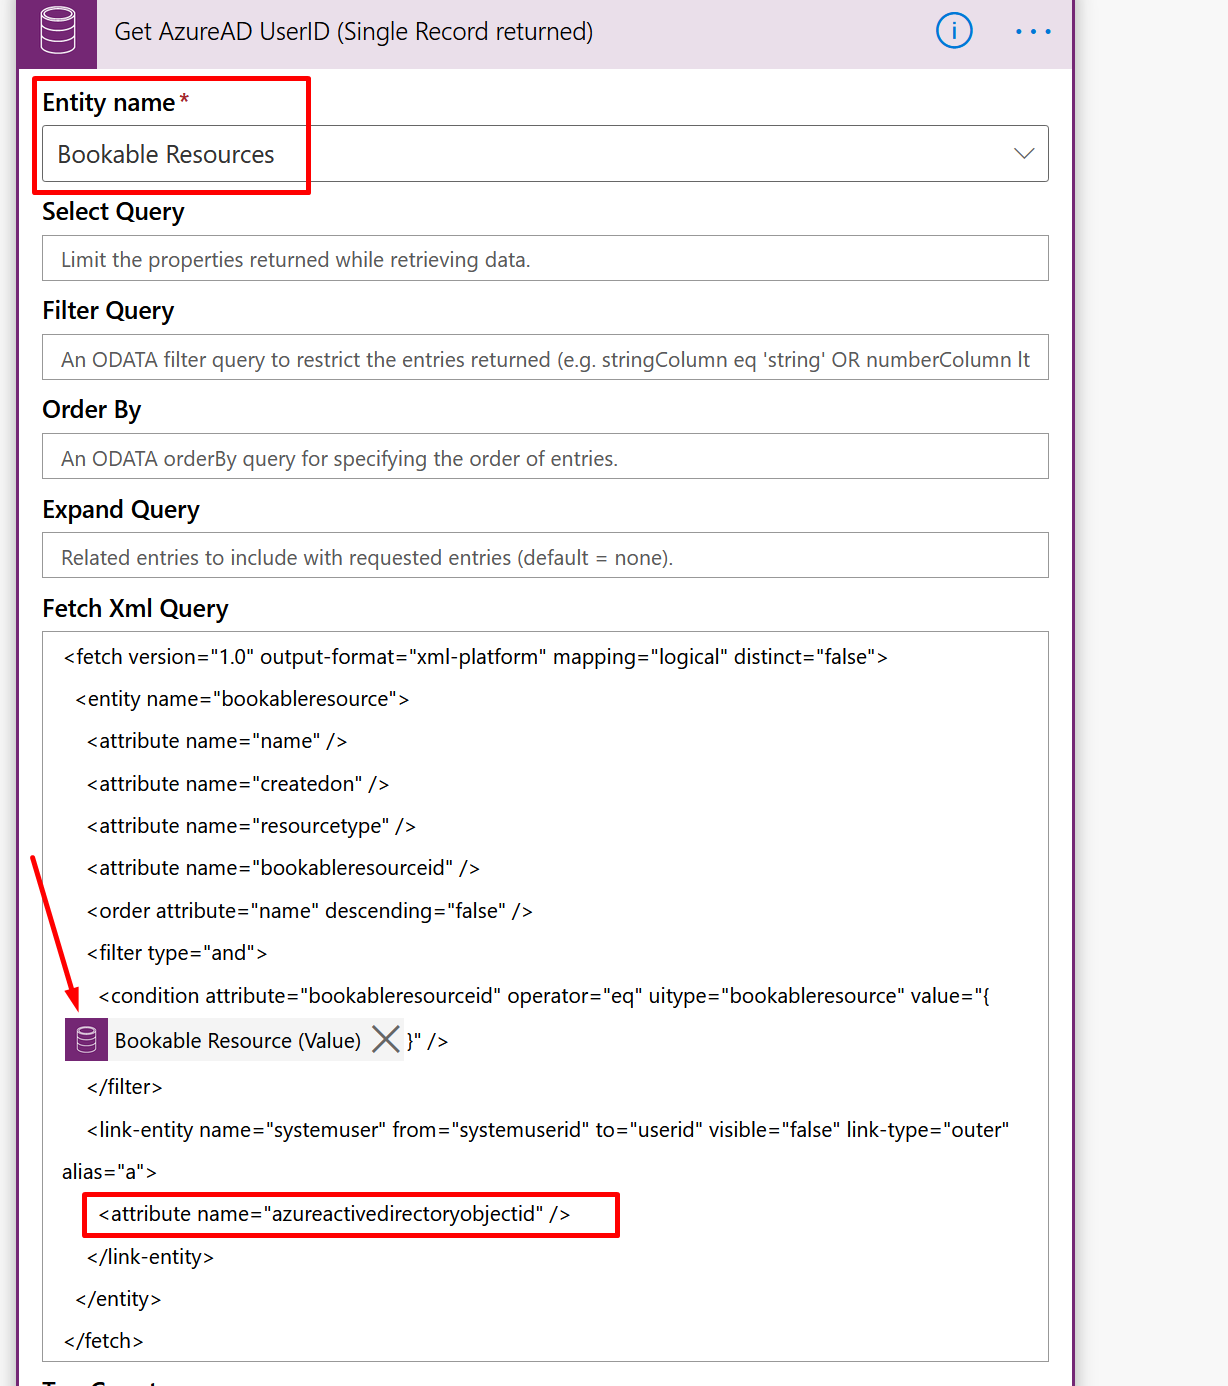
    Just because I need the Azure AD Object ID (User) entity, I’ve written a fetch XML on the Bookable Resource entity to go and get the User record’s Azure AD Object ID. I’ll need this to map it in the step where we’ll add the Member to the Project’s created Team.
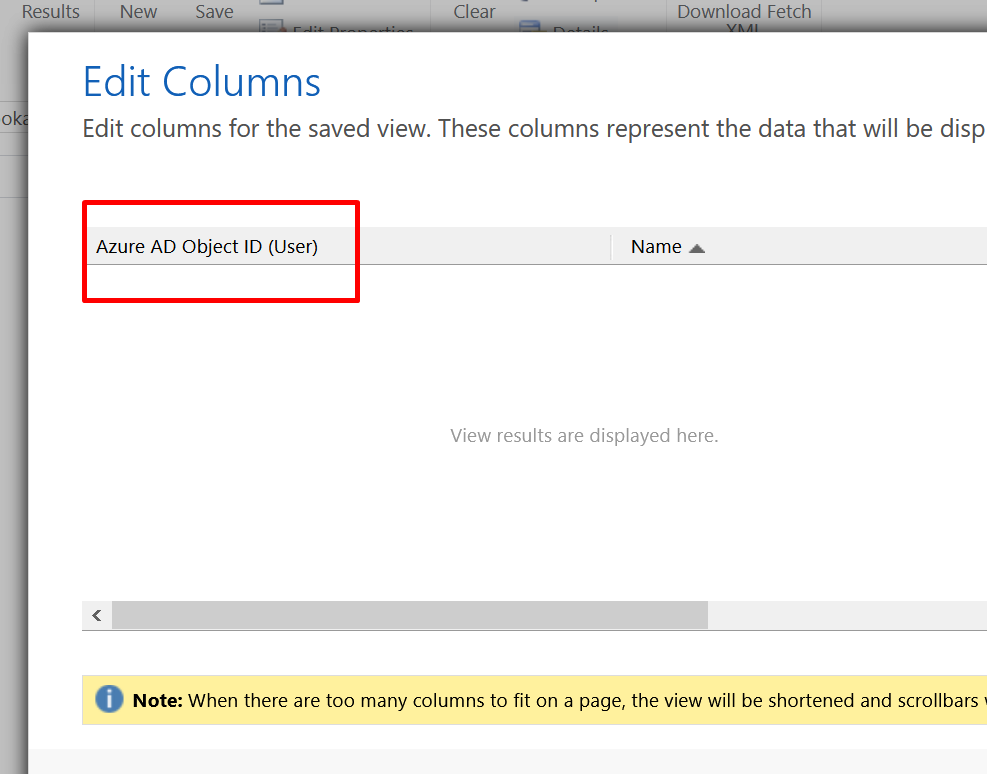

    My step to retrieve Bookable Resource + System User’s Azure AD ID looks as below. Make sure you select the Bookable Resource GUID reference from the trigger i.e. the Creation of the Project Team Member record to ensure we only get 1 record.
  4. Then, I’ll simply generate a Parsed JSON after the above Step so that I can get to select the required attribute to select in the Team’s Add a Team Member step (Because the related field is not available for Dynamic Values) (In case you know how to directly write using outputs() function, that should be good enough too!!)


  5. Now, add the Team Member to the Project’s Team in MS team. Again, as mentioned above in the previous Flow, use the Add a member to a team Action from Microsoft Teams connector to do so.
    Now, add the Team’s ID in the Team field.
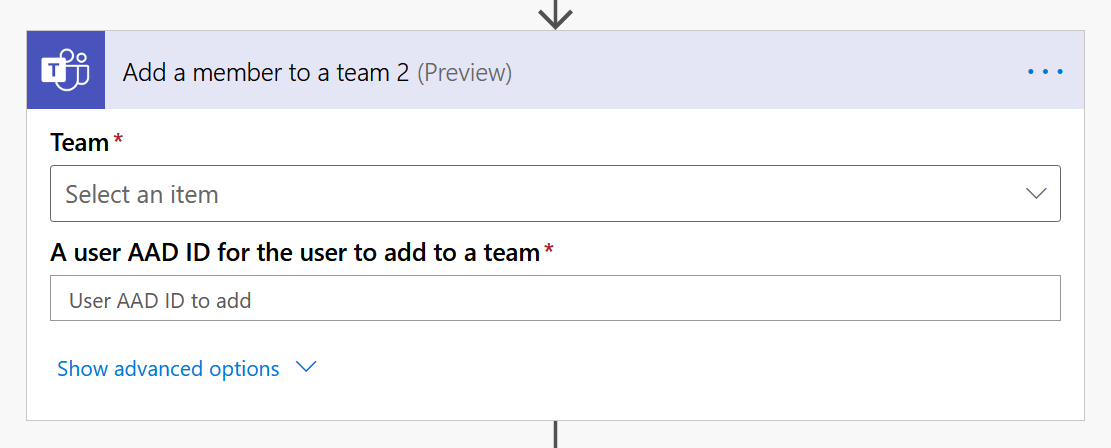
    On the Team field, you’ll need to Add a custom Value like we did in the previous Flow.


  6. And for the final step, in the User AAD ID for the user to add to a team step, you can pick the parsed Azure ID field from #4 above.
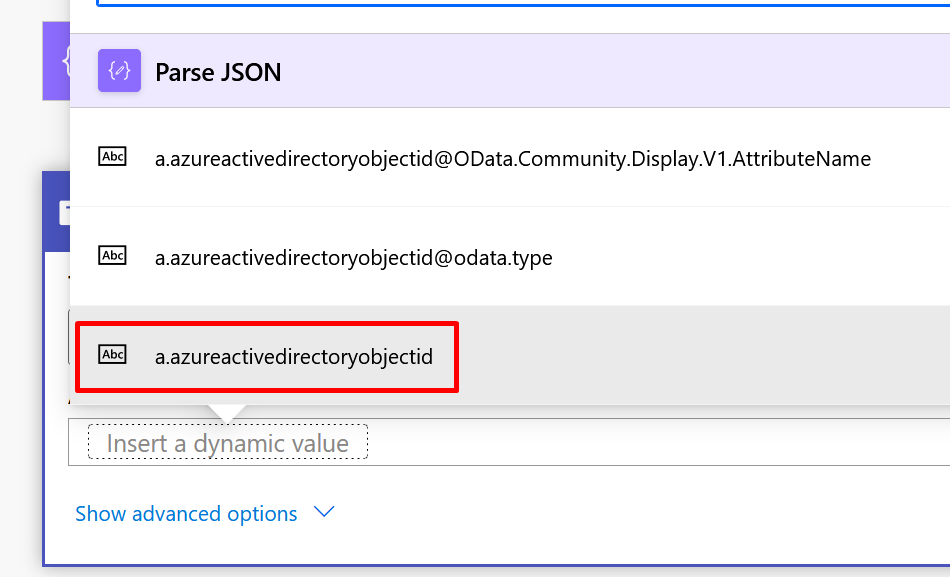
  7. As soon as you select from Parse, the Flow step will be converted to Apply to each. But that’s because we used List records which returns multiple values. Even though Apply to each is applied, this will logically run only once anyway!!
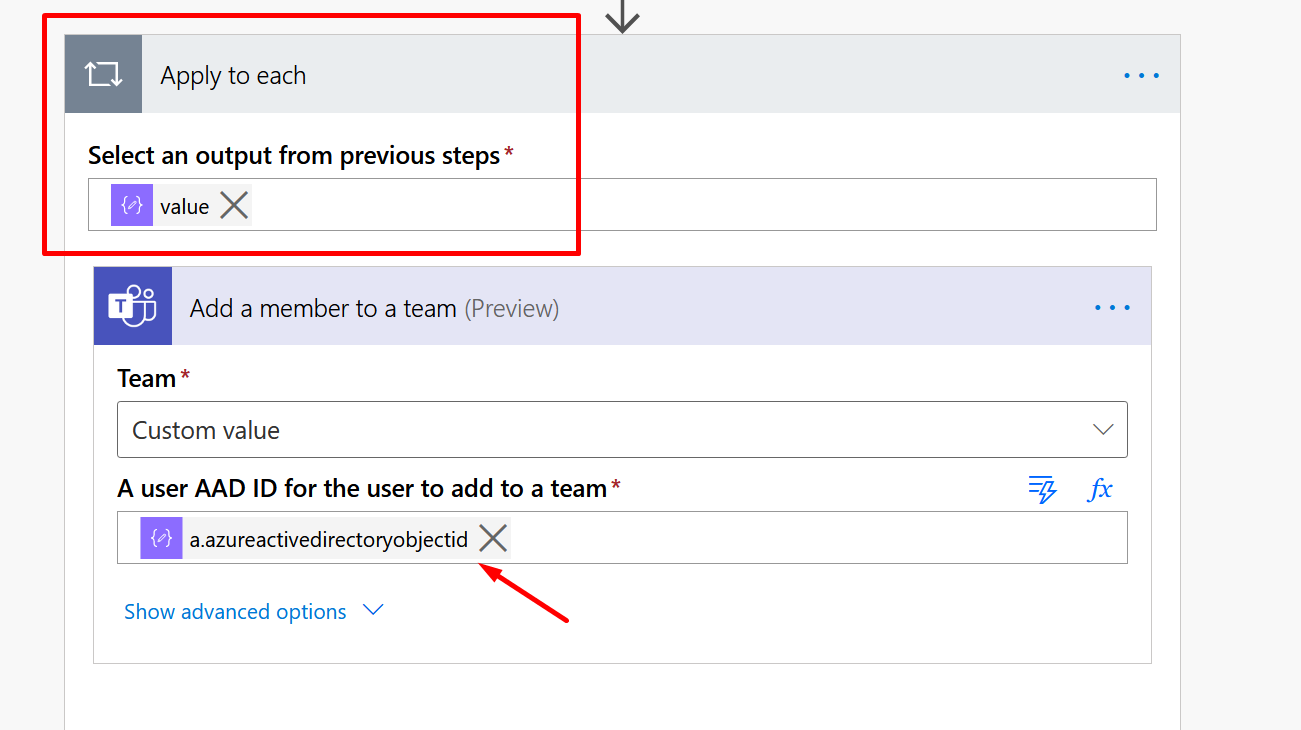
  8. Now in the user AAD

Working

Now’s let’s see all this in action.

  1. Let’s create a Project in PSA. Notice I’ll enter the name and the Description since we are creating a Team in MS Teams and that’s what we are filling out. Notice that MS Teams Project ID is blank. Our Flow will populate that once a Team is created in Microsoft Teams.
    Notice that Joe Danny is the Project Manager on the Project, he will be the Owner of the Team we are creating in MS Teams as per our first Flow.


  2. A Team like this will be created in Microsoft Teams.

  3. Also, notice that in the Project in PSA, a MS Teams Project ID will be populated too.

  4. Also, notice that Joe Danny is the Owner of the Team since Joe is the PM on the Project.

  5. Now, let’s add 1 more Team Members to the Project in PSA. Now, I’ve added a new Team Member Priyesh in the Project’s Team.
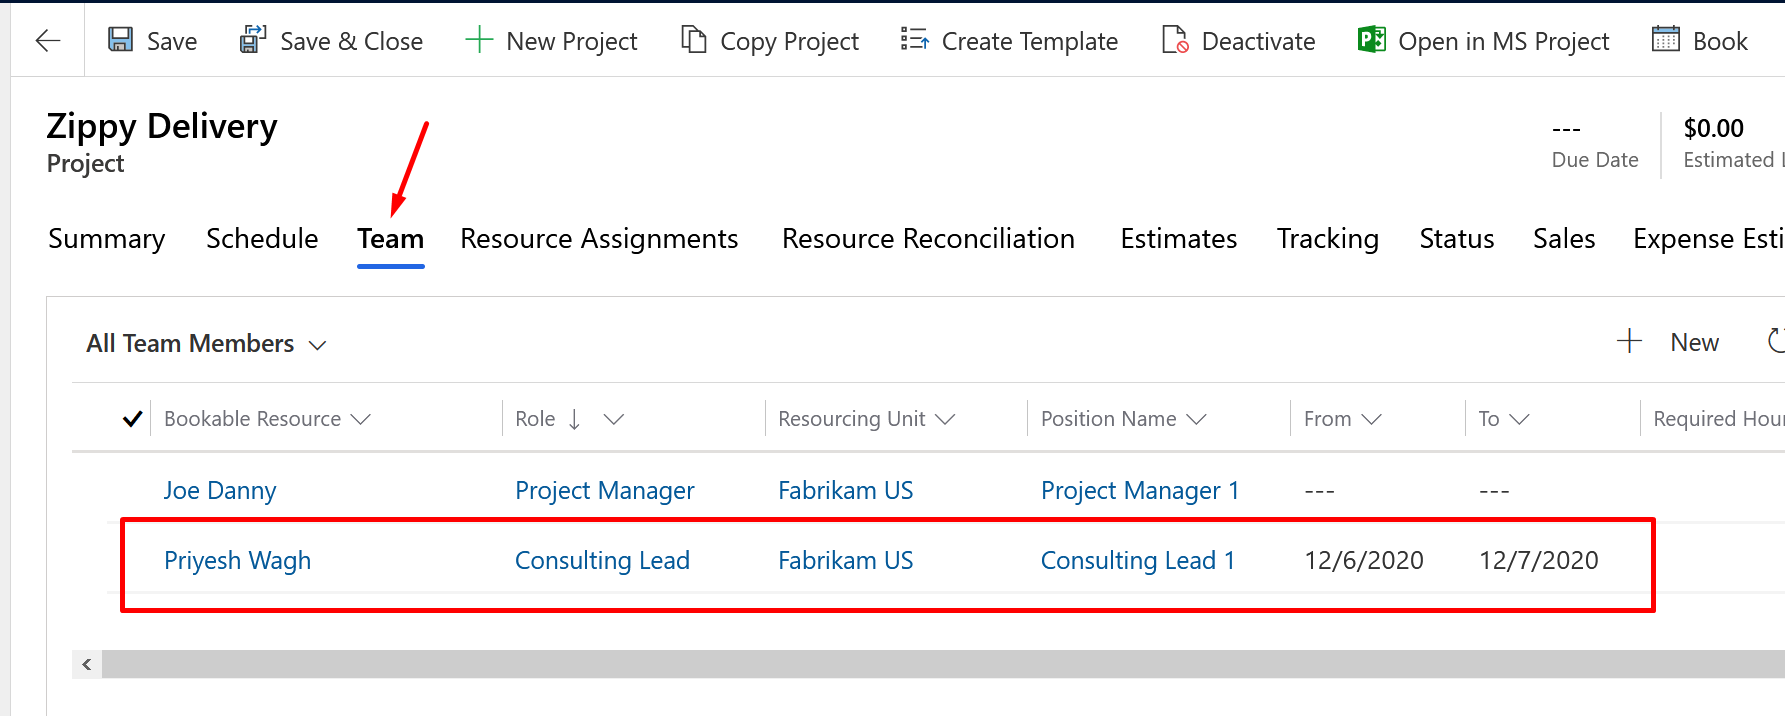

  6. That team member also get added as Members in Microsoft Teams in the Project’s Team. This is from out second Flow we created to add the Team Members to the created Teams for a PSA Project.
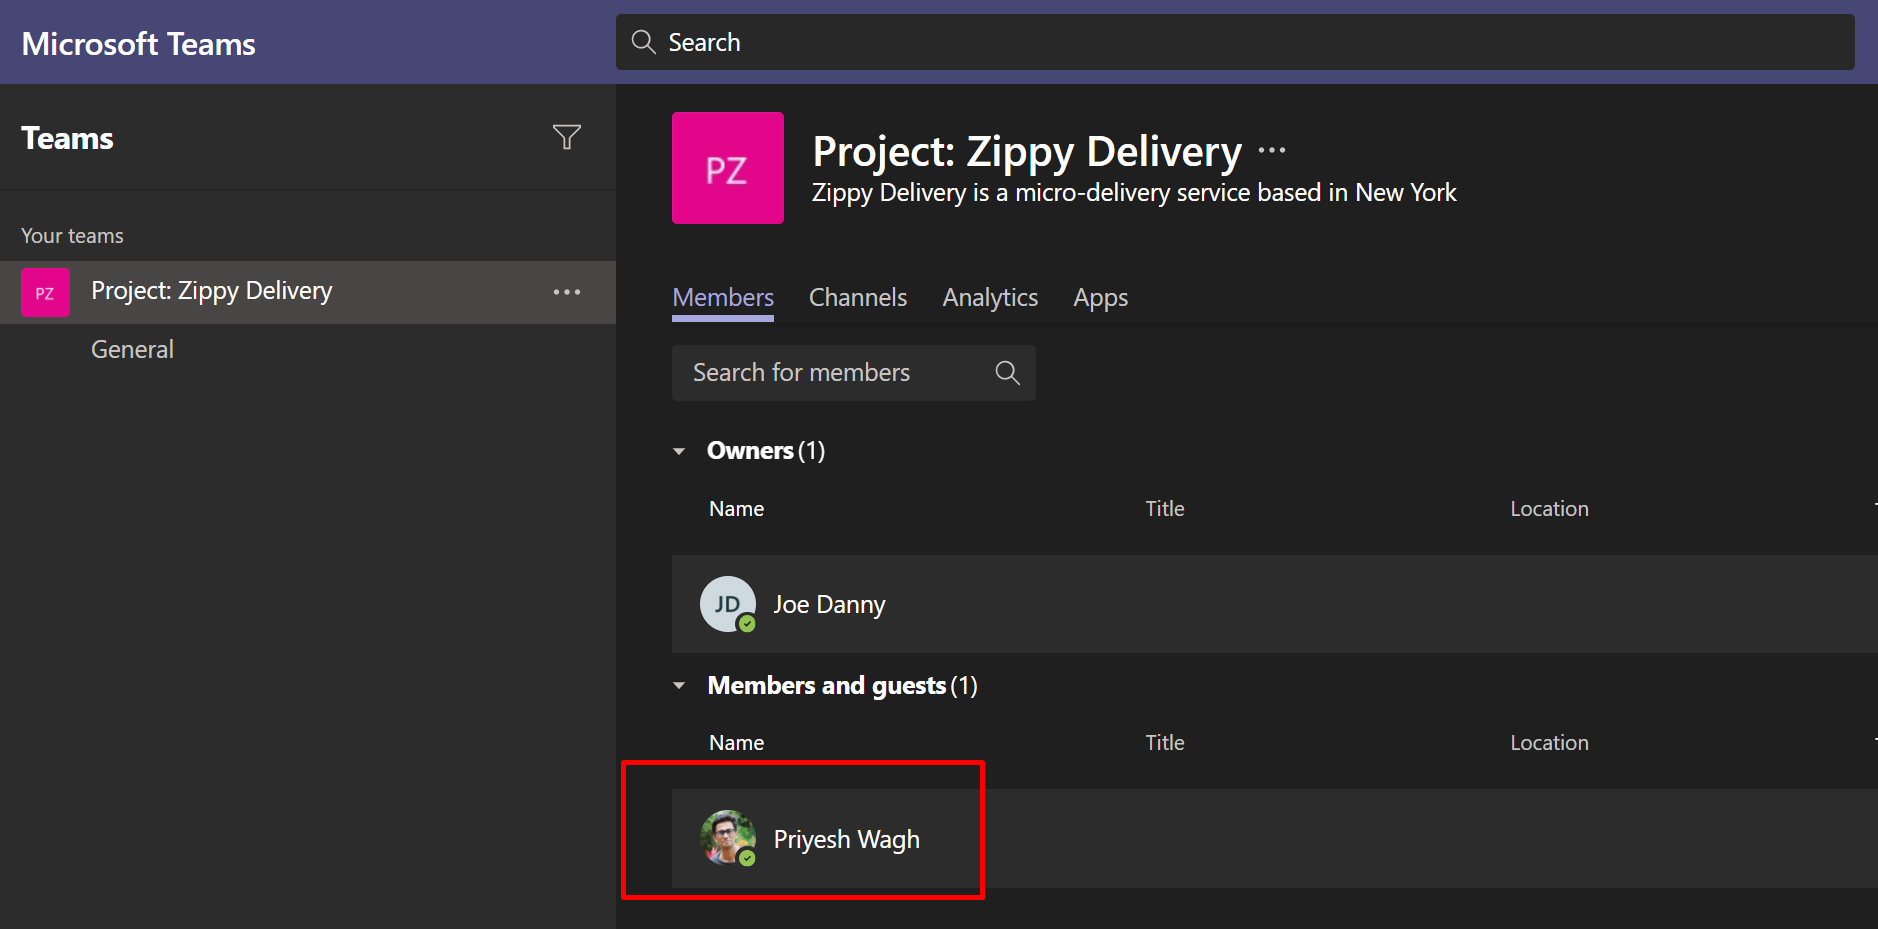

Here are some more enrichments you’ll need to do to handle some scenarios –

  1. Separately handle if a Project is Canceled/Deactivated for some reason.
  2. Remove Members from an MS Teams if they are removed from the Project.

Hope this was useful.

Here are some more posts about Project Service Automation (PSA) in Dynamics 365 / Microsoft Teams that might be helpful –

  1. Cancelled Bookings Imported in Time Entries in Dynamics 365 PSA issue | [Quick Tip]
  2. Task Completion reminder using Flow Bot in Microsoft Teams | Power Automate
  3. Change Booking Status colors on Schedule Board for Field Service/PSA [Quick Tip]
  4. Additional columns in PSA v3 Schedule view
  5. Check Managed Solution failures in Solution History in Dynamics 365 CRM
  6. Modify Project tab’s view in Schedule Board in PSA v3 | Quick Tip
  7. Update Price feature in D365 PSA v3
  8. A manager is required for non-project time entries, absence, and vacation error in D365 PSA v3
  9. Time/Expense Entry Rejection comments in D365 PSA v3
  10. PSA v3 View Custom Controls used on Project form

Thank you!!
Setting Lookup in a Flow CDS Connector: Classic vs. Current Environment connector | Power Automate Quick Tip

Both the CDS and CDS Current Environment connector are similar yet different in the way how they accept Lookup values set in their Update a record steps.

Here’s a quick tip!!

Scenario

Taking a simple example of setting Primary Contact Lookup on Account.

We’ll do the same thing using both the connectors mentioned below.

Common Data Service connector

Common Data Service (Current Environment) connector

Common Data Service Connector

Let’s start with using the classic Connector first –

  1. As mentioned in the Scenario above, let’s first try to use a class Common Data Service connector. Here’s how you identify the same.

  2. Now, whenever you have to set the Lookup value in the classic connector’s Update a record action, you can simply tag the Primary Key as is on the field in the connector step as shown below.


    And lookup can be tagged very easily.

Common Data Service (Current Environment) Connector

  1. Let’s do it with the new Common Data Service (Current Environment) connector. This is a much simpler way to tag a Lookup. Now, the new CDS Current Environment connector can be identified as below.

  2. In order to set Lookup, you’ll need to patch is in the below way
    pluralNameOfTheEntity([PrimaryKey])

  3. Here’s how my friend Linn Zaw Winn’s post explains in details of why we have to choose the plural name and exactly where you can get it from – http://linnzawwin.blogspot.com/2019/11/power-automate-how-to-set-lookup-field.html

Hope this was useful. Here are some more Power Automate / CDS posts which you might want to check out –

  1. Using outputs() function and JSON Parse to read data from missing dynamic value in a Flow | Power Automate
  2. Adaptive Cards for Outlook Actionable Messages using Power Automate | Power Platform
  3. Make On-Demand Flow to show up in Dynamics 365 | Power Automate
  4. Task Completion reminder using Flow Bot in Microsoft Teams | Power Automate
  5. Run As context in CDS (Current Environment) Flow Trigger | Power Automate
  6. BPF Flow Step as a Trigger in CDS (Current Environment) connector | Power Automate
  7. Accept HTTP Requests in a Flow and send Response back | Power Automate
  8. Call HTTP Request from a Canvas Power App using Flow and get back Response | Power Automate
  9. Setting Retry Policy for an HTTP request in a Flow | Power Automate
  10. Adaptive Cards for Outlook Actionable Messages using Power Automate | Power Platform

Thank you!!