Secure Input/Output in Power Automate Run History

Isn’t it just too easy to see from Flow (Power Automate’s) Runs what data was passed on? A simple switch in the Power Automate designer will secure this.

Default Behavior

By default, if you have access to the Flow, you can simply go in and see the inputs
openData

Secure Input / Output

In the Flow designer, you can select and step and go to Settings
settings

And turn on Secure Input / Output depending on what you want. It says this is still in Preview as of the day of writing this post.
turnOnInputs.png

Once this is Active, it is denoted by a Lock symbol on the step you enabled it on.
denoted by Lock.png

And now, when you try to look at the data, it will hide away the information
securedData.png
Note: Please note that this will run only for the Run History records after this was turned on. The previous records will continue to show the data.

Also, in case you’re curious to know about the Approval Process using Power Automate, you can refer this post – Approval Process using Power Automate

Hope this helps!!

Approval Process using Power Automate

Approvals have been around for quite some time now in Power Automate. Let’s look at the simplest example of how we can make use of Approvals in Flow / Power Automate and then you let your imagination and creativity take over!

Scenario

For the sake of simplicity, I have a custom entity called Request where users submit a Request and the Approval simply has to Approve/Reject.
simpleRequestRecord.png

The Approved/Reject status should be set in Dynamics 365 accordingly. Simple!

Power Automate for Approval

And then, my Power Automate looks like this –

  1. I will trigger this off the CDS connector on create of the Request record and then select Approvals in the next step.
    approvalConnector
  2. The Type of Approval selection is asked.
    typeOfApprova
  3. And my Approval body is simple, just providing the basic details and whom the Approval request should go to. In this case, Kuldeep Gupta
    approvalBody.png
  4. In the next Condition step, based on whether the Outcome is Approve or not, I’ll simply update the record’s status to either Accepted or Rejected.
    condition.png
  5. If Yes, the following will execute
    Yes
  6. And if No, then the below
    No

That’s it. Let’s see it in action!

Approval Process

  1. Let’s say Priyesh has created a Request record in Dynamics
    simpleRequestRecord
  2. As I submit this request, an Email from Power Automate goes out to Kuldeep asking for approval. And right on the email itself, he can chose to Accept/Reject
    approvalReceived
  3. Let’s say the request was Accepted
    responseSubmitted.png
  4. The request will be Approved.
    approvedMessage.png
  5. And in Dynamics, the status of the record will be changed to Accepted as defined in the conditions.
    acceptedRecord.png

Hope this quick tutorial helps!

Update Price feature in D365 PSA v3

Typically, your costs for your clients go up by a certain percentage (%). It’s a standard practice to update the entire Price List consistently as and when there’s an increase.

This is a great feature to update the entire Price List by a defined % and then reflect this in the Estimates in your Project in PSA. Let’s take a look –

Scenario

Let’s say your original SalesPrice for a Developer role is $50
scenario1.png

And the same is reflected in the Estimates in a Project as well. Based on $50 for Developer i.e. resource Priyesh Wagh will spend 12 hours. So 12 * $50 for that week of 1st Dec is $600
originalSalesApplied.png


Updating Prices in Sales PriceList

Now, there’s an increase you want to apply. With just a simple change, you’ll be able to do so.

Assuming the PriceList in question here is SalesPriceListUS and you want to add a 10% increment to the same. Simply click on Update Prices button as shown below.
originalPrice.png
And specify the % of increment to be applied. Use Negative number to Decrease.
apply10
And there we go, a 10% to $50 is applied to all items as indicated.
scenario2

Update Price on Project’s Estimates

Similarly, to bring the change to the desired Project, look at the Estimates tab on the Project and click on Update Price button to effect the Prices on the table as well.
applyNew.png

And you’ll see the updated prices in Sales time-phase in the Project Estimates
updatedSalesApplied.png

Hope this helps!!

D365 General Tip: Keeping Currency and PriceList in check

In a hurry, you perhaps selected a similar looking Price List on your Quote and you want to change it.

Example: By mistake, I have selected “SalesPriceListINR” and want to select “SalesPriceListUS
salesINR

But when you try to do this, you can’t see the PriceList you want to set. Why is that?

visiblePLs

Currency

That’s because the Currency selected on the record is Rupee (₹) and your PriceList has the currency US Dollar ($)

rupeeSelected

Change it to US Dollar and you’ll see your PriceLists show up.
USDSelected.png
USDSet.png

And try searching your Price Lists again
correctPriceList

Error while changing PriceList

In a typical scenario, if you have child records dependent on the record you are changing, you’ll see this error.
typicalError.png

But as simple as the wordings are, you’ll need to do the needful and make sure there are no Currency dependent records associated.


Hope this helps!


Territories enabled for OOB Hierarchical relationship in Sales Hub

With the 2019’s Wave 2 Update releasing, the out-of-the-box Sales Territory entity has been enabled with Hierarchy settings.

Define Hierarchy

Let’s say you are in Sales Hub and in App Settings, look for Sales Territories on the left-hand menu.

menuNavi

settingMenu

It’ll show up all Territories, open the same and add a Parent territory
Let’s say, I opened Japan, I’ll add Asia-Pacific as the parent of the territory
addedParent

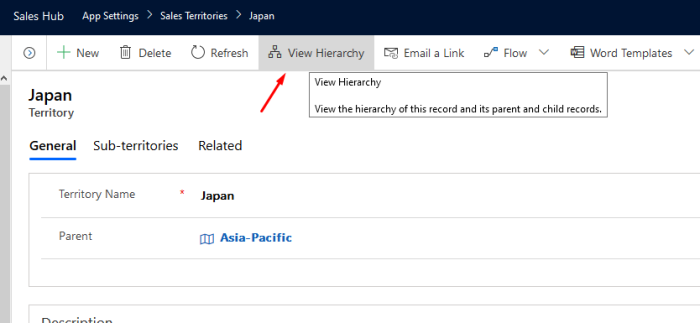
Once I do so, I can see the saved changes using the View Hierarchy button on the ribbon on either the Main Form on the public View.

Note: It won’t immediately appear once you enter a Parent and save, please reload the page.
viewHier.png

actualView.png


Please note that this is only for Unified Interface and not available for the classic UI. Also, this is only for the Sales Enterprise license.

Although the feature says it’s only available for Unified, I was able to catch it in classic UI as well. But this is discouraged since we are moving towards Unified UI and classic UI will soon be gone.

Hope this quick tip helps! 🙂