Custom View Filter JS code not working in Dynamics 365 CE. Why? [Quick Tip]

One of the major pet-peeve is not understanding why the code isn’t working. And you for sure know you’ve written the correct code. But, thing just don’t work.

One such tricky situation is that of applying custom filter to fields using JavaScript in Dynamics 365 Customer Engagement apps.

Scenario

Let’s say you have a custom filter to be applied to a field and you’ve written your JS code on Load to apply the filter and everything (you know what you need to do!)

Example:
defaultCode

But the above is just not working. Why???
contactNotWorking

Reason

The reason is pretty simple! Because, the Lookup field is still using the one set on the field itself. Check that –

onFieldFilteringOn


The above should be turned off to make your code work since the field’s default OOB filtering takes precedence.
turnedOff

And now, your code should work (Provided everything in it correct)

working


Hope this quick tip helps!

Check Managed Solution failures in Solution History in Dynamics 365 CRM

At times, solution upgrades failed for Managed solution and you have to get in touch with Microsoft support to figure out and get this through –

Example: You’re upgrading a solution like Project Service Automation (or any other for that matter)

Solution Failure

installationFailed

Solution History

So, instead of directly opening a support ticket with Microsoft, it’s best to dig a little into Solution History to get an insight of what exactly failed and to see if you have a quick resolution for this yourself-

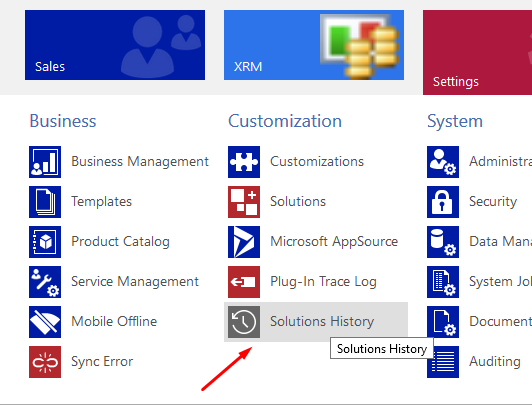
  1. Navigate to Solution History in Settings in D365.
    solutionHistory
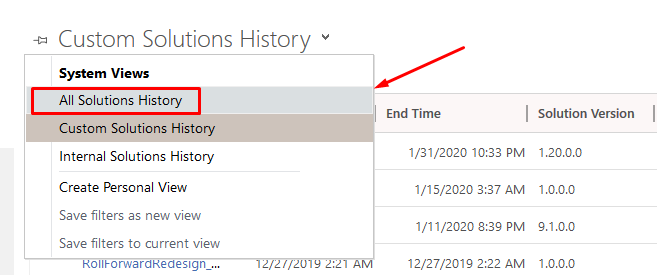
  2. Switch the view to see All Solutions
    switchView
  3. And open the one that failed recently
    openFailed
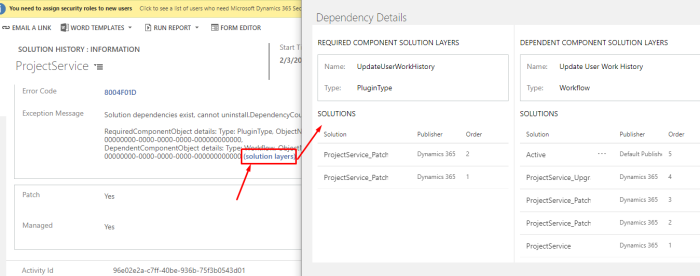
  4. In my example particularly, I found the below component had a conflicting dependency which caused the solution to fail-
    dependentComponent

Checking in Dependency Viewer

Now, this isn’t very subtle to check the Dependency Viewer –

  1. In the Exception error message, right click the solutions layers link from the error message itself. Use the scroll wheel itself to click on the link instead of clicking or right clicking.
    openSolutionLayers
    In my case from the above screenshot, the issue was that the managed workflow Update User Work History was set to Draft and hence, the upgrade failed. It could be anything else in your case.
  2. If this doesn’t open in a new window and opens in the new tab with some additional characters in the URL, then trim the beginning and ending of the text in the bar to make it a legitimate URL and press enter
    trim1

trim2

Post this, you’ll need to work your way to fix the solution and then try upgrading again.

So, if you have a particular solution like restoring back the missing component or fulfilling whatever the dependency may be, you can retry upgrade and this should work successfully.

Finally, if things don’t work out, it would be best to open a support ticket with Microsoft and they should help.

Apart from this, there are still failures which unfortunately, only Microsoft could tell. Those are usually the ones that happen due to data as Microsoft Support said. I’ll follow up this blog in the future once I uncover more details.

Hope this helps!

Set Lookups in Xrm.WebApi D365 v9 correctly. Solving ‘Undeclared Property’ error

Using Xrm.WebApi needs you to be careful with the field names and what to use when. Especially, when you are dealing with Lookups.

One of the most common errors you’ll come across is the one like below – “An undeclared property (fieldname you entered) which only has property annotations in the payload but no property value was found in the payload.

error

This is confusing as to what needs to be put in while setting the lookup.

If you have done the below, entered the name of the field which is all in small caps  –

object[“msdyn_resourcerequirement@odata.bind”] = “/msdyn_resourcerequirements(<Guid>)”;

This will result in the above error!!!


You’ll need to put the Schema name of the lookup field instead and this should solve your problem –

correctName.png

and the code should look like this –

object[“msdyn_ResourceRequirement@odata.bind”] = “/msdyn_resourcerequirements(<Guid>)”;

And this should totally work for you!!

Hope this helps! 🙂

Store ‘Today’s Date’ in a field to use in workflow conditions in D365 CE

Most of us need this in our workflow conditions to check against – to have today’s date handy and then use them in If conditions in workflows. But, the filter in If conditions in workflows don’t let you dynamically select On or after ‘Today’.

And when you want to compare to today’s date on selection of On or After, you are forced to enter a date and not dynamically select Today.

onOrAfterBlank

To overcome this, here’s what you can do to simply store Today’s Date in all records.

Calculated Date and Time field

So workaround this, you can simply create a new Date and Time type of Calculated field to store the current date and use it in your workflow conditions or wherever you need it.
createCalculatedField

Make sure the type of the field is Calculated and then, Edit the criteria.

Select Now() function to set the value of the field.
Now
And the final criteria condition will simply look like the below
finalCriteria

Once you save and publish all your changes, you’ll see that the field is automatically populated with today’s date.
allDatesPopulated.png

Using in Workflow Conditions

Now, you can use the same in the workflow conditions as shown below –

addedCriteria

and you should be able to use this in your workflow conditions which could look like this

addedOnCondition

Hope this quick workaround comes handy!


Modified By (Delegate) & Created By (Delegate) in D365

These fields which are everywhere but you don’t really pay attention to really mean something worth.

So if you feel you want to get hold of someone for modifying a record. Maybe also take a look at Modified By (Delegate) just in case so that the actual user might be someone else who wanted to do another thing on that record. 🙂

Impersonation is one of the basic aspects of a plugin step that you need to carefully design to let another user (usually Admins for most implementations) make the plugin run under their context instead of giving more security roles/privileges to every other new user.

Well, same goes for Created By & Created By (Delegate) also!

Modified By

Usually, when you update something on a record, the Modified By is updated as expected. But notice that Modified By (Delegate) is not updated.
noDelegate.png

That’s because you are the rightful owner of the record and there’s no other person involved.

But what is someone else is modifying the record (who don’t have access to that record)?

In that case, Modified On (Delegate) field is populated with the name of that user. In such scenarios, Modified By (Delegate) user is the one who caused changes to the record.

delegatedUser

Why Modified By (Delegate) was populated

The reason this was populated was because the record was updated through a plugin by a user who doesn’t have Write access to the record.

But because the user invoked a plugin which was Impersonating as a User who has rights to the records, the record was successfully updated. And this, the actual user who called the plugin is the one who will be populated in the Modified By (Delegate) field.

impersonatingOtherUser

Hope this quick tip helps!

Workaround to get Plugin Profiler from the Unified Interface in D365 CE

Developers like me, often need to Profile the Plugin so see what logic you are implementing and this is pretty common in the development lifecycle. But, Let’s say you don’t have the classic UI at your disposal and need to download the Profiler from the Unified Interface itself – Here’s a little detour you’ll need to take to get it right.

Alternatively, using Persist To Entity is also preferred. But example – if you have a plugin on Create and on PreOperation, you won’t want to record to be created, you can go with the below –

Ease of the Classic UI

On the classic UI, you would get the Profiled file correctly just by Download Log File button on the interface itself.

classicProfiler

And the file has correct data starting with –
startingWIth

And ending with
endingWith.png

Profiler Message on the Unified Interface

As of now, the message pop-up for the profiled plugin will give you this –
currentUCIMessage.png

And the file has this –

currentUCIFile

And the Plugin Registration Tool doesn’t understand this! You’ll get this parsing error if you try –
parseError
parseErrorMessage

Turn On Exception Logging

Before that, you can check this post on how you can quickly go to the classic UI’s Settings area here – D365 Quick Tip: Shortcut to Settings from the Unified Interface

To be able to capture these details in the Plugin Profile entity, enable Plug-in and custom workflow activity tracing from the System Settings as shown below
turnOnLogging

You can’t add Plug-in Trace Logs to UCI

  1. Smarter way would be to add the Plug-in Trace Log entity to the UCI App itself and not having to go back to the classic UI. Unfortunately, you can’t do that.
    cantAddToUCI.png
    With that, we will have to go back to the Classic UI’s Settings > Plugin-In Profile Area to get out Profiled Log File.

Plug-In Trace Log

  1. Assuming you are back in the classic UI (maybe keep this open in another tab)
    Open the Trace Log record
    openProfileRecord.png
  2. Scroll down to the very bottom to find the Exception Details
    profiledData.png
  3. Now, copy that to the text file and attach it in the Plugin Registration Tool
    correctProfileFile.png
  4. This should work and you won’t get an error
    attached.png

Phew! I know this is lengthy. But we hope this will soon be eased 🙂

Hope this helps you!

Show specific entities in Activity Party List Lookup in D365 Activity entity

Out-of-the-box, D365 Activity Party List field, say, Appointment’s Required/Optional Attendees fields lets you choose among multiple Activity Party enabled entities when you want to select records. And perhaps you don’t even want users to select what’s not relevant.

default

Let’s look at how we can show only the required entities in the selection list.

Before that, if you want to check how you can enable custom entities for the Activity Party, you can refer this post of mine – Enable entity for Party List selection in Appointment

Hide entities from the Activity Party List field

This can be achieved by writing a simple JS code and calling it onLoad of the Appointment form where the Party List field exists.

  1. Let’s say you only want to show the entities Lead and Contact in the Required Attendees Party List field
  2. Here’s the JS code that goes on the onLoad function of the Appointment form
    // JavaScript source code
    oAppointmentFormCustomization =
    {
    filterRequiredAttendees: function () {
    Xrm.Page.getAttribute("requiredattendees").setLookupTypes(["lead","contact"]);
    }
    };


  3. And call the method filterRequiredAttendees onLoad as below
    onLoad
  4. The Appointment’s Required Attendees field will show only the entities you provided in the setLookupTypes([“lead”,”contact”]);
    filtered

Hope this helps!

Use Read-Only grid among Editable Grid enabled entities in D365

When you enable Editable Grid for an entity, all the public views become Editable Grids, correct?

And if you wonder if you can keep certain grids as Read-Only and the rest as Editable, your assumption is correct. Here’s what this blog is about.

You can still go back and select a particular grid which you want to keep as a classic Read-Only grid

  1. Let’s say you have added the Editable Grid under Controls. This will apply Editable Grids for all the Views on that entity.
    enabledEditable
  2. And you want Vendors view, for example, to show the classic Read-Only grid, open it up.
    vendorView
  3. Select Custom Controls.
    customControls
  4. And force-add another Read only grid even if it says the Default one is already selected.
    forceAddRead-Only
  5. Save and Publish you changed and check
    classicGrid
  6. And the rest of the grids will continue to be Editable Grids
    editableOthers

Note: I tried this on the Unified Interface and this works. Somehow, it didn’t work on the Classic Web UI.


Hope this helps!

D365 PSA: Restrict Project access only to their Project Managers

Out-of-the-box PSA’s Project Manager security role provides complete access to even other Project Managers. But then, what if you want to bring down the access of the Project Managers to their own Projects only?

Remember, access in D365 PSA is provided for Owner (ownerid) field and not Project Manager (msdyn_projectmanager) field.

PSARoleRestrict

Scenario

Now, I don’t want a Project Manager to have access to others Projects and looks like this can’t be controlled from the Security Level perspective, given the Project Manager is a separate field than Owner of the Project.

So, I’ll limit the access to only the User level (the one who created the record would have the access, obviously)

PSARoleRestrict2

But this remove the access from even the Project Managers since they don’t own the Projects. To overcome this, I’ve written a simple plugin to provide access to the Project Manager whenever they are updated by Sharing and giving PMs the access.

For this, I’ve written a plugin code that will grant all permissions to the Project Manager of that Project and I would like to share this with you all to consume it.

GitHub Project

Here’s the GitHub repository I’ve created which has the plugin code and the Unmanaged Solution that contains only the plugin assembly and the registered step –

Link: D365PSA-PMAccessRights

gitProj

The D365 Unmanaged Solution resides here –

unmanagedSoln

This will work in the following scenarios –

  1. When a Project Manager is changed from Person A to Person B, the access rights of Person A will be removed and granted to Person B.
  2. You can even create a trigger field and use an on-demand workflow to set the trigger. This trigger should be included in the filtering attributes of the plugin step to update the existing records.

This will provide access to the Project Manager of the Project automatically apart from the Owner so that they see/access only Projects that concern them
accessGiven

Make sure no other security role is overriding your restricted access.

Hope this helps! 🙂

Get SharePoint Document Location link on field on create in D365

I’ve been working on getting the SharePoint Document’s link to get back into D365 but looks like it can’t come back and get tagged to the record it was created from.

I tried to fire off a plugin on SharePoint Document record create, but in vain. Flow didn’t do justice since SharePoint Document entity doesn’t support Change Tracking.

So, I retrieved the Absolute URL of the “SharePoint Document Location” entity on it’s create itself so that I have the link once the record is created. And click that link to open the folder in SharePoint.

Workflow to wait and then fetch

So if you immediately make a call to retrieve the Absolute URL in the plugin code you’ve written on Create won’t work because Absolute URL gets created moments after the actual Location record is created unlike being passed in the execution context.

My approach is to fire the workflow on the create of the SharePoint Document Location record and Wait for 1 minute.

wfBody

After 1 minute, set off the flag to call the plugin and fetch the Absolute URL as shown below –

updateFlag

Retrieve Absolute URL in Plugin

You can use RetrieveAbsoluteAndSiteCollectionUrlRequest message to retrieve the SiteCollection URL and the Absolute URL of the document folder of the record

retrieveAbsolute


Working

  1. When you open the Document sub-grid on the record for the first time, a Document Location record is created –
    openForFirst
  2. The workflow designed above will run and fire off the plugin after 1 minute. The plugin will then make the message request go through to get you the Absolute URL as below –
    link2
  3. And probably you can use that link to open up the folder by clicking on the field that has this URL or send it across in email to internal users (whatever suits your requirements)
    linkInField
  4. It will open up the SP folder for that record and will have all the documents you attach in the Document sub-grid on the record.
    spFolder

Hope this helps!