Toggle Experimental Features in Power Automate | Quick Tip

If you are working in Power Automate, you might want to check if you are already using the Experimental Features or not.

Here’s how you check and toggle between turned on and off.
Also, please note that it is not recommended to use Experimental Features on a Production instance. Please use Experimental Features only for Sandbox environments.

Experimental Features

Here’s how you can turn Experimental Features On or Off.

  1. While making Flows, you can click on the Gear Icon to go into Settings on the top right corner.

  2. When you click on it, you’ll see the dialog box where the Experimental Features could either be already turned on or off.

  3. And that’s it. You can just save and this dialog box will be closed.

Identify Experimental Feature Turned On/Off

In order to identify how the Experimental Features are turned on or now, here’s what you check –

  1. When turned OFF, the Dynamic Content will load on the right hand side as it always used to from the start.

  2. And when turned ON, the buttons to choose either the Dynamic Content or the Expressions will show when clicked on a field in a Step. And then you can choose either to show the menu.


    And the menu will look like this upon clicking –

Here’s official Microsoft Documentation on Experimental Features – https://docs.microsoft.com/en-us/power-automate/experimental-features?WT.mc_id=DX-MVP-5003911

Hope this was useful!
Here are some more Power Automate posts you might want to check –

  1. Enable SharePoint Online integration Dynamics 365 | Power Platform Admin Center
  2. Dynamics 365 Storage Utilization | Dataverse Storage | Power Platform Admin Center
  3. Use Hierarchy in Roll Up Fields in Dynamics 365 CRM
  4. Filter records in a View owned by a Team you are a member of | Dynamics 365 CRM
  5. Get GUID of the current View in Dynamics 365 CRM JS from ribbon button | Ribbon Workbench
  6. Dynamics 365 App For Outlook missing on SiteMap in CRM? Use shortcut link [Quick Tip]
  7. Import lookup referencing records together in Dynamics 365 CRM | [Linking related entity data during Excel Import]
  8. Excel Importing Notes (Annotation) entity in Dynamics 365 CRM
  9. Enable/Disable the need to Approve Email for Mailboxes in Dynamics 365 CRM CE
  10. Call Azure Function from Dynamics 365 CRM using Webhooks
  11. Show Ribbon button only on record selection in Dynamics CRM
  12. Accessing multiple occurrences of a field in Business Process Flow using JS in D365 CRM

Thank you!!

Auditing Enhancements for Dynamics 365 CRM in Power Platform Admin Center

Audit Management has improved lately in the Power Platform Admin Center (https://admin.powerplatform.microsoft.com/), let’s review what’s new!

Auditing in Power Platform Admin Center

Given that you are in the Power Platform Admin Center, let’s look at an org CFT 158’s Audit Settings –

  1. You’ll now see an Auditing section in the environment –

  2. And if you click on Manage as shown below, you can see what all is Enabled / Audited.


    In Manage, you’ll see the below Auditing enabled and also how long the Audit Logs can be Retained for –

  3. And you can choose for a particular environment, as to how long you want to retain the logs for. Let’s say, you don’t want to retain Audit records for Sandbox environments for more than a certain time.

Audit Log Deletion

Now, you have the ability to select what Audit Logs you want to delete based on a certain Table, People/System or from selection of Dates. –

  1. Under the Free up capacity label in the Auditing summary on the Environment in PPAC, you’ll find a link for Delete logs.

  2. In this menu, you’ll be able to select what Audit Logs you want to delete.
    You can select from within a Table, Date selections or Access logs, by people and systems.


  3. Beginning to Date Range
    Now, let’s select by Date i.e. Deleting Logs from beginning and up to the selected Date.
    Now, these are the Audit records for a sample account.

  4. Now, I’ll select a Date i.e. 5th Jan – so, it’ll delete the Audit everything till 5th Jan (will leave 5th Jan probably because of the Timezone issue on my end.)


  5. And once you set this, you’ll be asked for confirmation.

  6. Once you confirm, a Bulk Delete System Job will run and look like below

  7. And if I check my System Jobs (It probably left out 5th Jan’s logs because of time zone not set correctly)
    And everything prior to 5th Jan will be deleted.

  8. So, to verify this, I added 1 more Auditing record and then ran another job for 6th Jan to verify if 5th Jan is deleted or not.

  9. And it deleted the 5th Jan records

  10. Table
    Now, you can also select a specific table/entity you want to delete Logs for.

  11. And select the Tables you want retaining others. I choose Contact for example.

  12. And it’ll ask for confirmation as well. Once I select Confirm, it’ll Delete Audit Logs only for Contact.


  13. And the third type is to delete the Access Logs.

    Note: Please note that at times, some Bulk Delete Jobs could be waiting to be submitted.

Hope this summary was useful!

Here are some more Dynamics 365 Administrator related posts you might want to check –

  1. Enable Plug-in Profiler in Settings area in SiteMap in Dynamics 365 | [Quick Tip]
  2. Disable Recent Records from Dynamics 365 Lookup Control | Model-Driven Apps [Quick Tip]
  3. Language format for Whole Number field in Dynamics 365 CE
  4. Custom Help Pages and Guided Tasks for Unified Interface in Dynamics 365
  5. Make Managed fields Required in Dynamics 365 – Managed Properties Error [Workaround] | D365 CE Quick Tip
  6. Sign up for a Dynamics 365 Project Operations (Lite Deployment) environment and provision a new instance | Power Platform
  7. Show custom ribbon button based on Security Role of the logged in User in Dynamics 365 | Ribbon Workbench in XrmToolbox
  8. Filter records in a View owned by a Team you are a member of | Dynamics 365 CRM
  9. Duration field in Dynamics 365 converts Hours value to Days in Dynamics 365 | [Flow Workaround to convert in Hours and Mins]
  10. Form Access Checker in new Power Apps Form Designer | Model-Driven Apps in Dynamics 365

Thank you!

Flows with Dataverse triggers not working after Minimal Copy in Sandbox instance | Power Automate

There are 2 possible ways the Flows are not triggering on the Sandbox instance after a Minimal Copy.

Let’s look at both the scenarios!

Administration Mode

Let’s get the more obvious options out of the way first. So let’s look at the Administration Mode scenarios where the Background Processes are turned off right after the Minimal Copy is completed –

  1. In Power Platform Admin Center (https://admin.powerplatform.microsoft.com/), you can navigate to the environment and look if the Administration Mode is enabled or not.

    And if it is, the Background Processes are still turned ON or not.

  2. Now, the Administration Mode can stay ON, the Background Operations however should be Enabled.

    If not, then the Administration Mode itself can be disabled entirely which will keep the background operations enabled.


    But even if this doesn’t help and your Flows are not triggering, below is another possibility.

Callback Registrations in Dataverse

Callback Registration records are created when you create and Save Flows –
Microsoft Docs on Callback Registrations here – https://docs.microsoft.com/en-us/dynamics365/customerengagement/on-premises/developer/entities/callbackregistration?view=op-9-1?WT.mc_id=DX-MVP-5003911

  1. Now, the reason the Flows are not triggered are because of the Minimal Copy, the Callback Registration records on the Environment also got deleted.
    So, you can now create a new Flow to query all the Callback Registration records on the environment.
    Add Row Count as 100 or something so that you don’t get a Flow Checker warning. 😊

  2. Now, when you read what Callback Registration records are retrieved, you’ll only find 0 records because all the Dataverse trigger Flows are deleted

  3. And all the other Callback Registration records which should belong to the other Flows (which has Dataverse as the trigger and not other Flows) in my environment are not listed!

  4. And that’s why, the Flows are not triggered which are supposed to be triggered from Dataverse/CRM.

Solution

There are 2 solutions to this –

  1. First is to Delete the Trigger itself


  2. And then re-add the same trigger

  3. And make sure it has all the right steps which it was supposed to have and then Save.

  4. Now, if you Run the on-demand Flow to check the Callback Registrations, 1 record must now have been created.
    And it belongs to the entity which you created the Trigger for. Annotations (Notes), in this case.

  5. And now, if you perform the operation in Dynamics – the Flow will be triggered.

  6. Second solution is to Re-import the Flow or the Solution in which you Flow belongs.

Hope this was helpful! Here are some more Dynamics 365 posts which you might be interested in –

  1. Enable SharePoint Online integration Dynamics 365 | Power Platform Admin Center
  2. Dynamics 365 Storage Utilization | Dataverse Storage | Power Platform Admin Center
  3. Use Hierarchy in Roll Up Fields in Dynamics 365 CRM
  4. Filter records in a View owned by a Team you are a member of | Dynamics 365 CRM
  5. Get GUID of the current View in Dynamics 365 CRM JS from ribbon button | Ribbon Workbench
  6. Dynamics 365 App For Outlook missing on SiteMap in CRM? Use shortcut link [Quick Tip]
  7. Import lookup referencing records together in Dynamics 365 CRM | [Linking related entity data during Excel Import]
  8. Excel Importing Notes (Annotation) entity in Dynamics 365 CRM
  9. Enable/Disable the need to Approve Email for Mailboxes in Dynamics 365 CRM CE
  10. Call Azure Function from Dynamics 365 CRM using Webhooks
  11. Show Ribbon button only on record selection in Dynamics CRM
  12. Accessing multiple occurrences of a field in Business Process Flow using JS in D365 CRM

Thank you!!

Ribbon button visibility based on a null value in field in Dynamics 365 | Ribbon Workbench

In case you are using ValueRule already for showing / hiding a ribbon button, but wondering how you can check for the same field for null values i.e. showing the ribbon button only when the field contains data?

I’ll explain in this post –

You can also refer this post for showing/hiding button based on a certain value – https://d365demystified.com/2021/01/08/ribbon-button-visibility-based-on-a-field-value-in-dynamics-365-ribbon-workbench/

ValueRule

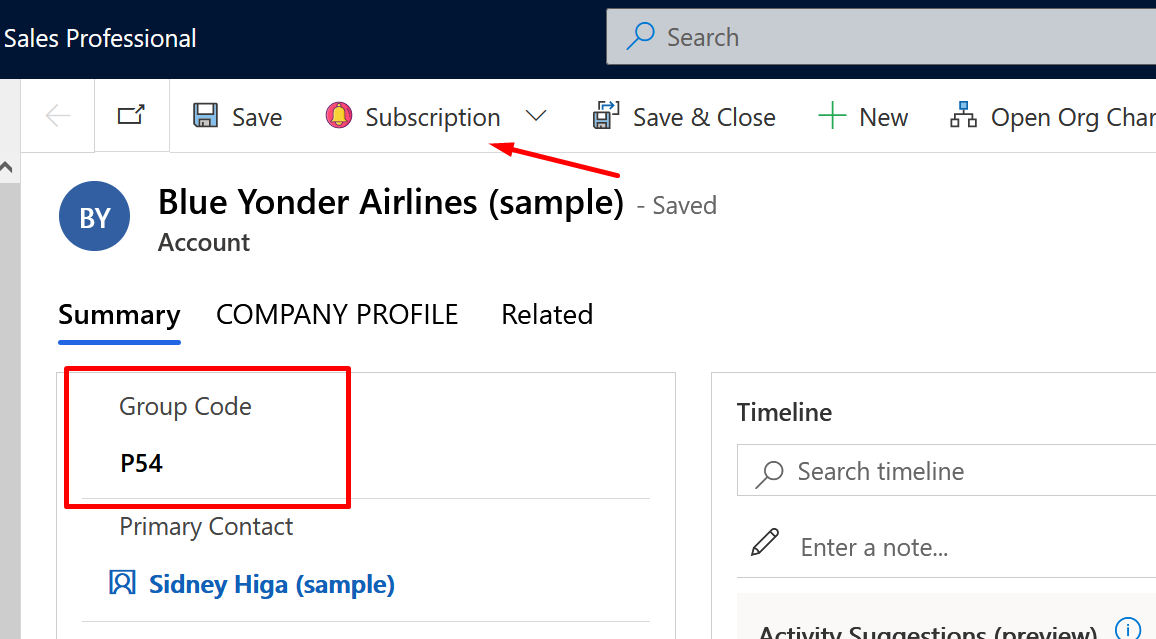
Let’s consider an example where you want to show a Subscription button based on the Group Code field on the Account form –

  1. I have a Group Code button on the Account Form, if this contains data, only then the Subscription button/flyout button should show.

  2. So, in the Ribbon Workbench, you can select your button and start by adding a Display Rule (Assuming you don’t have other Display Rules already set which you’ll need to take care of)

  3. In the Display Rule, you can select the type as ValueRule

  4. In the value Rule, the field you are checking for in this example is Group Code (Name: cf_groupcode)


    At this point, if I leave the Value as blank in the above screenshot, the button will be hidden if the value is blank in the above shown Display Rule. This acts as Show when “Group Code Does Not Contain Data

    In this case, the button will be shown when the Group Code field is blank.


    And hidden when the Group Code field Contains Data


  5. Now, if we choose to Invert Result, you’ll get this – This will act as Show when “Group Code Contains Data


    Now, in this condition, the Ribbon button will be shown is the Group Code has data in it.


    And will be hidden when the Group Code field is blank.

Also Ensure

If you are wondering if your changes are being applied, also cross check the below two points –

  1. The Command must be attached to the button.

  2. And the DisplayRule must be attached to the Command itself.

Hope this was useful!

Here are some more XrmToolBox related posts which you might want to check –

  1. Create a Flyout menu for ribbons in Ribbon Workbench | XrmToolBox
  2. Show custom ribbon button based on Security Role of the logged in User in Dynamics 365 | Ribbon Workbench in XrmToolbox
  3. Connecting XrmToolBox to an MFA enabled Dynamics 365 environment | Azure AD
  4. Find deprecated JS code used in your Dynamics 365 environment | Dynamics 365 v9 JS Validator tool | XrmToolBox
  5. Delete App Passwords created by other users in Office 365 | Multi-factor authentication
  6. Single record and multiple record auditing in Dynamics 365 to Audit record access | M365 Compliance
  7. Filter records in a View owned by a Team you are a member of | Dynamics 365 CRM
  8. Show custom ribbon button based on Security Role of the logged in User in Dynamics 365 | Ribbon Workbench in XrmToolbox
  9. Ribbon button visibility based on a field value in Dynamics 365 | Ribbon Workbench
  10. Get GUID of the current View in Dynamics 365 CRM JS from ribbon button | Ribbon Workbench
  11. Pass Execution Context to JS Script function as a parameter from a Ribbon button in Dynamics 365 | Ribbon Workbench

Thank you!