ChildFlowUnsupportedForInvokerConnections error while using Child Flows [SOLVED] | Power Automate

Often times, if you are using Child Flows and but you see some unexpected while Saving your parent Flows upon adding a Child Flow, which usually look like the below
undefined

Assuming, you are aware of using Child Flows and that they can only be created inside a Solution. (Of course, that’s why you could encounter this issue since you’re able to set a Child Flow already 😊)

Reason Issue

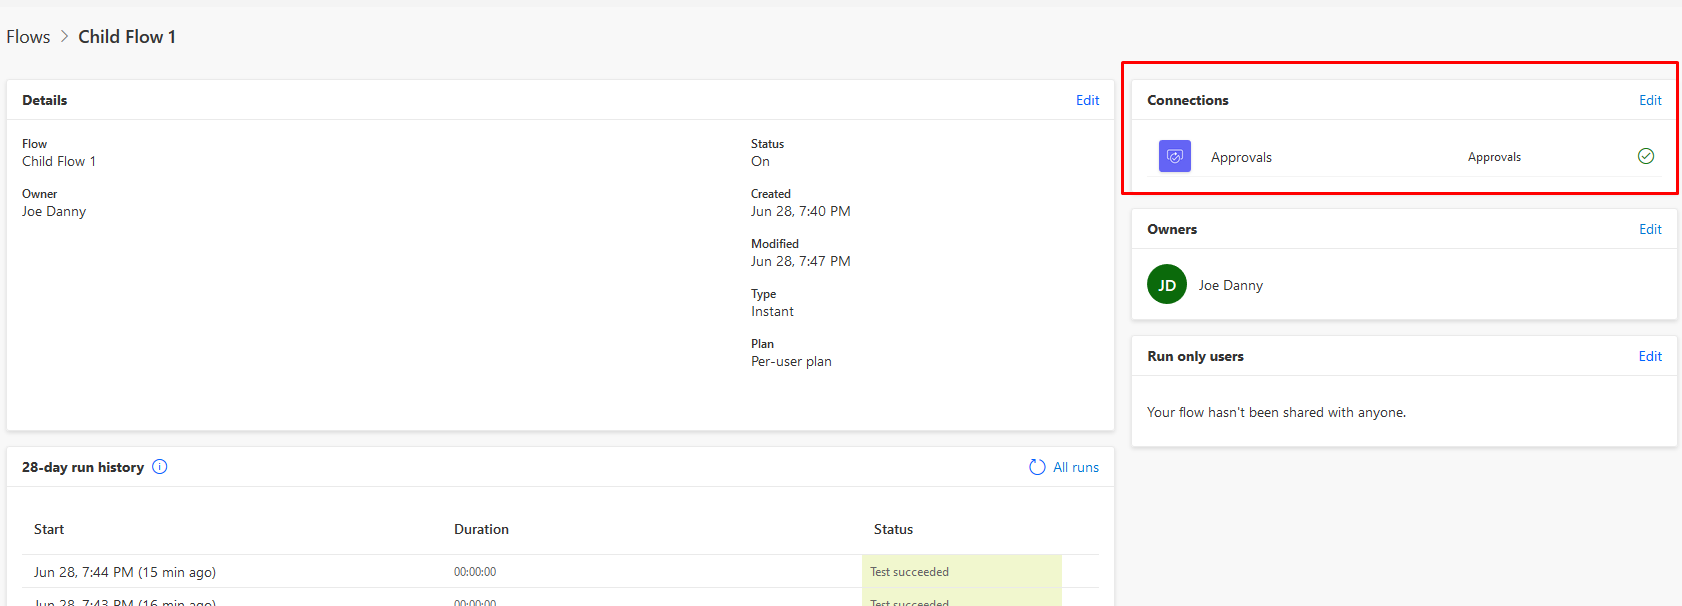
Let’s say this is your Child Flow as shown below in Power Automate. It uses a connection for Approvals. (It could be any other connection in your case.)
undefined

Now, open Run only users section as shown below
undefined

It’ll show that my Approvals connection is relying on Provided by run-only user in Power Automate. To learn more about Run only Users, refer this post – https://www.serverlessnotes.com/docs/sharing-flows-as-owners-and-run-only-users

Now, I switch to Use this connection (<Connector>)
undefined

It’ll ask for a confirmation as per below
undefined

Once this is set for all respective connections, you’ll have no issues in adding a Child Flow to your parent Flow and saving your parent Flow!

Here are some more Power Automate / Flow posts you might want to look at –

  1. BPF Flow Step as a Trigger in CDS (Current Environment) connector | Power Automate
  2. Pause a Flow using Delay and Delay Until | Power Automate
  3. Generate Dynamics 365 record link in a Flow using CDS connector | Power Automate
  4. Get Count of records retrieved in CDS connector in a Flow | Power Automate
  5. Loop through array of objects in a Flow & Create records in CDS | Power Automate
  6. Call a Dynamics 365 Action from Flow [Bound and Unbound Actions] | Power Automate
  7. Number Formatting in a Flow | Power Automate
  8. Text Functions in a Flow | Power Automate
  9. Setting Retry Policy for an HTTP request in a Flow | Power Automate
  10. Make HTTP request from Flow in Power Automate

Hope this quick tip helps!

Excel Importing Notes (Annotation) entity in Dynamics 365 CRM

Preparing an Excel Template for Notes entity is a little tricky. Doesn’t work when you just Export directly as a Template from the Templates Wizard and try to include all columns and import as is. Why? Because there’s no Regarding field exported when you export/import that template.

undefined

Here’s what you can do as a workaround.

Scenario

Now, let’s assume you want to Export a standard Excel Template for import so that you can re-import into Dynamics for Notes entity for a regarding entity.

Exporting Excel Template

Your Document Templates are where all your Excel Templates can be exported from –

Now, follow the below –

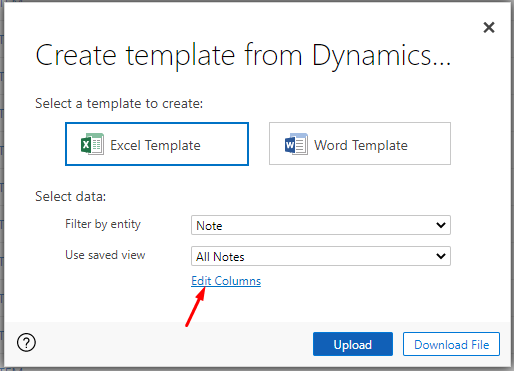
  1. Select Notes entity and Edit Columns you need to Export the Excel with your required columns

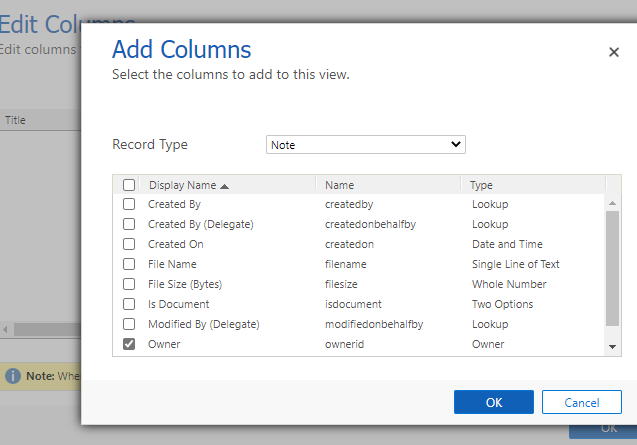
  2. Select the columns you need. Observe that you don’t get Regarding column to export


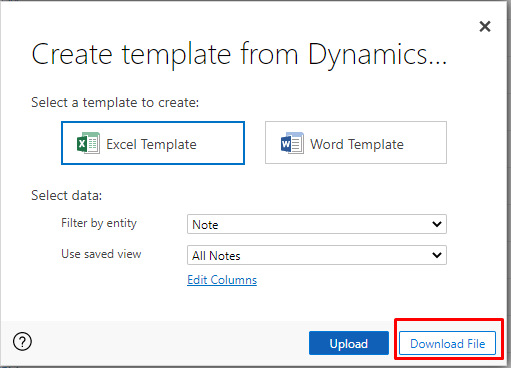
  3. Then Download the file.

Modifying the Excel

Now, since you don’t have the Regarding field in the Excel you exported from Templates, here’s what you need to do –

  1. Add a column yourself, give it a proper name based on what the Notes’ Parent entity should be. In this example, I’m importing Notes for Account. So, I’m adding a column called ‘Account Name’


  2. A new column will be created as below

  3. Now, populate your data based on how the Notes should be imported and tagged to which records.

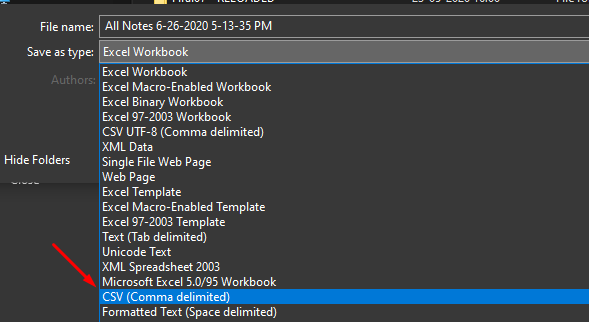
  4. Now, by default, this template is exported in Microsoft Excel Worksheet (xlsx) format. You’ll need to Save As in CSV format

Re-Importing

Up until above, your Excel is ready to be imported. Let’s begin –

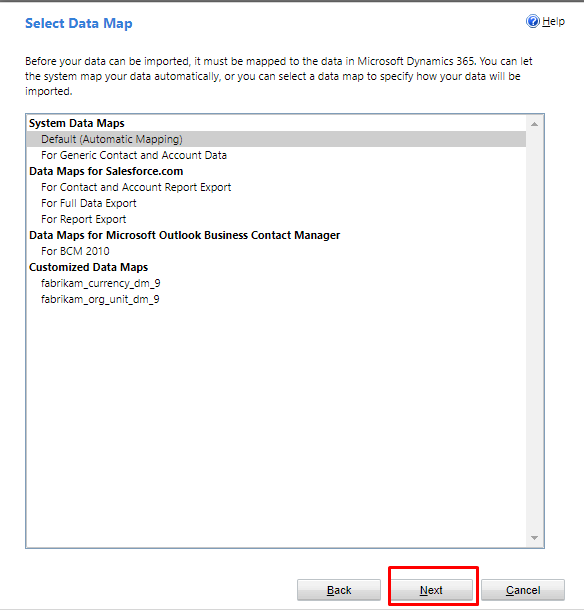
  1. Import the file as a usual Excel Import in Dynamics 365 CRM. Since this is not a direct Template importing as is, but a CSV, you’ll get to map this file manually.
    undefined

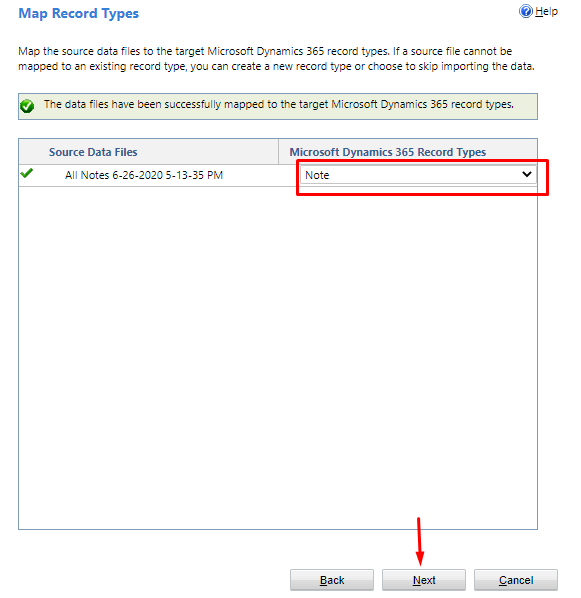
  2. Then, you’ll need to manually select the Note entity from the drop-down and then proceed
    undefined

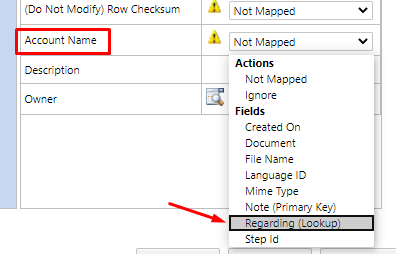
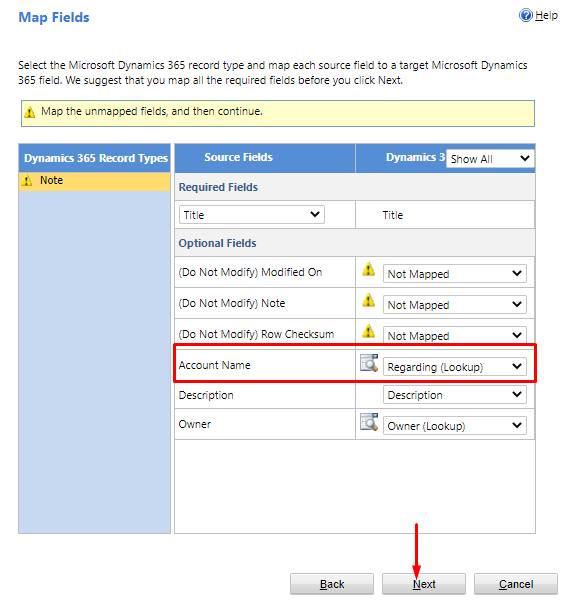
  3. Now, whatever is mapped automatically will be mapped. For the newly created Account Name field, you’ll need to expand the Not Mapped dropdown and select Regarding (Lookup)
    undefined
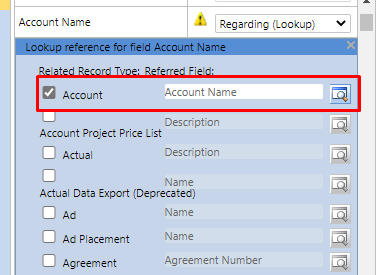
  4. Now, you’ll need to select the entity you want the Notes to appear under. In my case, this is Accounts, so I have it right there
    undefined
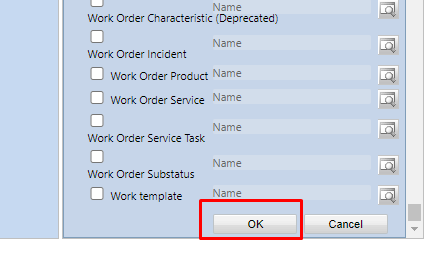
  5. Since this Regarding fields supports several entities, scroll all the way down to Confirm your selection
    undefined

  6. Now, your Regarding field is set and you are ready to confirm and Import
    undefined
  7. Now, my Import here is completed. (You’ll need to take care the Import is successful)
    undefined

Imported Notes

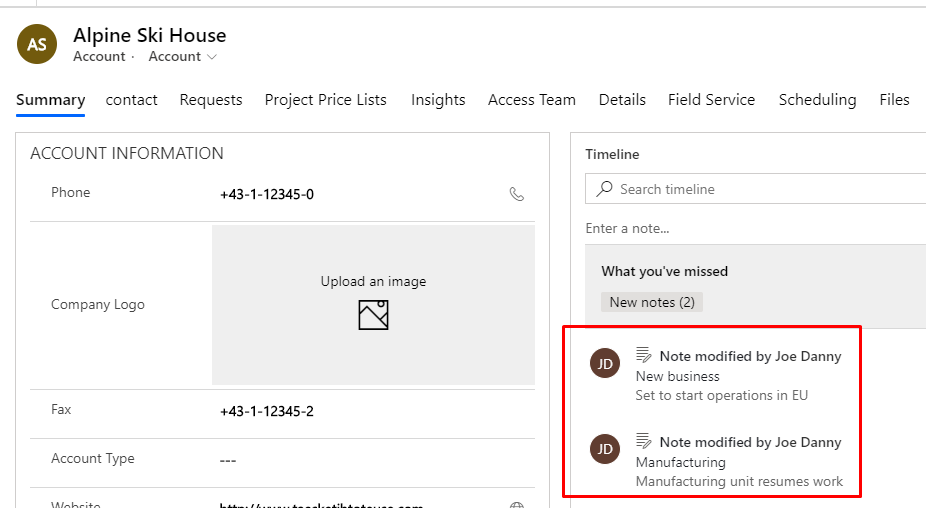
If you look at the records now, the Notes will be attached to the respective Regarding records
undefined
undefined

Here are some more posts on D365 CE you might want to look at –

  1. Pass selected rows’ GUIDs to ribbon button in D365 | Ribbon Workbench
  2. Refresh button missing on Roll-Up fields in D365 UCI? Quick Tip.
  3. Check Managed Solution failures in Solution History in D365 CE
  4. Button Flow in Power Automate to replicate a Quick Create Form in D365 CE
  5. Create a support Queue in D365 CE
  6. What is “Does not support untyped value in non-open type” ODataException in creating records in D365 CE?
  7. Set Lookups in Xrm.WebApi D365 v9 correctly. Solving ‘Undeclared Property’ error
  8. Set Work Hours Template to a Bookable Resource in D365 PSA v3
  9. Modified By (Delegate) & Created By (Delegate) in D365
  10. Qualify Lead in D365 CE: Select which entity records should be created

Hope this helps!!

BPF Flow Step as a Trigger in CDS (Current Environment) connector | Power Automate

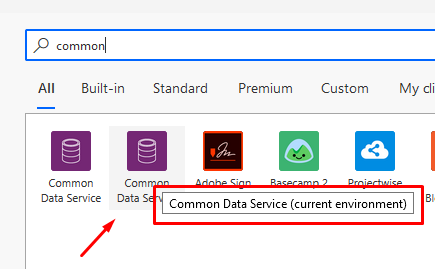
Here’s an update to the Common Data Service (Current Environment) connector in Power Automate

Remember, this is available only in Common Data Service (Current Environment) connector i.e. you’ll need to create you Flow inside a Solution in Power Automate
undefined

Flow Step

Now, you can call your Flow from a Business Process Flow, which existed for some time. But now, it’s available as a trigger in the Common Data Service (Current Environment)
undefined

Flow & BPF Setup

  1. Now, my Flow is kept simple to illustrate what has been triggered. The first step simple is run When a flow step is executed.
    It starts with a simple Instant Flow like template if you want to have an additional input
    undefined
    And then you can use these in the context further. But I’ll keep it simple assuming you are familiar with trigger inputs.
  2. Then, you get the details that you can use from the trigger.
    undefined
  3. And I’m simply passing on the values over to an email so that I can read it. You application could be anything. Typically, it could be a complex business process in a Flow to trigger when a Flow Step is triggered.
    undefined
  4. Now, in my Business Process Flow Step, I’ve added a Flow Step (Preview), mind that this is still in Preview as of writing this post.
    undefined
  5. And select the Flow I’ve intended for this.
    undefined

Running the Flow

Now, here’s how it goes –

  1. I’ve called the Flow from the Flow Step
    undefined
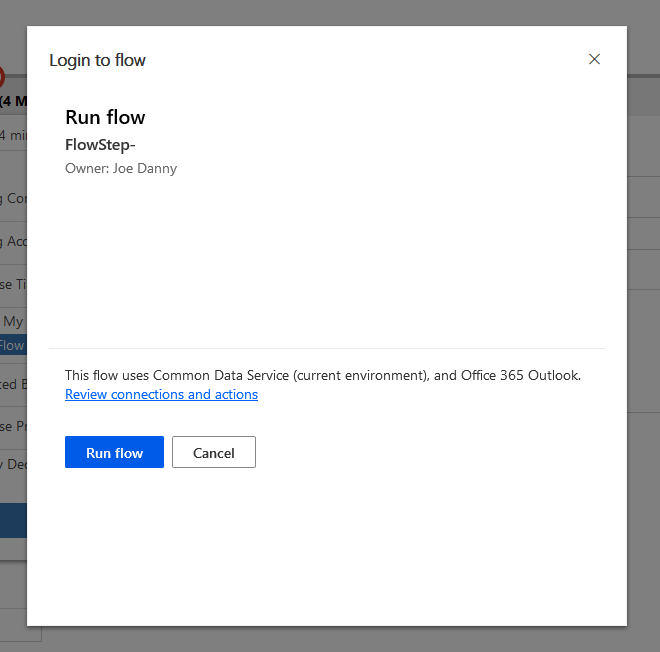
  2. It’ll ask for confirmation of the Flow in a window
    undefined
  3. Once all the permissions are set, depending on what’s needed in the Flow, you’ll be asked for a confirmation
    undefined
  4. Once completed, you can check in Flow Runs about what happened to the execution of the Flow
    undefined


Results

So here are some results I composed from the data of the BPF itself-
undefined

And that’s it!

Here are some more Power Automate / Flow posts you might want to look at:

  1. Pause a Flow using Delay and Delay Until | Power Automate
  2. Generate Dynamics 365 record link in a Flow using CDS connector | Power Automate
  3. Text Functions in a Flow | Power Automate
  4. Loop through array of objects in a Flow & Create records in CDS | Power Automate
  5. Get Count of records retrieved in CDS connector in a Flow | Power Automate
  6. Number Formatting in a Flow | Power Automate
  7. Call a Dynamics 365 Action from Flow [Bound and Unbound Actions] | Power Automate
  8. Switch-Case in a Flow | Power Automate
  9. Setting Retry Policy for an HTTP request in a Flow | Power Automate
  10. Make HTTP request from Flow in Power Automate

Hope this helps!!

Pass selected rows’ GUIDs to ribbon button in D365 | Ribbon Workbench

Whenever your Ribbon button customization involves doing something to selected records, here’s the most common application that you need to take action on the selected record’s GUIDs.

Here’s how –

CRM Parameter

In Ribbon Workbench, let’s say you have a button command which is attached to a button and it calls a method ‘process’ which looks like this (it will be your method in your case)

  1. In Commands, Custom JavaScript Action will have a CRM Parameter called as SelectedControlSelectedItemIds [pretty self explanatory 😊]
    undefined


    And it’ll pass data of the selected GUIDs in my data variable passed to the method.
    undefined

Read the GUIDs

Here’s my sample code where I intend to read it from the function I used to call when user clicks on the ribbon button

  1. Now, let’s say I select a few records on the Main Sub-grid where I’ve put my button on.
    undefined

  2. Now, on clicking it, it’ll pass the three selected records’ GUIDs to the method that the button is calling. You can read it from the data parameter
    undefined
  3. You can further read from this array and use it to perform your operations.

Hope this was easy. Here are some more Ribbon Customization related posts you might want to look at –

  1. Debug Ribbon button customization using Command Checker in Dynamics 365 CE Unified Interface
  2. Show Ribbon button only on record selection in Dynamics CRM
  3. Hide Custom Ribbon Button [Easy Way] – Ribbon Workbench
  4. [SOLVED] Navigating URL from Ribbon’s custom button in Dynamics for Phones app
  5. Fix Ribbon icons on the Unified Interface in D365 CE
  6. D365 Ribbon Button shortcut to open a Document in SharePoint Online
  7. Pass data to HTML Web Resource using browser’s sessionStorage in Dynamics 365 CE

Thank you!!

Pause a Flow using Delay and Delay Until | Power Automate

In some use cases, you want to pause a Flow either by a duration you specify or until the timestamp you specify.

Let’s look at both the ways – Delay and Delay Until in Schedule operation

undefined

Delay

In a simple application, you can make a Flow wait for a certain duration by using the Delay Action in Time

undefined
And I’m selecting a standard 3 min wait
undefined
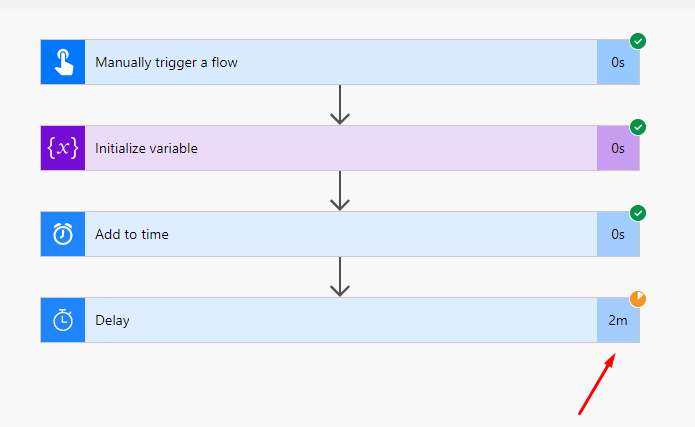
And it will pause the execution until then
undefined

And resume the Flow after the Delay duration has been completed
undefined

Delay Until

Now, a variation to pausing a Flow until the timestamp you specify is achieved using Delay Until action the timestamp you specify
In my example, I’m using a Timestamp stored in a Time variable and the value is something like below

undefined

So, I can use the Delay until action and it accepts a TimeStamp. It accepts ISO8601 format.
undefined

And I’ll set a value, which contains my timestamp
undefined

In my case, based on the Timestamp stored in my variable, it’ll wait until the below shown time.
undefined

And will be completed when the timestamp is hit
undefined

And that’s it.

Here are some more posts that might help you –

  1. Generate Dynamics 365 record link in a Flow using CDS connector | Power Automate
  2. Text Functions in a Flow | Power Automate
  3. Loop through array of objects in a Flow & Create records in CDS | Power Automate
  4. Get Count of records retrieved in CDS connector in a Flow | Power Automate
  5. Setting Retry Policy for an HTTP request in a Flow | Power Automate
  6. Button Flow in Power Automate to replicate a Quick Create Form in D365 CE
  7. Make HTTP request from Flow in Power Automate
  8. Using Parse JSON to read individual List Records in Flow|Power Automate

Hope this helps!!

Generate Dynamics 365 record link in a Flow using CDS connector | Power Automate

There are several ways to formulate a Dynamics 365 record URL and make it clickable in a Flow in Power Automate.

Here’s one of the ways I follow for most scenarios – Let’s say I want to open a PSA Time Entry record from my Flow, here’s how I do it

Get record action to retrieve URL

Since this post is focused on CDS connector, I can get the D365 record link in body of Get record action for Common Data Service connector.

Unfortunately, I didn’t see this if the trigger was a CDS action, so I made a separate Get record call.
undefined

undefined
But, we’ll retrieve the same without having to select/parse body object. So let’s see –

Generating Link

First, I’ve initialized a variable that’ll hold the String format of the end URL
undefined
Now, first – I’ve appended https://. This won’t come directly using the uriHost() method

Then, the uriHost() holds the formula ‘uriHost(body(‘Get_record’)?[‘@odata.id’])

Meaning, get the uriHost name i.e. Environment name itself.
undefined

Then, I’ve appended options for the window to open which are mentioned below in this post.

Finally, I’ve appended the Primary Key of the record itself at the end
undefined

Options

Now, let’s talk about the options –

  1. cmdBar = [true | false]
    It’ll show the ribbon on the record. If false is chosen, it’ll be hidden
    undefined
  2. navBar = [off | on]
    It’ll show the Navigation Bar on top if on. If off, it’ll be hidden
    undefined
  3. newWindow=[true | false]
    This didn’t affect in my case. It anyway opened in a new tab. This could be different is the link is not opened from Email but is used elsewhere
    undefined
  4. pagetype=entityrecord
    Since we are targeting a Dynamics 365 entity record, the above is used.
    undefined
  5. etn= [name of the entity]
    Name of the entity
    undefined
  6. id
    GUID of the record itself.
    undefined

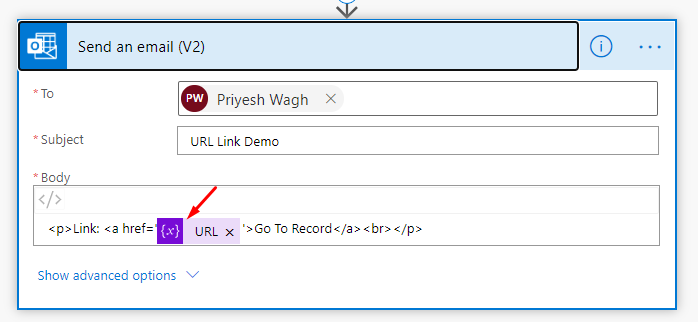
Here’s an Email that I composed to show how the URL will end up looking –
undefined

Which will result in Email like this

undefined

And open the record like this.
undefined
As per my settings in the URL I created, I don’t have the Nav Bar or Command Bar visible. It’s up to you to decide your preference

Here are some more Power Automate / Flow content you might want to check –

  1. Text Functions in a Flow | Power Automate
  2. Loop through array of objects in a Flow & Create records in CDS | Power Automate
  3. Get Count of records retrieved in CDS connector in a Flow | Power Automate
  4. Number Formatting in a Flow | Power Automate
  5. Call a Dynamics 365 Action from Flow [Bound and Unbound Actions] | Power Automate
  6. Make HTTP request from Flow in Power Automate
  7. Switch-Case in a Flow | Power Automate
  8. Setting Retry Policy for an HTTP request in a Flow | Power Automate

Hope this helps!!

Text Functions in a Flow | Power Automate

As I was looking at some String/Text operations in Flow recently, here’s what I discovered.

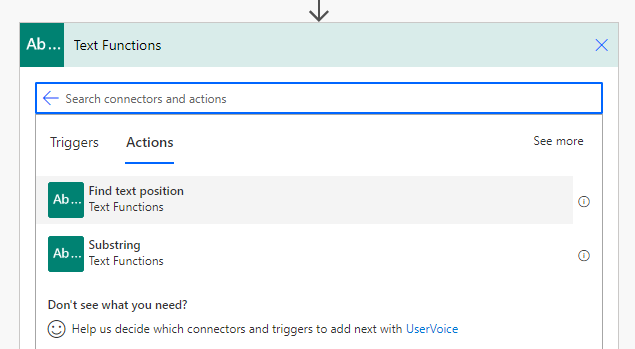
Looks like there are a lot more to come, so let’s look at some initial ones.

undefined

Find text position

A pretty simple feature to find the position the Search Text starts from in a String.
undefined

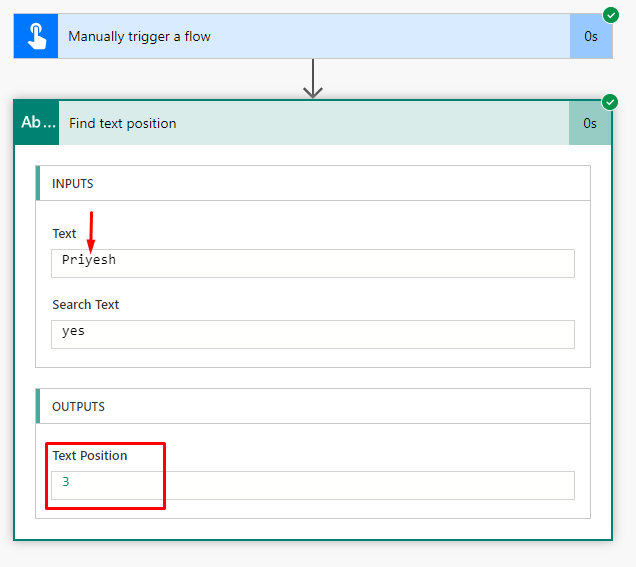
Here, I’m trying to find where does ‘yes’ in string ‘Priyesh’ starts from in the given text. And the answer was 3. [Text Index starting from 0]
undefined

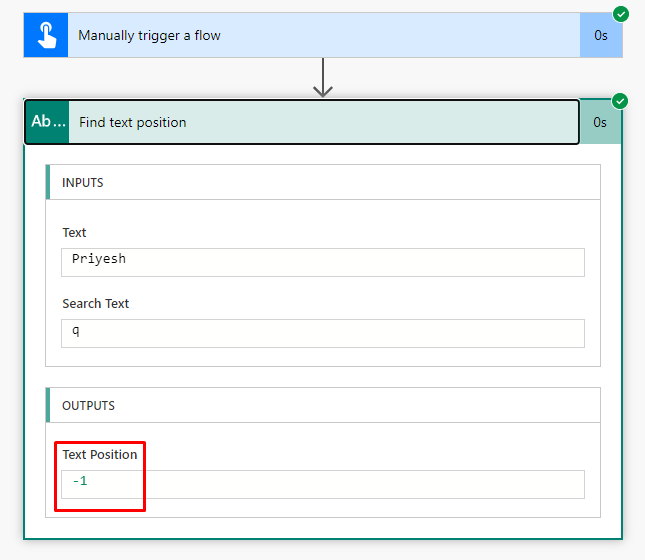
If the text doesn’t exist, the result is -1
undefined

Substring

Here’s another important Text function called Substring.

This will return the substring with starting index of 3 and the length of the string from the starting character.
undefined

In this case, it’ll return the string “yes”
undefined

If your Starting Position in Substring is out of the range i.e. exceeding the length of the entire string, you’ll see and error like below stating the issue.
Also, the same error will be displayed if the Length of the Substring chosen falls out of range i.e. the index exceeding end of the string.
undefined

Here are some more Power Automate / Flow posts you might want to look at

  1. Loop through array of objects in a Flow & Create records in CDS | Power Automate
  2. Get Count of records retrieved in CDS connector in a Flow | Power Automate
  3. Number Formatting in a Flow | Power Automate
  4. Call a Dynamics 365 Action from Flow [Bound and Unbound Actions] | Power Automate
  5. Switch-Case in a Flow | Power Automate
  6. Setting Retry Policy for an HTTP request in a Flow | Power Automate
  7. Using Parse JSON to read individual List Records in Flow|Power Automate
  8. Make HTTP request from Flow in Power Automate
  9. Enable Flow button on D365 Ribbon
  10. Button Flow in Power Automate to replicate a Quick Create Form in D365 CE

Restore older version of a Canvas Power App | Power Platform

When you users report of an issue and you need some time to look into it but can’t hold the users, you just want to restore to a previous version for the time being.

Here’s how you can restore/revert to an older version of the Canvas App you’ve deployed.

Current Version

Let’s say my current version had a button called Profile under the label Accounts. But in the new version, I had moved it and now want to restore the previous one for some reason.

undefined

This previous version is what I want to restore to.

undefined

Restore & Publish

Here’s how you can Restore it.

  1. Navigate to Save, and go to See All Versions
    undefined

  2. Now, you’ll come to all the versions of the App existing. The current one will have the status of Live. Click on the three ellipses of the old version of App you wish to restore and you’ll see an option to Restore
    undefined

  3. It’ll ask for a confirmation. Remember, the new version will be 1 version higher that the current Live version. In this case, it’ll be version 18 to be created from version 16 (version 17 is the current Live version)
    undefined

  4. Once you confirm, a new version will be created. This is not yet in Published stage. This is because you might want to go back and change something and then Publish
    undefined

  5. Now, let’s say you are ready to Publish, simply select it. And then either from the options in ellipses or on the top ribbon, you can Publish this version
    undefined

Update on App

Upon opening the App, the user will see a message like this
undefined

And when you tap on it, the previous version is restored
undefined

Pretty easy!!

Here are some more Canvas Power App posts you might want to check –

  1. Implement character length validation in a Canvas Power App | Power Platform
  2. Logged In User details in a Canvas Power App
  3. Implementing Exit app, Logout and Confirm Exit features in a Canvas Power App
  4. Variables in Canvas Power Apps | Global and Context
  5. Get N:N records in a Canvas Power App using Common Data Service connector | Power Platform
  6. Adding a Canvas PowerApp to Teams

Hope this helps!

Implement character length validation in a Canvas Power App | Power Platform

Often times, you want to know the size of text entered in a field and want to indicate a user that they need to restrict the text to your specific size, like Twitter. And make sure the user is restricted within the limits. So, I’ve added a button to show that validation –


undefined

And you want to dynamically check the length as you type to see how much is remaining
undefined
And maybe also add some validation like disabling the button if the limit is reached
undefined

Let’s look at how we can implement this in Canvas Power App!

Setup

Let’s get to building this out!

  1. Let’s say you have a Text Input. I’ve simply called it “Message
    undefined
    undefined

  2. Then, I have the Label field called as “CharLength“. This will be a place holder for our counter of characters in the Message textbox.
    undefined
    undefined

  3. And finally, a Submit button which will be disabled if the Text size exceeds the limit.
    undefined
    undefined

Setting Properties

Now, let’s get the properties set to these components so as to validate the character limit

  1. Nothing to set on the Text Input ‘Message’ for this example.
  2. Let’s move to the label CharLength itself. Set the Text handler of the CharLength label control to the following (You can have your own limit)
    undefined
    In the above example, I’ve set the length 60 and then I’m subtracting the length of the Text of the Message.Text (Text entered in Message box) so that as we type on, the remaining value will be shown as below –
    undefined
  3. Now, let’s see the Color property of the text field. It’ll be a visual cue indicating the user that they’ve exceeded the character limit
    undefined
    In the above example, I’ve added a condition to set the color as Red, if the length is exceeded or Black is the length is under the limit and will look something like below –
    undefined

  4. Finally, we’ll go to the Submit button and set the Display Mode property of it to the below
    undefined
    I’ve added a condition, that if the Length of the Message box’s Text goes above the limit, set the Display Mode to Edit i.e. Active or else, Disable. And it will look like below when disabled
    undefined


Execution

This is how it will work when you put this in execution

I’ve also created a YouTube video demonstrating the same –

And that’s it. So you can use this validation as you want. In place of the button, you could have something else put up.

Hope this helps!

Here are some posts on Canvas Power Apps you might want to check –

  1. Logged In User details in a Canvas Power App
  2. Implementing Exit app, Logout and Confirm Exit features in a Canvas Power App
  3. Get N:N records in a Canvas Power App using Common Data Service connector | Power Platform
  4. Variables in Canvas Power Apps | Global and Context
  5. Correctly connect to an Excel file in a Canvas PowerApp
  6. Adding a Canvas PowerApp to Teams
  7. Sending Image from Canvas PowerApps to SharePoint Document Library using Flows

Thanks!!