Using Parse JSON to read individual List Records in Flow|Power Automate

This is a scenario I came across when I was using Common Data Service connector [not Common Data Service (Current Environment)] connector to read Opportunities tied to an Account.

Example

In this scenario, I wanted to retrieve the Opportunities tied to an Account. So, my filter query was _parentaccountid_value(‘ACCOUNT_IDENTIFIER’)

Here’s my Flow starts. I want to read Opportunities that are tied to my Account in context –

baseQuery

Flow Inside a solution vs. Outside a Solution

Inside a Solution

Now, when I had this Flow inside a solution, the result didn’t have a body and instead just gave me Status Reason value as below –

missingData

Outside a Solution

Whereas, outside the Solution, I was able to get the array of Objects i.e. Opportunity data in the Body in the Output itself.
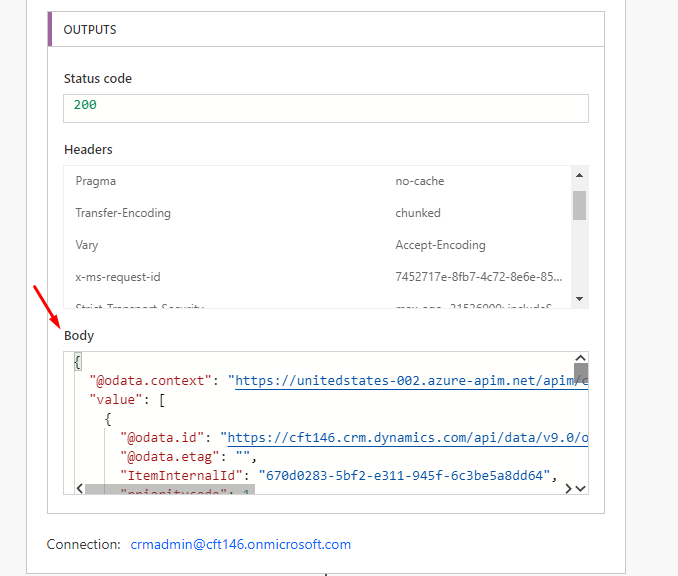
outsideSolutionResult

So, what can we do about the Flow which is used inside a Solution and you want to actually see what was the output? You may or may not require to see the records (depending on your implementation)

But let’s say you want to see what was returned, let’s just parse these results as is using Parse JSON to see what we got.

Use Parse JSON from Data Operation

Another way to read what you’re retrieving is using Parse JSON Data Operation.

  1. Search Parse JSON and you’ll see the result in Data Operation type of Actions as shown below –useParseJSON
  2. Now, you have to apply this to Current item from the retrieved List records in Apply to each operation. In case you don’t have the schema or not sure what to put it in. Simply use {} in Schema field. This will just pass through as is.
    applyParseJSON

Checking Result

Now, let’s test using the above and see if we can get the results

  1. Now, you can actually see the Inputs and Output of Parse JSON which is basically the same. This is useful if you want to visually see what’s going on through your Flow.
    visibleResult

But, if you don’t want to see what’s being passed through when in Production? You can Secure Input/Output in Power Automate Run History

Hope this helps you!!

Create a To-Do List Item of Important Outlook Emails using Power Automate

Since Power Automate is so powerful that you can creatively use it to improve your productivity at work. Here’s an example of how you can utilize a scenario where you need a quick checklist to make sure you respond all important emails for the day.

Power Automate

  1. You’ll need to create an Automated Power Automate and select the trigger as Office 365 Outlook. Select ‘When a new email arrived (V3)’ from the same and make sure you only select the High Importance marked emails
    selectOnlyHighImp
  2. Next step, create a To-Do Item. Select the List you have created. In my case, I created a separate list called ‘Respond Important Emails’
    toDoList
    And the step to configure the To-Do List item should be like this –
    addToDoStep
    In the above picture, I’ve made sure I select the correct List I want to create a To-Do in.

    And to give myself some time, I’ve added a reminder time of 2 hours from the time this Flow/Power Automate will run i.e. when the email will come in –
    add2Hours

How it works

Now, when an Important email will arrive in my Inbox as below –
actualEmail

Power Automate will create a To-Do in my created List
newItemAdded

And it will look like this –
reminderIn2Hours
Also, the reminder is set to remind me 2 hours post the time the To-Do item was created. Just in case I’m into something else, I’d set myself a reminder.

Hope this helps! And you can use your creativity to improve your productivity!

Create your own Insight Cards with Power Automate in Sales Insights

Sales Insight’s cards are not just restricted by what is provided by Sales Insights for your Org, you can make your own using Power Automate too. Here’s how –

Requirements

These features aren’t free under Free Features of Sales Insights. Sales Insights license is for $50/user/month. More info on licensing here – Sales Insights Licensing

For free features, only pre-defined Insight Cards show up. You don’t get to create your Cards. To try this feature, you can create a 30-day Sales Insight trial.

Scenario

Let’s say you have a custom field on the Account called as Renewal Date which holds a Date of renewal for an account. And you want to create an Insights card to show up whenever this date is within 5 days –
fieldOnForm

Create a new Insights Card using Power Automate

Let’s say you have Sales Insights already setup in your Org and you have moderate knowledge of Power Automate (formerly known as Flows)

  1. Navigate to Sales Insights settings in Sales Hub > Global Settings > under Assistant Studio, look for Home and you’ll see a button to Create a new Insight card.
    navigateToCards.png
  2. Since our requirement is a pretty common one and Power Automate has a template for it already, you can select one or even start from scratch.
    template
  3. Make sure all the permissions are correct and you’re set to modify a Power Automate Template (or create from scratch)
    permissions.png
  4. Let’s say you are making this run on a daily business during your non-business hours.

Little Tweak to store a Reminder Date in D365

I wanted to have a custom reference of the Reminder Date in my own way in D365 instead of making the Power Automate query more complex.
I’ve created a Calculated Date field for RenewalReminder to store date of 5 days before the Renewal Date and this will be maintained for all records.
renewalDateField
So that the field stores 5 days prior to the Renewal Date
fieldValue.png
(I’ve hidden it away in actual implementation later on)

In the past, I’ve implemented a similar scenario to store current date used for views in D365, reference Blog: Store ‘Today’s Date’ in a field to use in workflow conditions in D365 CE

Design Power Automate

Since we’ve chosen a template to get a reference from, feel free to remove/modify whatever you need to –

  1. Now, I want to Flow to be triggered every day at UTC midnight
    flowPart1
    Details: Every midnight, fetch me Accounts where I RenewalDate has passed so that selective Accounts will be queried, and then I want to create cards for those accounts in the next step.
    And I’m only comparing the RenewalReminder field value to the current date since it will run everyday
    dateConfig.png
  2. In the final step, for Each account, I’ll create a Card with the Account’s details which the user needs to see.
    createCard.png
    I’ve set some properties which are quite self-explanatory. I’ve made the Open button on the card to open the record itself.
    And I’ve also made the card to show up only until the Renewal Date. (Maybe setup a separate process for Accounts past renewal date)

    And that’s that! Your Power Automate is ready to create Insight Cards which remind you of an upcoming renewal

Seeing it Run

Now, every day when the Power Automate runs, it will create Insight cards for you and they’ll appear as you’ve configured them. In this case, For Alpine Ski House account, the Renewal Date is 20th Nov, so the card has started showing up since 5 days before the Renewal Date (Date stored in RenewalReminder for referencing, you can choose your own way to do so in Flows)
cardShowUp

Even in your Dashboards, since you’re the owner of the record and it’s set to show only to the owner, you’ll see it and clicking on the Open button will open the Account record itself
clickOpen.png

Hope this helps!!

Sending Image from Canvas PowerApps to SharePoint Document Library using Flows

One of the most common requirements is to upload images to SharePoint using PowerApps. From my learning from various sources, I’ll try to “demystify” my explanation to send/upload an image to SharePoint Document Library using Flows on my Canvas PowerApp.

Ingredients

Assuming you have the following things already  in place in PowerApps as well as in SharePoint

  1. PowerApps’ Camera/Image control and a Submit button. In my case, the image above is a camera so that I capture the image I want and the image below is the Image control to show me what I clicked.
    powerApp
  2. A SharePoint Document Library to record, say, Incidents.
    spDocLibrary
  3. We will get to the Submit button on the PowerApp once we create our Flow.

Flow

Let’s create a Flow to pick the Image from your PowerApp, convert it to binary and send it to the SharePoint Document Folder location called Incidents.

  1. Since we want to trigger the Flow from the PowerApps itself, we will select the trigger of the Flow as ‘From PowerApps’ and hit Create
    createFlow
  2. Once your Flow is ready, leave the first step of PowerApps because that’s the trigger. Add Step to create a SharePoint file and fill in the details of the Document Library you have created.
    createSPFile
  3. Fill in the FileContent as above. You’ll need this to be converted in the intermediate step after this.
  4. Now, you’ll need to add an additional step in between PowerApps and the Create SP File step as below. It will be a Compose action.
    addAction
  5. In Compose action, under Expression, select dataUriToBinary expression and make sure you open the bracket as well.
    dataUriToBinary
    toolTipHidden
  6. Now, go back to the Dynamic Content section and select the CreateFile_FileContent to complete the formula.
    fileContentAvailable
    completedFormula
  7. Click OK on the screenshot above and the formula should be set.
  8. Now, replace the File Content section to take in the Output of the Compose step.
    outputRecorded
  9. Save your Flow and your complete Flow should look like this.
    CompleteFlow
  10. I’m naming my Flow as ‘IncidentFlow’ so that I can identify it.
    incidentFlow

Adding the Flow to Submit button

Going back to the PowerApp, let’s Run this Flow on the selection of the Submit button and pass the image.

  1. Now, select the Submit button, and on the Formula bar, add the Flow you created, I named it IncidentRun. Select the same so that the Formula comes as IncidentRun.Run( for you to pass on the image.
    Now, pass the latest image on the collection i.e. the same image which is being displayed in the image control below.

    runFlowFormula


Running the App

I just ran the app on the desktop itself, you could do it from your phone too!
So I clicked on the Camera when I was ready, the image appeared in the image control and I that was what I wanted to upload. So I clicked on Submit button.
hittingSubmit

The flow was successful
FlowSuccessful

And my image was in SharePoint too!
imageUploaded

I know it is a lengthy post but I tried to summarize as much as possible. Make sure you have a way to uniquely name each file or else, the same file will be overridden.

Thank you!