Project Approvals are stuck in Queued status | PSA / Project Operations Quick Tip

Let’s see if you recently experienced changes in the way you do Approvals in PSA/Project Operations and your Approvals are stuck in Pending/Queued state, here’s what you can do.

Scenario

Recently, if you noticed some changes in your existing PSA/Project Operations – Approval Sets feature has been introduced that needs tweaking for it to work correctly for you.

You might observe that the Approvals are stuck in Queued status for infinite time and you don’t know when they will be successfully approved.
And they appear something like this –

Approval Threshold in Project Parameters

Now, navigate to Project Parameters as below –

  1. Once in Project Service App, go to Administration area and look for Parameters.

  2. In the Project Parameters record, you’ll find this field called as threshold.

  3. Then, you can enter a Threshold number so that your Approvals are not stuck when you Approve them.


  4. Then, Approve the Time Entries again (from Project Approvals). And they should go through this time.

  5. You’ll see a message that it will denote that the Approvals have been queued for Approvals and that they will be Approved. Then, you can look at the My Past Approvals view to find the completed Approvals view in Approvals.

You can read official Microsoft Docs on Modern Approvals in Project Operations here – https://docs.microsoft.com/en-us/dynamics365/project-operations/psa/approval-set?WT.mc_id=DX-MVP-5003911

Hope this helped!

Here are some more Dynamics 365 Administrator related posts you might want to check –

  1. Enable Plug-in Profiler in Settings area in SiteMap in Dynamics 365 | [Quick Tip]
  2. Disable Recent Records from Dynamics 365 Lookup Control | Model-Driven Apps [Quick Tip]
  3. Language format for Whole Number field in Dynamics 365 CE
  4. Custom Help Pages and Guided Tasks for Unified Interface in Dynamics 365
  5. Make Managed fields Required in Dynamics 365 – Managed Properties Error [Workaround] | D365 CE Quick Tip
  6. Sign up for a Dynamics 365 Project Operations (Lite Deployment) environment and provision a new instance | Power Platform
  7. Show custom ribbon button based on Security Role of the logged in User in Dynamics 365 | Ribbon Workbench in XrmToolbox
  8. Filter records in a View owned by a Team you are a member of | Dynamics 365 CRM
  9. Duration field in Dynamics 365 converts Hours value to Days in Dynamics 365 | [Flow Workaround to convert in Hours and Mins]
  10. Form Access Checker in new Power Apps Form Designer | Model-Driven Apps in Dynamics 365

Thank you!
Create a Team, add Members in Microsoft Teams upon Project and Team Members creation in PSA / Project Operations | Power Automate

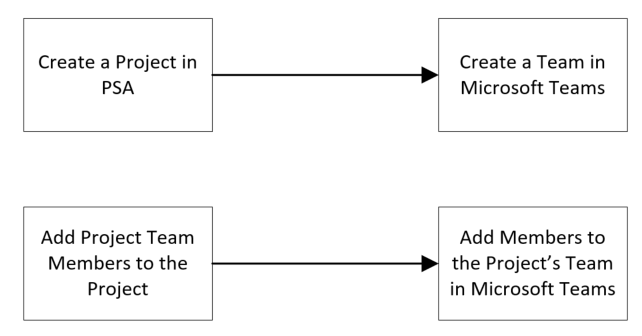
Let’s take a simple use case where you need to have a Microsoft Team created in Teams and have the Project Members added to the Microsoft Teams’ Project Team.

You can simply do this using 2 simple Flows in Power Automate

Scenario & Setup

If you are a PSA Customer, you would want to create a Team in Microsoft Teams based on what Project it is and then add Team Members of the Project as Team Members in the Microsoft Teams’ Team you created.

Let’s look at a Simple example of how you can do this. And further, you can enhance the implementation yourselves based on whether a Project becomes Inactive, or someone is to be removed from the Project Team.

I’ll be creating 2 Flows for this purpose –

  1. One that will create a Team in Microsoft Teams upon Project Creation and
  2. Other, will add Member to the Project’s MS Team upon addition of the Team Member in Project in PSA/Project Operations.

Create a Team for the Project

Let’s look at the first scenario where you can create a Team in Microsoft Teams once create a Project in PSA.

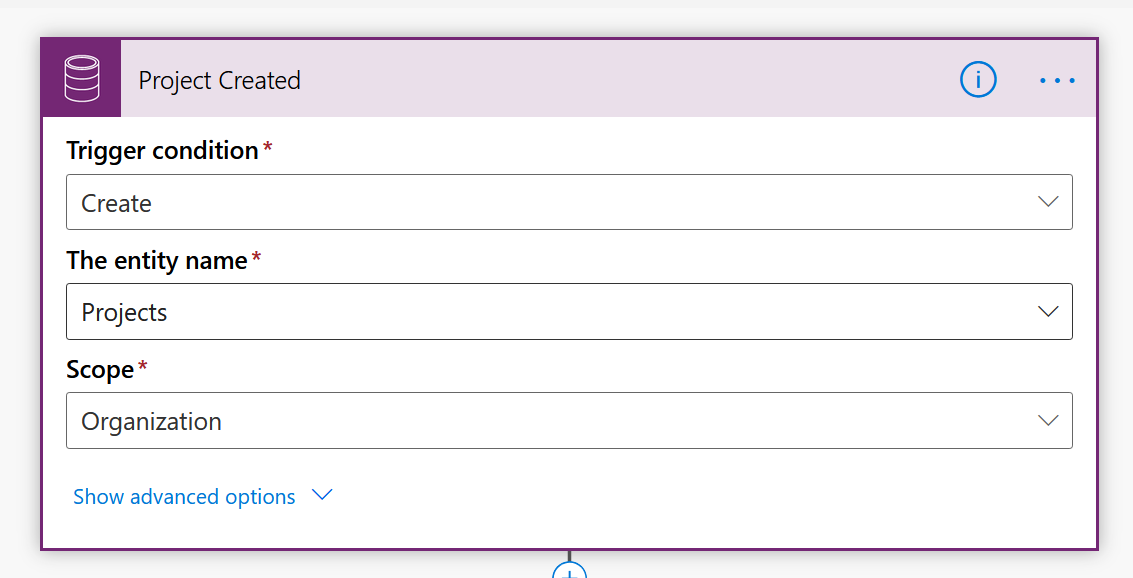
  1. Flow to trigger off of a creation of a Project.
    |
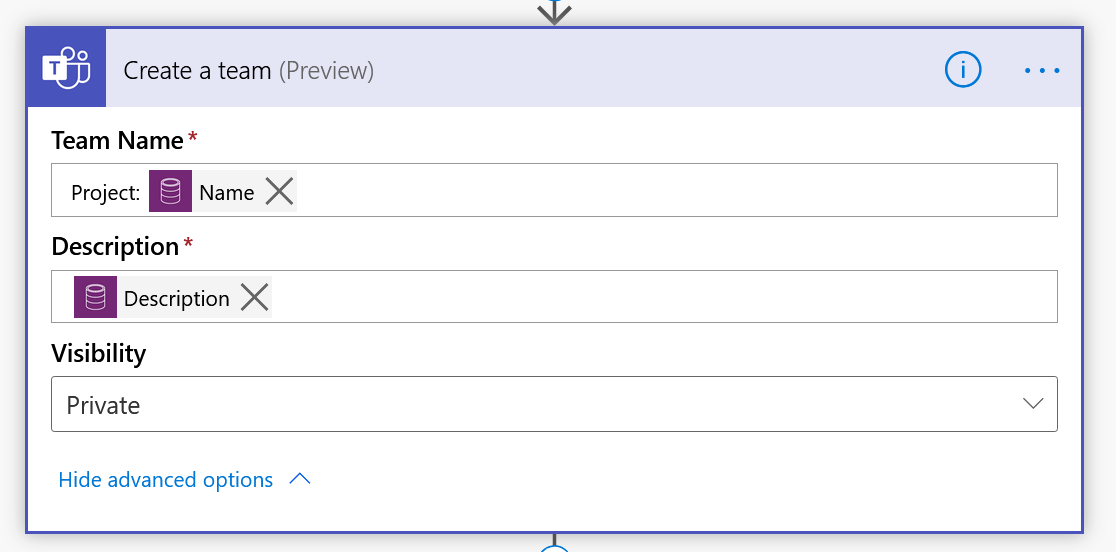
  2. Now, search for create a team in the next step to find a Microsoft Teams connector’s Action to create a Team in Microsoft Teams.


  3. Assign the Name of the Project and Description of the Project for easy understanding. You can make the team Private which is ideal to keep users’ Teams cleaner and also keeps Project discussions isolated if that’s the need.


  4. Once a Team is created, I’ve created a field on Project record to hold the MS Teams’ ID for other references.

    Add a step to update the Project back with the created MS Teams’ ID like this

    And in that, I’ll update the Created Team’s ID

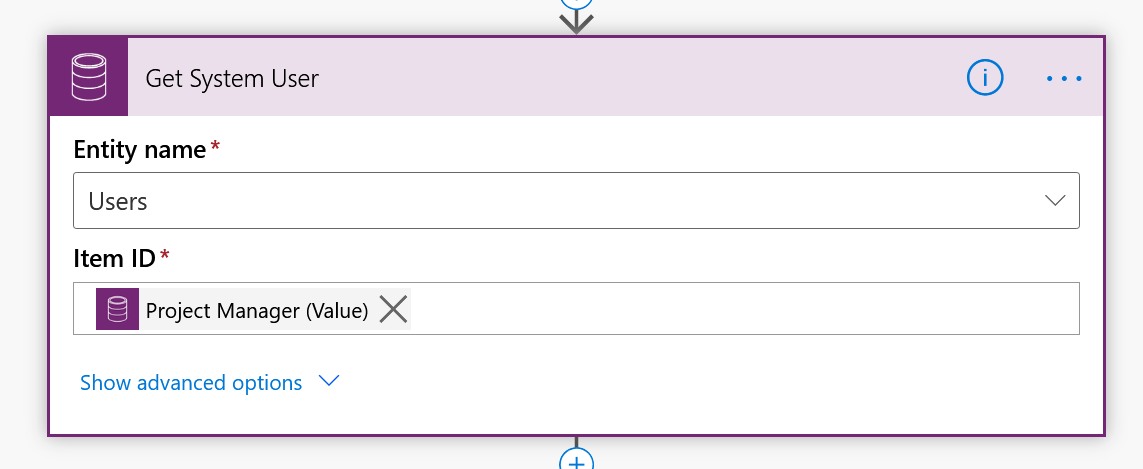
  5. Now, fetch the Project Manager’s User record in CDS (PSA, basically) so that the User’s ID can be used to make the Owner of the Team you are creating.

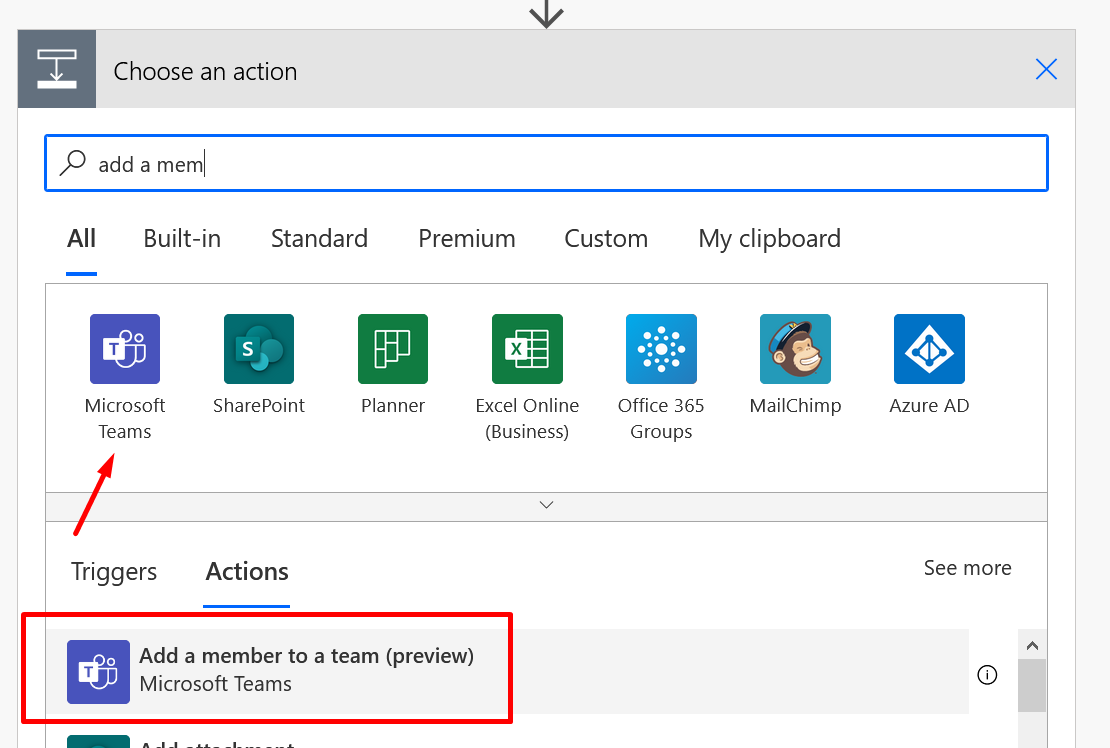
  6. Next, you need to add Members to the Team. Look for add a member to the team and you’ll find Microsoft Teams’ action which you can use.

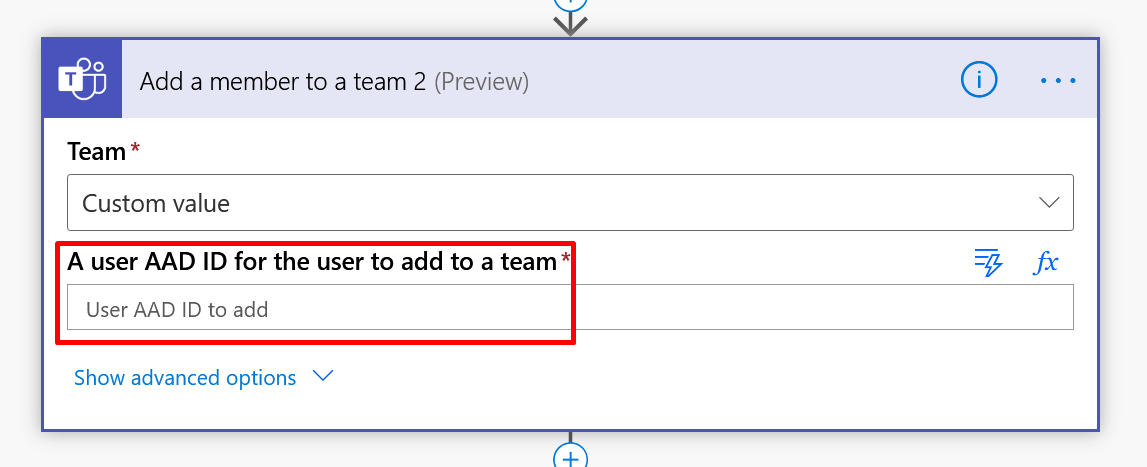
  7. Here’s how the Add a team member looks like.

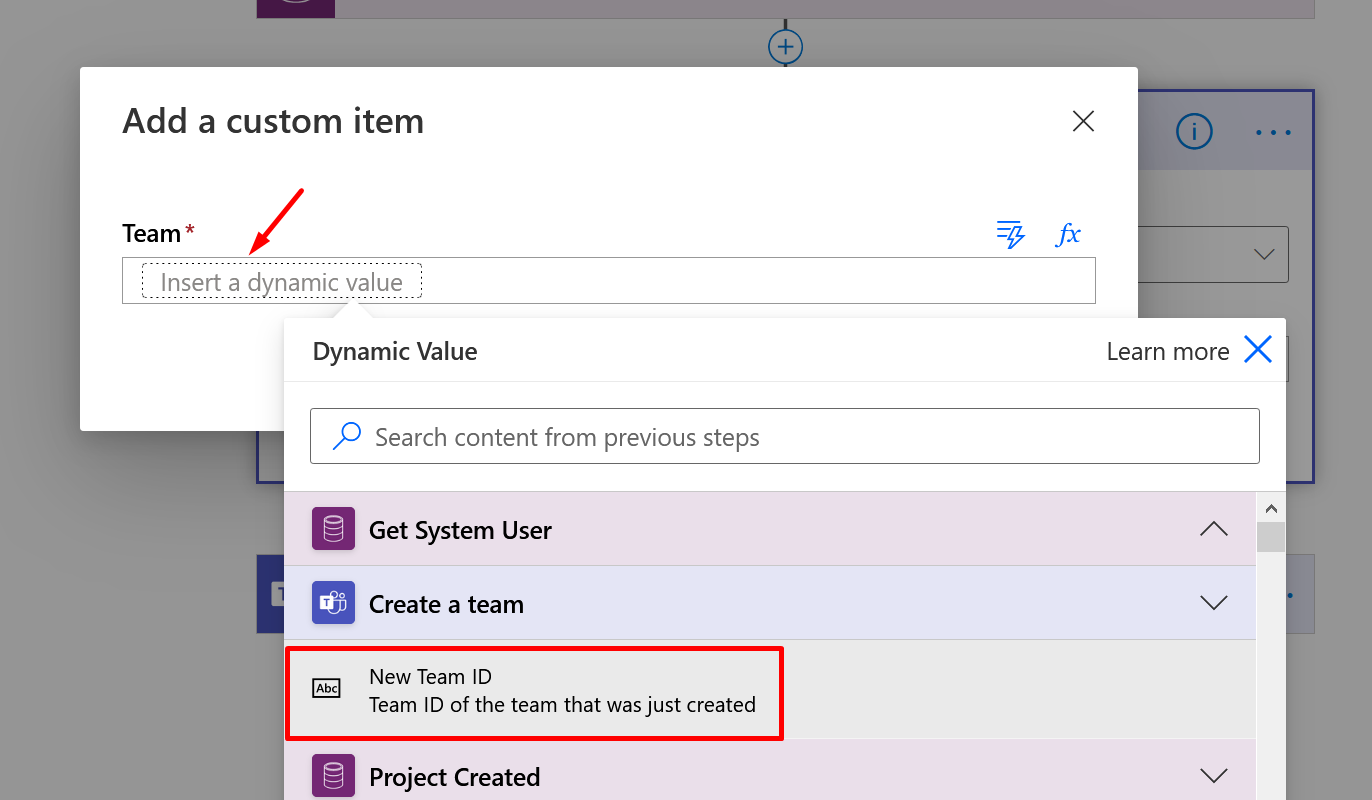
  8. Now, this is a little tricky. Since you don’t get the Dynamic Values right away in this Action, click on Add a custom item.

  9. In Add a custom item, you can add the Team ID of the MS Team you just created for the Project in step #3 above.

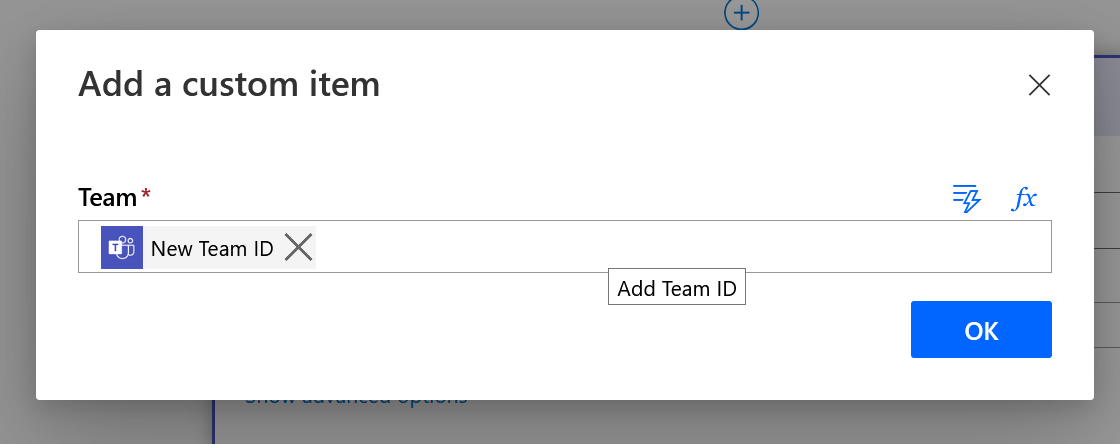
    Once you add it, it’ll look like below

  10. And for the User’s AAD ID step, set the System User’s (fetched in #5)

    Add Azure AD Object ID

  11. Now, the last step looks set.

Add Members to the Project Team

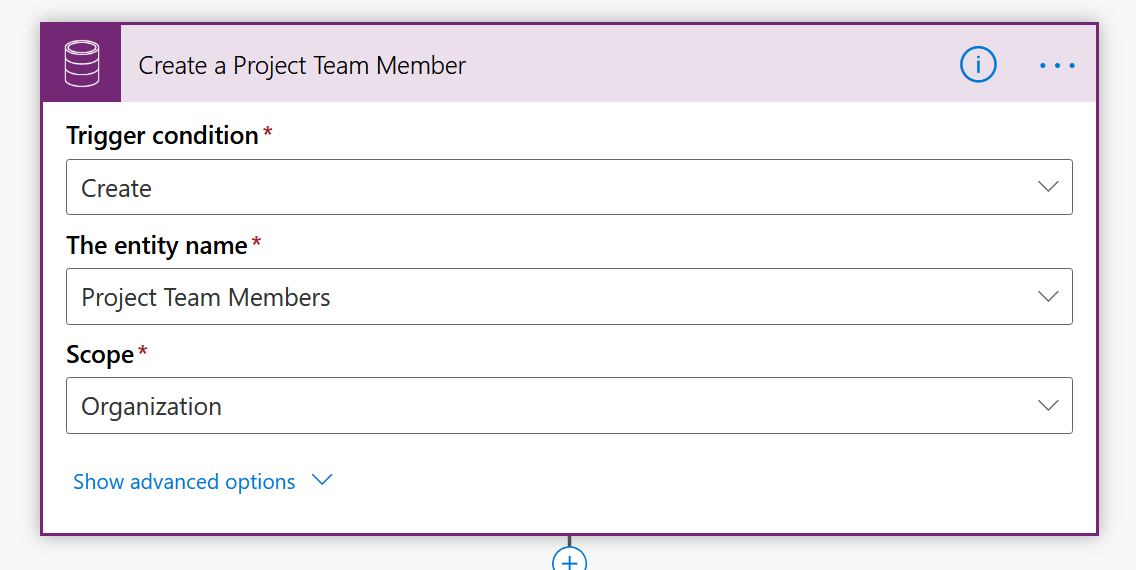
Let’s work on the other scenario with other Flow. This will be on trigger of a creation of a project Team Member.

  1. This second will fire off on creation of a Project Team Member. Hence, the trigger on Create of a Project Team Member.

  2. I’ll get the Project record since I need the MS Teams ID which is a custom field we created to store the MS Team’s ID on the Project.

    Again, you can do this easily if you know how to get related records. I’ve done an extra step for simplicity.


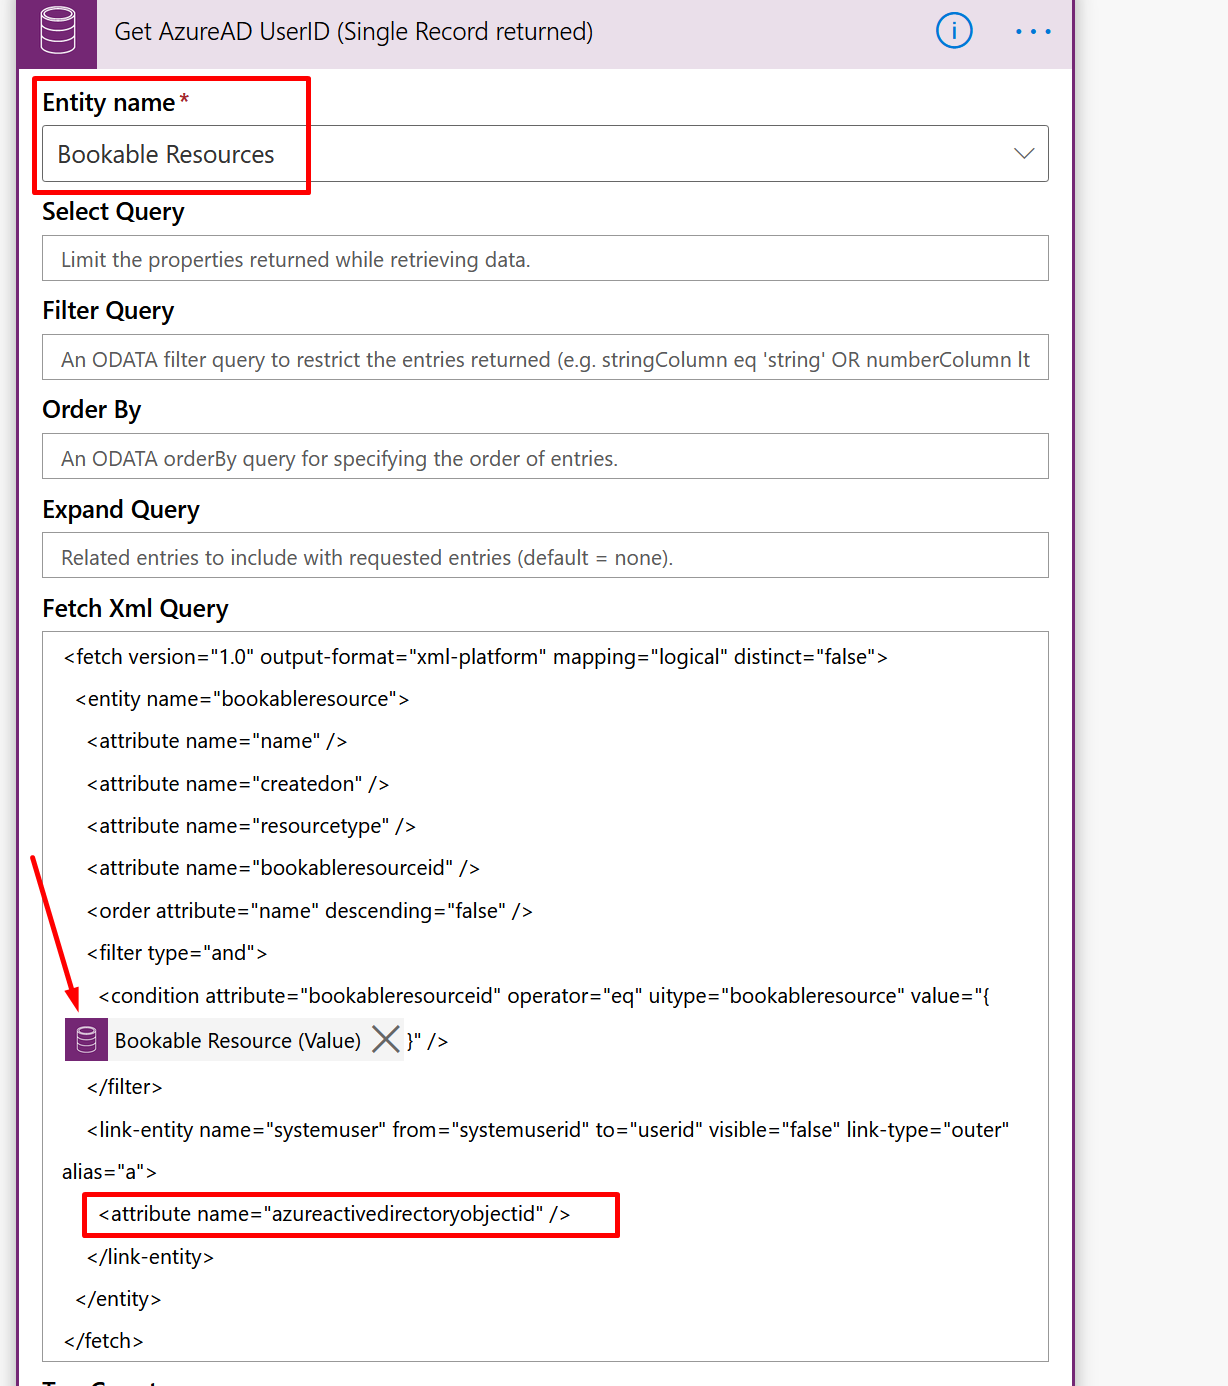
  3. Now, the next step is to retrieve the Bookable Resource‘s Record. In turn, we’ll retrieve the System User record associated with the Bookable Resource record on the Project Team so that the System User’s ID can be used.
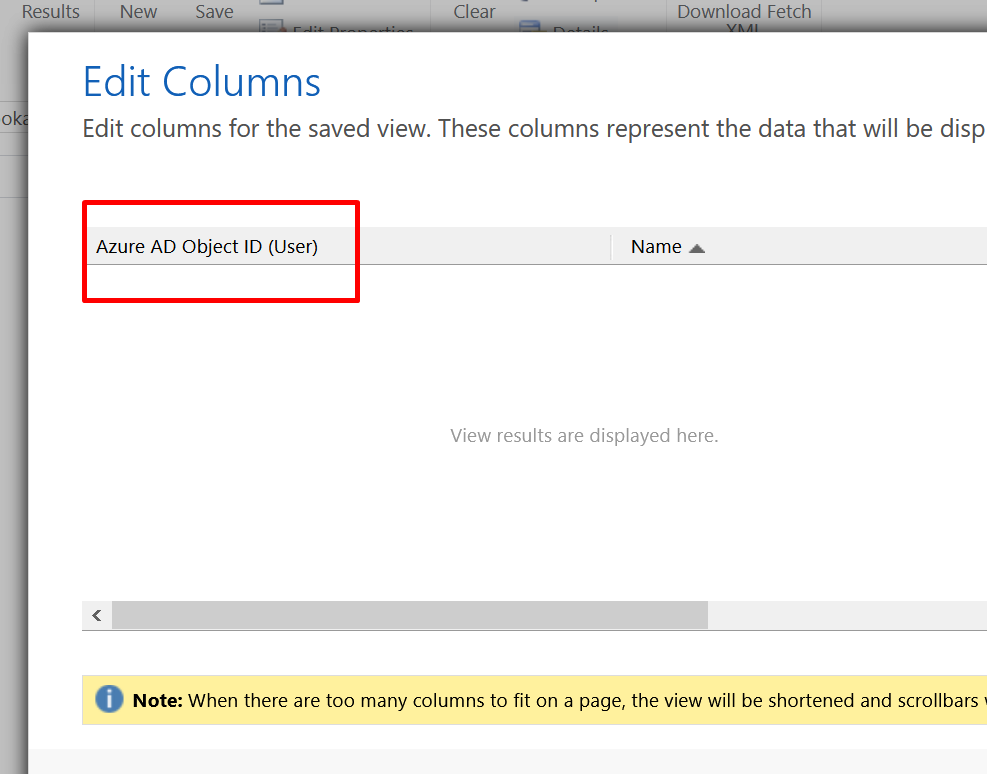
    Just because I need the Azure AD Object ID (User) entity, I’ve written a fetch XML on the Bookable Resource entity to go and get the User record’s Azure AD Object ID. I’ll need this to map it in the step where we’ll add the Member to the Project’s created Team.


    My step to retrieve Bookable Resource + System User’s Azure AD ID looks as below. Make sure you select the Bookable Resource GUID reference from the trigger i.e. the Creation of the Project Team Member record to ensure we only get 1 record.

  4. Then, I’ll simply generate a Parsed JSON after the above Step so that I can get to select the required attribute to select in the Team’s Add a Team Member step (Because the related field is not available for Dynamic Values) (In case you know how to directly write using outputs() function, that should be good enough too!!)


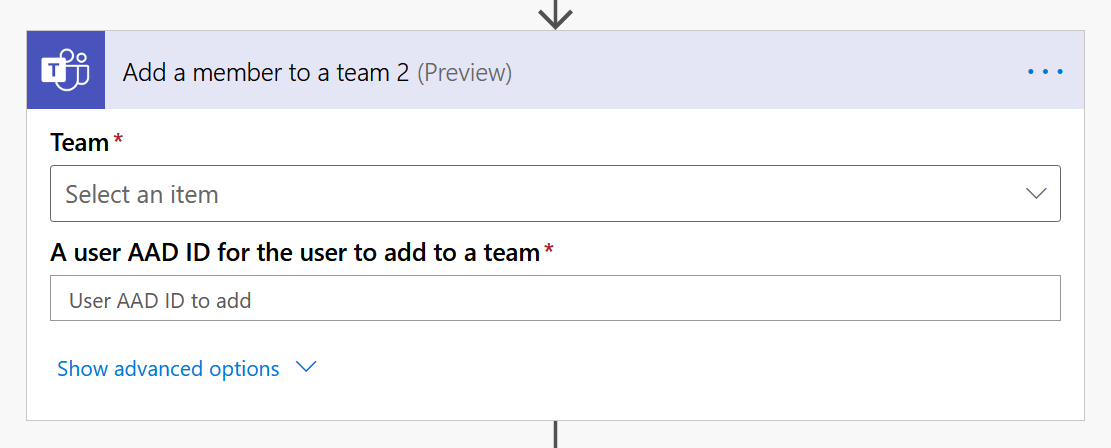
  5. Now, add the Team Member to the Project’s Team in MS team. Again, as mentioned above in the previous Flow, use the Add a member to a team Action from Microsoft Teams connector to do so.
    Now, add the Team’s ID in the Team field.

    On the Team field, you’ll need to Add a custom Value like we did in the previous Flow.


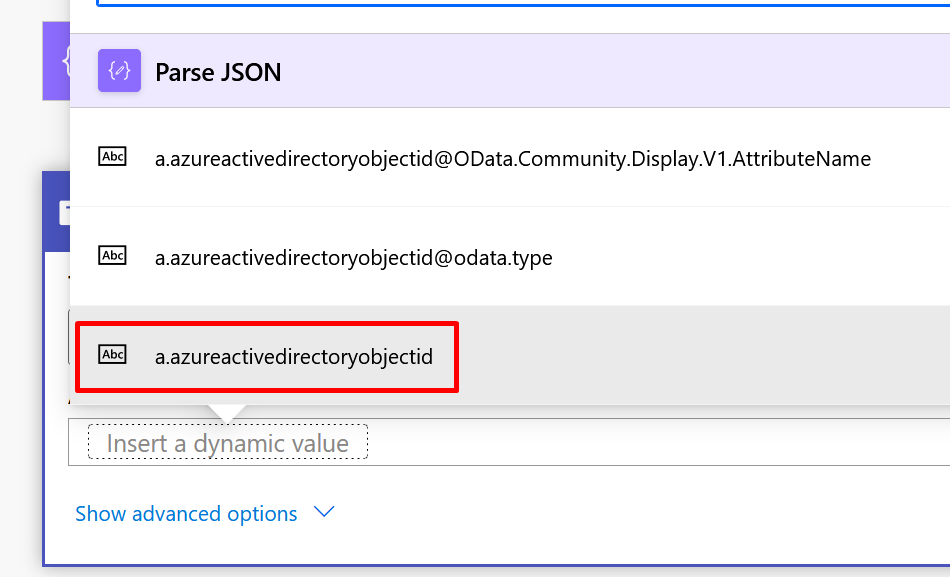
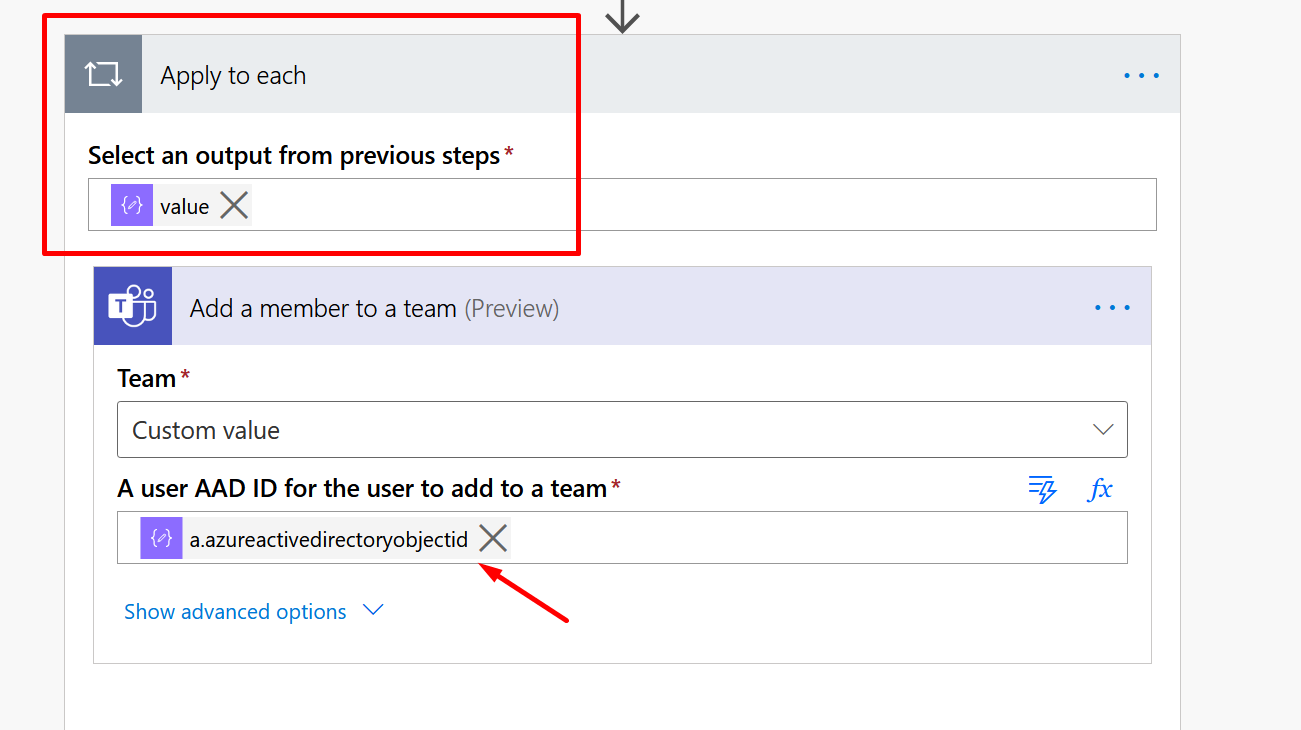
  6. And for the final step, in the User AAD ID for the user to add to a team step, you can pick the parsed Azure ID field from #4 above.

  7. As soon as you select from Parse, the Flow step will be converted to Apply to each. But that’s because we used List records which returns multiple values. Even though Apply to each is applied, this will logically run only once anyway!!

  8. Now in the user AAD

Working

Now’s let’s see all this in action.

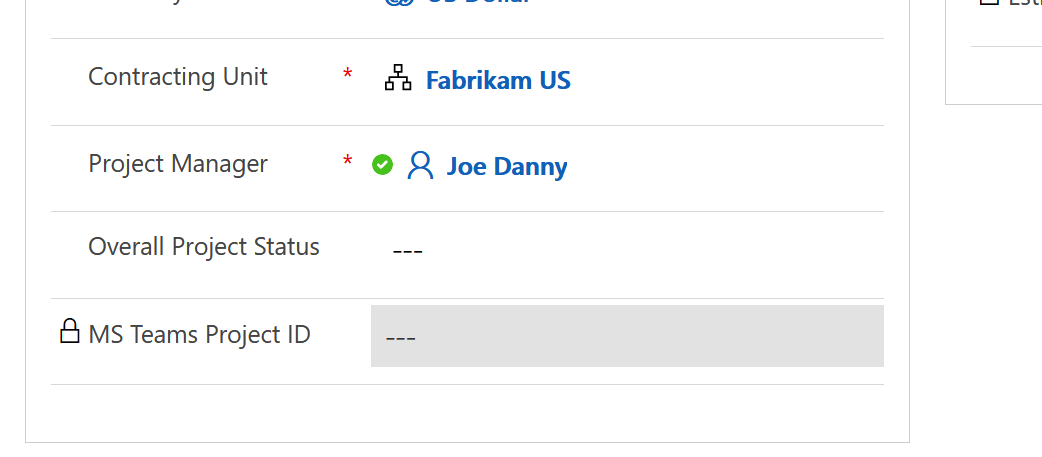
  1. Let’s create a Project in PSA. Notice I’ll enter the name and the Description since we are creating a Team in MS Teams and that’s what we are filling out. Notice that MS Teams Project ID is blank. Our Flow will populate that once a Team is created in Microsoft Teams.
    Notice that Joe Danny is the Project Manager on the Project, he will be the Owner of the Team we are creating in MS Teams as per our first Flow.


  2. A Team like this will be created in Microsoft Teams.

  3. Also, notice that in the Project in PSA, a MS Teams Project ID will be populated too.

  4. Also, notice that Joe Danny is the Owner of the Team since Joe is the PM on the Project.

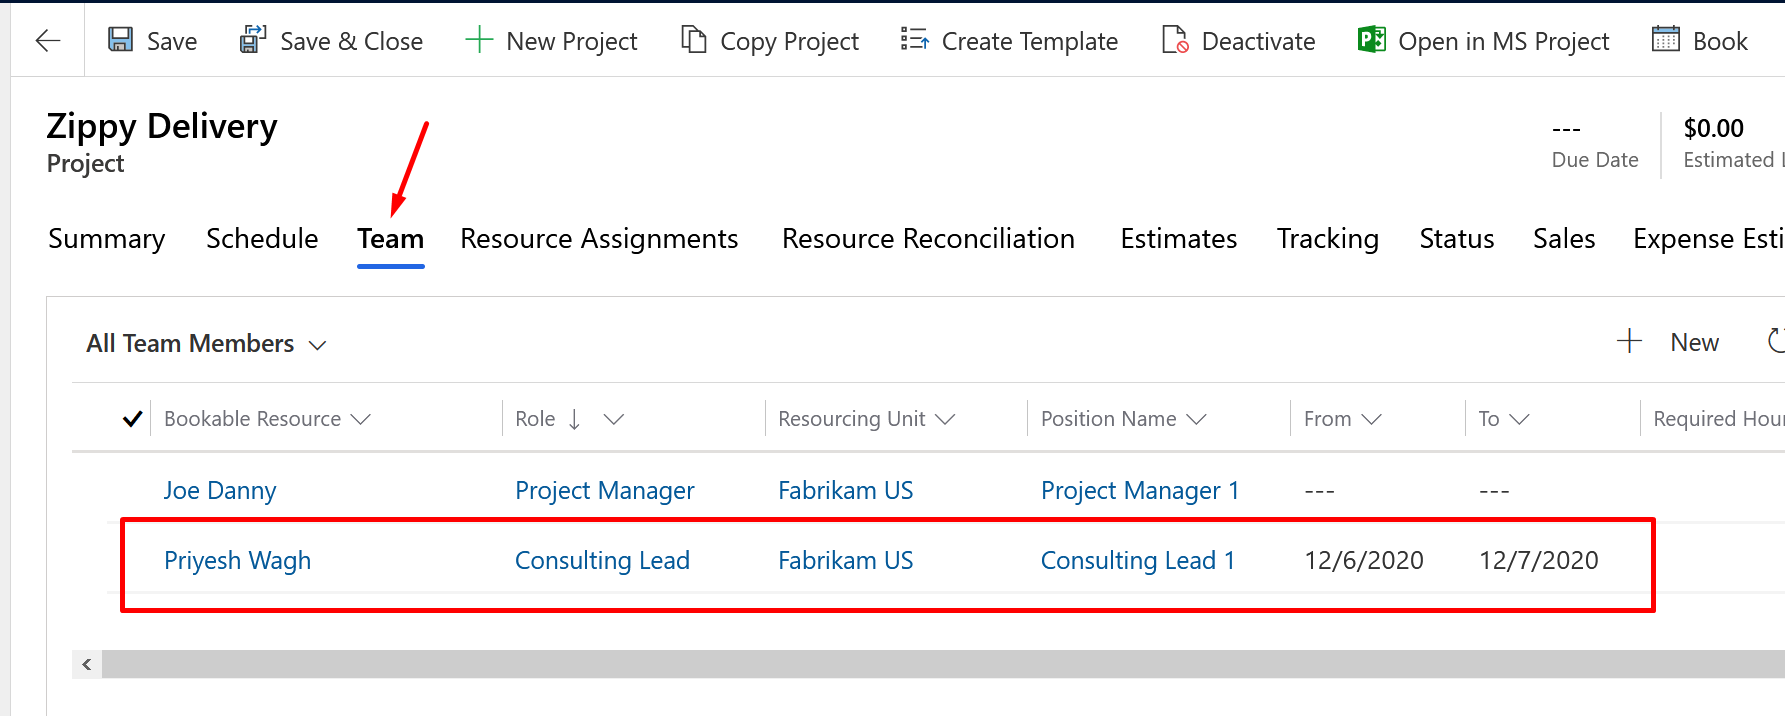
  5. Now, let’s add 1 more Team Members to the Project in PSA. Now, I’ve added a new Team Member Priyesh in the Project’s Team.


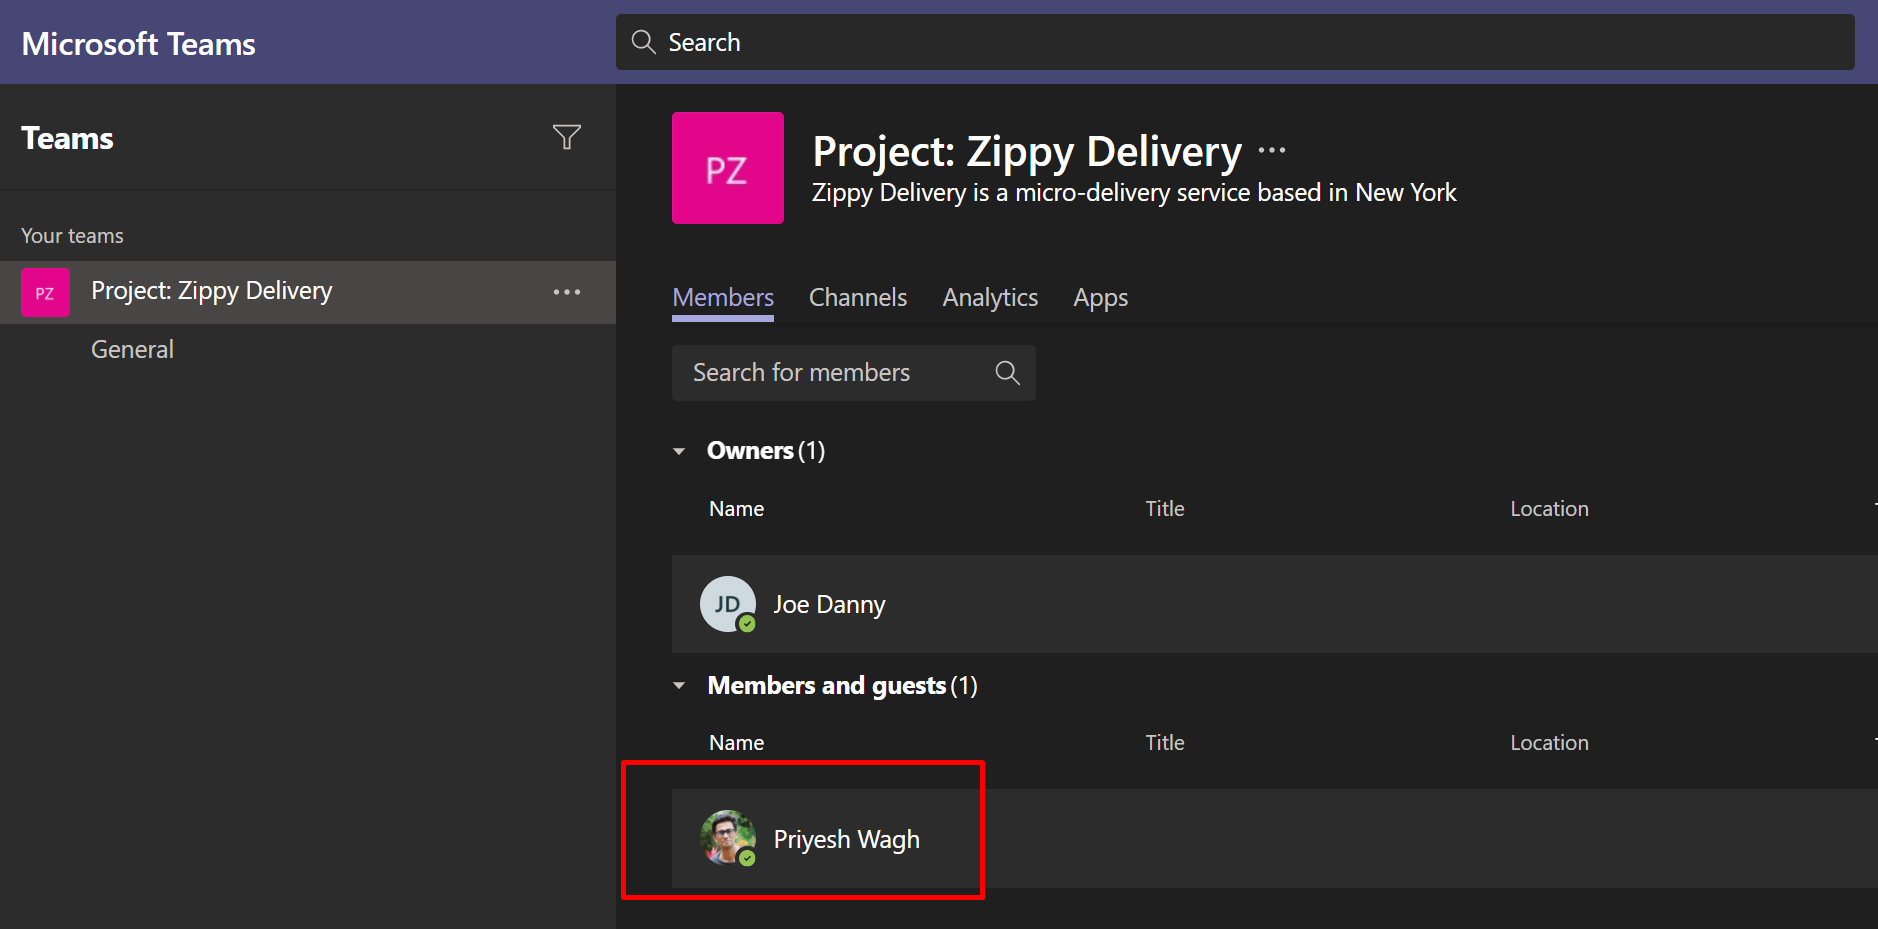
  6. That team member also get added as Members in Microsoft Teams in the Project’s Team. This is from out second Flow we created to add the Team Members to the created Teams for a PSA Project.


Here are some more enrichments you’ll need to do to handle some scenarios –

  1. Separately handle if a Project is Canceled/Deactivated for some reason.
  2. Remove Members from an MS Teams if they are removed from the Project.

Hope this was useful.

Here are some more posts about Project Service Automation (PSA) in Dynamics 365 / Microsoft Teams that might be helpful –

  1. Cancelled Bookings Imported in Time Entries in Dynamics 365 PSA issue | [Quick Tip]
  2. Task Completion reminder using Flow Bot in Microsoft Teams | Power Automate
  3. Change Booking Status colors on Schedule Board for Field Service/PSA [Quick Tip]
  4. Additional columns in PSA v3 Schedule view
  5. Check Managed Solution failures in Solution History in Dynamics 365 CRM
  6. Modify Project tab’s view in Schedule Board in PSA v3 | Quick Tip
  7. Update Price feature in D365 PSA v3
  8. A manager is required for non-project time entries, absence, and vacation error in D365 PSA v3
  9. Time/Expense Entry Rejection comments in D365 PSA v3
  10. PSA v3 View Custom Controls used on Project form

Thank you!!

Cancelled Bookings Imported in Time Entries in Dynamics 365 PSA issue | [Quick Tip]

Import Bookings is one of the important features provided by PSA for users to do Time Entries quickly and efficiently!

But out of the box, they also Import Cancelled Bookings!

Scenario

Now, let’s say we have some Bookings for a Resource and they look like this-

  1. These are the original Bookings for Priyesh on Tuesday and Thursday respectively i.e. 27th and 29th Oct 2020.

  2. Now, let’s cancel the 27th Oct 2020 booking. You can do so by right-clicking and changing the Status to Canceled. Once done, it will look like below –

  3. By default, when Priyesh tries the use the Import Bookings feature in Time Entries, he sees the below Canceled Booking as well.
    It can happen that the one who imports doesn’t recollect about the Canceled Booking and might Import it by mistake.


    To solve this, here’s what we do!

Resource Bookings for Time Entry Import view

So, here’s the view you care for.

  1. Open the Resource Bookings for Time Entry Import view as shown below

  2. In this view, change the Criteria

    The default criteria will look like below –
  3. Add another condition to it on top level i.e. the Booking Resource Booking entity itself for Booking Status field.


    Add this condition

    This should be it. Save and Publish your changes.

Correct Bookings Imported

With that small change, Canceled Bookings will not be imported for Time Entries.

Hope this helps!

Here are some more Dynamics 365 PSA (Project Service Automation) related posts you might want to look at –

  1. Change Booking Status colors on Schedule Board for Field Service/PSA [Quick Tip]
  2. Modify Project tab’s view in Schedule Board in PSA v3 | Quick Tip
  3. Dynamics 365 PSA v2 to v3 Upgrade failed? Here’s what to do.
  4. Additional columns in PSA v3 Schedule view
  5. Update Price feature in D365 PSA v3
  6. A manager is required for non-project time entries, absence, and vacation error in D365 PSA v3
  7. Set Work Hours Template to a Bookable Resource in D365 PSA v3
  8. Booking Resources more than their capacity in D365 PSA v3
  9. Time/Expense Entry Rejection comments in D365 PSA v3
  10. PSA v3 View Custom Controls used on Project form

Thank you!

Change Booking Status colors on Schedule Board for Field Service/PSA [Quick Tip]

Here’s a Quick Tip for everyone using Field Service and Project Service Automation. In case you are wondering how can you change the colors of the Booking Statuses on the Schedule Board for Field Service and PSA, here’s what you need to do.

Default Colors

This what your default Schedule Board looks like out-of-the-box.

Booking Statuses

Booking Status is an entity within which you can set this up.
You can navigate to Booking Statuses entity in your Field Service like below

There are these records you can modify. Also, for PSA, you have the same entity with different records for Booking Statuses
But, let’s look at Field Service’s example –

Now in each record, you can see in Common tab

And you can change by selecting this color picker control

And save the new selected color.

And let’s change for Completed as well, just another example – changed for Completed also to a greenish shade

Updated Colors

Now let’s look at the updated Schedule Board of how these colors look.

Hope this quick tip helps!

Here are some more PSA/Field Service posts you might want to look at –

  1. How to add Rating Values to Rating Models in D365 Field Service and PSA
  2. Why we see Cross Day in Work Hours on Bookable Resources/User?
  3. Modify Project tab’s view in Schedule Board in PSA v3 | Quick Tip
  4. Dynamics 365 PSA v2 to v3 Upgrade failed? Here’s what to do.
  5. Additional columns in PSA v3 Schedule view
  6. Update Price feature in D365 PSA v3
  7. A manager is required for non-project time entries, absence, and vacation error in D365 PSA v3
  8. Set Work Hours Template to a Bookable Resource in D365 PSA v3
  9. Booking Resources more than their capacity in D365 PSA v3
  10. PSA v3 View Custom Controls used on Project form

Thanks!

A manager is required for non-project time entries, absence, and vacation error in D365 PSA v3

In PSA v3, there occurs a scenario where Resources (Users) have to enter about their absenteeism and they’re not able to submit the request successfully on the Time Entry grid.

Error while Submitting Absence/Vacation & Non-Project Time Entries

  1. Typically, when a Resource has to make an entry for Absence but doing the below
    absenceTypeEntry
  2. And then clicking on Submit.
    submittingTE.png
  3. But, doing so gives an error!
    errorMessage.png

Let’s look at what was missing in readying the system for using PSA for the Resources –

Adding Manager for a Resource

Evidently from the error message itself, a Manager is required to approve the non-project time entries. Here’s how you can set it up!

  1. In PSA, it is required that ‘Manager’ is set for a Bookable Resource to be able to submit an absence/vacation/non-project time entry. Quite logical.
    So, In User record (associated with the Bookable Resource record of the actual user), the Manager should be assigned.
    missingManager.png
  2. Like below, if there’s a manager present, the Resource should have no trouble submitted non-project/absence Time Entries.
    managerAdded
  3. And once this is set, the entries should be submitted without an issue like below –
    entrySubmitted.png

What can the Manager do?

  1. Once this type of Time Entry has been submitted, the Manager can see it under Approval entity in their PSA under Absences/Vacations for Approval
    approvalArrived

Hope this was helpful!


Booking Resources more than their capacity in D365 PSA v3

While booking resources, you often don’t pay attention to how much capacity the resource has.

Or rather, you are aware, but you want to book the resource anyway (only to change later on, which I don’t recommend.)

In that case, if you are trying to overbook a resource out of their capacity, you are treated with this message below –

errorMessage

Why this occurs?

This is because of the Work Hours defined for the Resource. Rather, what Work Hour Template is assigned to that resource. Now, let’s say, you are trying to book someone for 8 hours on top of their already booked 2 hours
overloading.png

If you switch to the Hours view, you’ll see the availability marked by white cells. Grey meaning, unavailable.
available

Remember, this is even said in the error message when you tried to click Book.
errorMessage

Alternative

Of course you can do this, but you should have a very strong reason to overbook resources. 🙂

Switch to Evenly Distribute Hours to allow the resource to be booked on top of the existing one.
evenlyDistribute.png

And this should be fine, but it will appear in red indicating that the resource is overbooked. Say, 10 hours (on top of already booked 2 hours) – exceeding the 9 hours total limit.
hardOver
redMarking

Suggested

You should rather Propose Book the resource, this way, the booking will exist and won’t bloat the schedule board. And then, you can decide later to do something with it.

Front Load – Proposed

Now with combination of Front-Load and Proposed, you should be able to Book for only the remaining capacity

frontLoadPropose.png
only7.png

Evenly Distributed – Proposed

With Evenly Distributed Proposed, you should be able to exceed the capacity and even Propose for the full time you want.
evenlyDisProposed.png
Full10Hours.png


Hope this quick tip helps! 🙂

Happy 365ing!


Time/Expense Entry Rejection comments in D365 PSA v3

Let’s say in your PSA implementation, you are the Project Approver and you often face the challenges to rejecting time entries so that the resources could just correct it and re-submit. (Or any reason, for that matter)

Do you manually go and tell them that they need to re-submit? Let’s make this easier. This post applied for both, Time and Expense entries in PSA v3.

Where are the Rejection comments stored?

As an Approver, you have Resources submitting their Time Entries and you see them under Time Entries For Approval view in Approvals entity, ready to be Accepted/Rejected
ApprovalWaiting.png


And optionally, you can enter comments specifying why you rejected the Time Entry.
rejectionComment.png

But where is this data stored?

It’s actually stored as a Note on the Time Entry record itself! Note that the Entry Status of the Time Entry now says ‘Returned
storedAsNotes.png

Let the Resource know

You could just create a workflow to send an email to (Even Microsoft Flow, if you are comfortable with it)
A simple workflow to send out a notification will be useful to let the Resource (Owner of the Time Entry) know that the Time Entry was rejected and they need to take action.
workflow
On create of Note, Check if the Regarding (Time Entry) contains data and the Entry Status == Returned

emailBody
And send it to the Owner of the Time Entry specifying what details should go out. Add a link to the Time Entry record, maybe.

And they can click the link back to the Time Entry itself.
emailToResource

Hope this use-case proves useful in your implementation! 🙂

Happy 365ing!

PSA v3 View Custom Controls used on Project form

Here’s a summary of what all Custom Controls are used in the out-of-the-box PSA v3 Project form. I strongly recommend not changing the existing controls/views.

However, if you accidentally delete any Tab/View, this post will help you get it back! 🙂

Project Task View

Project Task uses AdditionalColumns as the Default View from entity Project Tasks (Project)
projectTaskView

and the Control used is CC_ProjectTaskControl and note that the CC_TrackingView is CC_ProjectTaskControl_NotTracking, you’ll see a different CC_TrackingView used later below.
projectTaskControl


Resource Assignments View

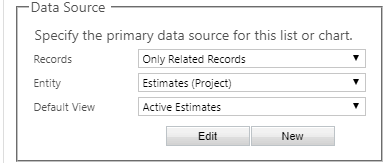
Resource Assignment uses Active Estimates as the Default View from entity Project Tasks (Project)

resourceAssignmentView.png

And uses CC_ViewType as CC_EstimatesGridControl_AssignmentView
resourceAssignmentControl

Resource Reconciliation View

Resource Reconciliation View also uses the same Active Estimates View as in Resource Assignments
estimatesView

but uses CC_ReconciliationControl for the control
reconciliationControl

Estimates View

Again, Estimates View uses the same Estimates view as mentioned in the Reconciliation View and Resource Assignments View above.
estimatesView

Also, it uses the same CC_EstimatedGridControl but the CC_ViewType is CC_EstimatesGridControl_FinancialView
estimatesFinancialView

Tracking View

Tracking View uses the All Project Tasks as the Default View
trackingView

It uses the same CC_ProjectTaskControl as used in the Project Task view but CC_TrackingView here is CC_ProjectTaskControl_Tracking
TrackingControl

Expense Estimates View

Again, Expense Estimates View uses the same Estimates view as mentioned in the Reconciliation View, Resource Assignments View & Estimates view above.
estimatesView

But the CC_ViewType used is CC_EstimatesGridControl_ExpenseView
expenseViewControl.png


Hope this summarizes and helps you build your custom form quicker.

D365 PSA: Restrict Project access only to their Project Managers

Out-of-the-box PSA’s Project Manager security role provides complete access to even other Project Managers. But then, what if you want to bring down the access of the Project Managers to their own Projects only?

Remember, access in D365 PSA is provided for Owner (ownerid) field and not Project Manager (msdyn_projectmanager) field.

PSARoleRestrict

Scenario

Now, I don’t want a Project Manager to have access to others Projects and looks like this can’t be controlled from the Security Level perspective, given the Project Manager is a separate field than Owner of the Project.

So, I’ll limit the access to only the User level (the one who created the record would have the access, obviously)

PSARoleRestrict2

But this remove the access from even the Project Managers since they don’t own the Projects. To overcome this, I’ve written a simple plugin to provide access to the Project Manager whenever they are updated by Sharing and giving PMs the access.

For this, I’ve written a plugin code that will grant all permissions to the Project Manager of that Project and I would like to share this with you all to consume it.

GitHub Project

Here’s the GitHub repository I’ve created which has the plugin code and the Unmanaged Solution that contains only the plugin assembly and the registered step –

Link: D365PSA-PMAccessRights

gitProj

The D365 Unmanaged Solution resides here –

unmanagedSoln

This will work in the following scenarios –

  1. When a Project Manager is changed from Person A to Person B, the access rights of Person A will be removed and granted to Person B.
  2. You can even create a trigger field and use an on-demand workflow to set the trigger. This trigger should be included in the filtering attributes of the plugin step to update the existing records.

This will provide access to the Project Manager of the Project automatically apart from the Owner so that they see/access only Projects that concern them
accessGiven

Make sure no other security role is overriding your restricted access.

Hope this helps! 🙂