Setting Up Default Organizational Unit, Cost and Sales Price List in Project Operations Lite

One of the first things to do when starting a new Project Operations Lite environment is to start setting up organizational data for your environment and in that, setting up Organizational Units, Price Lists and Roles is one of the first things to start setting up –

Let’s see on how you can start the same!

Organizational Unit

One of the first things is to find the Default Org unit for your Project Operations Lite environment –

  1. Ensure that in your Project Operations environment, you are in Project Operations app. On the SiteMap, switch to the Projects area and then, Settings sub-area.

  2. Now, locate Parameters and there should be 1 record in the Parameters which is mapped to the Default Organization Unit. Select the same (click on the clickable Default Organization Unit lookup itself to directly go to the Organizational Unit [or referred to as Contracting Unit in further blogs])

  3. Once in the Org Unit record, update the name to what should be relevant based on your use case.

  4. I’ve renamed this to a more readable name based on my example. Now, it should be easy for you to deal with this Org Unit while referencing further.

Cost Price List in Organizational Unit

Now that the Org Unit is found and renamed correctly, let’s add a Cost Price List first –

  1. In your Org Unit record, click on Add Existing Price List.

  2. Then, click on New Record button upon clicking the Look for records lookup field.

  3. Select Price Lists as the record type and it should be the only option there.

  4. Then, it’ll open the Price List record creation form on the window and you can start filling in the details. Make sure the Context selected is of type Cost.
    Also, the Effective Start Date and Effective End Date should be relevant as all calculations will be successful only if the dates to be processed for transactions fall inside the intended Price List dates.

    Save and Close the record once completed.

  5. Then the saved record will be shows as selected on the lookup field and you can then click on Add button at the bottom.

  6. Once added, the sub-grid on the Org Unit will take a while to refresh and then show you the tagged Cost Price List correctly.

Now, you have tagged a Cost Price List successfully. Let’s quickly add a Sales Price List.

Sales Price List

Now that you have created and tagged a Cost Price List in the previous section, let’s quickly create a Sales Price List shell so that you have a corresponding Sales Price List to look at as well –

  1. Navigate to the Sales area and then select, Sales sub-area in the Sitemap.

  2. Here, click on the Price Lists table and then click to add a new Price List record.

  3. Note that the Context of the record should be Sales this time since we want to create a Sales Price List. Save & Close once the record looks satisfactory based on your relevant information to fill in.

  4. Now, you can see that the Sales and Cost Price Lists are ready in your environment.

Next Section here will cover adding Resource Roles, and then adding Role Prices to the Sales and Cost Price Lists.

In later parts of this series, we’ll continue to add more to the Price Lists, Roles etc.

Hope this post was useful!

Thank you!

Starting a Project Operations Lite Trial Environment

One of the first things you want to get done is to spin up a Project Operations Trial environment. Here’s how you do it!
Note that no Credit Card is required for a Project Operations trial environment.

Project Operations Trial Environment

Here’s how you start a Project Operations trial environment –

  1. Navigate to https://trials.dynamics.com/ which will be redirected to https://dynamics.microsoft.com/en-us/dynamics-365-free-trial/ and the page you’ll see will be something like this –

  2. Scroll down on the page till you see the option for Project Operations. Click on Try for free.

  3. Once you click on Try for free, you can enter a new email on which you want to start a trial. I’ve come up with a sample email which I haven’t used before. I prefer not to enter an email/username which I already use.

  4. Click Next and then you can select Setup my account.

  5. Then, you can validate/enter the details which would be something like this and click Next.

  6. Then, choose if you want to receive an OTP via Text or a Call. Text is my preferred way so I selected that and clicked on Send verification code.

  7. I received an OTP which I entered as asked on the next pane and clicked Verify.

  8. Further, I’ll be shown the login details of the trial environment I want to create. Once this is done and I save the information, I click on Next.

  9. Then, you’ll be shown the details of the environment you’ll be provisioning. Save this info before proceeding.
    Next, click on Start using Dynamics 365 Project Operations (CE) – Preview Trial. It’ll redirect you to the questionnaire page on a new tab where you’ll need to answer the questions before choosing the Deployment Type.

Deployment Type Questionnaire

As we left off from the Step #9 in the above section, you’ll be taken to a questionnaire Wizard in order to provision a Project Operations trial –

  1. Yes to managing Opportunities as they move through the process.

  2. Yes to requiring advance or extensible resource management.

  3. Yes to requirement of workflow for approval of Time and Expense.

  4. No to advanced Expense management.

  5. No to Non-Stocked Materials

  6. No to Stocked materials as well.

  7. Select the version here. Even if you would have answered the questions randomly, you would have still gotten to choose a different version than recommended. Hence, the answers above point to a recommendation of Project Operations Lite type of Deployment.
    Click Begin Setup once Lite Deployment is selected.

  8. Setup will start provisioning once you click on Start.

  9. And it’ll take a while and it’ll say that it will redirect you to the Power Platform Admin Center.

  10. And once you are redirected to Power Platform Admin Center and you’ll see that the environment is provisioning. This will take a few minutes before completion.

Set Name and URL for your environment

Provisioning a Project Operations trial will get set a predefined URL and name which you should update to be readable –

  1. Open the environment once the link is clickable and the State is set to Ready.
  2. Then, click on the Edit button

  3. Once you click Edit, you’ll get to update the Name and the URL. Set to something that is relevant to the purpose of the environment.

  4. Once you click on Save, you’ll see this loading page which will take a while to complete and finally, your Project Operations Lite environment setup will be ready!

Here’s Microsoft’s Documentation detailing which all Deployment Types have different Project Operations features available – https://learn.microsoft.com/en-us/dynamics365/project-operations/environment/determine-deployment-type?WT.mc_id=DX-MVP-5003911

Hope this post was useful!

Here are some Power Automate posts you want to check out –

  1. Select the item based on a key value using Filter Array in Power Automate
  2. Select values from an array using Select action in a Power Automate Flow
  3. Blocking Attachment Extensions in Dynamics 365 CRM
  4. Upgrade Dataverse for Teams Environment to Dataverse Environment
  5. Showing Sandbox or Non Production Apps in Power App mobile app
  6. Create a Power Apps Per User Plan Trial | Dataverse environment
  7. Install On-Premise Gateway from Power Automate or Power Apps | Power Platform
  8. Co-presence in Power Automate | Multiple users working on a Flow
  9. Search Rows (preview) Action in Dataverse connector in a Flow | Power Automate
  10. Suppress Workflow Header Information while sending back HTTP Response in a Flow | Power Automate
  11. Call a Flow from Canvas Power App and get back response | Power Platform
  12. FetchXML Aggregation in a Flow using CDS (Current Environment) connector | Power Automate
  13. Parsing Outputs of a List Rows action using Parse JSON in a Flow | Common Data Service (CE) connector
  14. Asynchronous HTTP Response from a Flow | Power Automate
  15. Validate JSON Schema for HTTP Request trigger in a Flow and send Response | Power Automate
  16. Converting JSON to XML and XML to JSON in a Flow | Power Automate

Difference between Project Operations Deployment Types

Now, as you know that there are the following 3 types of Project Operations Deployments –

  1. Project Operations Lite (Deal to Proforma Invoicing).
  2. Project Operations for resource/non-stocked scenarios.
  3. Project Operations for production/stocked scenarios.

To keep the comparison understandable and simple, let’s review the below in a short summary.

Comparison

Project Operations LiteProject Operations for Resource/Non-stockedProject Operations for Production/Stocked
Finance & Operations module is not setupFinance & Operations setup is requiredFinance & Operations Setup is required
No Dual Write IntegrationDual Write Integration is required.Dual Write Integration is required.
Up to Pro-forma Invoicing is availablePro-forma Invoicing in PO and Customer-facing Invoicing in F&OFull Invoicing in F&O
Basic ExpenseBasic and Full Expense with Receipt OCRFull Expense with Receipt OCR

Hope this quick summary was useful. I’ll continue adding more to this article over time.

Here’s official Microsoft Documentation for full deployment guidance with questionnaire –

Thank you!

Getting Started with Microsoft Graph API

Microsoft Graph API is a superb way to leverage Microsoft 365 services as a developer. Before you start to wonder where all to get started from, this post is for you!

Microsoft Graph Explorer

Here’s how you can start using the Microsoft Graph API –

  1. Navigate to the Microsoft Graph Explorer (https://developer.microsoft.com/en-us/graph/graph-explorer), you’ll see the below –

  2. By default, if you run on Run Query, it’ll retrieve Sample Data already present.

  3. You can click on the Person icon in order to Authenticate to the environment you are already logged in.

  4. In case you are already logged in, select the environment or login from the start.


  5. You’ll also need to provide consent in order to proceed.

  6. Now that you are logged in, you can see the Tenant information being displayed and you can then also try to test run the same query and you’ll see your actual data being retrieved.

Important Notes

  1. In order to access a Users’ data, they have to consent this data for access.
  2. OData Queries are used to further query the data in order to access them.

Here’s the official link to the Microsoft Graph documentation and other resources: https://learn.microsoft.com/en-us/graph/?WT.mc_id=DX-MVP-5003911

Hope this was useful!

Thank you!

Permanently Delete users from Power Platform

Often times, as organizations have users enabled and disabled, over the course of time we see a lot of Disabled Users pile up in the system. Power Platform now lets you delete these Users permanently from the system.

Warning: Please note that this process will not get back the User you delete as you are going to permanently delete the User from Entra ID as well as Power Platform.

Enable Delete Users feature from Admin Center

First, you’ll need to enable this in the Power Platform Admin Center

  1. Select the environment you wish to enable this feature in and then click on Settings.

  2. Then, look for Features section.

  3. you’ll find the option for Delete Disabled Users which would be OFF by default. Switch it to ON.


    Zooming in a little bit, this is how the turned on feature should look –

  4. Once you turn this ON, be sure to scroll to the bottom of the page and click on Save to save the changes you just made.

Now that you have turned this on. You can now Delete the Disabled Users.

Pre-Requisite: Permanently Delete User

Now, let’s see how this process is to be carried out –

  1. Assuming the license of the User is now removed and if you Refresh the User in Power Platform Admin Center, you’ll see that the User will appear in the Disabled Users filtered list.

  2. Even if you delete the User in M365, you can refresh the Power Platform and see the User Name still present

  3. Now, if you open the User which you see with a different username in Power Platform Admin Center and click on it to open it in classic UI and see the Delete button to Delete the User

  4. Here’s the delete button.

  5. When you click on Delete and confirm it’ll throw the error message that this cannot be deleted.

Now, the next step is to permanently delete the User from Entra ID. Here’s a blog post to permanently delete the User from Entra ID: Permanently Delete a User in Entra ID

Delete in Power Platform

Now that the User is permanently deleted in Entra ID, you can re-attempt the delete the user in Power Platform.

  1. Now, retry the step from the User page in classic UI as you’ll see the button there.

  2. Now, you can click on the User in the Power Platform Admin Center and see that the user is showing that it has been deleted in the Environment

  3. And you can see the button to now Delete Permanently in the environment as well.

  4. And it’ll ask you if you want to really delete the User.

Hope this helps!

Thank you!

Manually Add Licensed Users in Dataverse Environment in Power Platform Admin Center

In case you want to reflect a recently licensed user in a Dataverse environment but you don’t see it reflect immediately, here’s how you can manually add users to the Dataverse environment yourself.

Check that the User has an appropriate license

From Microsoft 365 Admin Portal, ensure that the user has been successfully been given a license –

  1. In Users, click on the User and ensure the user has correct License required to be added to the environment.

  2. And even if you refresh the Enabled Users (in classic CRM UI), you don’t see the User.


    Here’s how you can quickly add a User instead of trying to sync all users (It’s possible to do that but slightly lengthy process). I’ll cover it in a separate post and link it here.
    First, let’s see in the below section on how to quickly add a User –

Add Users from Power Platform Admin Center

Given that you have the correct Dynamics 365 Administrator privileges, here’s how you can add Users manually –

  1. Go to the Environment in Power Platform Admin Center

  2. Go to the Users section once you expand on Users Permissions tab

  3. You’ll see that User is still not part of the environment. Here’s how you can add the User. Click on the + Add User button.

  4. Then, search for the User with their Email Address and you’ll see it populate once the user qualifies the criteria mentioned on the pane under User access requirements.

  5. Then, click on Add.

  6. In the next step, you’ll be asked to provide a Security Role to the User. For example, I’m assigning a Salesperson security role from the default Business Unit. And then clicking Save.

  7. This User will be added with the Security Roles. If you don’t see the name immediately, click on Refresh.

  8. You’ll see the User appear in the environment list.
    Also, you’ll see the User in the classic UI if you click on Manage users in Dynamics 365.

  9. Here’s how it’ll appear in the Classic UI.

Hope this was useful!

Thank you!

Perform a changeset request in Dataverse connector in Power Automate

You must’ve noticed Perform a changeset request in the Dataverse connector in Power Automate.

Purpose of this Action is to perform batch of available Dataverse connector actions successfully or rollback the batch performed inside this changeset request.

Here’s what it does.

Perform a changeset request

Here’s how to use the connector action

  1. Select Perform a changeset request in the Dataverse connector Actions list.

  2. Now, since this works like a batch of operations to perform all actions successfully or “rollback” operations, you’ll see this working like a Scope but only for Dataverse actions.

  3. You have the below Actions available to perform.

  4. Now, let’s design an example changeset batch here.
    First, I’ll create an Account and then a Contact.

  5. When this Flow runs, for example, if the Contact creation fails, the Account creation too will be rollbacked unlike having these steps outside of the “Perform a changeset request” action.


  6. Please note that the Outputs of the Changeset request itself or even within the steps within a changeset request cannot be captured or referred to in Dynamic Content.

Hope this helps!

Check which Power Automate or Power Apps Licenses are assigned to you | [Quick Tip]

In case you are using Power Automate for your own use or asked to build something for the team, here’s how you can check what capabilities you are entitled to –

Check Licenses in Power Automate

Here’s how you can check licenses assigned to you in Power Automate –

  1. When in Power Automate, click on the Gear icon.


  2. Now, select View My Licenses.

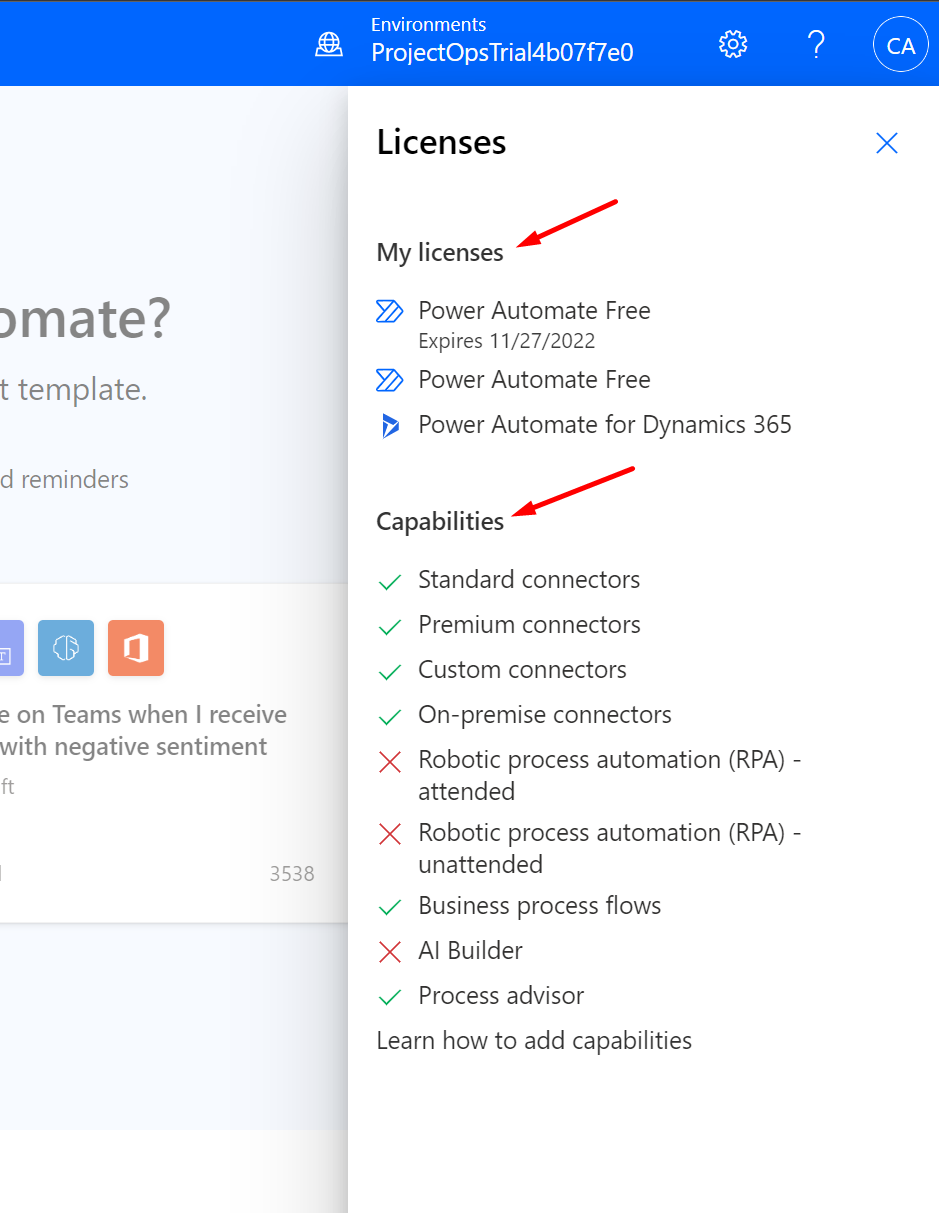
  3. Here, you’ll clearly see all the licenses and the capabilities you have with the Power Automate license assigned to you.


  4. Another example is a User with only Power Automate Free license assigned to them. This is what they will see –

  5. This simple and clear distinction helps you identify with the capabilities you have in Power Automate.
    Here’s the Power Automate Pricing Link provided in the “Learn how to add capabilities” section at the bottom.
    https://powerautomate.microsoft.com/en-us/pricing/

  6. Here’s a Bonus! Same applies for Power Apps as well. If you are in Power Apps (https://make.powerapps.com/) or in the App Designer in a Canvas App, you can see the Plan(s) option under the Gear Icon.


  7. And you’ll see the Capability available to your user.

Hope this helps!

Here are some Power Automate posts you want to check out –

  1. Select the item based on a key value using Filter Array in Power Automate
  2. Select values from an array using Select action in a Power Automate Flow
  3. Blocking Attachment Extensions in Dynamics 365 CRM
  4. Upgrade Dataverse for Teams Environment to Dataverse Environment
  5. Showing Sandbox or Non Production Apps in Power App mobile app
  6. Create a Power Apps Per User Plan Trial | Dataverse environment
  7. Install On-Premise Gateway from Power Automate or Power Apps | Power Platform
  8. Co-presence in Power Automate | Multiple users working on a Flow
  9. Search Rows (preview) Action in Dataverse connector in a Flow | Power Automate
  10. Suppress Workflow Header Information while sending back HTTP Response in a Flow | Power Automate
  11. Call a Flow from Canvas Power App and get back response | Power Platform\
  12. FetchXML Aggregation in a Flow using CDS (Current Environment) connector | Power Automate
  13. Parsing Outputs of a List Rows action using Parse JSON in a Flow | Common Data Service (CE) connector
  14. Asynchronous HTTP Response from a Flow | Power Automate
  15. Validate JSON Schema for HTTP Request trigger in a Flow and send Response | Power Automate
  16. Converting JSON to XML and XML to JSON in a Flow | Power Automate

Thank you!

Create a GUID in a Flow | Power Automate [Quick Tip]

Here’s how you can create a GUID in a Flow!

GUID Function

Here’s how you can use the “guid()” method in Power Automate Flow to create a new GUID every time it’s run –

  1. I’m using an instant Flow to demonstrate this. And I have a variable where I’m adding a guid() method from the Dynamic Content area.


  2. Just using this, it’ll generate a unique GUID on each run.

  3. Below are some examples which were generated on each run.

Hope this was useful!

Here are some Power Automate posts you want to check out –

  1. Select the item based on a key value using Filter Array in Power Automate
  2. Select values from an array using Select action in a Power Automate Flow
  3. Blocking Attachment Extensions in Dynamics 365 CRM
  4. Upgrade Dataverse for Teams Environment to Dataverse Environment
  5. Showing Sandbox or Non Production Apps in Power App mobile app
  6. Create a Power Apps Per User Plan Trial | Dataverse environment
  7. Install On-Premise Gateway from Power Automate or Power Apps | Power Platform
  8. Co-presence in Power Automate | Multiple users working on a Flow
  9. Search Rows (preview) Action in Dataverse connector in a Flow | Power Automate
  10. Suppress Workflow Header Information while sending back HTTP Response in a Flow | Power Automate
  11. Call a Flow from Canvas Power App and get back response | Power Platform\
  12. FetchXML Aggregation in a Flow using CDS (Current Environment) connector | Power Automate
  13. Parsing Outputs of a List Rows action using Parse JSON in a Flow | Common Data Service (CE) connector
  14. Asynchronous HTTP Response from a Flow | Power Automate
  15. Validate JSON Schema for HTTP Request trigger in a Flow and send Response | Power Automate
  16. Converting JSON to XML and XML to JSON in a Flow | Power Automate

Thank you!

See Trigger Outputs using Edit Columns in Flow Runs | Power Automate [Quick Tip]

If you are noticed a new addition to the Cloud Flows is where you see the Edit Columns in the Flow page.

Edit Columns in Flow

When you open a Flow, you see the below –

  1. These are your usual results of Flow Runs.

  2. And then you open each Flow Run to see what data is passed in the attributes of the steps.

  3. Now, here’s where Edit Columns are a useful new addition if you are using Flows around Sep 2022 time frame.

  4. And then you get to select the attributes from the Flow itself. In this instance, I’m select name and accountid fields from the Flow.
    Once your desired columns are selected, you can click Save.


  5. Those columns and their respective values will show up. This will save your effort to go into each Flow to look at what the values are.

  6. And from All Runs page, you can even export these to Excel if you need to.

Hope this was useful!

Here are some Power Automate posts you want to check out –

  1. Blocking Attachment Extensions in Dynamics 365 CRM
  2. Upgrade Dataverse for Teams Environment to Dataverse Environment
  3. Showing Sandbox or Non Production Apps in Power App mobile app
  4. Create a Power Apps Per User Plan Trial | Dataverse environment
  5. Install On-Premise Gateway from Power Automate or Power Apps | Power Platform
  6. Co-presence in Power Automate | Multiple users working on a Flow
  7. Search Rows (preview) Action in Dataverse connector in a Flow | Power Automate
  8. Suppress Workflow Header Information while sending back HTTP Response in a Flow | Power Automate
  9. Call a Flow from Canvas Power App and get back response | Power Platform\
  10. FetchXML Aggregation in a Flow using CDS (Current Environment) connector | Power Automate
  11. Parsing Outputs of a List Rows action using Parse JSON in a Flow | Common Data Service (CE) connector
  12. Asynchronous HTTP Response from a Flow | Power Automate
  13. Validate JSON Schema for HTTP Request trigger in a Flow and send Response | Power Automate
  14. Converting JSON to XML and XML to JSON in a Flow | Power Automate

Thank you!