Setup Power Platform Pipelines

Given that you need to setup Power Platform Pipelines, here’s a post for you!
This post will walk you through on how you can setup Power Platform Pipelines.

Pre-Requisites

Here’s what you need to setup in order to enable Power Platform Pipelines –

  1. You need to enable Managed Environments for the environments which need to participate in Power Platform Pipelines. Here’s a post on Managed Environment which I’ve written in the past – Enable Managed Environments in Power Platform Admin Center

    Given that all participating environments have been enabled with Managed Environments, select an Environment which is supposed to a “Host” environment where all the Pipelines master data will house and then go to it’s Dynamics 365 Apps section from Resources to install Power Platform Pipelines into that environment.

  2. Once you are in, click on Install app and then search for Power Platform Pipelines.

  3. Confirm that you are about to install this Solution.

  4. Once installed, go to Power Apps Maker Portal (https://make.powerapps.com/) and then select the Host environment in which you have installed Power Platform Pipelines on.
    Then go to Apps and you’ll see Deployment Pipeline Configuration app. Play that app!


    Let’s see how you can set the environments up first!

Setting up Environments

Here’s how you can setup your Environments in the –

  1. Once you are in the Deployment Pipeline Configuration App, go to Environments and create a New record.

  2. Then, enter all the details. Also, mention if the Environment type is Development Environment or Target Environment.

  3. Once you save the record, this the configuration will be validated.


  4. In case you are wondering how to you find the Environment ID, here’s where you’ll find the Environment ID in Power Platform Admin Center (https://admin.powerplatform.microsoft.com/environments), select the environment and you’ll see the details as below –

  5. Once all the Environments are set in the Deployment Manager, here’s how it should look


Configure Deployment Pipelines

Now that your environments are set, let’s also configure the Deployment Pipelines –

  1. Go to Pipelines and create a New record.

  2. Now, fill in all the relevant information and save the record.

  3. Now, link your Managed Environments in the Linked Deployment Environment grid below. Then click on Add Existing Environments button.

  4. And once you add, they’ll appear like this while selecting them in lookups. Then click Add.

  5. Once added the Development Environments, go ahead and create new Pipeline Stages too.

  6. In the new Deployment Stage, I’ll simply tag the Production Environment and save the record to keep this example simple.

    At this point, your Pipeline is all set to Run.

    Shortly, I’ll share another post on how you can Run a Pipeline in Power Platform!

Hope this was useful!

Thank you!

Pass Entity parameter from Power Automate Flow to an Action

Let’s say that you want to run a Power Automate Flow on a set of Dataverse records and those records will be referenced in your C# Plugins.

And the next steps is you’ll create an Action for this and register it in the Plugin Registration Tool.

In case you are new to plugins in CRM, you can refer this series – Plugins Development in Dynamics 365 CRM for Beginners | [Blog Series]

Bound Action in CRM

Let’s suppose you are aware on how to create Actions in Dynamics 365 CRM. This is an old concept since many years and I’m also assuming you know how to profile a plugin (which is registered as an Action in CRM) –

  1. When you open an Action, let’s suppose you are passing Account as well as a Contact Entity to the Action itself.
    Notice that the Action is registered as a Bound Action on the Account entity already.


  2. Also, assuming that you have Activated this Action and then registered this Action as a Step on the Plugin in the Plugin Registration Tool.


    Now, let’s see how we can pass the parameters to the plugin itself from the Flow

Power Automate Flow – Bound Action

You must’ve used the Dataverse connector a lot, so here’s how you can call the Bound Action and pass the Entity parameters to the Action itself –

  1. You’ll need to use a Perform a bound action action in Power Automate which is offered by Dataverse connector.

  2. Then, select the Table which you have registered the Action on in CRM and you’ll then see the Action’s backend name appear for selected, then pass the primary key of the record.

  3. Now, since there are 2 Entity parameters to be passed for the Action, here’s you’ll see all the fields from those Entity itself!

  4. For each of these Entity parameters, you have to look for the Primary Key field of those tables and then pass the GUIDs of the Entity records you presumably have.

  5. But wait! There’s a limitation here. You can only have 1024 parameters saved for the step selected. Hence, only 1 lookup will suffice.
    You’ll get the below error when trying to set both the Lookups that I’m passing to the action above.
    The error says “The dynamic schema response from API ‘commondataserviceforapps‘ operation ‘GetMetadataForBoundActionInput‘ is too large, only schemas with at most 1024 properties are supported.

  6. Hence, I’ll go back and remove 1 Entity parameters just for this example to work!

  7. And then, I’ll simply profile the Plugin Action to see what is passed in the InputParameters.

Plugin Context

Now, given that you might have already Profiled the plugin and attached it to the Plugin Registration Tool process, let’s examine the context’s Input Parameters –

  1. the InputParameters in the plugin’s execution context will contain the following parameters, which we’ll see in later section of this blog post.
    Target [EntityReference, in a CRUD operation registered plugin step – Target is an Entity in the plugin context]
    AccountRecord [Entity]

Considerations

Here are some considerations if you want to make design decisions for your implementation –

  1. Cannot have 2 or more Entities as parameters as the Perform a bound action step itself has limitations of 1024 properties at the Power Automate level.
  2. Pass some other Entity than the Action you have registered on since you’ll get the registered Entity as EntityReference itself in the “Target” parameter.

Hope this was useful!

Thank you!

Project Status Update Reports on Projects using Copilot in Project Operations

Now that you must have enabled Copilot for Project Operations [If not, you can refer this post to learn how you can enable Copilot for Project Operations – Enable Copilot for Project Operations]

Note: Please note that this is a Preview feature at the time of writing this post and hence, not recommended for Production usage.

Enable Copilot For Project Operations

First, you need to ensure that Copilot is enabled for your Project Operations environment – Enable Copilot for Project Operations

Once this is enabled, you’ll be able to see Copilot on the ribbon button on the Project. Let’s look at the same in the below section.

Project Status Update Report

Now that you have Copilot enabled for Project Operations, you can now create Task Plans for a Project in Project Operations –

  1. When you navigate to a Project, you’ll see Copilot appear on the Ribbon given that you have enabled it for your Project Operations instance.

  2. Once you select Status Report, it’ll give you option to generate either an Internal or an External Report. Then it runs in the background and takes a few minutes till Copilot will gather all the information for you and generate a report.


  3. External Report generated is as below –


  4. Internal Report generated is as below –


Here’s Microsoft’s Full Documentation on how Project Status Update Reports are generated in Project Operations’ Copilot (Preview) – https://learn.microsoft.com/en-us/dynamics365/release-plan/2023wave1/finance-operations/dynamics365-project-operations/generate-project-status-reports-using-project-manager-copilot?WT.mc_id=DX-MVP-5003911

Hope this was useful!

Thank you!

Risk Assessments on Projects using Copilot in Project Operations

Now that you must have enabled Copilot for Project Operations [If not, you can refer this post to learn how you can enable Copilot for Project Operations – Enable Copilot for Project Operations]

Note: Please note that this is a Preview feature at the time of writing this post and hence, not recommended for Production usage.

Enable Copilot For Project Operations

First, you need to ensure that Copilot is enabled for your Project Operations environment – Enable Copilot for Project Operations

Once this is enabled, you’ll be able to see Copilot on the ribbon button on the Project. Let’s look at the same in the below section.

Risk Assessment

Now that you have Copilot enabled for Project Operations, you can now create Task Plans for a Project in Project Operations –

  1. When you navigate to a Project, you’ll see Copilot appear on the Ribbon given that you have enabled it for your Project Operations instance.

  2. Once you select Risk Assessment, it runs in the background and takes a few minutes till Copilot will populate the Risks for you.


  3. Once this is generated in a few moments, it appears in the Risks tab on the Project itself.


  4. Additionally, you are free to use this in reporting as well

Here’s Microsoft’s Full Documentation on how Risk Assessments work in Project Operations’ Copilot (Preview) – https://learn.microsoft.com/en-us/dynamics365/release-plan/2023wave1/finance-operations/dynamics365-project-operations/assess-issues-risks-project-using-project-manager-copilot?WT.mc_id=DX-MVP-5003911

Hope this was useful!

Thank you!

Enable Copilot for Dynamics 365 Sales environment

Copilot for Dynamics 365 Sales is in Preview at the point of writing this post. Hence, I’ll start by showing how you can turn Copilot for Dynamics 365 Sales on for your environment.

It is recommended to do this in your Sandbox instances first.

Enable Copilot for Dynamics 365 Sales

Given that you have the correct licenses setup and you are a System Administrator, you can follow the below steps in order to enable Copilot for Dynamics 365 Sales –

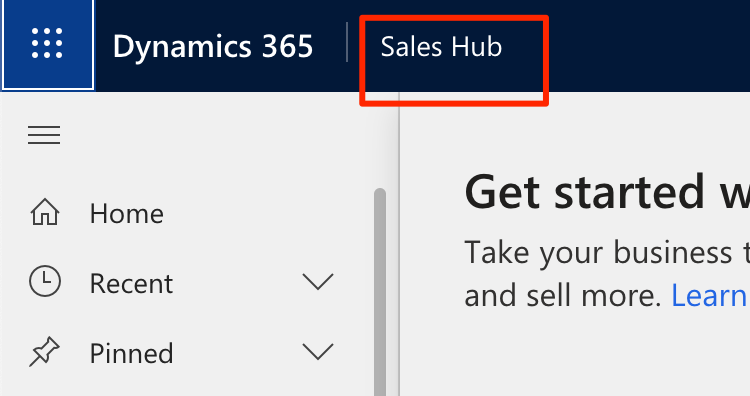
  1. Make sure you are in the Sales Hub app.

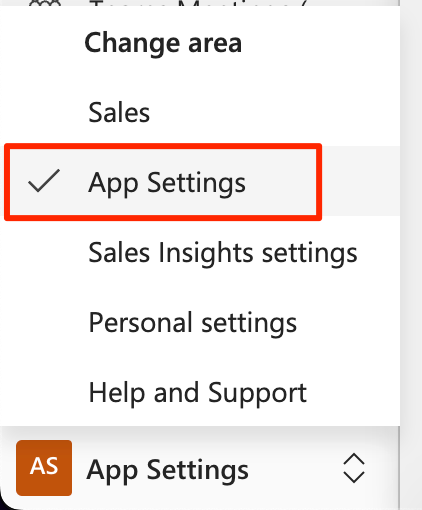
  2. And then go to the App Settings

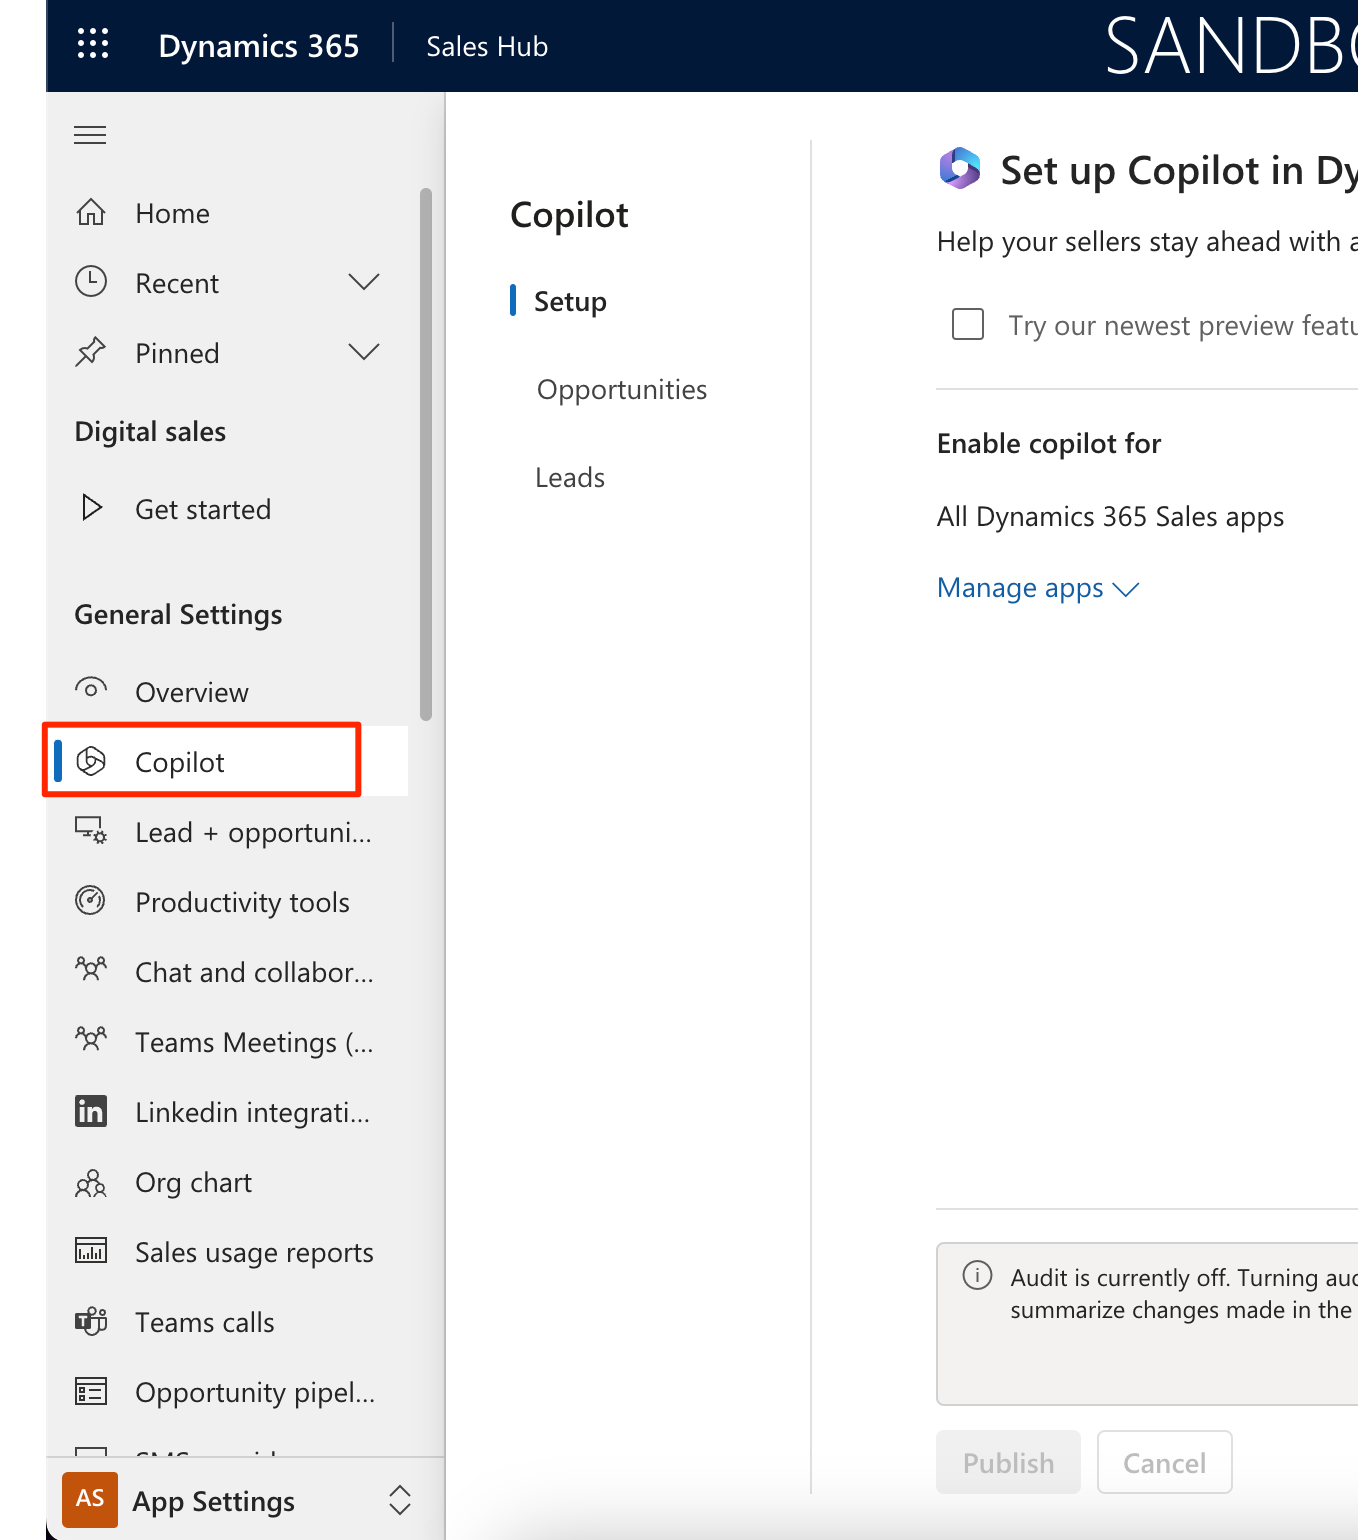
  3. Here, you’ll see the Copilot as an option on the Sitemap, select that.

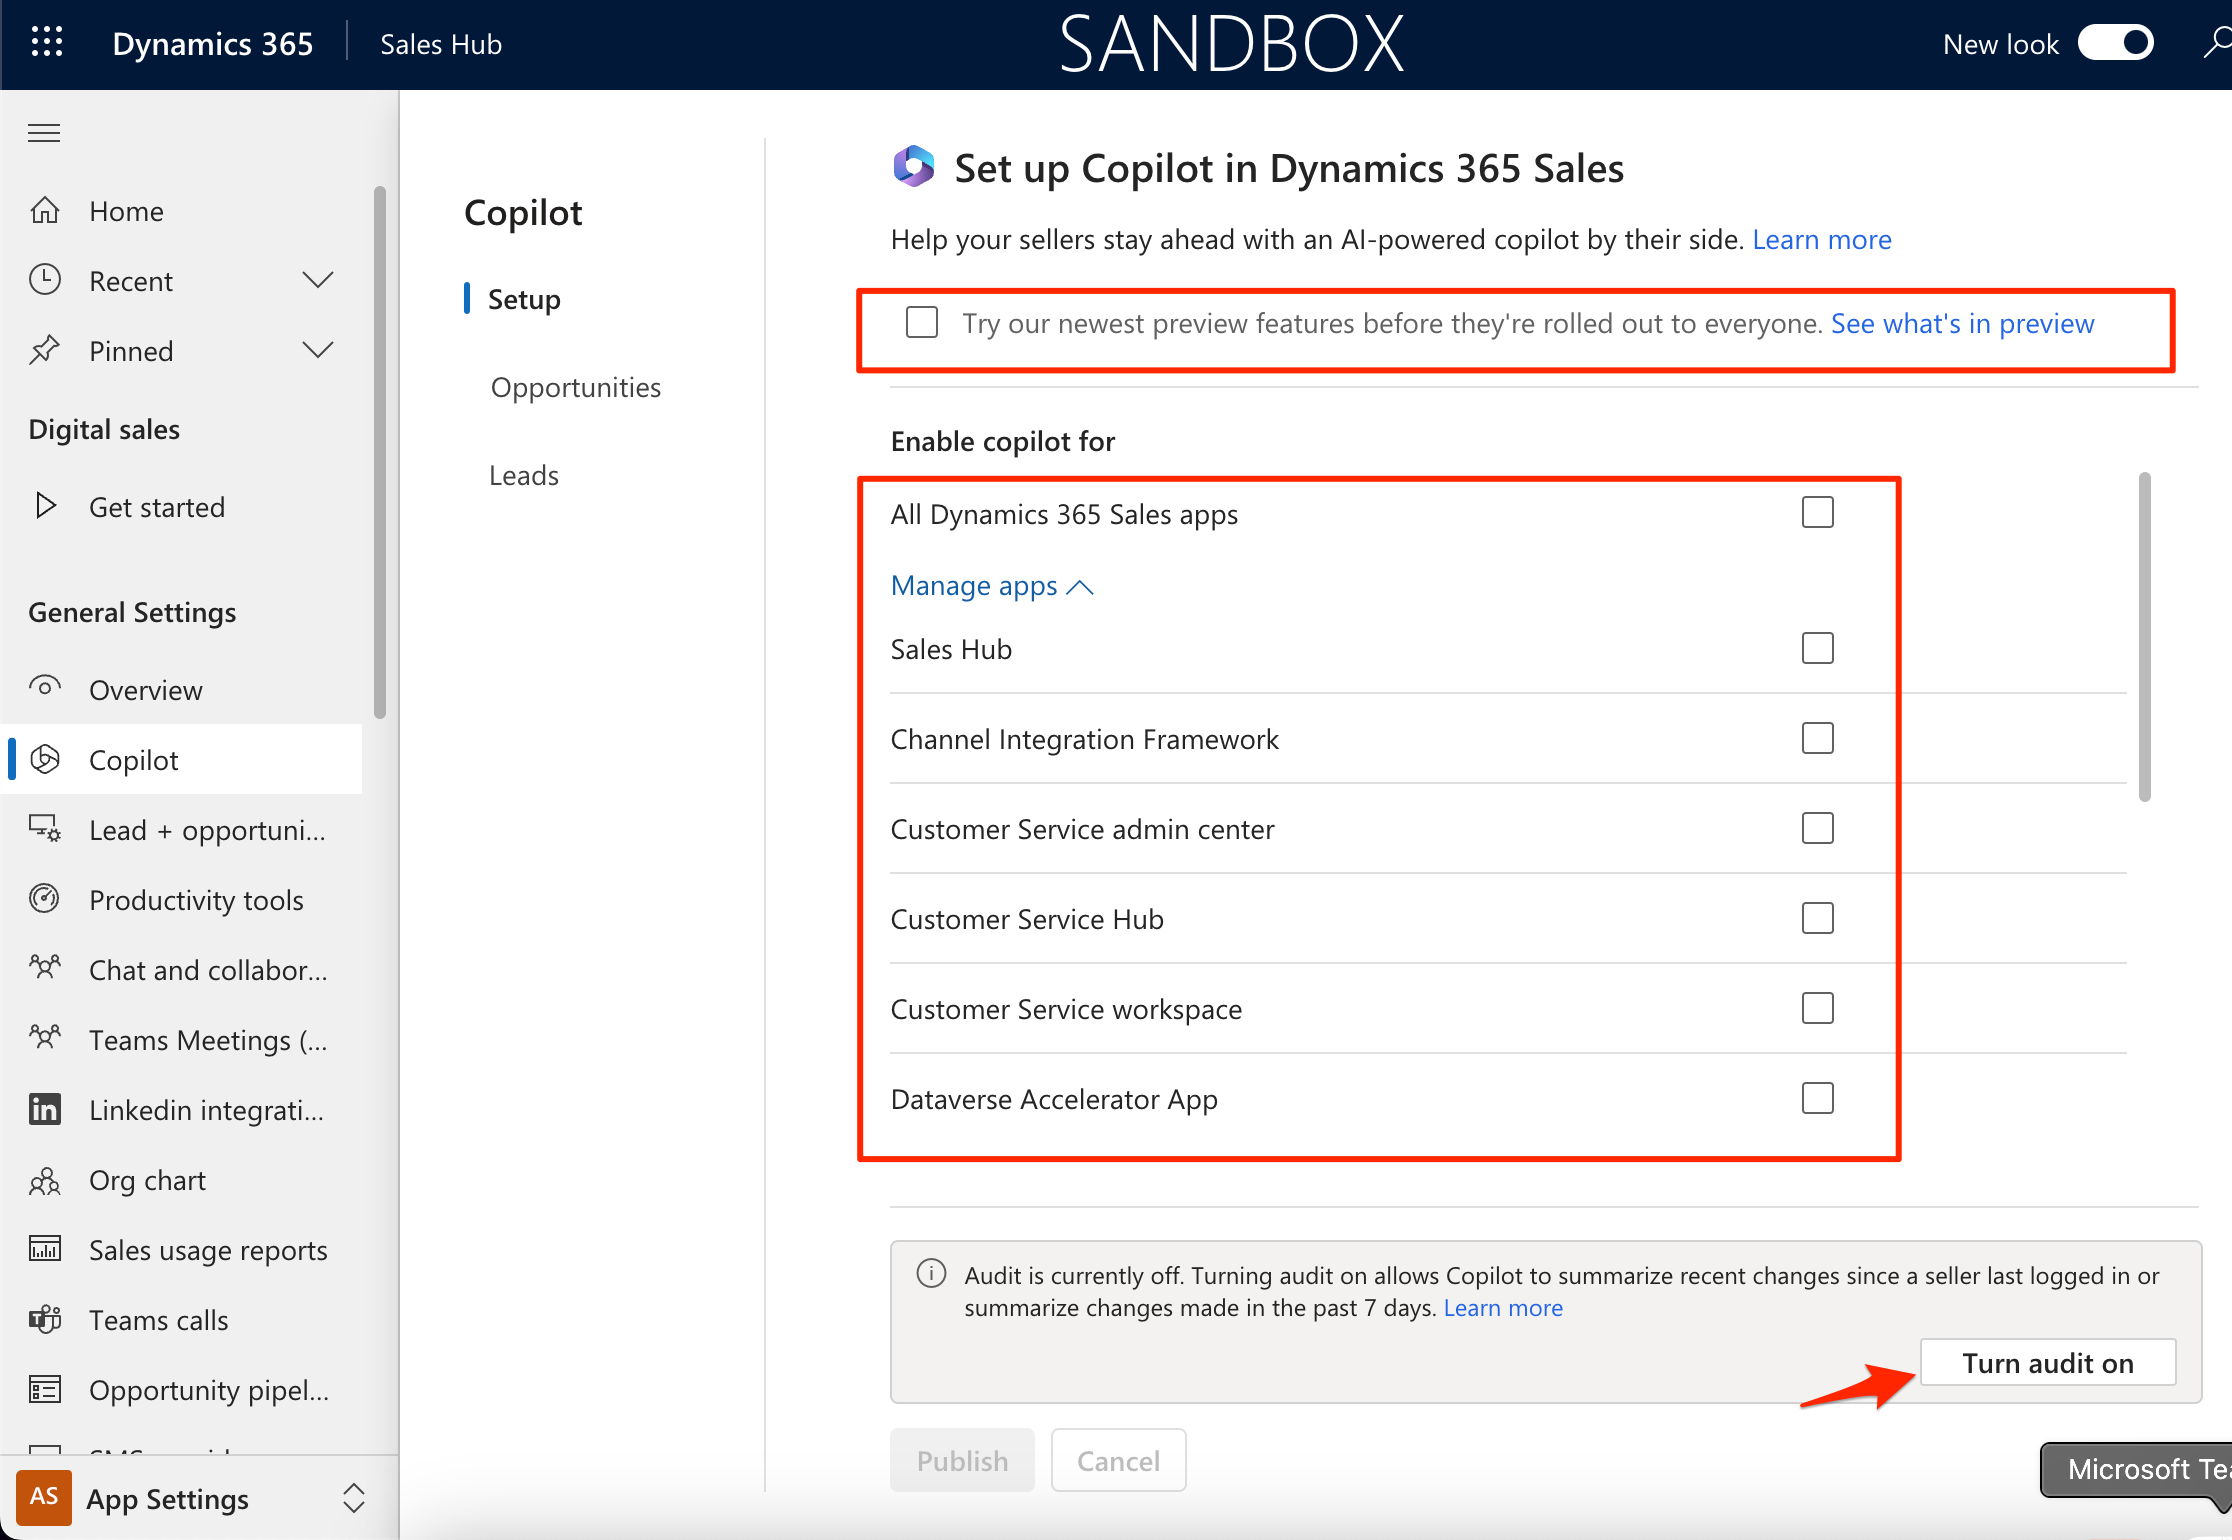
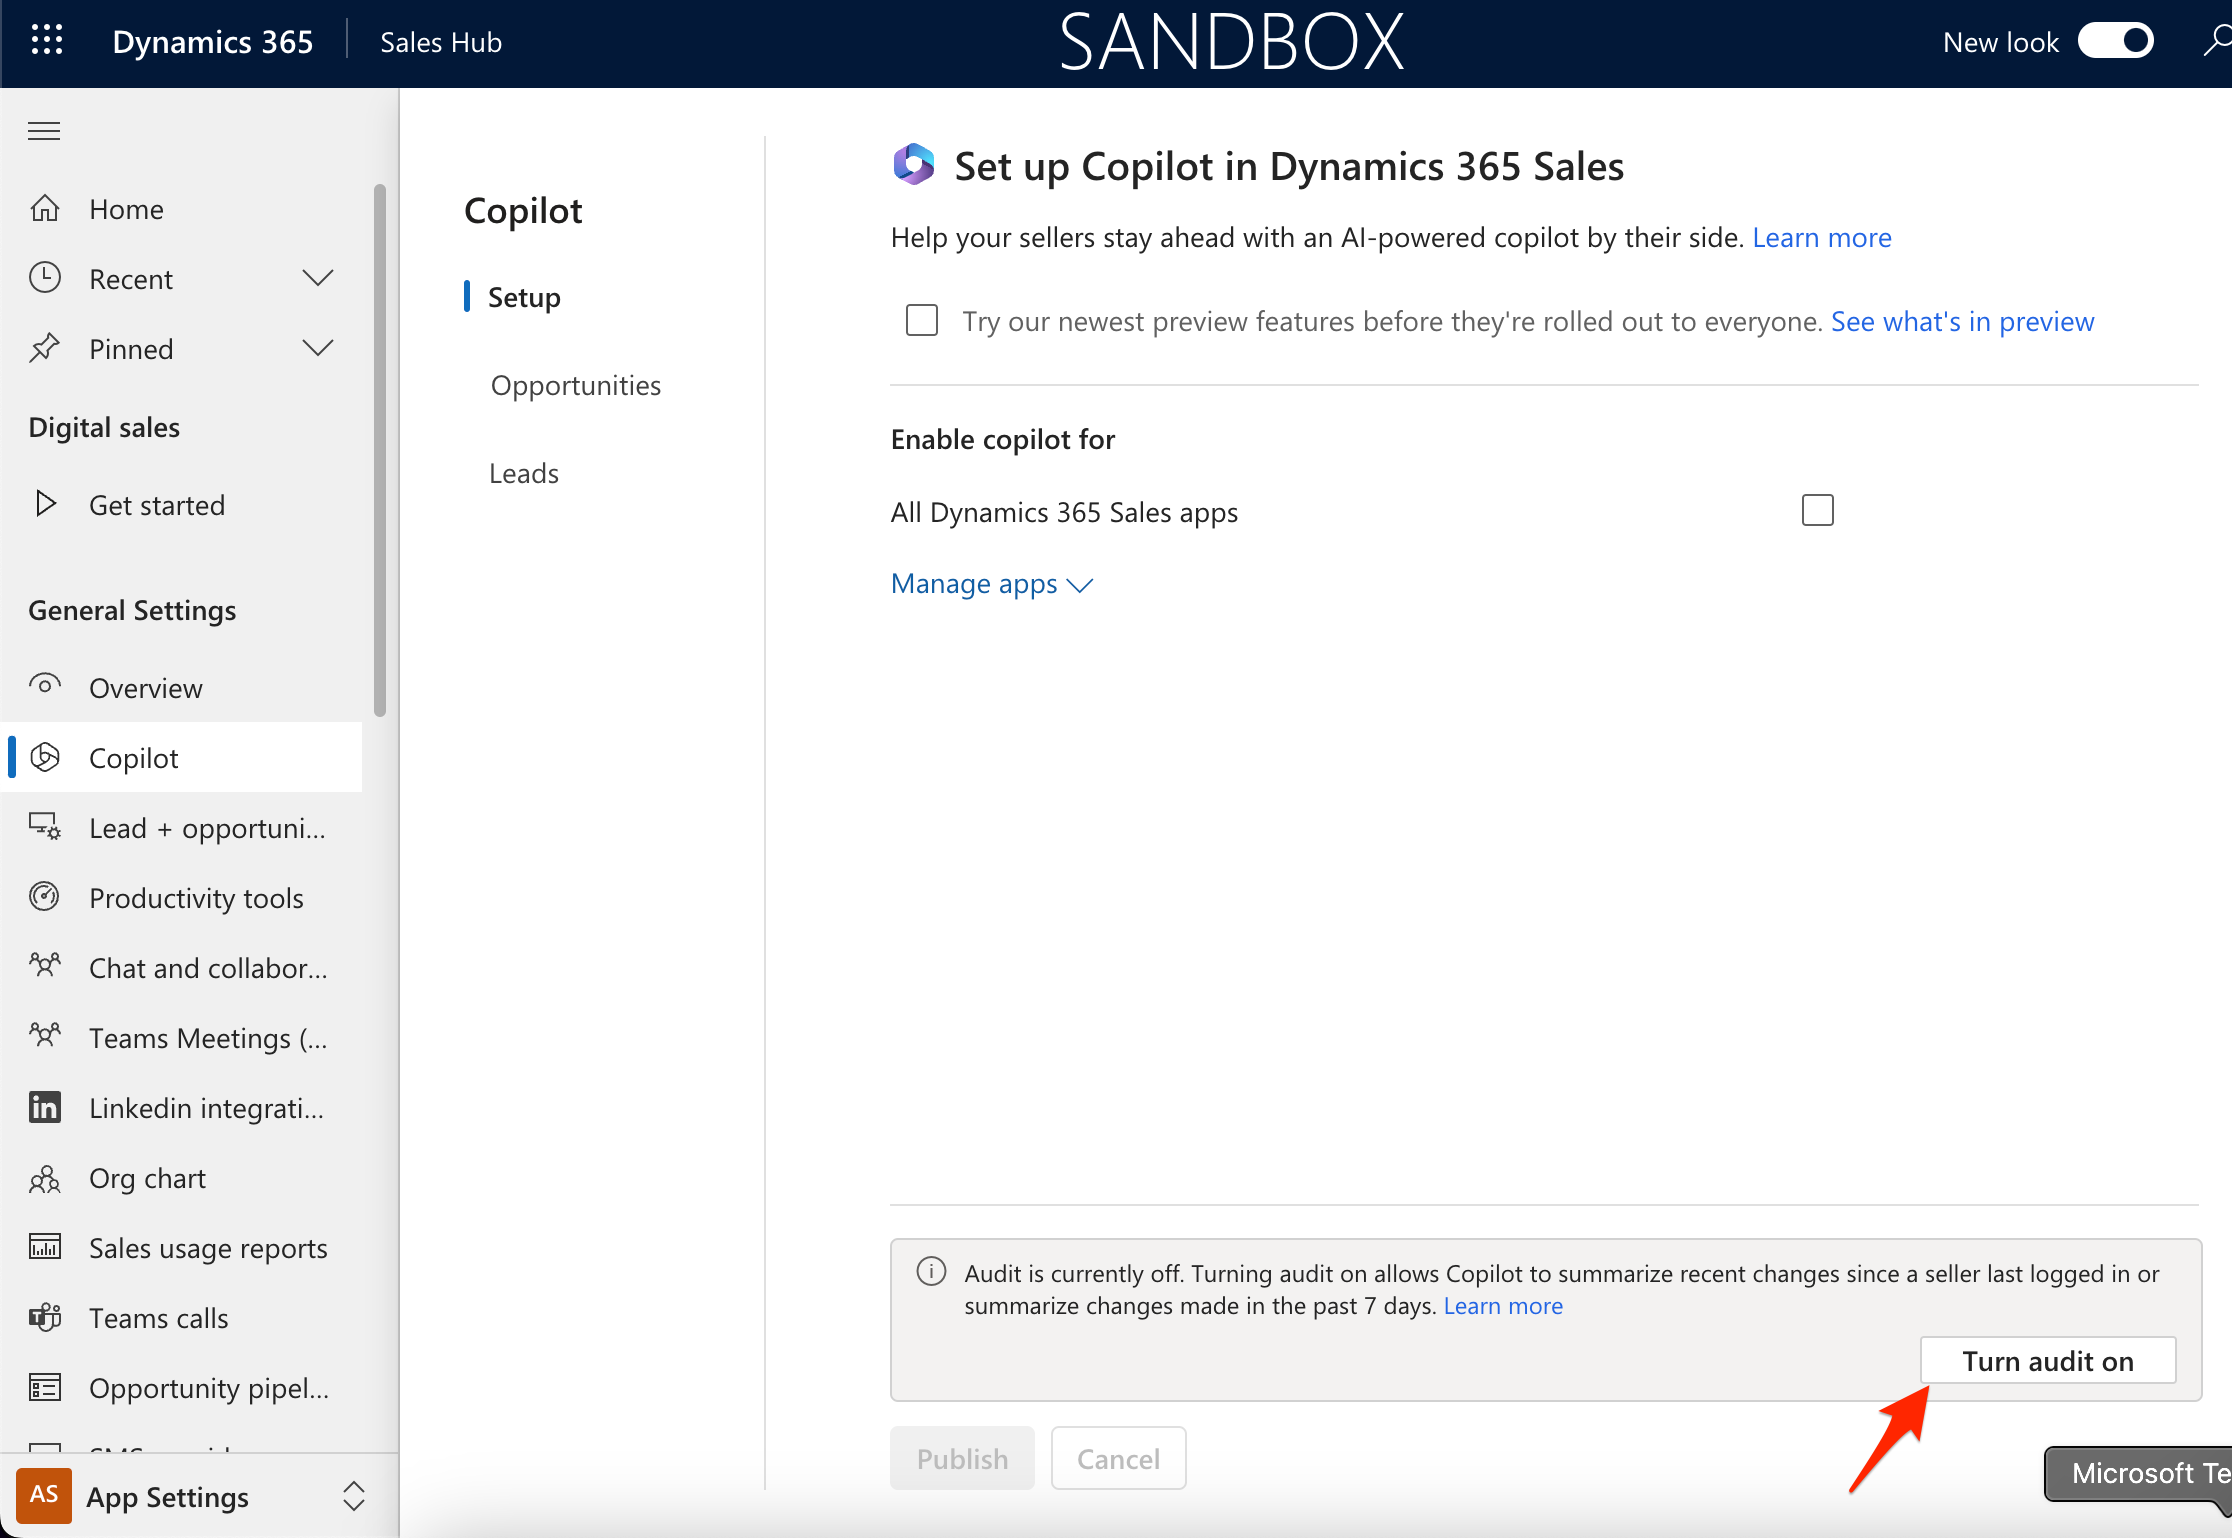
  4. Note that all the Settings are turned off by default.

  5. First thing you can do is, turn Auditing On. It’ll take a while to Save the changes in the background.

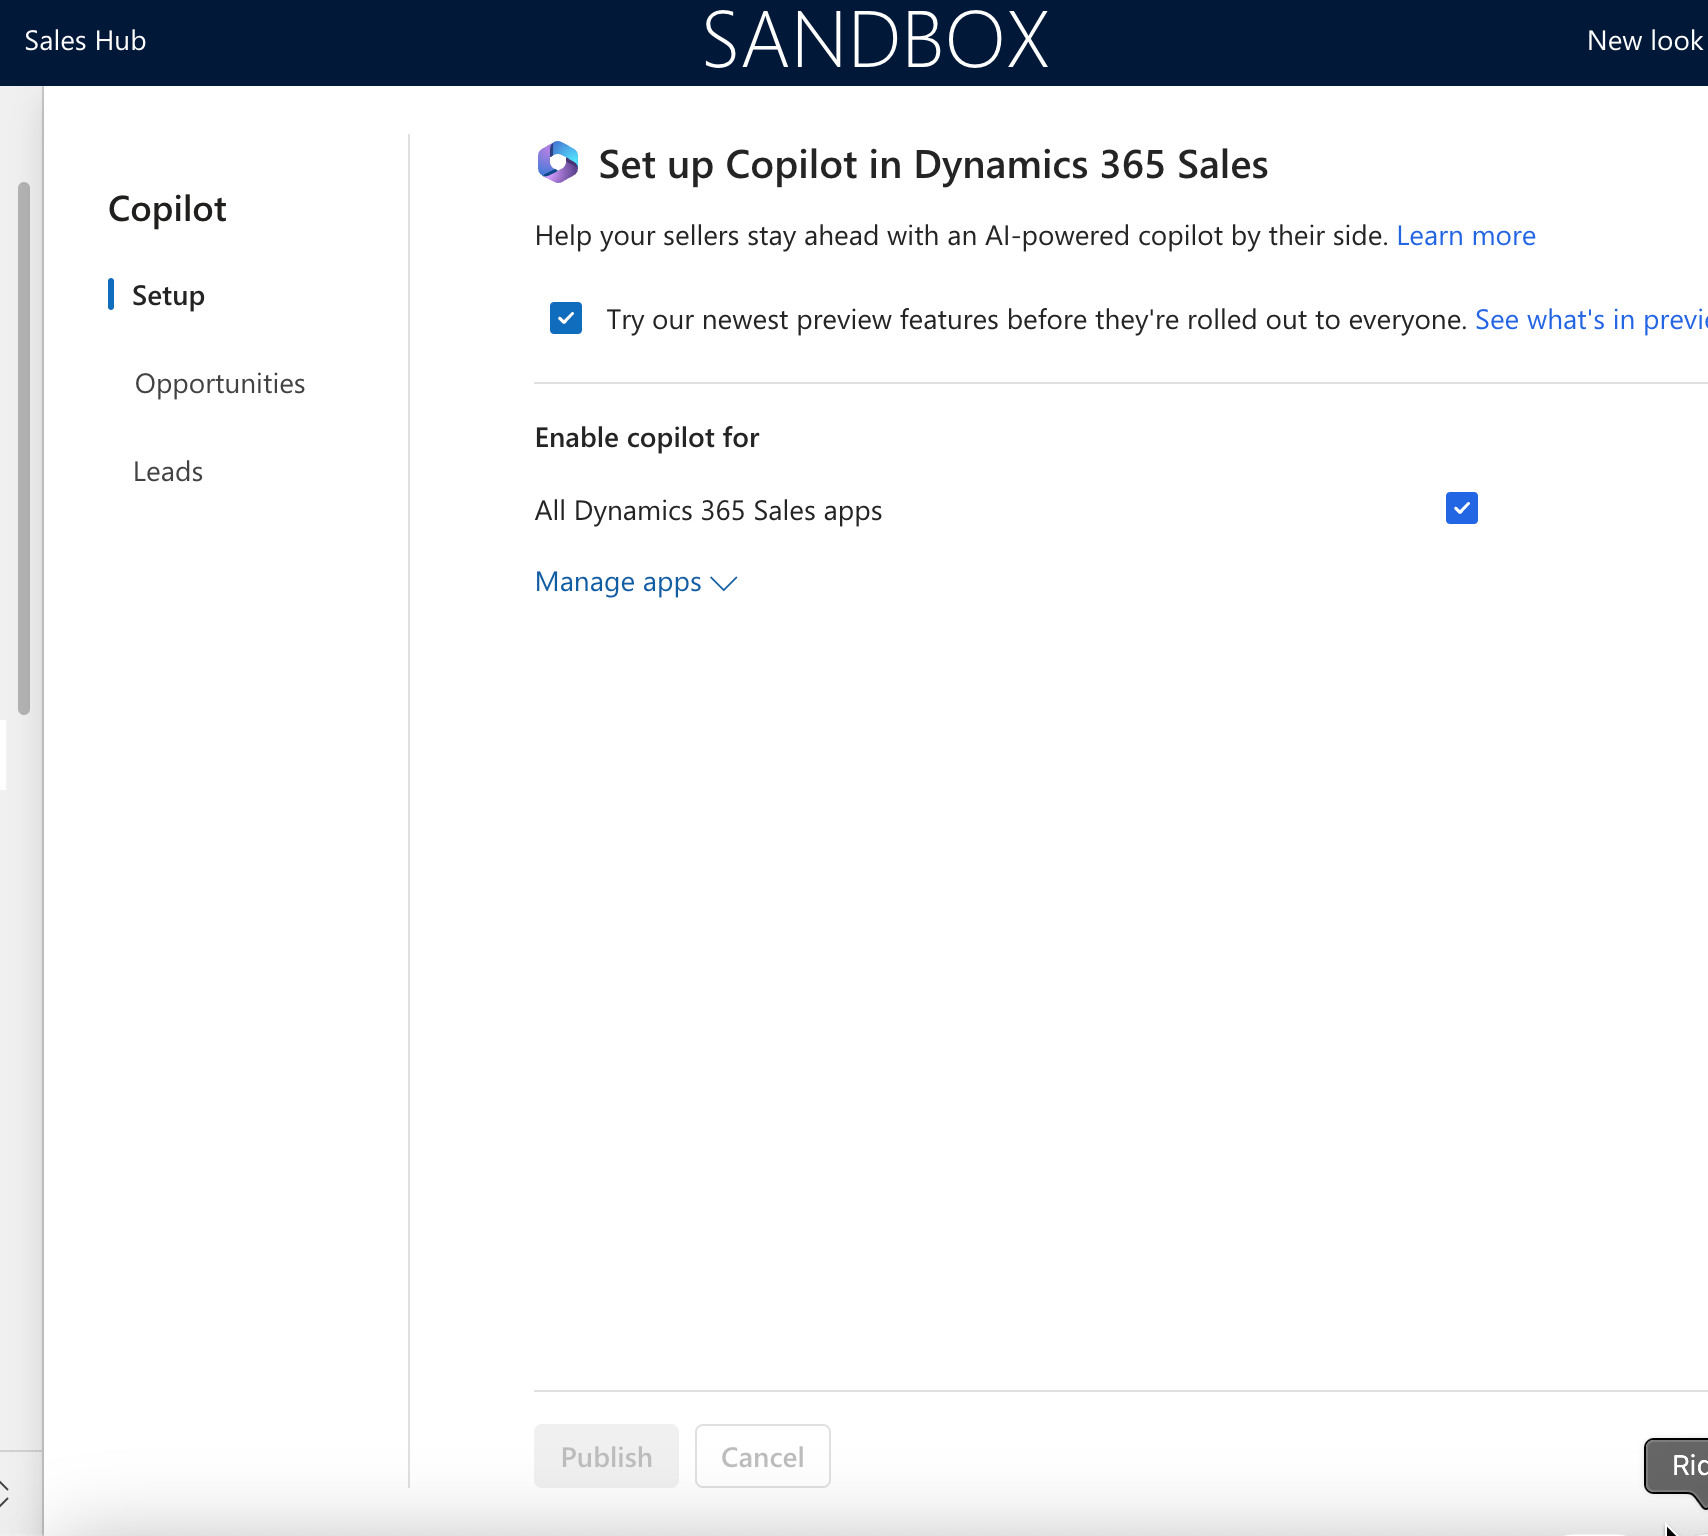
  6. Then, you can turn on other features which are in Preview On and enable the Copilot App based on your Published apps in your environment.

  7. Here are the Preview features which are listed under the See what’s in preview link in the above screenshot – https://learn.microsoft.com/en-gb/dynamics365/sales/view-copy-email-summary
  8. Once the changes are saved, it’ll look like this in the Published state. the selections will remain the Publish button will be disabled.

  9. At this stage, the Copilot has been enabled for the selected Apps in your environment.
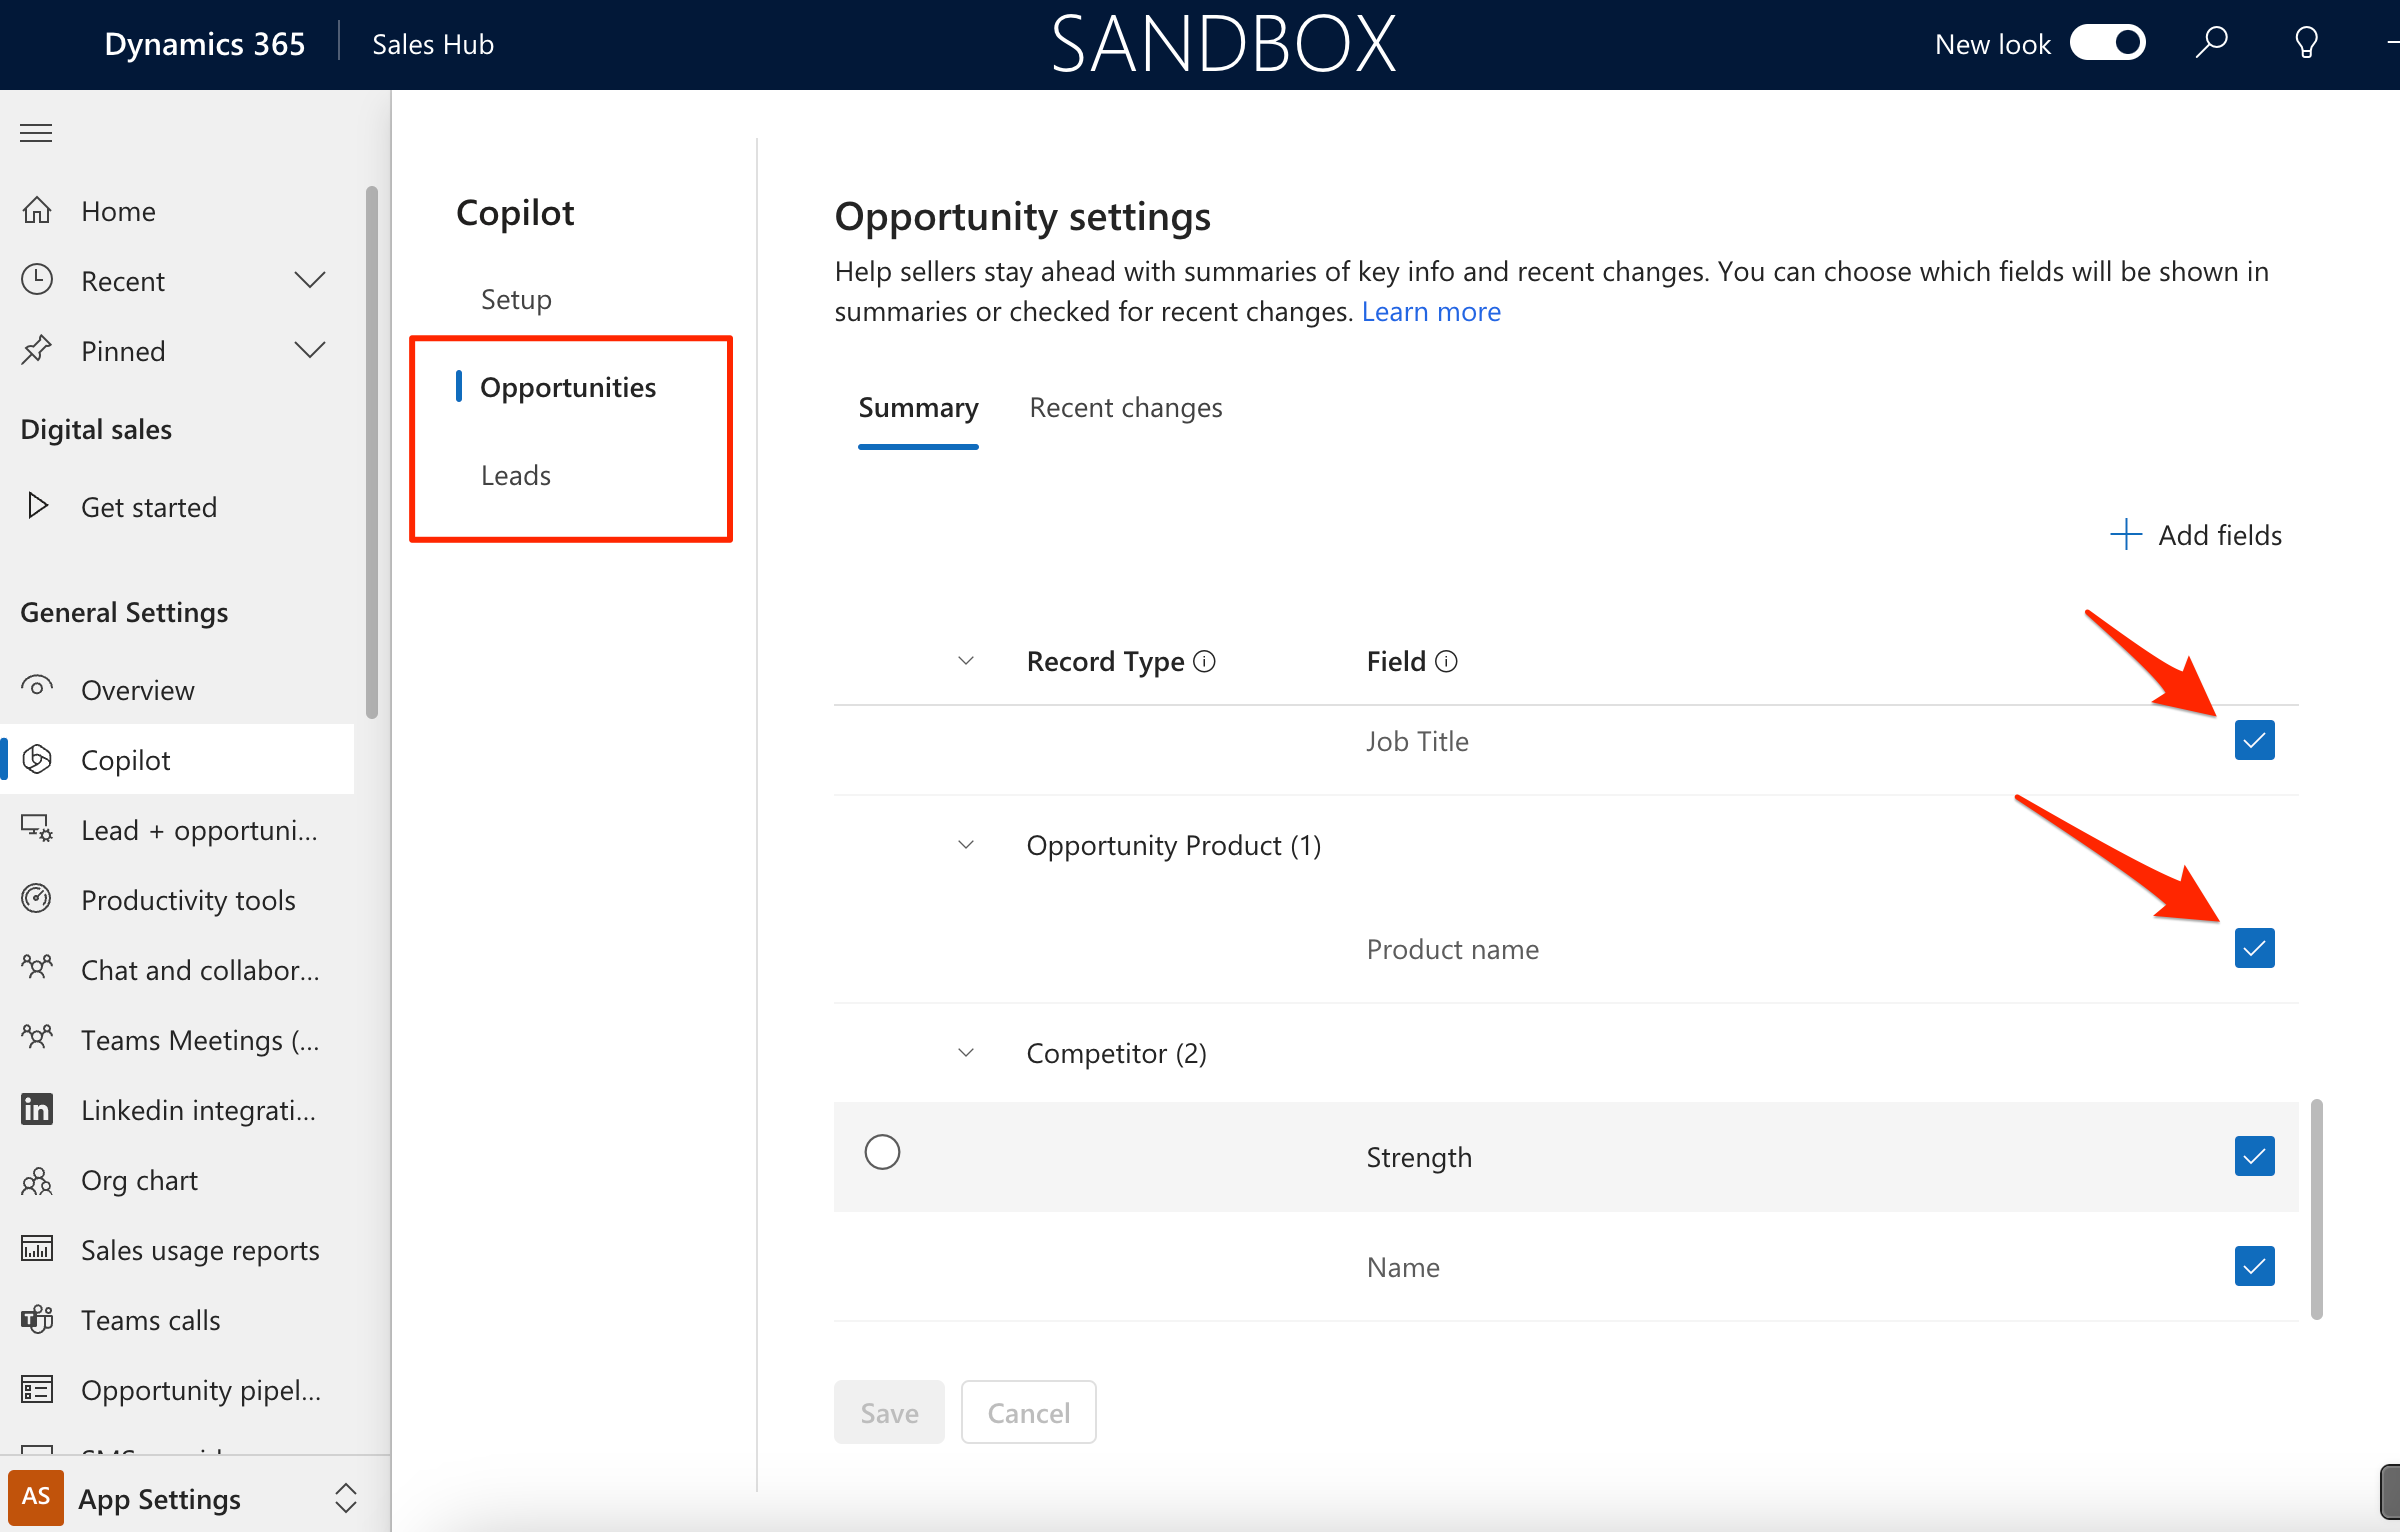
    Now, you can move to other options like Opportunities and Leads tabs on the settings page.
    The Summary section in the entities will show which fields should be included in Summary information that Copilot will generate.
    The Recent Changes in the entities will show which fields should be included to keep track of the changes which happen on these fields.


At this point, you are all set in configuring Copilot in your Dynamics 365 Sales environment. Next, I’ll write about how we can use the features which we enabled in this post and I’ll share link of the upcoming post here.

Hope this helps!

Thank you!

Hierarchy Settings in Dynamics 365 CE | Power Platform Admin Center

You must have seen Security Roles, Field Level Security, Access Teams etc. as a way to access records in Dynamics 365 CE (or CRM). Here’s what Hierarchy Security is all about –

There are 2 types of Hierarchy Settings in Dynamics 365 CE and what they mean in a short explanation –

  1. Manager Hierarchy – Access control of records based on the Manager settings for a System User.
  2. Position Hierarchy – Access control of records based on the Position of the System Users based on how they are placed in the Organization.

Configure Hierarchy Settings in Power Platform Admin Center

Given that you have Dynamics 365 Admin privileges, you can configure the Hierarchy Settings as below –

  1. Go to the Environment’s Settings in Power Platform Admin Center

  2. Now, you can expand and click on Hierarchy Settings

  3. By default, these will be Disabled by default. Then, you can turn on the one which you want and configure the same.

  4. In order to Configure the Manager Hierarchy Model, you can refer this post below –
    Manager Hierarchy Settings in Dynamics 365 CE
  5. In order to Configure the Position Hierarchy Model, you can refer this post below –
    Position Hierarchy Settings in Dynamics 365 CE

Hope this was useful!

Thank you!

Position Hierarchy Settings in Dynamics 365 CE

In this post, you’ll learn how to configure Position Hierarchy for Dynamics 365 CE environment –


Let’s first look at the scenario which we want to look at and then how we can configure the Hierarchy to limit and show the Positions of the Users the intended data.

Scenario

Let’s consider the below scenario on who report to whom in the org CFT300 based on the below Positions in the Org –

In the above example,

  1. Salesperson should see then own records.
  2. VP of Sales should say their own records and of Salesperson roles too.
  3. Executive Director should see their own records and only those of VP of Sales, but not Salesperson roles.


Position Hierarchy

Given that you already know how to navigate to Hierarchy Settings in Power Platform Admin Center, refer the below to understand how to configure the same based on the above scenario –

  1. Once you are in the Hierarchy Settings in the Environment’s Settings area in Power Platform Admin Center –


  2. Now, you can select Enable Position hierarchy Model and click on Save to apply the Position Hierarchy Model access to your environment. Once Saved, you’ll see as below.

  3. The Depth defines how many levels of Positions should a User be able to access records of other user in other positions in a top-down approach.

  4. Let’s click on Configure in order to start setting up the Positions in the Org.

  5. Now, based on the diagram above, I’ll create the Position hierarchy on this page

  6. Now, based on the same, I’ve created the below Positions in a hierarchy


    And the tree looks like this –

  7. Now, next is to assign these Positions to different Users in Power Platform Admin Center. If you go to Users and select any of the Users, you’ll see Change Position button on the ribbon.

  8. Then, you can find the Position you created which you want to give to the Users. Select it and Save it on the Pane.

  9. Complete the process for all the Users who need to be having one of the Positions you created.


    So based on this, Jack Green will be the Executive Director and will be able to access Amit Prajapati’s records and not Vidit Gholam’s or Ethan Rebello’s records.

    Also, the selected Tables are the ones to which the Position Hierarchy should apply.


    Now, based on the above setup and the Scenario provided, let’s look at how the records will be visible to the Users in the hierarchy.

Dynamics CRM Records access based on the Position Hierarchy Security –

  1. Let’s start reviewing from the bottom of the hierarchy. Vidit and Ethan, both will see their own record in the Active Accounts view and no one else’s based on the Hierarchy Settings.
    Also, note that the Read privilege for all the Users in their Security Roles is set to “Users” and not “Organization“.

    Ethan Rebello


    Vidit Gholam

  2. We move 1 level up to Amit Prajapati – he’ll see his own record and also Vidit’s and Ethan’s records in Active Accounts view.

  3. And Jack Green can access his own record and as he’s the Executive Director and can see VP of Sales position records, he’ll see only Amit’s records for Accounts and not Ethan’s and Vidit’s.


    This will change if we increase the Depth to 2, 3 and onward based on the hierarchy structure.

Hope this was useful!

Thank you!

Manager Hierarchy Settings in Dynamics 365 CE

In this post, you’ll learn how to configure Manager Hierarchy for Dynamics 365 CE environment –


Let’s first look at the scenario which we want to look at and then how we can configure the Hierarchy to limit and show the Managers the intended data.

Scenario

Let’s consider the below scenario on who reports to whom in the Org CFT300 used in this example –

In the above example,

  1. Manager of Vidit Gholam and Ethan Rebello is set as Amit Prajapati.
  2. Manager of Amit Prajapati is Jack Green.

And this structure looks as below in Dynamics 365 CRM environment –

Note: Please note that in order to set Hierarchy Settings correctly, the Read privileges on the intended entity must be set to “User” level. If it is set to “Organization”, the the User will anyway be able to access everyone’s records despite Hierarchy Security Settings in place.

Manager Hierarchy

Given that you already know how to navigate to Hierarchy settings in Power Platform Admin Center, refer the below to understand how to configure the same based on the above scenario –

  1. Once you are in the Hierarchy Settings in the Environment’s Settings area in Power Platform Admin Center –

  2. Now, you can select Enable Manager hierarchy Model and click on Save to apply the Hierarchy Model access to your environment.

  3. The Depth defines how many levels should a Manager be able to access records of the Users in the top-down approach.
  4. You’ll also need to set the Users’ Manager in Power Platform Admin Center. If you go to the Users and select any 1 of them, you’ll see Change Manager button on the ribbon.

  5. And, search the User who should be the Manager of the User which you are editing.


    So based on this, Jack Green will only be able to access Amit Prajapati’s records and not Vidit Gholam’s or Ethan Rebello’s records.

    Also, the selected Tables are the one to which the Hierarchy Security should apply.


    Now, based on the above setup and the Scenario provided, let’s look at how the records will be visible to the users in the hierarchy.


Dynamics CRM Records access based on Manager Hierarchy Security –

  1. Let’s start reviewing from the bottom of the hierarchy. Vidit and Ethan, both will see their own record in the Active Accounts view and no one else’s based on the Hierarchy Settings.
    Also, note that the Read privilege for all the Users in their Security Roles is set to “User” and not Organization” level.

    Ethan Rebello


    Vidit Gholam –

  2. We move 1 level up to Amit Prajapati – he’ll see his own record and also Vidit’s and Ethan’s records in Active Accounts view.


  3. And Jack Green can access his own record and as he’s the Manager of Amit Prajapati, he’ll only see Amit’s records for Account and not Ethan’s and Vidit’s.


    This will change is we increase the depth to 2, 3 and onward based on the hierarchy structure.

Hope this was useful!

Thank you!

Time and Materials Billing Backlog table in Project Operations

Even wondered what is Time and Materials Billing Backlog table in Project Operations which you see in the Sitemap but you might not be sure what records are in it –

Time and Materials Billing Backlog

Here’s the purpose of Time and Materials Billing Backlog entity –

  1. Given that you have 2 Time Entries Submitted for Approval to the Project Management / Account Manager.

  2. When the Time Entries are Submitted, the Approver receives them for Approval. The Project Approver can then Approve the Time Entries.

  3. Once they Approve the Time Entries, they are turned into Actuals (msdyn_actual) in Project Operations.
    Then, Actuals are then Supposed to be marked as Ready to Invoice.

  4. So, when the Actuals are the created and even when they are marked Ready to Invoice, that’s when they appear in Time and Materials Billing Backlog view.
    This table is in fact Actuals table itself! 😊 (There’s no Time and Entry Billing Backlog as a separate Table in Dataverse).

  5. In fact, Accounting managers or Project Managers can Ready the Actuals from the Time and Materials Billing Backlog table itself.

  6. Now, then the Invoice is created for the ready Actuals, they are added to Invoice Lines

  7. And then, they are removed from the Time and Materials Billing Backlog view.

Hope this was useful!

Thank you!

Create Project Plan using Copilot in Project Operations

Now that you must have enabled Copilot for Project Operations [If not, you can refer this post to learn how you can enable Copilot for Project Operations – Enable Copilot for Project Operations]

Note: Please note that this is a Preview feature at the time of writing this post and hence, not recommended for Production usage.

Enable Copilot For Project Operations

First, you need to ensure that Copilot is enabled for your Project Operations environment – Enable Copilot for Project Operations

Once this is enabled, you’ll be able to see Copilot on the ribbon button on the Project. Let’s look at the same in the below section.

Task Plan

Now that you have Copilot enabled for Project Operations, you can now create Task Plans for a Project in Project Operations –

  1. Before you proceed to trying to create a Task Plan, the Copilot in Project Operations will look for data on the Project record such as the Description of the Project, Start Dates, End Dates etc as reference point in order to understand what type of Tasks are to be created.


    The sample Description I put for this Project is – “This project will be a 3-month implementation for Microsoft Dynamics 365 Project Operations with integration to F&O system. This project will involve developers to design, architect, develop code, test and deploy the same.

  2. Once Project details are in place and the Project doesn’t have a Project Plan yet. It should look something like this and having Copilot button on the ribbon visible.

  3. If you expand the menu, you’ll see that it has an option called as Task Plan. Click on it and it’ll begin processing operations and show loading screen while it processes in the background.


    And the loading screen will keep showing messages like Computing, Collecting, analysing etc.

  4. In a few moments, it’ll process successfully and you’ll see Tasks being generated in the Tasks pane on the Project. Note that it’ll only segment into tasks and sub-tasks based on the Description and Start/End Dates – it won’t assign anyone or estimate any hours.

Here’s Microsoft Documentation on how the Task Plan feature works. Please note that this in Preview at the time of writing this post – https://learn.microsoft.com/en-us/dynamics365/release-plan/2023wave1/finance-operations/dynamics365-project-operations/generate-project-plans-using-project-manager-copilot?WT.mc_id=DX-MVP-5003911

Hope this post was useful!

Thank you!