Parsing Outputs of a List Rows action using Parse JSON in a Flow | Common Data Service (CE) connector

For newbies using Common Data Service (Current Environment) Connector, it might be a little puzzling to find all the records and other supporting output data while parsing from a List Rows action in the connector.

Here’s my post summarizing the same and helping you show what is in the output when and then you can make a decision!

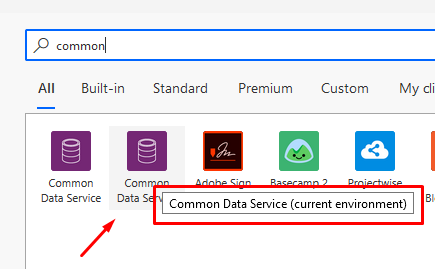
Before we begin, please note the connector Icon at the time of writing this post – The tooltip if hover on will read as “Common Data Service (Current Environment)

List Rows

So, here’s what my List Rows action looks like

  1. I’m retrieving 10 Accounts in this example

  2. Now, I’m adding 4 Parse JSON variables to hold the different Outputs from the Dynamic Content of the List Rows.
  3. I’ll rename the first Parse JSON as Value and add Value from the Dynamic Content from List Rows output


  4. Second, I’ll rename the Parse JSON to Body and add Body from the Dynamic Content to it.

  5. Third, Parse JSON is renamed to Item and I’ll select the body/value – Item first.


    And as soon as I do that, the Block gets converted to For Each, because Item is list of all the records directly

  6. Finally, in my fourth Parse JSON block, I’ve renamed it to Outputs of List Rows and added the outputs of the List Rows step itself using outputs() function – More on outputs() here – Using outputs() function and JSON Parse to read data from missing dynamic value in a Flow | Power Automate


    Now, let’s Run the Flow and see what results we get!!

Value / Body / Item

Now, let’s look at the output JSON data from each of these blocks and see what we get –

  1. Value. I used JSON Beautifier to parse and look at the JSON data and here’s what it looks like.
    Body attribute and has array of all the records.


  2. Next, Body. Body has similar data as values but with some additional attributes to support the same.
    Then, the array of all the records under Value attribute instead of directly appearing under Body in the Value block above. I know it’s a little puzzling — 😊


  3. The, Item. It’s a simple JSON of a single record itself. Hence, it exists inside a For Each loop


  4. And finally, the outputs() of the List Rows action entirely, it has Body, Header and other


    But, note that the Body is also another attribute inside the main Body tag and sits next to Headers and StatusCode

I’ve also embedded my YouTube video explaining the same –

Here are some Power Automate / Flow posts which you might find worth checking out –

  1. Invalid type. Expected Integer but got Number error in Parse JSON – Error at runtime after generating Schema | Power Automate
  2. Asynchronous HTTP Response from a Flow | Power Automate
  3. FormatDateTime function in a Flow | Power Automate
  4. Validate JSON Schema for HTTP Request trigger in a Flow and send Response | Power Automate
  5. Office 365 Outlook connector in Cloud Flows showing Invalid Connection error | Power Automate
  6. FormatDateTime function in a Flow | Power AutomateUsing outputs() function and JSON Parse to read data from missing dynamic value in a Flow | Power Automate
  7. Formatting Approvals’ Details in Cloud Flows | Power Automate
  8. Trigger Conditions not working in a Cloud Flow? Here’s Why | Power Automate Quick Tip
  9. InvalidWorkflowTriggerName or InvalidWorkflowRunActionName error in saving Cloud Flows | Power Automate Quick Tip
  10. Using triggerBody() / triggerOutput() to read CDS trigger metadata attributes in a Flow | Power Automate

Thank you!!
Make On-Demand Flow to show up in Dynamics 365 | Power Automate

Here’s a Flow trigger that you can make to appear on-demand in Dynamics 365 views. What makes a Flow appear on a certain entity?

Like this –

Common Data Service connector (Not Current Environment version)

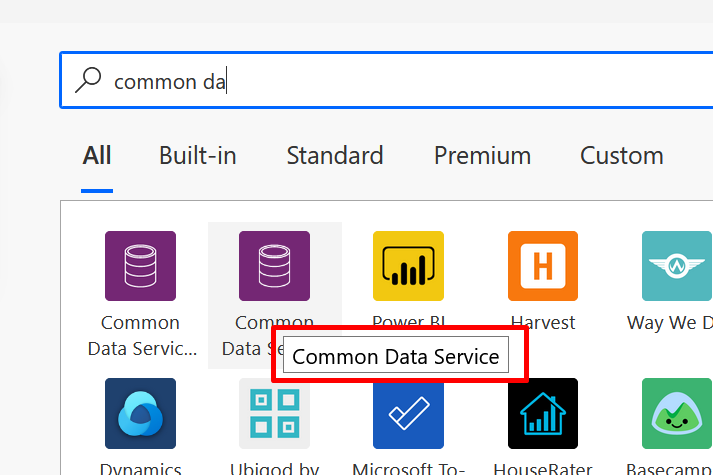
If you’re familiar by now with Common Data Service Connectors, there are 2 of them. 1. Common Data Service, 2. Common Data Service (Current Environment).

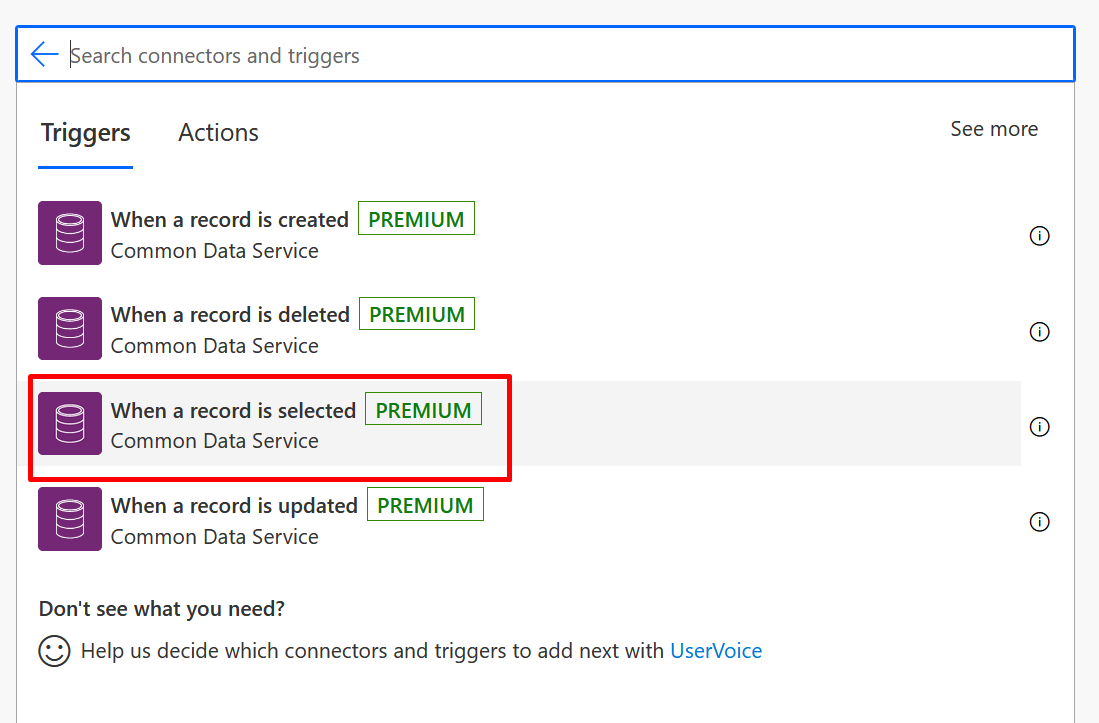
  1. Here, you’ll have to use the 1st one i.e. Common Data Service connector. If you type Common Data Service in triggers, both will appear but you have to hover on these and make sure you don’t select the one with Current Environment written on it.

  2. Once you select this, you can select this trigger in order to make it on demand in Dynamics 365.

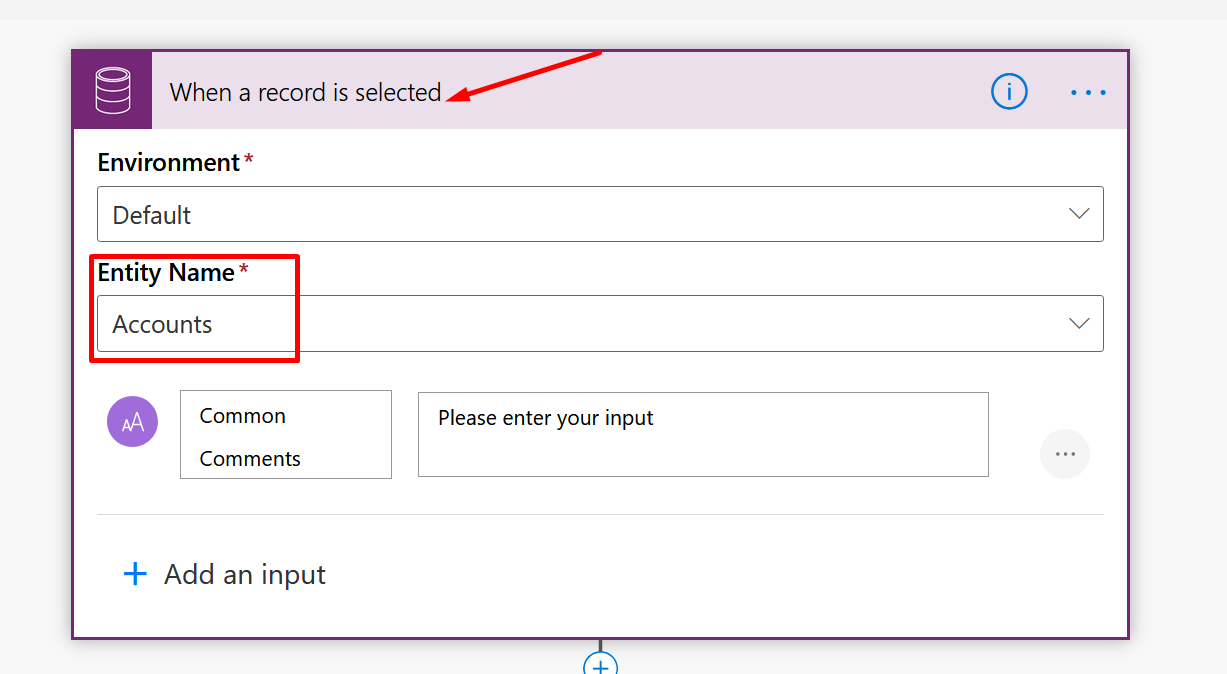
  3. Now, it appears like any other Flow trigger. Optionally, you can add some inputs in case you want to.
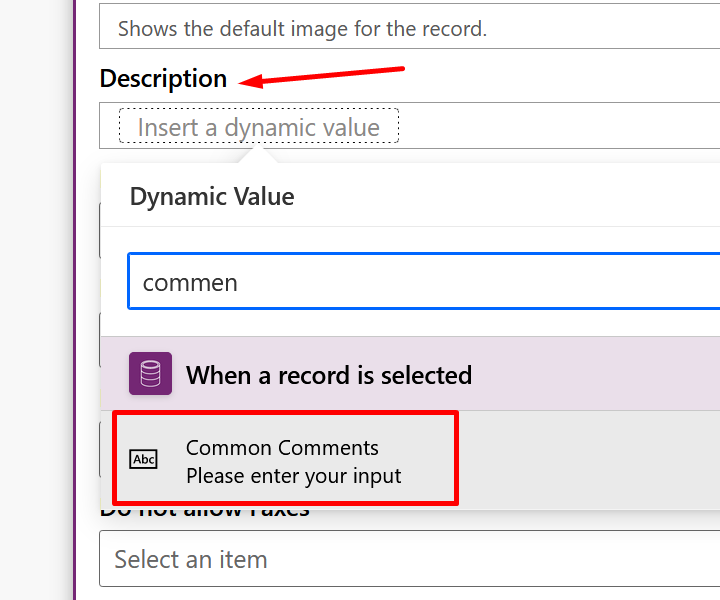
    In my example, I’m taking in a field value called as “Common Comments” and will just update the Description field of the selected Accounts for simplicity of this example.

    Because I want it on Accounts entity views, I’ll select entity Account.


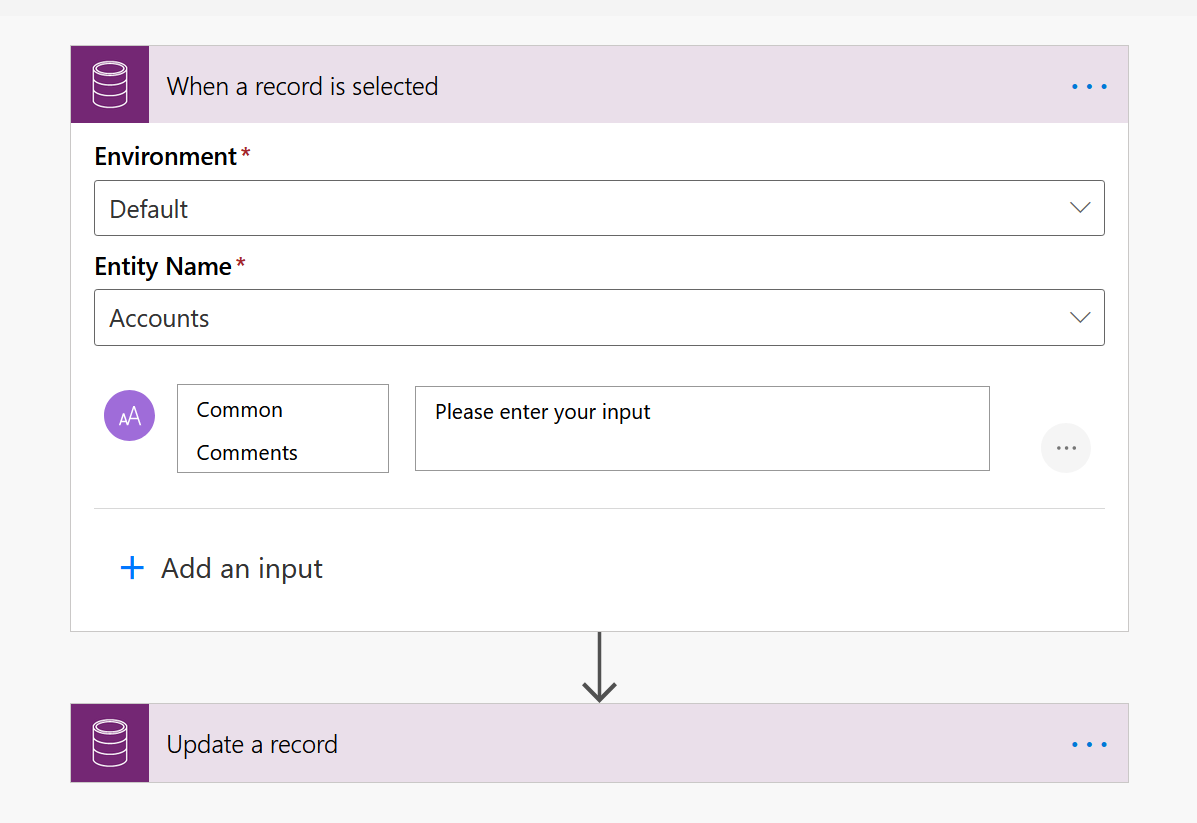
  4. Now, my Flow looks like this. That’s it.


  5. To keep things simple, I’ll just update the record with whatever I put in the Common Comments Input variable in my Flow trigger.

    Now let’s see it work.

On-Demand Flow

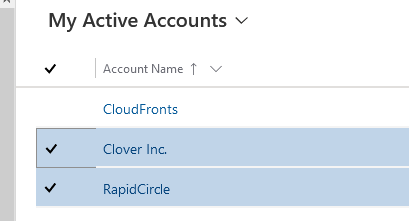
Now, in Dynamics 365, I’ll navigate to Accounts entity and select a few records.

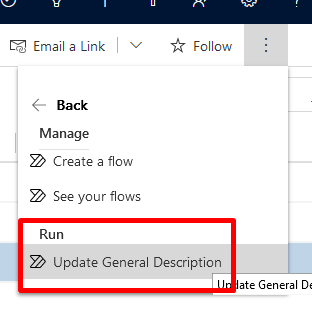
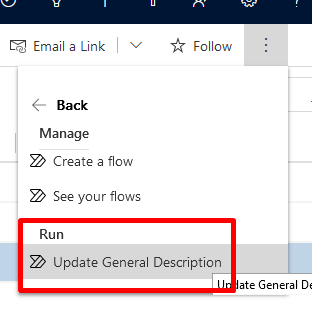
  1. Once I select a few records and check the Flows dropdown from the ribbon menu –


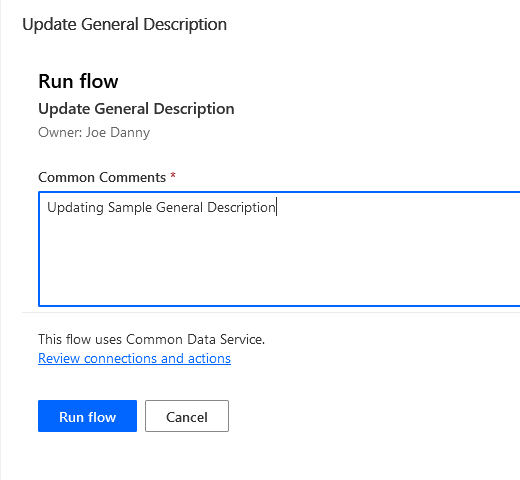
  2. If I run this flow, I’ll get option to put my Input parameters as I have declared above.

  3. Since I had selected 2 records, there’ll be two separate instances (Flow Runs) triggered for this Flow

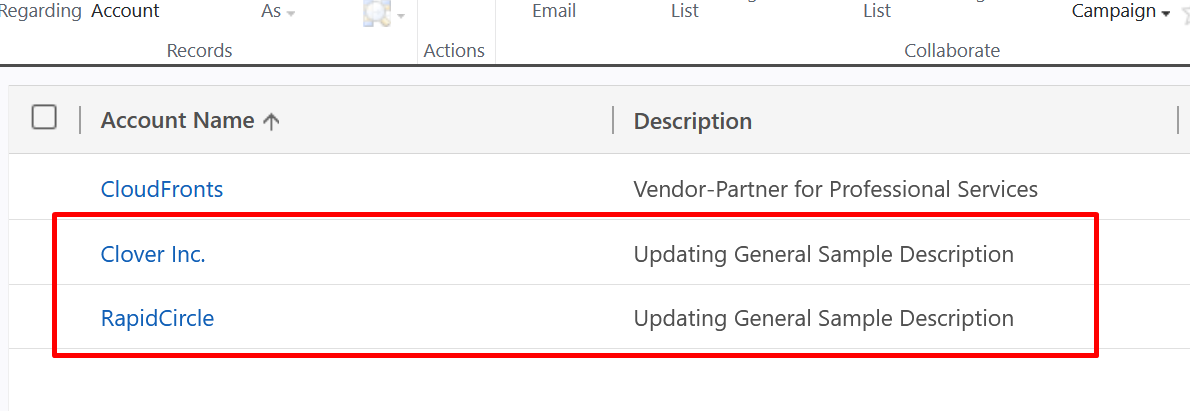
  4. And I can see the values updated in the records. (Checking using Advanced Find)

    That’s it!!

Hope this was useful.

Here are some more Power Automate / Flow posts you might want to look at-

  1. Run As context in CDS (Current Environment) Flow Trigger | Power Automate
  2. Secure Input/Output in Power Automate Run History
  3. Task Completion reminder using Flow Bot in Microsoft Teams | Power Automate
  4. Using triggerBody() / triggerOutput() to read CDS trigger metadata attributes in a Flow | Power Automate
  5. Call HTTP Request from a Canvas Power App using Flow and get back Response | Power Automate
  6. Send a Power App Push Notification using Flow to open a record in Canvas App | Power Automate
  7. Accept HTTP Requests in a Flow and send Response back | Power Automate
  8. Terminate a Flow with Failed/Cancelled status | Power Automate
  9. Pause a Flow using Delay and Delay Until | Power Automate
  10. Generate Dynamics 365 record link in a Flow using CDS connector | Power Automate

Thank you!!
Run As context in CDS (Current Environment) Flow Trigger | Power Automate

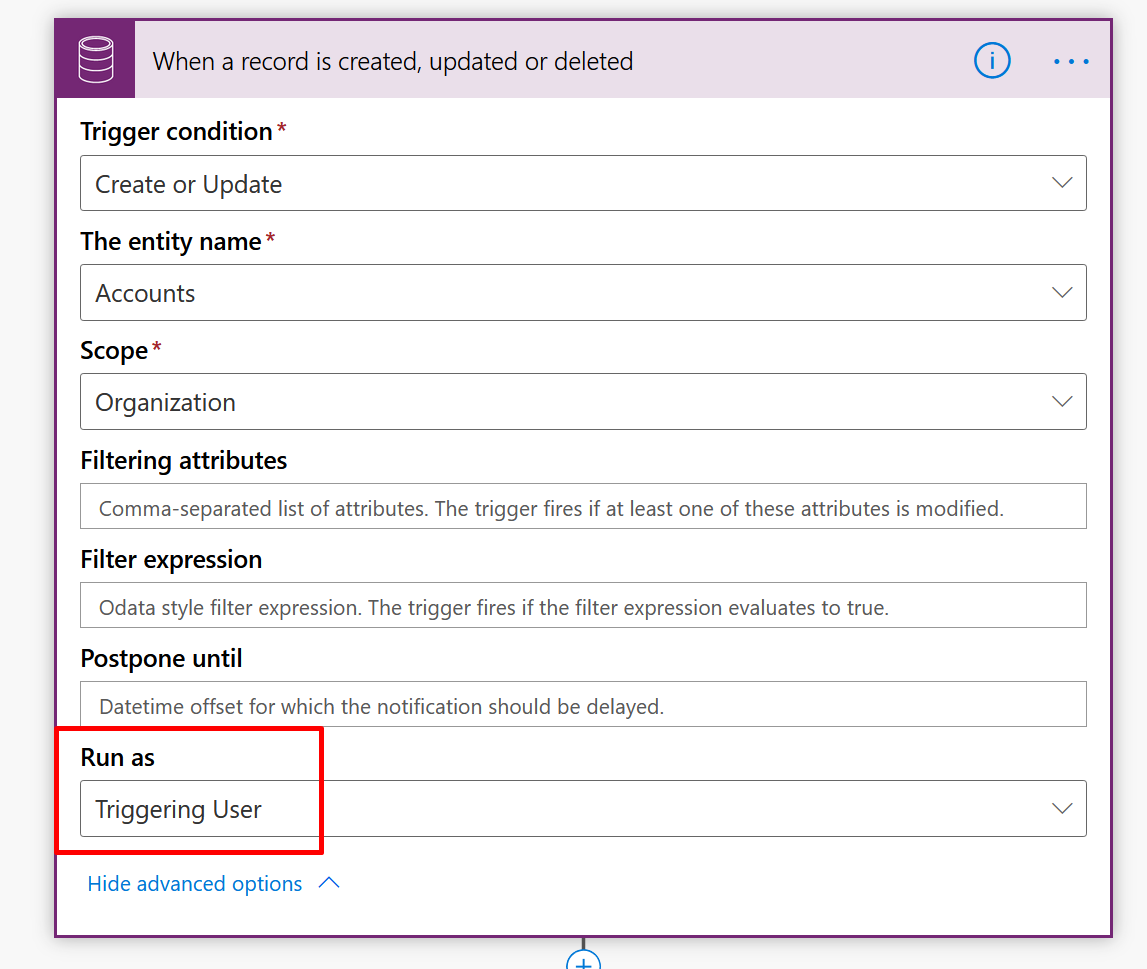
In a CDS (Current Environment), you have to option to Run the Flow under a context of a certain user. And there are a few options from which you can select from – Process Owner, Record Owner & Triggering User

Here’s my Flow in which the trigger is the CDS (Current Environment) connector. Show advanced options and you’ll see that there’s a field call as Run As


Which has the following 3 Options as I mentioned above –

Let’s look at each one of these.

Scenario

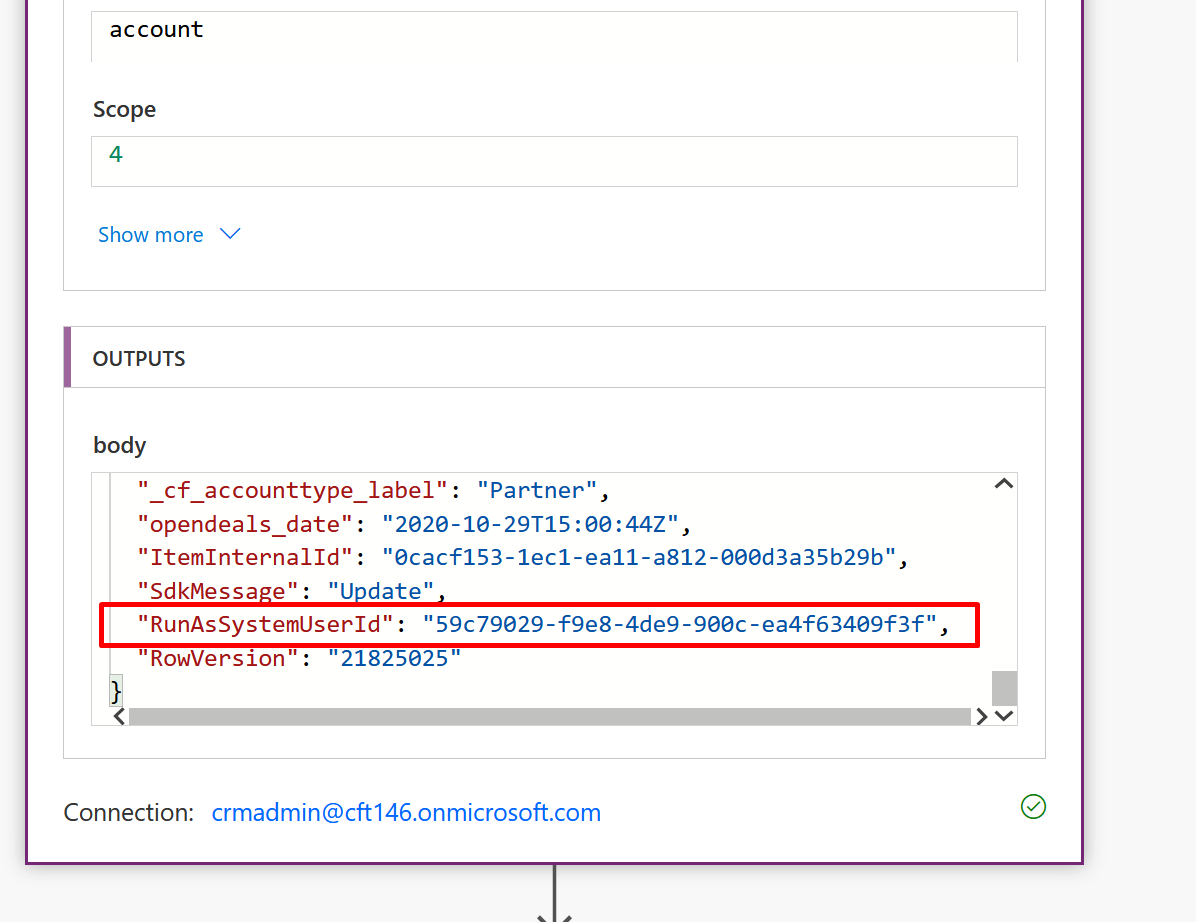
To demonstrate Run As, my Flow is triggering on the Update of the Account record, an attribute in the CDS (Current Environment) connector called as RunAsSystemUserId provides the GUID of the System User used in the connector’s Run As field.

You can use triggerOutputs() function to get this GUID from the Trigger Outputs and use it to fetch the System User record. To see how triggerOutputs/triggerBody() works, check this post – Using triggerBody() / triggerOutput() to read CDS trigger metadata attributes in a Flow | Power Automate

Process Owner

As suggested, Flow Owner meaning the one who Owns the Flow

  1. If I select as Process Owner, no matter who triggers the Flow or who is the Owner of the record, the Run As user will be the one who Owns the Flow.


    The record could belong to one owner and the other owner might modify it as shown below –


    But the Flow will Run As the Owner of the Flow as suggested.


    Multiple Owners?
    In my test, I believe the one who created the Flow becomes the first Owner and hence, is what it appears in Run As

Record Owner

  1. Easily, the record Owner in Dynamics 365 is the Owner of the record, so no matter who triggered the Flow or who the Flow owner is, the Record Owner will be the Run As user.

  2. In this example, Priyesh Wagh is modifying the record Owner by Kuldeep Gupta, the Flow Run As will show as Kuldeep Gupta

Triggering User [Also Default]

  1. If the Run As is set to Triggering User, whoever caused the Flow to Run is the Run As context user.


    Let’s say Kuldeep Gupta is a user is modifying a record Owned by SYSTEM, the Run As user is Kuldeep Gupta.


  2. Now, if there’s no Run As selected or even if there are multiple Owners to the same Flow, the one who causes the Flow to run, is the context user of the Flow.


    Let’s say Priyesh Wagh modified this record owned by SYSTEM, the Flow will Run As Priyesh Wagh


Hope this helps!!

Here are some more Power Automate related posts you might want to look at –

  1. Task Completion reminder using Flow Bot in Microsoft Teams | Power Automate
  2. Call HTTP Request from a Canvas Power App using Flow and get back Response | Power Automate
  3. Send a Power App Push Notification using Flow to open a record in Canvas App | Power Automate
  4. Accept HTTP Requests in a Flow and send Response back | Power Automate
  5. Terminate a Flow with Failed/Cancelled status | Power Automate
  6. ChildFlowUnsupportedForInvokerConnections error while using Child Flows [SOLVED] | Power Automate
  7. BPF Flow Step as a Trigger in CDS (Current Environment) connector | Power Automate
  8. Pause a Flow using Delay and Delay Until | Power Automate
  9. Generate Dynamics 365 record link in a Flow using CDS connector | Power Automate
  10. Setting Retry Policy for an HTTP request in a Flow | Power Automate
  11. Text Functions in a Flow | Power Automate
  12. Using Parse JSON to read individual List Records in Flow|Power Automate

Thank you!!
Using triggerBody() / triggerOutput() to read CDS trigger metadata attributes in a Flow | Power Automate

Now, for all the newbies working with Common Data Service (Current Environment) connector face a little constraint in order to read certain fields which are NOT in the list of the Dynamic Content of the CDS connector itself.

Scenario

Let’s say you want to read this field from the Body / Outputs of the CDS trigger in a Flow in Power Automate

Attributes (or rather supporting metadata) won’t be accessible directly since it’s not from the context of the CDS connector itself like you see for other fields as below –

Flow

In this example, here’s how our Flow will look like.

We’ll declare 2 variables after the CDS connector with Create or Update trigger on Accounts entity and how we can work with the results.

Reading from triggerBody()

When to use triggerBody() ? – When you want to fetch attributes from the body of the trigger.

Here’s how you can use triggerBody() function to read ‘RunAsSystemUserId’ from the outputs of CDS connector.

  1. Let’s say you have a variable declared to store your results. Let’s call it Trigger Body. Click on the fx sign to enter the formula

  2. Now, in the formula, enter triggerBody()?[‘RunAsSystemUserId’]. triggerBody() is a method to you’ll find it in auto-complete

  3. And the variable will look like this

Result of triggerBody() will be as below

Reading from triggerOutputs()

When to use triggerOutputs() ? – Whenever you need to access anything from within the body as well as some info from the header as well as shown in the 2nd screenshot in step #2 below.

Here’s how you can use triggerOutputs() funtion to read ‘RunAsSystemUserId’ from the outputs of CDS connector

  1. Let’s say you have a variable declared to store your results. Let’s call it Trigger Output. Click on the fx sign to enter the formula


  2. Now, in the formula, enter triggerOutputs()?[‘body/RunAsSystemUserId’]. triggerOutputs() is a method to you’ll find it in auto-complete.


    The reason this we write “body/RunAsSystemUserId” is because in the JSON structure of the complete Outputs of the CDS Connector, you’ll see that RunAsSystemUserId attribute lies inside body in the JSON.
    Whereas in terms of triggerBody() above, we are reading attributes from the “body” itself.

Result of triggerOutputs() will be as below

Hope this was useful!

Here are some more Power Automate / Flow posts you might want to check –

  1. Call HTTP Request from a Canvas Power App using Flow and get back Response | Power Automate
  2. Send a Power App Push Notification using Flow to open a record in Canvas App | Power Automate
  3. Accept HTTP Requests in a Flow and send Response back | Power Automate
  4. Terminate a Flow with Failed/Cancelled status | Power Automate
  5. Adaptive Cards for Teams to collect data from users using Power Automate | SharePoint Lists
  6. ChildFlowUnsupportedForInvokerConnections error while using Child Flows [SOLVED] | Power Automate
  7. BPF Flow Step as a Trigger in CDS (Current Environment) connector | Power Automate
  8. Pause a Flow using Delay and Delay Until | Power Automate
  9. Generate Dynamics 365 record link in a Flow using CDS connector | Power Automate
  10. Text Functions in a Flow | Power Automate
  11. Loop through array of objects in a Flow & Create records in CDS | Power Automate
  12. Get Count of records retrieved in CDS connector in a Flow | Power Automate

Thank you!

BPF Flow Step as a Trigger in CDS (Current Environment) connector | Power Automate

Here’s an update to the Common Data Service (Current Environment) connector in Power Automate

Remember, this is available only in Common Data Service (Current Environment) connector i.e. you’ll need to create you Flow inside a Solution in Power Automate
undefined

Flow Step

Now, you can call your Flow from a Business Process Flow, which existed for some time. But now, it’s available as a trigger in the Common Data Service (Current Environment)
undefined

Flow & BPF Setup

  1. Now, my Flow is kept simple to illustrate what has been triggered. The first step simple is run When a flow step is executed.
    It starts with a simple Instant Flow like template if you want to have an additional input
    undefined
    And then you can use these in the context further. But I’ll keep it simple assuming you are familiar with trigger inputs.
  2. Then, you get the details that you can use from the trigger.
    undefined
  3. And I’m simply passing on the values over to an email so that I can read it. You application could be anything. Typically, it could be a complex business process in a Flow to trigger when a Flow Step is triggered.
    undefined
  4. Now, in my Business Process Flow Step, I’ve added a Flow Step (Preview), mind that this is still in Preview as of writing this post.
    undefined
  5. And select the Flow I’ve intended for this.
    undefined

Running the Flow

Now, here’s how it goes –

  1. I’ve called the Flow from the Flow Step
    undefined
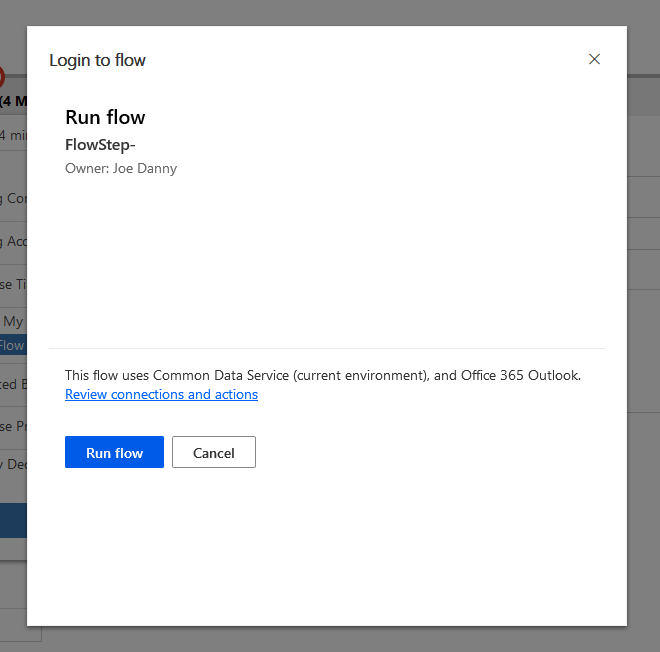
  2. It’ll ask for confirmation of the Flow in a window
    undefined
  3. Once all the permissions are set, depending on what’s needed in the Flow, you’ll be asked for a confirmation
    undefined
  4. Once completed, you can check in Flow Runs about what happened to the execution of the Flow
    undefined


Results

So here are some results I composed from the data of the BPF itself-
undefined

And that’s it!

Here are some more Power Automate / Flow posts you might want to look at:

  1. Pause a Flow using Delay and Delay Until | Power Automate
  2. Generate Dynamics 365 record link in a Flow using CDS connector | Power Automate
  3. Text Functions in a Flow | Power Automate
  4. Loop through array of objects in a Flow & Create records in CDS | Power Automate
  5. Get Count of records retrieved in CDS connector in a Flow | Power Automate
  6. Number Formatting in a Flow | Power Automate
  7. Call a Dynamics 365 Action from Flow [Bound and Unbound Actions] | Power Automate
  8. Switch-Case in a Flow | Power Automate
  9. Setting Retry Policy for an HTTP request in a Flow | Power Automate
  10. Make HTTP request from Flow in Power Automate

Hope this helps!!

Get Count of records retrieved in CDS connector in a Flow | Power Automate

In several applications, you need to know how many record were retrieved in the List records Action in a Common Data Service connector in order to take a decision.

Scenario

Typically, let’s say I know only 1 record should exist in order to take that record forward and do an action. But how do I know when only 1 record was received? That’s when you use Control

Check Count

Now, let’s say you want to want to retrieve Accounts and know how many were returned (Perhaps, you want to proceed only if at least 1 or more were retrieved)

  1. This is my List Records action and I’ve named it as Get All Records.
    defaultListRecords
  2. And just to display how many records are retrieved, I’ll use a variable. Usually, you would use this in condition (which we’ll get to in a bit)
    initVar
  3. So, in the expressions to set the Variable, under Dynamic Content, I’ll write –
    writeHereand write the below expressioncountactualExpression
    which is set to the variable
    setVar
  4. And here are the results. I have 101 Accounts
    count

Using it for comparison

This is one of the typical use cases where you want to proceed only if you have at least 1 record –
typicalUseCase

Here are some more Flow related topics you might want to take a look at –

  1. Number Formatting in a Flow | Power Automate
  2. Get N:N records in a Canvas Power App using Common Data Service connector | Power Platform
  3. Switch-Case in a Flow | Power Automate
  4. Setting Retry Policy for an HTTP request in a Flow | Power Automate
  5. Retrieve only active Dynamics 365 CE licensed Users in CDS connector in Power Automate
  6. Button Flow in Power Automate to replicate a Quick Create Form in D365 CE
  7. Make HTTP request from Flow in Power Automate
  8. Create a To-Do List Item of Important Outlook Emails using Power Automate

Hope this quick tip helps!

Call a Dynamics 365 Action from Flow [Bound and Unbound Actions] | Power Automate

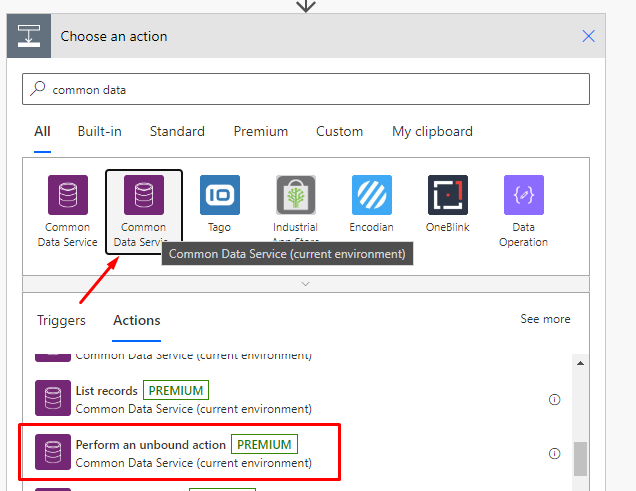
Ever wondered how to call an Action from a Flow using the new Common Data Service (Current Environment) connector? There are 2 actions to perform this –

Here’s a quick post to demonstrate that and the difference between Perform a bound action and Perform an unbound action in the CDS (Current Environment) connector.

Note that the connector used here is Common Data Service (Current Environment) connector which is available only if you are creating a Flow inside a Solution, not outside.
currentEnv
Check more on this connector here – Selecting (Current) in Environment in Power Automate CDS connector and why it matters


Unbound Action

Bound Action meaning calling an Action in Dynamics 365 that is bound to any one entity i.e. which is not a Global Action
BoundAction

  1. In this example. I’m creating a Flow that will call a Bound Action which runs on Account entity.
    insideBoundAction_Body
  2. And the InputName field shown above will simply take a string field and reflect the same as it is in Output
  3. Now, I am using Perform a bound action Action from the Common Data Service (Current Environment) connector as shown below-
    selectBount
  4. Once you select Perform a bound action, you’ll need to select what entity the Action is tied to with the following properties –
    Entity Name: Name of the entity the Action is bound to
    Action Name: Name of the action (not Display Name)
    Item ID: Guid of the record of that entity. Typically this is dynamically retrieved from other operations above this step (I’ve simply hard-coded one)
    Parameters: In my example, I’m passing a parameter called ‘InputName’ and I’m passing a string called “Account Name”
    boundBody
  5. Operation-Now, once my Bound Action is executed, I can see the below results which it will return i.e. OutputName field after composing with InputName inside the Action
    boundOutput
  6. Further, you can use the following Output from the Bound Action i.e. the Response or the Output parameters the Action is sending.
    showBoundResponse

Unbound Action

Unbound Action meaning calling an Action that is not bound to any entity in Dynamics 365 and is set to None (Global)
CreateUnboundAction


  1. In my Unbound Action, I am simply passing InputName through to the OutputName field as is.
    insideUnboundAction_Body
  2. Now, I’ll use Perform an unbound action from the Actions in Common Data Service (Current Environment) connector
    selectUnbound
  3. Once you select this action, you simply need to select the name of the Action from Dynamics 365 itself (Again, not Display Name) and pass along any Input parameters for the same, if any.
    unboundBody
  4. Operation – Now, once you execute this, the Action will execute and give you a response as below
    unboundOutput
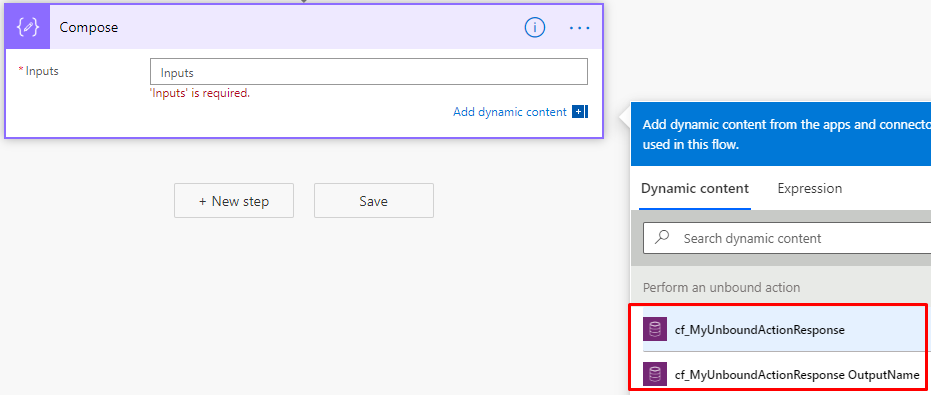
  5. Further, you can select what you want to use from the response of the action step i.e. either the Response itself or the Output Parameters, if any.
    showUnboundResponse


Here are some other Power Automate / Flow posts that might interest you –

  1. Switch-Case in a Flow | Power Automate
  2. Enable Flow button on D365 Ribbon
  3. Secure Input/Output in Power Automate Run History
  4. Setting Retry Policy for an HTTP request in a Flow | Power Automate
  5. Using Parse JSON to read individual List Records in Flow|Power Automate
  6. Make HTTP request from Flow in Power Automate
  7. Retrieve only active Dynamics 365 CE licensed Users in CDS connector in Power Automate
  8. Create a To-Do List Item of Important Outlook Emails using Power Automate
  9. RSS notifications to your phone using Power Automate
  10. Selecting (Current) in Environment in Power Automate CDS connector and why it matters
  11. Button Flow in Power Automate to replicate a Quick Create Form in D365 CE
  12. Approval Process using Power Automate

Hope this simple example helps explain the actions!