Suppress Workflow Header Information while sending back HTTP Response in a Flow | Power Automate

Let’s see how we can suppress critical information about the Flow to the caller HTTP Application while sending back a response.

Scenario

The Flow will send Header information back while sending a HTTP Response to the caller HTTP Request.

  1. Here’s how the Flow will look –

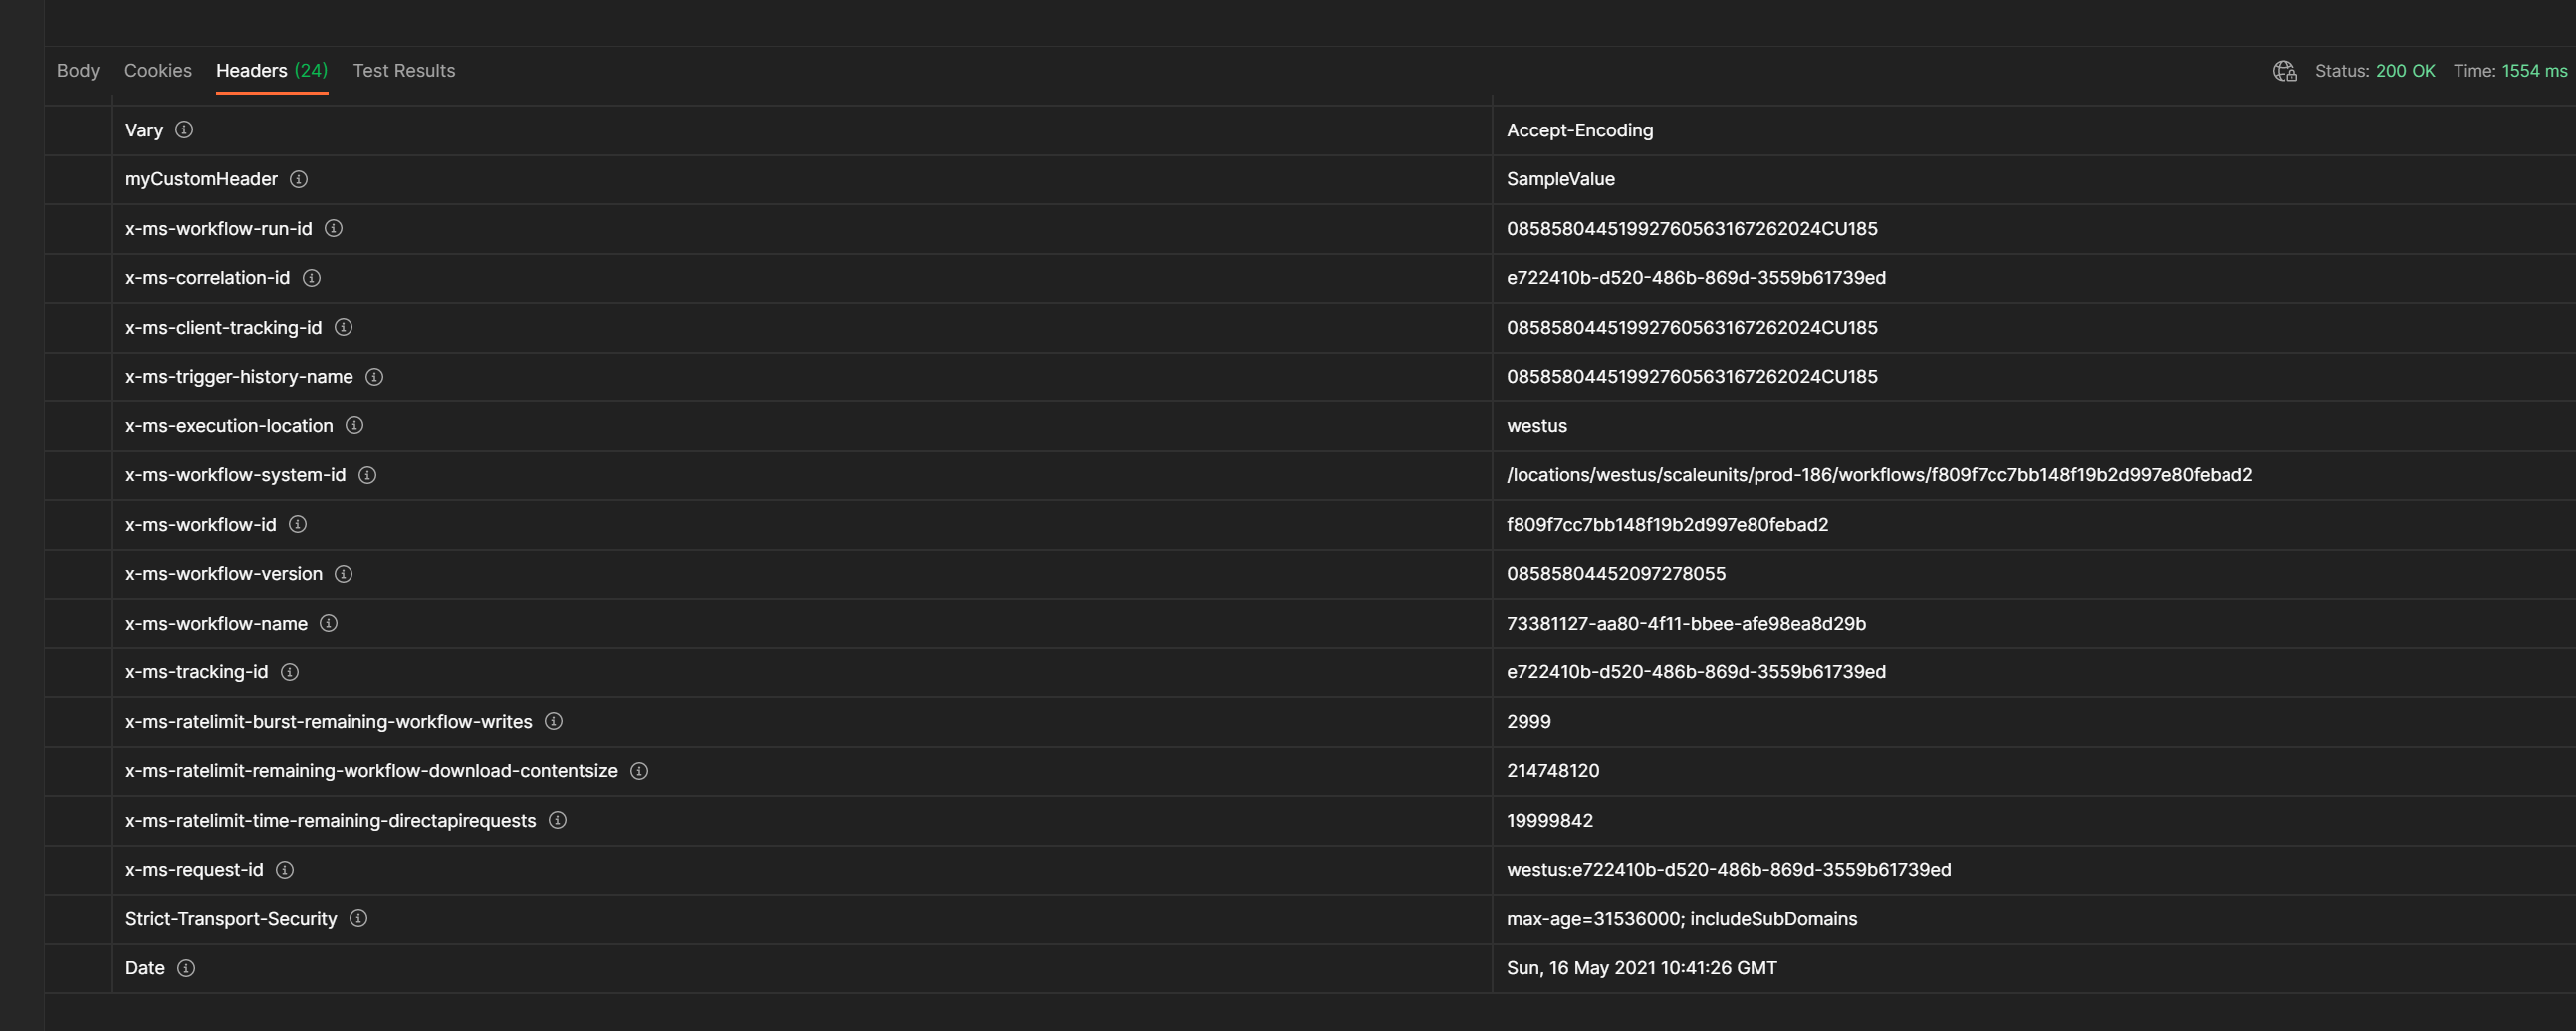
    Note, that we are sending a Custom Header along as well.

  2. And along with this info, the follow Header information will also be visible in the calling application. We’ll use Postman to check this scenario.

    You’ll see that a lot of Headers have been sent back along with our Custom Header.


    And you’ll see whole lot of Headers that expose the Flow details in these Headers.

    Let’s see how we can cut this information short and not send back any unnecessary information to the HTTP Request we’ve received.

Suppress Workflow Headers in HTTP Request

Let’s see how with a simple tweat, we can avoid sending the Workflow Header information back as HTTP Response.

  1. We go to the Settings of the HTTP Request Trigger itself as shown below –


  2. Now, you see the option, Suppress Workflow Headers, it will be OFF by default.


    Your turn it ON,


  3. Now, let’s try to make a call again and see the difference. Going back to the Postman, we Send another request post you’ve saved the workflow changes above.

    We see that only 10 Headers are sent as opposed to 24 as seen without suppressing the info.

  4. And if we see what Headers are sent back, we see along with our Custom Header, only the ones which are required will be sent suppressing all the critical information.

    This is a good practice to suppress Workflows that don’t give out information in production scenarios which are not required by end application.

I’ve also made a quick YouTube video of the same. Check it out as well –

Hope this was useful!

Here are some more Power Automate / Flow posts you might want to check –

  1. Invalid XML issue in Dataverse connector for List Rows action | Fetch XML Query | Power Automate
  2. FetchXML Aggregation in a Flow using CDS (Current Environment) connector | Power Automate
  3. Invalid type. Expected Integer but got Number error in Parse JSON – Error at runtime after generating Schema | Power Automate
  4. Asynchronous HTTP Response from a Flow | Power Automate
  5. Validate JSON Schema for HTTP Request trigger in a Flow and send Response | Power Automate
  6. Tag a User in a Microsoft Teams post made using Power Automate
  7. Converting JSON to XML and XML to JSON in a Flow | Power Automate
  8. Office 365 Outlook connector in Cloud Flows showing Invalid Connection error | Power Automate
  9. FormatDateTime function in a Flow | Power Automate
  10. Make On-Demand Flow to show up in Dynamics 365 | Power Automate
  11. Task Completion reminder using Flow Bot in Microsoft Teams | Power Automate
  12. Secure Input/Output in Power Automate Run History

    Thank you!

Advertisement

Asynchronous HTTP Response from a Flow | Power Automate

By default, whenever yo submit an HTTP Request to a Flow, your application will wait till the request is completed. Meaning, the HTTP Response by default in a Cloud Flow is Synchronous.

So, let’s see how you can make it Asynchronous and how you can later retrieve the status of the HTTP Request itself from the Flow. If you make a HTTP Response as Asynchronous, the calling HTTP Request application will receive a 202 Accepted in response.

HTTP Request by Default

Let us see how the HTTP Request and Response is structured by default.

  1. Here’ s the HTTP Request which will receive the request and process the data further.

  2. And let’s assume you some lengthy process involved in your Flow which is making an average execution time span to a significant time. To mimic that, I’ve simply introduced a delay of 3 minutes to demonstrate the Async example.

    In case you want to review how to pause a Workflow using Delay and Delay Until, you can check this post – Pause a Flow using Delay and Delay Until | Power Automate
  3. And finally, assuming my execution of the Flow has completed and I’m supposed to send the Response back to the HTTP Request calling application, I’ll use the Response Action from the Request connector
    }
  4. And my Response will look something like this letting the caller application know that the processing has been successfully completed.


    Now let’s see how this calling application will behave in this case. Assuming, we haven’t manipulated any settings as yet.

    The Flow looks like this just to give you a visual perspective of the implementation.

  5. Now, Once I send a Request from Postman, the Postman itself will be waiting for a response till the execution of the Flow is completed.


  6. This is because the Flow itself is waiting to be processed and yet to reach the Response block in the Flow.

Asynchronous Response

We will now turn on the Asynchronous Response of the HTTP Response Action –

  1. Go to Settings on the Response action step.


  2. In Settings, turn on Asynchronous Response On and save it.

  3. As mentioned in the description of the Asynchronous Response setting, the caller Application will immediately get a 202 Accepted code upon sending the HTTP Request.

  4. Notice the Headers, you’ll see a Location header item

  5. Capture this URL in your calling application as you can use it to check the status of the Request later on once the operation is completed on the Flow.

Checking Request Status

Since we have the Location information which was passed on from to the Response Header previously, we can use the URL to check the Response Status separately by making another call to the URL itself.

  1. If the Status is still Running, you’ll get this response. It will imply that the Flow is still Running and the Response is not available yet.


  2. Else, you’ll get the actual Response which was supposed to be received had the Flow’s HTTP Response was set to Synchronous by default (Asynchronous Response = OFF)


Hope this was helpful!

I’ve added a YouTube Video for the same. You can alternatively, check the same as well –

Here are some more Power Automate / Flow posts you might want to check –

  1. Validate JSON Schema for HTTP Request trigger in a Flow and send Response | Power Automate
  2. Call HTTP Request from a Canvas Power App using Flow and get back Response | Power Automate
  3. Accept HTTP Requests in a Flow and send Response back | Power Automate
  4. Setting Retry Policy for an HTTP request in a Flow | Power Automate
  5. Make HTTP request from Flow in Power Automate
  6. Connecting XrmToolBox to an MFA enabled Dynamics 365 environment | Azure ADFormatDateTime function in a Flow | Power Automate
  7. Visualize Adaptive Card for Teams user action within a Cloud Flow | Experimental Feature
  8. FormatDateTime function in a Flow | Power Automate
  9. Form Access Checker in new Power Apps Form Designer | Model-Driven Apps in Dynamics 365Formatting Approvals’ Details in Cloud Flows | Power Automate
  10. Trigger Conditions not working in a Cloud Flow? Here’s Why | Power Automate Quick Tip
  11. Setting Lookup in a Flow CDS Connector: Classic vs. Current Environment connector | Power Automate Quick Tip
  12. Make On-Demand Flow to show up in Dynamics 365 | Power Automate
  13. Adaptive Cards for Outlook Actionable Messages using Power Automate | Power Platform
  14. Run As context in CDS (Current Environment) Flow Trigger | Power Automate

Thank you!!

Validate JSON Schema for HTTP Request trigger in a Flow and send Response | Power Automate

In a Cloud Flow, if you are using an HTTP Request Trigger that accepts HTTP Requests – you have the option to validate the Incoming data based on the Schema of the JSON.

Scenario

Let’s assume this is the data which will be passed to the HTTP Request Flow –


HTTP Request & Schema

Let’s look at the HTTP Request Trigger itself in a Cloud Flow –

  1. First, let’s initiate the HTTP Request Trigger here and make sure we generate the Schema from the same data we will be passing. I also have a separate post on the HTTP Request itself which you can check here – Accept HTTP Requests in a Flow and send Response back | Power Automate
     
  2. Here, we can paste the sample data which we saw in the scenario above.

  3.  Once you click Done, the Schema will be generated from the sample data you’ve just entered. Additionally, if needed you can also specify the method you are looking to implement. POST in this case


  4. Further on, I’m doing some operations internally and finally, I’ll be sending a response to the caller using the HTTP Response Action in HTTP connector in a Cloud Flow

  5. And here is what I’m sending back in Response if my Flow happens to work as expected.

  6. So, the end of my Flow looks something like this. (Depending on what you are trying to do in your Flow)


Turning Validation On

Now, coming back to the HTTP Request trigger itself –

  1. Go to Settings on the HTTP Trigger itself –


  2. Now, look for Schema Validation option and turn it on.


Now, let’s consider the scenario and test the Postman.

Testing with Postman – Validation On

Let’s try to send incorrect data to the Flow using Postman which doesn’t comply with the Schema and see how we receive the 400 Error message in Postman

  1. Now, when I try to send the correct data as expected by the Schema once the validation is turned on, I’ll get a success message once the Flow has finished running and return with a 200 code


  2. Now, if we try to send incorrect data, it will not be accepted. So first, I’ll add a new attribute which I’ve not added in the schema already in order for the validation to fail and give us an expected validation error.
    See the data which I’m sending. To which, I get the 400 Bad Request error

  3. If you get back a 400 Bad Request, the Flow will not register it as a Flow Run. Hence, you won’t know if the Flow was hit or not.
  4. And in case the validation is turned OFF, you’ll get the Response as expected from the Flow in the event that Flow has completed successful execution.

Hope this post helped!

Here are some more Power Automate / Flow posts you might want to check –

  1. Tag a User in a Microsoft Teams post made using Power Automate
  2. Converting JSON to XML and XML to JSON in a Flow | Power Automate
  3. Office 365 Outlook connector in Cloud Flows showing Invalid Connection error | Power Automate
  4. FormatDateTime function in a Flow | Power Automate
  5. Formatting Approvals’ Details in Cloud Flows | Power Automate
  6. Trigger Conditions not working in a Cloud Flow? Here’s Why | Power Automate Quick Tip
  7. Read OptionSet Labels from CDS/Dataverse Triggers or Action Steps in a Flow | Power Automate
  8. InvalidWorkflowTriggerName or InvalidWorkflowRunActionName error in saving Cloud Flows | Power Automate Quick Tip
  9. Setting Lookup in a Flow CDS Connector: Classic vs. Current Environment connector | Power Automate Quick Tip
  10. Using outputs() function and JSON Parse to read data from missing dynamic value in a Flow | Power Automate
  11. Using triggerBody() / triggerOutput() to read CDS trigger metadata attributes in a Flow | Power Automate
  12. Secure Input/Output in Power Automate Run History

Here are som

Call HTTP Request from a Canvas Power App using Flow and get back Response | Power Automate

Now, there are several questions about how can we make HTTP requests from a Canvas Power App. Well, as of today, only HTTP with Azure AD exists in native Canvas Power App Connectors, so in order to call HTTP requests only to external resources, you’ll need to go via a Flow and get response back.

Scenario

Call a Flow from within a Canvas Power App and capture the response back in the Canvas Power App.

In my example to keep things easy, I’m using a sample HTTP request provided by https://openweathermap.org/ (OpenWeatherMap) [I know there are native Weather connectors, but I’m just using as an example]

Flow

Here’s how Flow looks –

  1. Let’s say I create an Automated Flow which is triggered from a Power App. Just select that, there’s nothing to add to it.


  2. Next Step, I’ll make an HTTP request to a Service (In my example, I want to retrieve Humidity. You would of course have your use case)
    I’ve used the same example in one of my posts where I talked about making HTTP requests using Flow. Check this post – Make HTTP request from Flow in Power Automate


  3. To breakdown my received HTTP response into distinct pieces of info, I’ll parse it.

  4. Final step would be to send back the parsed info to the Power App itself so that I can use the info internally in the Canvas Power App from which this Flow was called.

  5. Now, I’m choosing to send back the Humidity value. So, I’ll choose a type of Output to be sent my response into

  6. And since I already parsed the response in the step above, it’s easy to select what piece of info I want to send back to my Canvas Power App.
    I’ve created a variable called as humidityValue and in that I’m passing humidity from the parsed JSON step.

  7. That’s it. My Flow overall looks like this

Canvas Power App

In my Canvas Power App, I only have a button which will populate the data into a label –

  1. Let’s say, I have a button called as Get Humidity. And below it, is a Label having “Humidity is” already written

  2. Now, the next step is to add the Flow in the Canvas Power App. Navigate to Action in the menu bar in Canvas Power App Studio and look for Power Automate

  3. On clicking it, you’ll be able to select the Flow you want to add in the Canvas Power App

  4. Once you select that, it’ll appear on the OnSelect formula bar of the button. Ideally, this should be added to whatever event you want the Flow to Run from (In my case, click of Get Humidity button)
    It’ll populate with a default formula like below. But we need some modification for it to be populated to the Label.

  5. Now, you can write the below formula to add the value retrieved from the variable which you created dynamically called as ‘humidity‘ and upon adding dot to the Run(), you’ll be able to select the variable you passed to the Canvas App from Flow.

  6. So, the completed Formula looks like this.
    Here, I’m using Set() function to set a dynamically declared variable in called as humidity and populate it with the value of humidityValue which we’ll get when we run Flow and the Flow will make an HTTP call to get that value.
    In case you also need to understand how variables work, you can refer this post of mine – Variables in Canvas Power Apps | Global and Context

  7. Now, we need to set it to the Label. So, we’ll write a formula on the Label’s Text event. So that, the Label is displaying Humidity is <valueOfHumidity> variable

  8. And you’re set. Hope this explanation was easy. Now, let’s Run the App and click Get Humidity button

Working

When I click a button, I’ll get the value into the Label field which I created.

When I click the button, it’ll be greyed out for a moment while the Canvas Power App calls the Flow and the Flow runs the HTTP request and sends back response to Canvas Power App.

Finally, once the variable is set, the Label control will display the value as below which came via HTTP using Flow

You can also see the results going in the Flow Run as well

Hope this was useful. Here are some more Canvas Power App & Power Automate posts you might want to look at –

  1. Send a Power App Push Notification using Flow to open a record in Canvas App | Power Automate
  2. Accept HTTP Requests in a Flow and send Response back | Power Automate
  3. Launch URL on a Data Table Text column selection in a Canvas PowerApp | SharePoint Lists
  4. Terminate a Flow with Failed/Cancelled status | Power Automate
  5. Aggregate functions in a Canvas Power App | Using on SharePoint Lists
  6. Logged In User details in a Canvas Power App
  7. Get N:N records in a Canvas Power App using Common Data Service connector | Power Platform
  8. Implement character length validation in a Canvas Power App | Power Platform
  9. Call a Dynamics 365 Action from Flow [Bound and Unbound Actions] | Power Automate
  10. Pause a Flow using Delay and Delay Until | Power Automate
  11. BPF Flow Step as a Trigger in CDS (Current Environment) connector | Power Automate
  12. Generate Dynamics 365 record link in a Flow using CDS connector | Power Automate
  13. Dependent OptionSets in a Canvas Power App for 1:N related CDS entities | Power Platform
  14. Implementing Exit app, Logout and Confirm Exit features in a Canvas Power App
  15. Using Parse JSON to read individual List Records in Flow|Power Automate

Thank you!

Accept HTTP Requests in a Flow and send Response back | Power Automate

Let’s say you want to create a consumable HTTP service, do some operation and send back Response. Here’s what you can do.

You can create an HTTP Request Trigger to receive the HTTP request, process the request and send back a Response.

Accept HTTP Request in Flow

Let’s create a listener first, so that we can get the URL to be used and ask users to submit on that URL.

  1. In your connectors, select the below connector ‘When an HTTP request is received


  2. This will let you accept HTTP requests of different methods. First, let’s just create the schema. Assuming you know what schema you are accepting, click on ‘Use sample payload to generate schema‘.


  3. Now, enter your sample data and click Done.


  4. Schema will be generated automatically.

  5. Now, save your Flow so that a URL could be generated.


  6. Also, remember to select what type of Request to accept. It’s under the Show advanced options

  7. Select what type of HTTP request this is. In this example, I’m accepting a POST request.

    relativePath is used when you want to access a specific resource in your HTTP request that is passed in the query string. None in my case, hence, not using it.
  8. Supported verbs in the HTTP Request trigger are GET, PUT, POST, PATCH, DELETE –

Process Info

This is subjective and is completely based on your use case, you can decide what you want to do with the data you receive. Could be anything!! I’ll simply highlight in short what I’m doing here.

I’m just accepting all “Requests” entity data and giving back a Reference ID to customer telling them that their request has been registered with us. Like a typical Ticketing system where you log a ticket and you get back a reference number.

In my example, I’m simply creating a CDS record in my D365 environment and I will return the Auto-generated field value to the Response so that it can be sent back to the caller.

In case you are also looking to create an Autonumber field for yourself in CDS, you can check this post – AutoNumber field in CDS | PowerApps

Send Back Response

Now, in the step above, I’ve created a CDS record in the system. It will also auto-generate a number for the record. I’ll use the same to pass it back as a response.

  1. Now, search for Response (or rather Request) in the Connectors list and you’ll be able to choose the Response action.


  2. In the same, you can then choose what Response code you want to return. This will differ based on where you use this. Example, if you use this Response Action in case of some error, you can return 500 or 404 if something was not found, depends.
    In this case, I’m returning 200 OK and the JSON of my message and sending back the Token (Auto-number field on Request entity record creation)

  3. Here, my Flow is complete.

Testing the Flow

Understand the building blocks of the Flow. Accept Request –> Process –> Response.

Now, the URL we get when we save the Flow is the one that goes to the developers/consumers.
It contain some tokens and header information.

See how I tested it using Postman.

  1. Once I copied it from the Flow and pasted in Postman, the Headers were populated automatically in Postman. (And then you can use this to build your code later on)


  2. Now, I am sending the data in the body in the following way

  3. Now, let’s say I submit the request using Postman.
    A record will be created in my D365 (Common Data Service)

  4. And the Token that the record generated will be returned as response back to Postman

    With the status of 200 OK

  5. And that’s how you can receive HTTP requests and send back responses using Flow in Power Automate.

Here are some more Power Automate / Flow posts you might want to look at

  1. Make HTTP request from Flow in Power Automate
  2. Setting Retry Policy for an HTTP request in a Flow | Power Automate
  3. Terminate a Flow with Failed/Cancelled status | Power Automate
  4. Adaptive Cards for Teams to collect data from users using Power Automate | SharePoint Lists
  5. BPF Flow Step as a Trigger in CDS (Current Environment) connector | Power Automate
  6. ChildFlowUnsupportedForInvokerConnections error while using Child Flows [SOLVED] | Power Automate
  7. Generate Dynamics 365 record link in a Flow using CDS connector | Power Automate
  8. Pause a Flow using Delay and Delay Until | Power Automate
  9. Get Count of records retrieved in CDS connector in a Flow | Power Automate
  10. Call a Dynamics 365 Action from Flow [Bound and Unbound Actions] | Power Automate
  11. Switch-Case in a Flow | Power Automate
  12. Using Parse JSON to read individual List Records in Flow|Power Automate

Hope this was useful! 🙂

Setting Retry Policy for an HTTP request in a Flow | Power Automate

Often times, There could be an issue where your HTTP request isn’t hitting well. So, to overcome this, you might want your Flow to Retry after a certain duration and for some number of times.

You want to setup a Retry policy for the same. Here’s how you do it!

Setting Retry Policy

Follow this to setup a Retry Policy of your Flow

  1. Locate your HTTP step and navigate to Settings
    openSettings

  2. Once you’re in Settings pane, scroll below and look for Retry Policy.
    retryPolicyLocation

  3. Default type is set by default, if you expand it, you can select what should be the Retry Type. In  this example, I’ve set to Fixed Interval for simplicity
    Default is set to 4 retries at an exponential interval. (Exponential increment type is a little confusing to explain, you can check this post as users discuss how exponential time increments work – )fixedInterval
  4. In Fixed Interval type, I’ve set number of retry count to be 3 and duration between each retry should be 30 seconds (represented in ISO-8601 format)
    sampleRetrySet
  5. With that, the policy is set. And the HTTP request step will try for 3 times at the interval of 30 seconds each.


If you want to test using some HTTP request, you can sample HTTP requests from here – https://httpstat.us/

How it works

Look for Failed Runs to see the result –

  1. Open a Failed Run where you know HTTP request could have failed
    openFailedRun
  2. Now, look for your HTTP request where you set the policy on. Expand the same.
    openHTTPCallThatFailed
  3. Upon expanding, you can see that there were 3 retries and it failed due to a timeout i.e. 408
    failedRetries
  4. You can also check on the right hand side of the page which says that the total duration of all these retries were 1 min 30 seconds
    totalFixedTime

If you observe the Flow Runs, you can find the the Flow did consistently try to run at an interval for the number of times specified.

In case you’re looking for more Flow/Power Automate related posts, check below –

  1. Make HTTP request from Flow in Power Automate
  2. Using Parse JSON to read individual List Records in Flow|Power Automate
  3. Selecting (Current) in Environment in Power Automate CDS connector and why it matters
  4. Retrieve only active Dynamics 365 CE licensed Users in CDS connector in Power Automate
  5. Secure Input/Output in Power Automate Run History
  6. Approval Process using Power Automate
  7. Create a To-Do List Item of Important Outlook Emails using Power Automate
  8. RSS notifications to your phone using Power Automate
  9. Enable Flow button on D365 Ribbon
  10. Button Flow in Power Automate to replicate a Quick Create Form in D365 CE

Hope this helps!!