Range function in Power Automate | Quick Tip

Here’s a pretty simple look at how you can create an Array of numbers from a Start of the number to the End number and an Array of the range will be created

Example Variable

I’m just creating a sample variable to hold the array I’m creating –

  1. Initialize a variable and it should look like below

Range function in Power Automate

Now, if you look at the Dynamic Content section, you’ll be able to find the range function. Let’s see how –

  1. In Dynamic Context, search for range function

  2. In the range function, you first need to input the Start number of what the array should start.
    In this example, I’m starting from number 4

  3. And once I put a comma, I’ll mention how many items in the array from the number 4 should be contained in the array (including 4 as well)
    So, I enter 12. This doesn’t mean the ending number of the Array should be 12, it means put 12 items.

  4. And then just click OK to set the Array in the variable. Then, save and Run.

  5. Now, when you Run the Flow, you’ll see the Output as below.
    Starting from number 4, there are 12 items and hence, ending at 15

Hope this was helpful!

Here are some more Power Automate / Flow posts you might want to check out –

  1. Retrieve Metadata of Global OptionSets from Dynamics 365 in Power Automate | HTTP with Azure AD action
  2. Primary Key of Activity type entity in a Dataverse connector in Power Automate | Quick Tip
  3. Split On in Power Automate in SharePoint trigger for Item updates
  4. Search Rows (preview) Action in Dataverse connector in a Flow | Power Automate
  5. Suppress Workflow Header Information while sending back HTTP Response in a Flow | Power Automate
  6. Invalid XML issue in Dataverse connector for List Rows action | Fetch XML Query | Power Automate
  7. FetchXML Aggregation in a Flow using CDS (Current Environment) connector | Power Automate
  8. Invalid type. Expected Integer but got Number error in Parse JSON – Error at runtime after generating Schema | Power Automate
  9. Asynchronous HTTP Response from a Flow | Power Automate
  10. Setting Lookup in a Flow CDS Connector: Classic vs. Current Environment connector | Power Automate Quick Tip

Thank you!

Block Connector access in Power Platform Admin Center | Power Apps & Power Automate

You can define policies in Power Platform Admin to restrict the use of certain connectors, both – prebuilt and custom connectors in the Power Platform.

Setting DLP Policy for Connectors – Blocking connectors

You’ll need to go to Power Platform Admin Center (https://admin.powerplatform.microsoft.com/)


  1. In Power Platform Admin Center, you’ll need to expand the section called as Policies and you’ll find the option called as Data Policies

  2. In this, you can create Policies for the Connectors which are used in Power Automate / Power Apps

  3. Once you start to create your Policy, give it a suitable name –


  4. Next, I’ll get a list all uncategorized Connectors which I can either choose to select and start Blocking them or send them to Business category.


  5. Let’s say you want to set a policy to restrict certain Actions on the connector called as Power Automate Admins connector. I want to now move this connector to Blocked category.
    So, I find the connector, select and and click on Block as shown below.


  6. Now, I’ll see this connector in the Blocked section.


  7. For now, I’ll ignore the Custom Connectors because I don’t have any for now.

  8. And then, proceed further to define the Scope of this policy i.e. on Environment level.
    For this example, Add all environments is selected since I want to have this for all environments and not selective ones. Quite self-explanatory.

  9. Finally, I’ll Create this Policy.

  10. And you’ll see your Policy created like this –

Policy Usage

Now, let’s review how this policy will work.

  1. Now, in a Flow, I’ll select the Connector for which we’ve set the Policy for. The policy doesn’t hide anything, it let’s you select it first.


  2. And if you select any Action from the Flow, the Flow Checker indicator will light up indicating an error.

  3. And if you expand, it’ll state that the connector is not allowed to be used.
    This won’t allow you to save the flow, forcing you to revoke the step you have performed.


Blocking selective Actions in Connectors

Given you don’t want to Block the whole connector but want to only restrict selective Actions in a connector, here’s what you can do –

  1. While we are tweaking our existing policy, let me take a chance to also show you that you can edit the Policy from the List. Select it, and then click on Edit Policy.

  2. Now, let’s assume our Connector not blocked in the first place and exists in either of the categories i.e. Business or Non-Business.
    Find the connector. Then find the three dots and expand the menu to further show Configure connector (preview) and then select Connector actions

    Remember, this is in Preview and we’ll need to wait to use it for Production once in GA.
  3. Now, you can select what all Actions should be allowed and what all shouldn’t be in order to restrict any unwanted operations configured by other Admins.
    In this scenario, let’s just allow ‘Disable Flow as Admin‘ action and restrict all other ones.

  4. Now, the allowed one will not have any issues.


  5. And the ones we have not allowed, will show the error in the Flow Checker.


Here are some Power Automate posts you want to check out –

  1. Showing Sandbox or Non Production Apps in Power App mobile app
  2. Create a Power Apps Per User Plan Trial | Dataverse environment
  3. Install On-Premise Gateway from Power Automate or Power Apps | Power Platform
  4. Co-presence in Power Automate | Multiple users working on a Flow
  5. Search Rows (preview) Action in Dataverse connector in a Flow | Power Automate
  6. Suppress Workflow Header Information while sending back HTTP Response in a Flow | Power Automate
  7. Call a Flow from Canvas Power App and get back response | Power Platform\
  8. FetchXML Aggregation in a Flow using CDS (Current Environment) connector | Power Automate
  9. Parsing Outputs of a List Rows action using Parse JSON in a Flow | Common Data Service (CE) connector
  10. Asynchronous HTTP Response from a Flow | Power Automate
  11. Validate JSON Schema for HTTP Request trigger in a Flow and send Response | Power Automate
  12. Converting JSON to XML and XML to JSON in a Flow | Power Automate

Thank you!

Install On-Premise Gateway from Power Automate or Power Apps | Power Platform

Here’s your summary to understand what are On-Prem Gateways in Power Automate and how you can set them up.
The same can be done from Power Apps as well (https://make.powerapps.com/)


So let’s see how you can set it up and get started. This post is for beginners who are looking to install an on-premise gateway. So this should be fairly simple process! 😊

Create an On-Prem Gateway in Power Automate

Here’s how you can create an On-Prem Gateway in Power Automate

  1. Expand the Data section and look for Gateways. Then, when you go in Gateways, you will see + New gateway button.


  2. Then, you’ll be taken to a new webpage (https://powerapps.microsoft.com/en-gb/downloads/). Here’s you’ll be able to Download an on-prem Gateway

  3. Once you click on Download, it’ll start downloading the Installer on your machine.


    It’ll complete, then you can simply open it to start installing.

  4. Once you begin the installation, choose where the Gateway folder path should be.
    Then, click Install.


    And it’ll install and will take a few moments.
  5. Once completed, it’ll ask for the email address (or rather username needed to install the Gateway)


  6. Further, authentication will take place as below (in case you have MFA enabled, that will be occur too)


  7. And, it’ll Sign you in.

  8. Once in, it’ll ask if this is a migration or the first time setup.
    Since I’m installing it for the first time, I’ll choose the first option as this is a fresh install.

  9. Upon clicking Next, I’ll be asked to set Properties for the gateway.
    So, to identify the machine, I’ll select a name with which I can identify and then enter a Recovery Key which I will store safely with me.
    Then, click Configure.


  10. It’ll take a few moments to configure.


  11. And now, you’re done in a few moments. Finally, the Gateway is now installed.


Configuration & Info

Given that your Gateway is now installed, you can always go in the File Explorer where you set it up and open the below app

If you wish to check the configurations in detail, you’ll need to Sign In again

And in Power Automate, you’ll see the Gateway is listed.


And if you open it up, you’ll see the high-level details and status of it.

Here are some Power Automate posts you want to check out –

  1. Co-presence in Power Automate | Multiple users working on a Flow
  2. Search Rows (preview) Action in Dataverse connector in a Flow | Power Automate
  3. Suppress Workflow Header Information while sending back HTTP Response in a Flow | Power Automate
  4. Call a Flow from Canvas Power App and get back response | Power Platform\
  5. FetchXML Aggregation in a Flow using CDS (Current Environment) connector | Power Automate
  6. Parsing Outputs of a List Rows action using Parse JSON in a Flow | Common Data Service (CE) connector
  7. Asynchronous HTTP Response from a Flow | Power Automate
  8. Validate JSON Schema for HTTP Request trigger in a Flow and send Response | Power Automate
  9. Converting JSON to XML and XML to JSON in a Flow | Power Automate
  10. Duration field in Dynamics 365 converts Hours value to Days in Dynamics 365 | [Flow Workaround to convert in Hours and Mins]

Thank you!

Co-presence in Power Automate | Multiple users working on a Flow

Here’s a cool feature that is just announced!

Now see who’s also Editing the Flow in parallel with you. Microsoft just announced this update is super-useful in teams working parallelly on a Flow – https://powerautomate.microsoft.com/en-us/blog/announcing-co-presence-in-power-automate/

Here’s a quick summary

Co-presence in Flow

Once a Flow is shared and if both the users happen to be on the same Flow in Edit mode at the same time, here’s how you identify

  1. Let’s say this Flow is being edited by CRM Admin and it’s shared with the user Priyesh Wagh too.
    And it appears like a usual Flow which you are editing


  2. Now, on the other hand, Priyesh Wagh also logged in and opened this Flow to Edit. And when CRM Admin too is already editing parallelly, both parties will see the other participants like so –


  3. Both parties can continue to Edit. However, when either of them saves First after both have entered, there will be no issue.
    Now, once any other party after that Saves their change i.e. 2nd save by other user than who first saved, they’ll see the below warning asking to choose an option to avoid the clash.


  4. Let’s say the user chooses to Save a copy, you’ll be asked to save this into a new Flow.


    The new Flow saved will not be shared with other users and hence, will continue to exist outside of the Shared with me section into Cloud flows section


Hope this was useful

Here are some more Power Automate / Flow posts you might want to check out –

  1. Retrieve Metadata of Global OptionSets from Dynamics 365 in Power Automate | HTTP with Azure AD action
  2. Primary Key of Activity type entity in a Dataverse connector in Power Automate | Quick Tip
  3. Split On in Power Automate in SharePoint trigger for Item updates
  4. Search Rows (preview) Action in Dataverse connector in a Flow | Power Automate
  5. Suppress Workflow Header Information while sending back HTTP Response in a Flow | Power Automate
  6. Invalid XML issue in Dataverse connector for List Rows action | Fetch XML Query | Power Automate
  7. FetchXML Aggregation in a Flow using CDS (Current Environment) connector | Power Automate
  8. Invalid type. Expected Integer but got Number error in Parse JSON – Error at runtime after generating Schema | Power Automate
  9. Asynchronous HTTP Response from a Flow | Power Automate
  10. Setting Lookup in a Flow CDS Connector: Classic vs. Current Environment connector | Power Automate Quick Tip

Thank you!

Create Teams Meeting invite from Power Automate

Here’s an example of several use cases which can let you create a Teams meeting from within Power Automate based on your business use case.

In my example, I’m using Power Automate to schedule a meeting from a Project in Project Operations inviting all Team Members for a follow up!

PS: Creating an Appointment in Outlook doesn’t set the Teams call. 😊

Scenario

For example, in Project Operations’ sample Project example – I want to simply put a Teams meeting to all the Project Team members of this sample Star Piping Project.

  1. Here are my Project Team Members whom I want to send the Teams invite to.


  2. And I should just be able to run a Flow from the Project itself to send an invite to all the Team Members.
    I’m calling my Flow as ‘Teams Roundtable Meeting’

  3. And my Flow is asking me when this meeting should be. So, I’ll mention the same.
    So, I want the meeting to be on 16th Sep 2021 and start at 10:30am


    And End it by 11:30am


  4. And once the values are accepted, the Meeting should be on the Teams of all the Team Members


    Let’s see how I built this Flow.

The Flow

Now, this is subjective – in your case, this could be anything we can imagine!!

  1. I’m accepting the important parameters in the form of Dataverse (Legacy) connector [Because, this connector let’s you Run the Flow in the context of the record, the new Dataverse green connector doesn’t allow this.]

    These are the values which we filled when we ran the Flow on the Project.


  2. Further, I have some steps to retrieve the Team Members, then eventually their Email addresses (In Project Operations, you need to retrieve the Email addresses from the Bookable Resources and further – see if User record has these email addresses or not)
    Next, I’ll create a variable of type Array to collect the Email Addresses which the meeting invite should go to.

  3. Now, I’ll append all the Email Addresses I retrieved from the Team Members in the array.

  4. Now, the Array is formed with all the Email addresses separated by commas. But, we are not done yet. We need to form a string.


    So, I use Join operation to join the email addresses into a string separated by semicolon (just like how you enter in the To field of emails)


    The result will be a string of Email addresses separated by semicolon


    Finally, once all the important data is collected, we can proceed towards creating the Teams invite.

Create a Teams meeting

Here’s how you can create a Teams meeting from Microsoft Teams connector in Power Automate

  1. Look for Microsoft Teams in Power Automate

  2. Now, in this Meeting, I can set the parameters based on how I want the meeting to be created.
    I’ll fill in the information which is required for the Invite to be created.
    The Start Time and End Time need to be set in the date-no-TZ format, hence, I’ve arranged the same accordingly
    Select Calendar Id as Calendar (Other options are Birthdays and United States Holidays)

  3. The Outputs are from the result of the Join operation we performed to form the string of Email addresses to be added as attendees.

  4. Finally, you can select these optional parameters to make sure the invite is created based on your preference.

    And that’s it!

Teams Invite vs Calendar Invite

Now, if you have a normal Calendar Appointment, it’ll look like below – It doesn’t have a Join button


Whereas, the Teams Calendar Invite has a Join button on it

Caveats

Some caveats worth mentioning –

  1. In case you are planning to have Appointments created in D365 and eventually either sync it to Outlook using Server-Side Sync, the invite will not be a Teams Invite.
  2. No option to later retrieve this Outlook Appointment in Flow and convert/update it to a Teams call.

Hope this was useful!

  1. Action.ShowCard vs Action.ToggleVisibility in Adaptive Cards | Microsoft Teams
  2. Admin Center URLs under M365 – Power Platform, Teams, SharePoint, Power BI
  3. Tag a User in a Microsoft Teams post made using Power Automate
  4. Visualize Adaptive Card for Teams user action within a Cloud Flow | Experimental Feature
  5. Create a Team, add Members in Microsoft Teams upon Project and Team Members creation in PSA / Project Operations | Power Automate
  6. Task Completion reminder using Flow Bot in Microsoft Teams | Power Automate
  7. Turn Teams On / Off at Org Level, provisioning users | M365 Admin Center Tip
  8. Adaptive Cards for Teams to collect data from users using Power Automate | SharePoint Lists

Thank you!

Join action in Data Operations in Power Automate

One of the commonly used connectors to perform operations in Flow is Data Operations

To describe this action in simpler terms, it is “Joining values in an array with a value”.

Join

Here’s how you can use the Join operation in Power Automate

  1. Look for Data Operations connector in Power Automate.

  2. In Join, you’ll see that you’ll need two fields that takes a source and by what character you want to Join into the String result this Action will output.

  3. Example – I want to Join numbers by a hyphen “-“. Here’s how it can be done.
    Here’s how my From and Join With fields will be populated.

  4. And this will return a String value by joining the items in the array by the value we entered in Join With.


    To be sure this is string, you can click on Show raw outputs and see the results


    Hope this was useful!

Here are some more Power Automate / Flow posts you might want to check out –

  1. Retrieve Metadata of Global OptionSets from Dynamics 365 in Power Automate | HTTP with Azure AD action
  2. Primary Key of Activity type entity in a Dataverse connector in Power Automate | Quick Tip
  3. Split On in Power Automate in SharePoint trigger for Item updates
  4. Search Rows (preview) Action in Dataverse connector in a Flow | Power Automate
  5. Suppress Workflow Header Information while sending back HTTP Response in a Flow | Power Automate
  6. Invalid XML issue in Dataverse connector for List Rows action | Fetch XML Query | Power Automate
  7. FetchXML Aggregation in a Flow using CDS (Current Environment) connector | Power Automate
  8. Invalid type. Expected Integer but got Number error in Parse JSON – Error at runtime after generating Schema | Power Automate
  9. Asynchronous HTTP Response from a Flow | Power Automate
  10. Setting Lookup in a Flow CDS Connector: Classic vs. Current Environment connector | Power Automate Quick Tip

Thank you!

Primary Key of Activity type entity in a Dataverse connector in Power Automate | Quick Tip

In case it’s your first time creating a Cloud Flow using Dataverse connector and dealing with Primary Key of the Activity Type of entity, here’s a quick tip to keep in mind.

Normal Entity

As a creator for Flow, let’s say you have listed Records of an entity called as Accounts (out-of-the-box), you’ll notice that the name of the entity

Activity Entity

Now, if you try to search for the Name of the Activity entity, it won’t appear as it does for other entities, instead just search “Unique” and you’ll find an entry for Unique identifier of the activity entity –

  1. Name of my Activity entity is ‘Snapshot’, but it doesn’t show up when I search Snapshot.

  2. So instead, just search “Unique” or “Identifier”

  3. On the contrary, out-of-the-box entities have their own names named as Primary Keys

Here are some more Power Automate / Cloud Flow blogs you might want to check –

  1. Split On in Power Automate in SharePoint trigger for Item updates
  2. Search Rows (preview) Action in Dataverse connector in a Flow | Power Automate
  3. Suppress Workflow Header Information while sending back HTTP Response in a Flow | Power Automate
  4. Invalid XML issue in Dataverse connector for List Rows action | Fetch XML Query | Power Automate
  5. FetchXML Aggregation in a Flow using CDS (Current Environment) connector | Power Automate
  6. Invalid type. Expected Integer but got Number error in Parse JSON – Error at runtime after generating Schema | Power Automate
  7. Asynchronous HTTP Response from a Flow | Power Automate
  8. Converting JSON to XML and XML to JSON in a Flow | Power Automate
  9. Validate JSON Schema for HTTP Request trigger in a Flow and send Response | Power Automate
  10. Tag a User in a Microsoft Teams post made using Power Automate

    Thank you!

Split On in Power Automate in SharePoint trigger for Item updates

Let’s consider this scenario where you have a SharePoint List and you need to Bulk Edit the same which triggers a Flow.

How would you want to capture the record updates in Flow Runs – Individually? Or all in an Array?

Let’s see how this can be done!

SharePoint Trigger in Power Automate

Let’s see what trigger is being used on which I can choose to have Split On in case of Bulk Update of Item Changes.

  1. In Power Automate, you can search for SharePoint and you’ll find the trigger on which for Item Update in SharePoint.

  2. Now, since I have a List called 2021 Onboarding in my SharePoint in the Site called Data Store Internal


  3. And this Flow will be triggered whenever there’s an Update to the Items on the List I’ve mentioned above.

Split On

Let’s look at what options are available us to toggle between having Split On and Off and what the results are –

  1. Go to the Settings of the Trigger to access the Split On setting toggle.


  2. You’ll see the Split On is set to ON i.e. as per below –


  3. Given that this can be turned ON and OFF, we’ll look at the difference between the two results when you Bulk Edit SharePoint Items which will initiate this trigger.

Example: Split ON

Now, let’s review how having Split On will affect the results.

  1. Now, let’s see Flow Runs are recorded when Split On is set to ON and the Split is on Body/Value


  2. Now, when I modify multiple items in SharePoint, say, the Group Code field in my SP List as below –


  3. Then, there will be 2 different Flow Runs.


  4. Now, if you look at the results, the way these exist per Flow Run is as follows. And for each record, this is the case –

Example: Split OFF

Now, let’s review how having Split OFF will affect the results.

  1. Now, once the Split is OFF and you Bulk Edit the records.


  2. And when you Bulk Edit the List in SharePoint the same way as you did above,


  3. Only 1 Flow Run will be created as shown below –


  4. And, if you open the results, you’ll see the multiple items in the body – value (Array of each record as value in the body) which were modified.


Hope this was useful!

Here are some more Power Automate / SharePoint Online posts you might want to check –

  1. Admin Center URLs under M365 – Power Platform, Teams, SharePoint, Power BI
  2. AddColumns() function to dynamically add columns to a Data table in Canvas Power App | SharePoint List
  3. Launch URL on a Data Table Text column selection in a Canvas PowerApp | SharePoint Lists
  4. Search Rows (preview) Action in Dataverse connector in a Flow | Power Automate
  5. Advanced Lookup in Model-Driven Apps | Power Platform
  6. Suppress Workflow Header Information while sending back HTTP Response in a Flow | Power Automate
  7. Adaptive Cards for Teams to collect data from users using Power Automate | SharePoint Lists
  8. Aggregate functions in a Canvas Power App | Using on SharePoint Lists
  9. Save generated PDFs to SharePoint directly – 2020 Wave 1 | Early Access Feature
  10. D365 Ribbon Button shortcut to open a Document in SharePoint Online

Thank you!

Search Rows (preview) Action in Dataverse connector in a Flow | Power Automate

As Dataverse connector keeps getting updated from time to time, here’s a new Search rows (preview) Action which you must be seeing in the Dataverse connector in Power Automate. Let’s see how we can use this Action.

As it suggests, that this is still in preview! So kindly take a note of that.

Search Rows (Preview)

  1. Search rows is an Action in the Dataverse connector and you’ll be able to see it like this

Enable Relevance Search

  1. Let’s assume you went ahead and used this connector in your Flow without having Relevance Search enabled in your D365 CE organization, you’ll see the Search Rows throw the below error.


    And the error is described as –

  2. To make Search Rows work, Relevance Search must be enabled for you Dynamics 365 CE / CRM environment. Head over to the System Settings in Dynamics 365 under Settings > Administration > System Settings. And in General tab, look for Relevance Search option, check-mark it and save.


  3. Here’s the full Microsoft Documentation on how to use queries for Relevance Search – https://docs.microsoft.com/en-us/powerapps/developer/data-platform/webapi/relevance-search?WT.mc_id=DX-MVP-5003911

Using Search Rows action

Let’s see how this Action from the Dataverse connector will work –

  1. Now, once you have selected the Search rows action, below are the features which I’ll explain one by one –

  2. Let’s first look at the last item i.e. Return row count. As it says, will result the count of results returned if set to Yes.
    Will return -1 if set to No.

  3. For Search Type and Search Mode to be covered, these need to be explained extensively since it covers several factors. To keep it short for now, I’ve linked the Search Type and Search Mode documentation as below
    https://docs.microsoft.com/en-us/power-automate/dataverse/search#search-type?WT.mc_id=DX-MVP-5003911

    And the short Summary of the same is:
    Search Type: “simple | full” There are 2 types called as simple and full. Default = simple. Both have different functions within them that you can use on the Search Term.

    Search Mode: “any | all” By Default – any. This defines if any criteria of the Search Term is to be considered or all must be true based on different syntax and operators used.
  4. Row Count denotes how many records should the results Return which is standard across other Dataverse actionss.
  5. Also, Row Filter uses OData style filtering which we’ll omit in this example to keep it simple. 😊
  6. Now, let’s enter a Search Term and keep it simple, I’ll pick an example: “Contoso“.
    Next, look at the Table filter – If I leave it blank it’ll search for Contoso across all Tables in Dataverse.


    Result to show from all Tables as per the above Search rows term –


    Now, I’ll add account and contact (I do have some records in the Opportunity as well which has the keyword ‘Contoso’. So those will be filtered out)


    And the result will be as follows –


    And if we look at the Raw Outputs to see how data is retrieved, we get the below –

  7. Now, let’s look at Sorting.
    Now, in the Sort by filter, I’ll enter the field name ‘name‘ and desc as the order of the Sort.
    And then, we’ll check the results


    And the results were as below –


  8. Next, let’s look at Facet Query. basically, it drills down on the Results which are already returned as a part of the main query and serve as metadata for the same to gather similar information together.
    Here’s how I enter a Facet query – Ex: contact.address1_city. Meaning, it’ll return Address 1: City from all the returned Data and store it under Facet Query.


    Now, when we run this, we’ll get the following results –


  9. Let’s look at what Skip Rows does.
    It’ll only omit the records from the already returned Results. Example: Even if the Result returned 5 records, it’ll Omit/Skip first x records. But still show that the Results returned are whatever the Query is supposed to return.

    In the below example, out of 5, I’ll skip 4 rows.


    And when you run the Query, you’ll find that the Record Count is 5, but only 1 entry was available in the Output.


Which Columns are Searchable?

There are 2 points to keep in mind to know and configure which all columns will the Search be performed on.

  1. If you are aware of how you can configure the Quick Find views in Dynamics 365 CE, same is applicable here since this works off of Relevance Search itself.
    In any Table/Entity’s Quick Find view, make sure the columns are selected in the Add Find Columns

  2. The ones selected in Find Columns are the ones on which the Search will be performed.

Here’s a YouTube video I made to demonstrate the same –

Hope this was useful!

Here are some more Power Automate / Cloud Flow posts you might want to check –

  1. Suppress Workflow Header Information while sending back HTTP Response in a Flow | Power Automate
  2. Invalid XML issue in Dataverse connector for List Rows action | Fetch XML Query | Power Automate
  3. FetchXML Aggregation in a Flow using CDS (Current Environment) connector | Power Automate
  4. Invalid type. Expected Integer but got Number error in Parse JSON – Error at runtime after generating Schema | Power Automate
  5. Asynchronous HTTP Response from a Flow | Power Automate
  6. Validate JSON Schema for HTTP Request trigger in a Flow and send Response | Power Automate
  7. Tag a User in a Microsoft Teams post made using Power Automate
  8. Converting JSON to XML and XML to JSON in a Flow | Power Automate
  9. Formatting Approvals’ Details in Cloud Flows | Power Automate
  10. Office 365 Outlook connector in Cloud Flows showing Invalid Connection error | Power Automate
  11. Read OptionSet Labels from CDS/Dataverse Triggers or Action Steps in a Flow | Power Automate
  12. Setting Lookup in a Flow CDS Connector: Classic vs. Current Environment connector | Power Automate Quick Tip

Thank you!

Suppress Workflow Header Information while sending back HTTP Response in a Flow | Power Automate

Let’s see how we can suppress critical information about the Flow to the caller HTTP Application while sending back a response.

Scenario

The Flow will send Header information back while sending a HTTP Response to the caller HTTP Request.

  1. Here’s how the Flow will look –

    Note, that we are sending a Custom Header along as well.

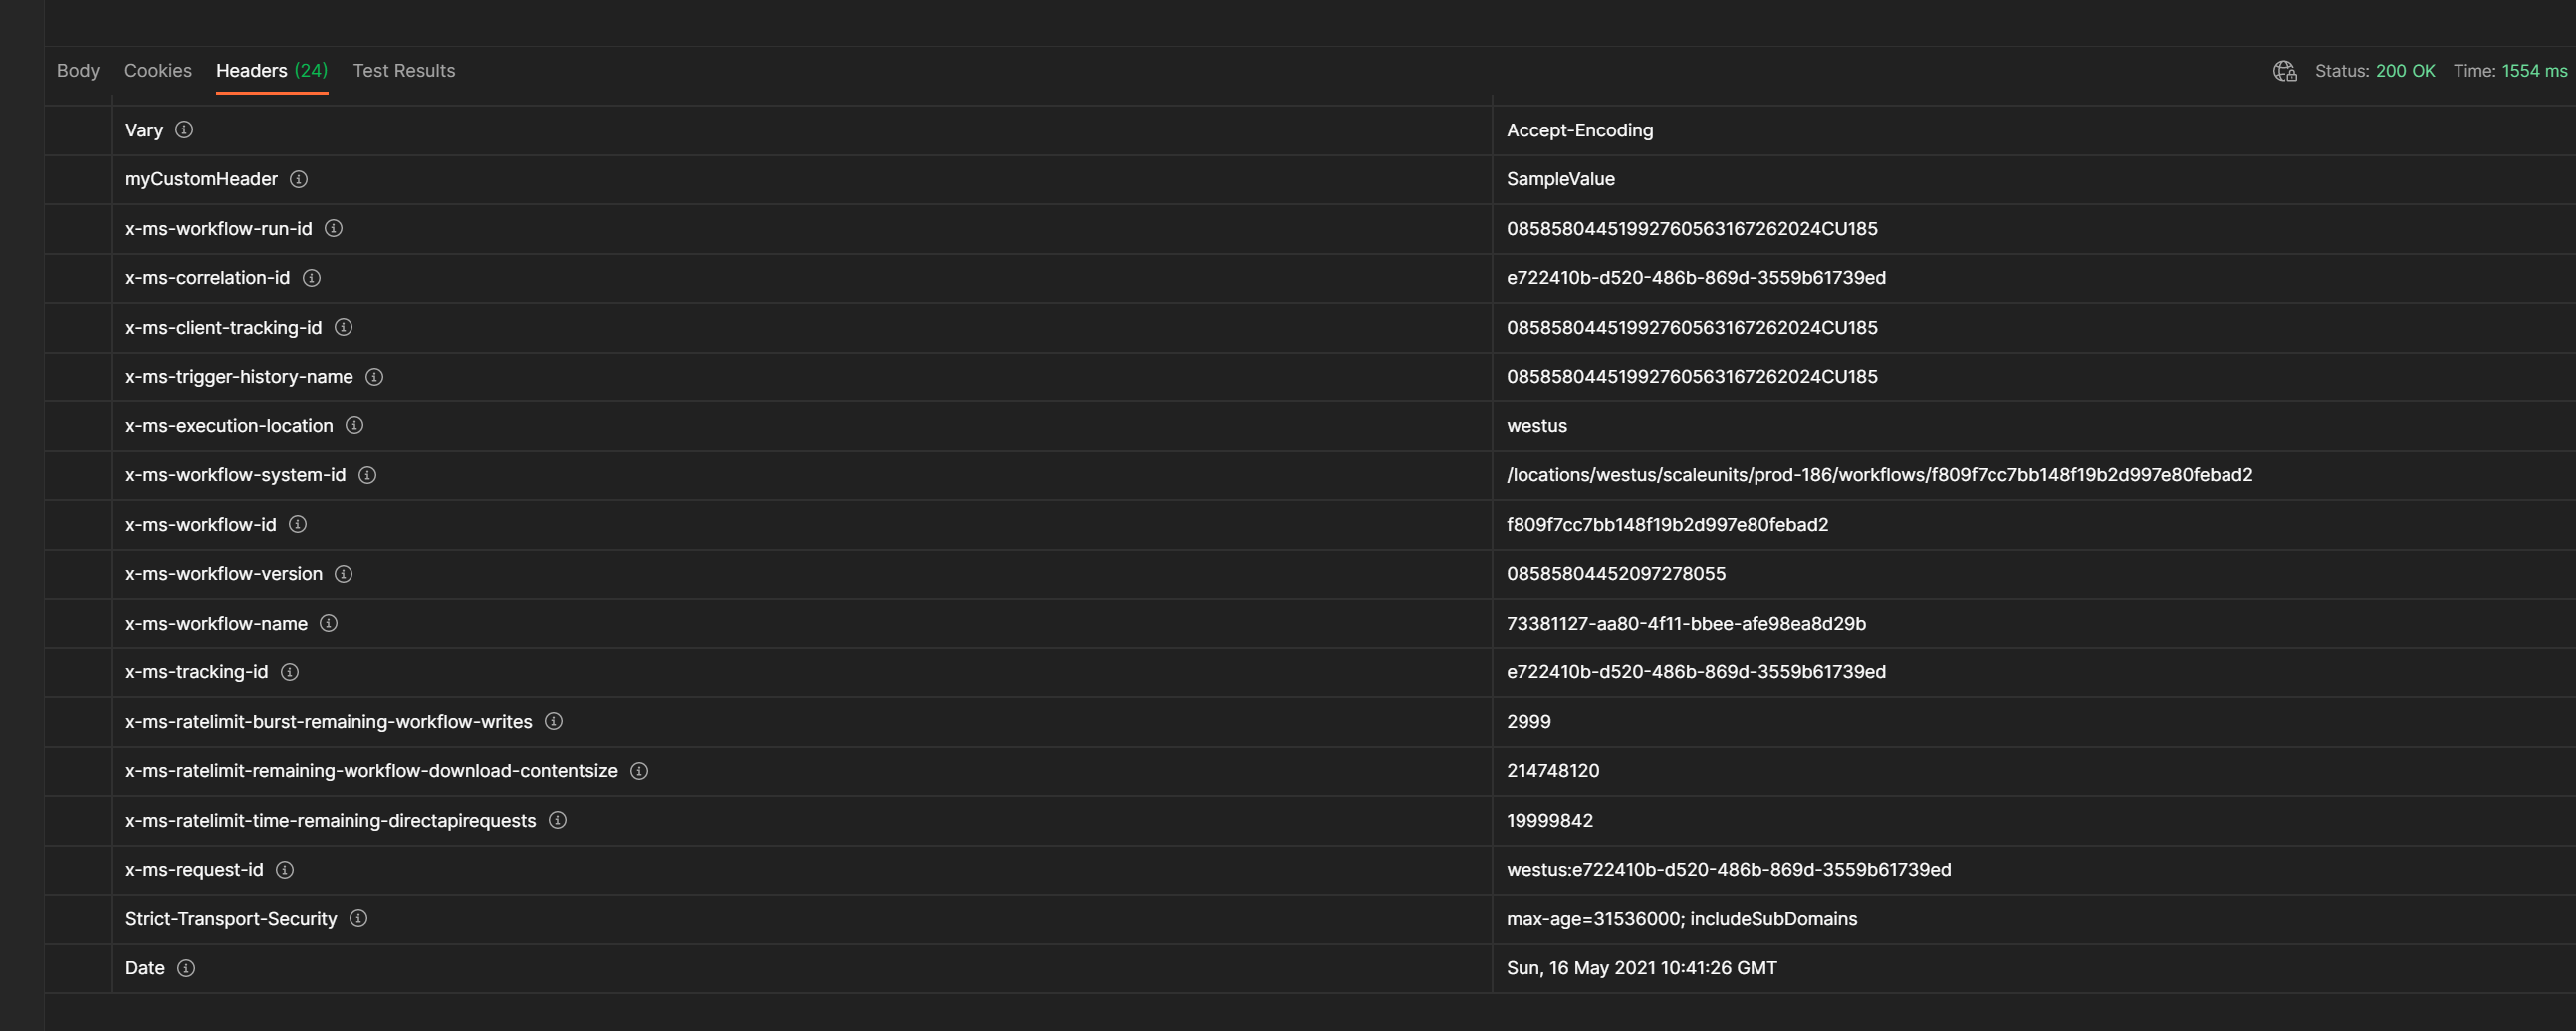
  2. And along with this info, the follow Header information will also be visible in the calling application. We’ll use Postman to check this scenario.

    You’ll see that a lot of Headers have been sent back along with our Custom Header.


    And you’ll see whole lot of Headers that expose the Flow details in these Headers.

    Let’s see how we can cut this information short and not send back any unnecessary information to the HTTP Request we’ve received.

Suppress Workflow Headers in HTTP Request

Let’s see how with a simple tweat, we can avoid sending the Workflow Header information back as HTTP Response.

  1. We go to the Settings of the HTTP Request Trigger itself as shown below –


  2. Now, you see the option, Suppress Workflow Headers, it will be OFF by default.


    Your turn it ON,


  3. Now, let’s try to make a call again and see the difference. Going back to the Postman, we Send another request post you’ve saved the workflow changes above.

    We see that only 10 Headers are sent as opposed to 24 as seen without suppressing the info.

  4. And if we see what Headers are sent back, we see along with our Custom Header, only the ones which are required will be sent suppressing all the critical information.

    This is a good practice to suppress Workflows that don’t give out information in production scenarios which are not required by end application.

I’ve also made a quick YouTube video of the same. Check it out as well –

Hope this was useful!

Here are some more Power Automate / Flow posts you might want to check –

  1. Invalid XML issue in Dataverse connector for List Rows action | Fetch XML Query | Power Automate
  2. FetchXML Aggregation in a Flow using CDS (Current Environment) connector | Power Automate
  3. Invalid type. Expected Integer but got Number error in Parse JSON – Error at runtime after generating Schema | Power Automate
  4. Asynchronous HTTP Response from a Flow | Power Automate
  5. Validate JSON Schema for HTTP Request trigger in a Flow and send Response | Power Automate
  6. Tag a User in a Microsoft Teams post made using Power Automate
  7. Converting JSON to XML and XML to JSON in a Flow | Power Automate
  8. Office 365 Outlook connector in Cloud Flows showing Invalid Connection error | Power Automate
  9. FormatDateTime function in a Flow | Power Automate
  10. Make On-Demand Flow to show up in Dynamics 365 | Power Automate
  11. Task Completion reminder using Flow Bot in Microsoft Teams | Power Automate
  12. Secure Input/Output in Power Automate Run History

    Thank you!